When l see the open decks of the all scenario BP I sometimes think I should have got that one, then I see all the extra fine work you have to do and I know why choose the one I did. Keep up the good work you are doing an excellent job.
-

Win a Free Custom Engraved Brass Coin!!!
As a way to introduce our brass coins to the community, we will raffle off a free coin during the month of August. Follow link ABOVE for instructions for entering.
-

PRE-ORDER SHIPS IN SCALE TODAY!
The beloved Ships in Scale Magazine is back and charting a new course for 2026!
Discover new skills, new techniques, and new inspirations in every issue.
NOTE THAT OUR FIRST ISSUE WILL BE JAN/FEB 2026
You are using an out of date browser. It may not display this or other websites correctly.
You should upgrade or use an alternative browser.
You should upgrade or use an alternative browser.
Black Pearl 1:50 ZHL All-Scenario version
- Thread starter Ahoy All
- Start date
- Watchers 25
-
- Tags
- black pearl zhl
- Joined
- Mar 1, 2021
- Messages
- 315
- Points
- 168

Thanks Tony....Taking the weekend off, beautiful day to take a ride on the motorcycle! Have a great weekend!When l see the open decks of the all scenario BP I sometimes think I should have got that one, then I see all the extra fine work you have to do and I know why choose the one I did. Keep up the good work you are doing an excellent job.
- Joined
- Mar 1, 2021
- Messages
- 315
- Points
- 168

Pirate Lore, Myths & Legends #4

Learn About Real Pirate History!
Pirates believed piercing their ears improved eyesight.
If a Pirate Captain thought there was a chance that he would be captured, he would change out of his expensive, fancy clothes. That way he could pretend they were just a part of the crew, and not the leader of the Piracy operation.
Most Pirating happened between 1690 and 1720.
The black “Jolly Roger” flag with white skull and crossbones was designed to be frightening, but had a version with a red background instead of black that was even more terrifying. Red meant no mercy would be taken!
Each Pirate Captain had his own Code of Conduct. Even though Pirates stole to get their treasure, on most ships stealing between shipmates was strictly forbidden and had harsh punishments.No one has ever actually found a hidden Pirate treasure map. Pirates usually did not live long full lives, and tended to spend all of their riches quickly. If there are Pirate treasure maps still out there, they are hidden very well!
There’s no historic proof that Pirates were ever made to walk the plank. It is thought to completely be a Hollywood myth.So many Pirates had eye patches and wooden legs, because ships were extremely dangerous places to work and Pirates often lost limbs and eyes.
A gang of Pirates from 1714 called the “Flying Gang” were the inspiration behind Jack Sparrow and Disney’s Pirates of the Caribbean movies.
Piracy dates back as far as ancient Greece, and still exists today. Modern Pirates attack container ships, tanker ships, and sometimes even cruise ships in the sea outside areas like Somalia, and the Straits of Malacca.
Real historical Pirates didn’t say “Arrr” and “Matey” as much as you think they did! Early Hollywood movies about Pirates featured an actor with a thick accent, which caused the ‘R’ to roll. This created a style for Pirate speech, but it is not historically accurate.
Source: pirate101.com
Beware of the Jolly Roger
It’s thought that Pirates originally used a red flag, which was a common sign that no mercy would be given in war at sea. The red flag was called Joli Rouge (translation: Pretty Red) by the French, and was probably translated poorly by the English to eventually become known as Jolly Roger instead.
While red flags stood for no mercy, black ones were a sign for a quarantined ship with disease and death on board. Pirates started using black flags instead of red to symbolize death, and began to modify the skull and crossbones graphic for their own personal tastes.
In addition to skull and crossbones, Pirates also put other emblems on their flags to spread fear among other ships they encountered. Common graphic symbols included:

Be well matey's.
Ahoy all.

Learn About Real Pirate History!
Pirates believed piercing their ears improved eyesight.
If a Pirate Captain thought there was a chance that he would be captured, he would change out of his expensive, fancy clothes. That way he could pretend they were just a part of the crew, and not the leader of the Piracy operation.
Most Pirating happened between 1690 and 1720.
The black “Jolly Roger” flag with white skull and crossbones was designed to be frightening, but had a version with a red background instead of black that was even more terrifying. Red meant no mercy would be taken!
Each Pirate Captain had his own Code of Conduct. Even though Pirates stole to get their treasure, on most ships stealing between shipmates was strictly forbidden and had harsh punishments.No one has ever actually found a hidden Pirate treasure map. Pirates usually did not live long full lives, and tended to spend all of their riches quickly. If there are Pirate treasure maps still out there, they are hidden very well!
There’s no historic proof that Pirates were ever made to walk the plank. It is thought to completely be a Hollywood myth.So many Pirates had eye patches and wooden legs, because ships were extremely dangerous places to work and Pirates often lost limbs and eyes.
A gang of Pirates from 1714 called the “Flying Gang” were the inspiration behind Jack Sparrow and Disney’s Pirates of the Caribbean movies.
Piracy dates back as far as ancient Greece, and still exists today. Modern Pirates attack container ships, tanker ships, and sometimes even cruise ships in the sea outside areas like Somalia, and the Straits of Malacca.
Real historical Pirates didn’t say “Arrr” and “Matey” as much as you think they did! Early Hollywood movies about Pirates featured an actor with a thick accent, which caused the ‘R’ to roll. This created a style for Pirate speech, but it is not historically accurate.
Source: pirate101.com
Beware of the Jolly Roger
It’s thought that Pirates originally used a red flag, which was a common sign that no mercy would be given in war at sea. The red flag was called Joli Rouge (translation: Pretty Red) by the French, and was probably translated poorly by the English to eventually become known as Jolly Roger instead.
While red flags stood for no mercy, black ones were a sign for a quarantined ship with disease and death on board. Pirates started using black flags instead of red to symbolize death, and began to modify the skull and crossbones graphic for their own personal tastes.
In addition to skull and crossbones, Pirates also put other emblems on their flags to spread fear among other ships they encountered. Common graphic symbols included:
- Skeletons
- Spears
- Swords
- Cutlass
- Hourglass (to show the enemies’ time was up)
- Initials of the Pirate Captain

Be well matey's.
Ahoy all.
- Joined
- Mar 1, 2021
- Messages
- 315
- Points
- 168

Captain's Log ~~~April 13, 2021
Build time today: 3 hours
Total build time: 44.5 hours
Construction for the Black Pearl (All-Scenario version)
Build guidelines:
Steps 78-92 excluding Step 88 & Part E4
Secure the following parts.
Parts 15, 22, 22A (attached to 22, Deck), 4B-15B, 20, K5 & J21, Z6, C4-C8 (2), C9-C11 (1)
Before starting the above steps I was visited by Ricky F. Up. Yep, couldn't leave well enough alone. I had to tinker with the lower deck and realized it would need light sanding on the deck slots make things fit without forcing the deck too much. So, all is going well until I get the bright idea to dry fit the main deck too....snapped one of the bulkheads like a wishbone.
Warning: Take your time and do the sanding when it is necessary. Flexing the bulkheads a tad too much is like trying to put a square part into a round hole....You might as well make a wish!....because you will hear the SNAP!

Make a wish matey!....SNAP!
Stupid is, stupid does.
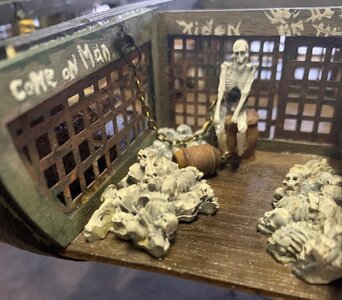
So, before moving forward with the middle deck placement.....I plugged in the Dremel and sanded any areas that seemed to be a bit off and did some general cleanup. I decided to go back and place some of the decorative items in place and played around with a few other things to throw in.
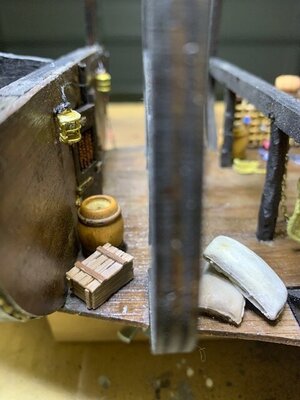
Here's a peek how the deck items turned out:
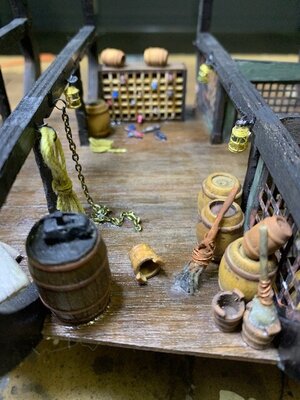
The barrel above has the switch on top that powers this deck's eight lamps. Once the middle deck is placed, you have just enough room to put you finger in and switch on/off, left-to-right. I made a half-baked attempt to throw in a couple of mops that I made.
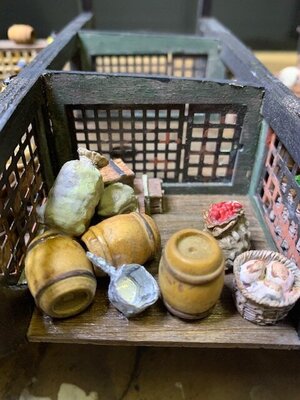
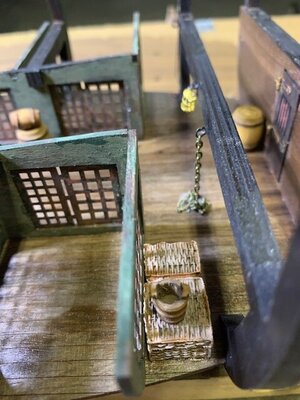
The lower deck items are in place and now I installed Bulkhead #15. NOTE: There is no real indication in the kit plans when to add this part. Earlier, it mentions that it is not necessary to place Bulkheads 3. 15. & 16 when the other bulkheads are in place. Bulkhead #15 must be in place before you set the middle deck onto the beams of the lower deck.
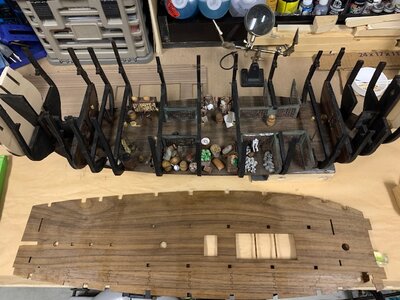
Bulkhead #15 is in now set and glued into position. I stained the middle deck with Minwax Golden Oak semi-transparent stain. I plan to use this color with the Minwax Ebony stain of the lower deck beams as my contrast stains. The lower deck above has a coat of satin finish Miniwax polyurethane, as well as a coat over the top of the middle deck Golden Oak stain.
They say "Red sky at night, Sailor's delight".

Tomorrow we seal up the lower deck and start with placement of Parts 4B-15B, K5&J21, which make up Bulkhead #3....and will take us up to Step #92, 34% of completion within the First Pole.
Looking ahead, any advice on how to best fill in the bow
is surely welcome.
Smooth sailing into the sunset. Good day mates.
Ahoy all.
Build time today: 3 hours
Total build time: 44.5 hours
Construction for the Black Pearl (All-Scenario version)
Build guidelines:
Steps 78-92 excluding Step 88 & Part E4
Secure the following parts.
Parts 15, 22, 22A (attached to 22, Deck), 4B-15B, 20, K5 & J21, Z6, C4-C8 (2), C9-C11 (1)
Before starting the above steps I was visited by Ricky F. Up. Yep, couldn't leave well enough alone. I had to tinker with the lower deck and realized it would need light sanding on the deck slots make things fit without forcing the deck too much. So, all is going well until I get the bright idea to dry fit the main deck too....snapped one of the bulkheads like a wishbone.
Warning: Take your time and do the sanding when it is necessary. Flexing the bulkheads a tad too much is like trying to put a square part into a round hole....You might as well make a wish!....because you will hear the SNAP!

Make a wish matey!....SNAP!
Stupid is, stupid does.

So, before moving forward with the middle deck placement.....I plugged in the Dremel and sanded any areas that seemed to be a bit off and did some general cleanup. I decided to go back and place some of the decorative items in place and played around with a few other things to throw in.
Here's a peek how the deck items turned out:


The barrel above has the switch on top that powers this deck's eight lamps. Once the middle deck is placed, you have just enough room to put you finger in and switch on/off, left-to-right. I made a half-baked attempt to throw in a couple of mops that I made.


The lower deck items are in place and now I installed Bulkhead #15. NOTE: There is no real indication in the kit plans when to add this part. Earlier, it mentions that it is not necessary to place Bulkheads 3. 15. & 16 when the other bulkheads are in place. Bulkhead #15 must be in place before you set the middle deck onto the beams of the lower deck.

Bulkhead #15 is in now set and glued into position. I stained the middle deck with Minwax Golden Oak semi-transparent stain. I plan to use this color with the Minwax Ebony stain of the lower deck beams as my contrast stains. The lower deck above has a coat of satin finish Miniwax polyurethane, as well as a coat over the top of the middle deck Golden Oak stain.
They say "Red sky at night, Sailor's delight".

Tomorrow we seal up the lower deck and start with placement of Parts 4B-15B, K5&J21, which make up Bulkhead #3....and will take us up to Step #92, 34% of completion within the First Pole.
Looking ahead, any advice on how to best fill in the bow
is surely welcome.
Smooth sailing into the sunset. Good day mates.
Ahoy all.
Last edited:
You ever seen the movie "Black Sails?
- Joined
- Mar 1, 2021
- Messages
- 315
- Points
- 168

Hi Ken,You ever seen the movie "Black Sails?
No I haven’t watched Black Sails. The Admiral and I started watching The Lost Pirate Kingdom on Netflix. I guess we’ll have to stream Black Sails and binge watch one weekend! Looks to be a nice little series!
Be well. Ahoy mate.
Rick
How cool are all those bits and baubles!?! Great job with the interior decorating. Love it!
I found it a the library.Hi Ken,
No I haven’t watched Black Sails. The Admiral and I started watching The Lost Pirate Kingdom on Netflix. I guess we’ll have to stream Black Sails and binge watch one weekend! Looks to be a nice little series!
Be well. Ahoy mate.
Rick
- Joined
- Mar 1, 2021
- Messages
- 315
- Points
- 168

Just bought the DVD pack. All 4 Seasons for $19....figure it’s better than signing up for Starz and paying $9 per season! So, did you enjoy the series?I found it a the library.
That's a good deal. I think I paid $30. I've watched it several times. Usually while building. The first set I purchased had problems..... make sure you watch it soon, so if problems,, you can return if necessary. Second one was good. I'll check out lost pirate kingdonJust bought the DVD pack. All 4 Seasons for $19....figure it’s better than signing up for Starz and paying $9 per season! So, did you enjoy the series?
- Joined
- Mar 1, 2021
- Messages
- 315
- Points
- 168

Good point Ken....my set will probably be some Chinese knockoff!That's a good deal. I think I paid $30. I've watched it several times. Usually while building. The first set I purchased had problems..... make sure you watch it soon, so if problems,, you can return if necessary. Second one was good. I'll check out lost pirate kingdon
I enjoyed it very much.Good point Ken....my set will probably be some Chinese knockoff!I did make sure it was a US destination shipping start point!
- Joined
- Mar 1, 2021
- Messages
- 315
- Points
- 168

Captain's Log ~~~April 16, 2021
Build time today: 4 hours
Total build time: 58 hours
Construction for the Black Pearl (All-Scenario version)
Build guidelines:
Steps 78-92
Secure the following parts.
Parts 15, 16, 22, 22A (attached to 22, Deck), 4B-15B, 20(2), Parts E3 & E4, K5 & J21, Z6, C4-C8 (2), C9-C11 (1)
"Just sit right back and you'll hear a tale.....

Murphy's law states..."Anything that can go wrong will go wrong". I am witness to this fact as I thought things were going along very good and that laying the gun deck would be a snap. I diligently filed the slots of the deck to fit the bulkheads and to my surprise after doing one final check before gluing, I realized that I put the two-piece deck upside down and backwards. I tried to blame the dog but the Admiral was not having any of it. Finally, I blamed the directions which show the ship one way and then another....why don't they keep things pointed one way...when explaining a new Step?
Between looking at pics from Step 74 to Step 93 the ship is in a whirlpool of configuration which would match any amusement park ride that spins you in a circle and when you got off you're wobbling like a top.
Filing this way will leave the following gaps when you flip the deck the right way with the smaller section on the starboard side.
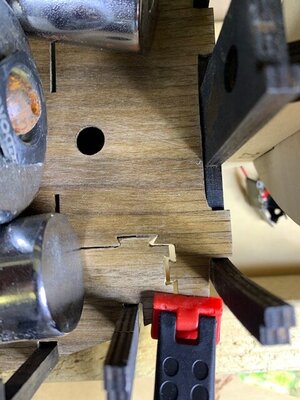
So, now I get out the wood dough and hit it with super glue after it hardened....
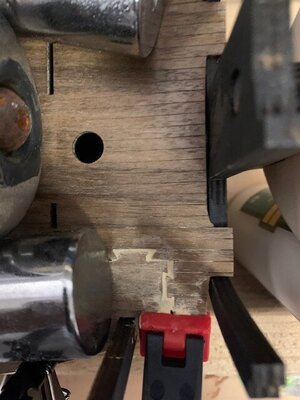
At this point I figure all will be OK because the deck is glued down and I'll just clean up the joint later after everything is dry and with some cleanup, stain and varnish....we can survive the f-up! Now, with a lot of weight on the deck, I figure all will be fine.
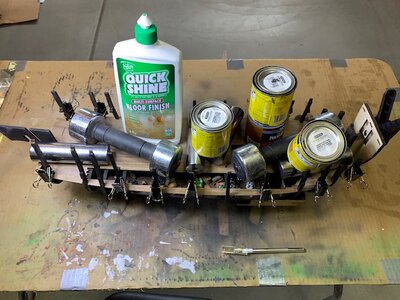
I decided to glue in the deck with the "removable panel" out as one piece because I figure with my luck, there's no way I won't glue it down and I wanted to have a look of having it lay in or be able to lift it up for better viewing. Now, I should have left the weights well enough alone....no, I take one of the 5lb dumbbells and balance it off one of the stain tins...that pic has long been deleted for stupidity...
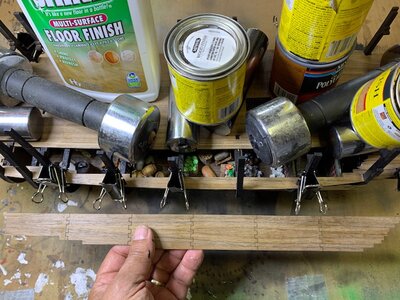
Here's where the fun starts.....in San Diego, my home gets a nice breeze off the ocean. As the ocean winds blow inland, it creates a vacuum in my house like a portal between two dimensions. The kitchen slider when opened allows the breeze to enter the home and the kitchen door that leads to the garage will often slam if you have the garage door opened and you let go of the kitchen door. The draft is that strong, our own wind tunnel on select days.
I had the kitchen door propped open with a shoe and the garage door and kitchen slider was open...the perfect storm for a cataclysmic slam of the kitchen door if any variable changes the air flow too drastically...With the deck in place. I decided to close the kitchen slider a bit too fast, as my dog picked up the shoe holding the kitchen door open at the same time. The perfect storm for the kitchen door to slam shut as the air gets flushed out of the kitchen, into and out the garage door...BOOM!
I hear a crash in the garage and go OH $hit! As I run past my dog, who is holding my shoe in his mouth, I looked into the garage and there the Pearl was, tilted on its side, hanging onto dear life at the edge of my worktable....#10 Rib snapped like a wishbone and a piece of the lower deck ornaments on the floor....
SHIPWRECK!
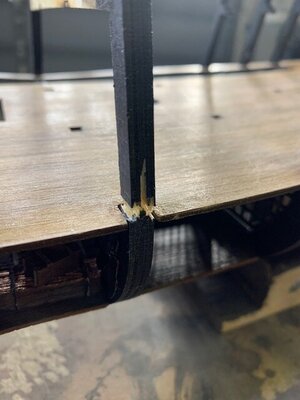
#10 broken rib, smashed by a 5lb dumbbell....call in the medic....
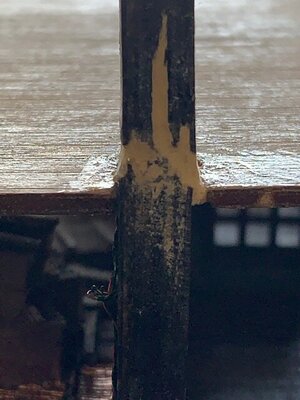
Wood dough filled in after the super glue set.....
A couple hours later before the Admiral returned home from grocery shopping....
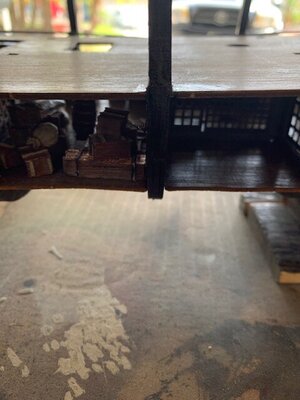
Passed the Admiral's inspection....but she didn't have to deal with the frustration that I had to pull the deck and glue it all over because it popped in several places....I really was ready to give up for the day and perhaps a lesser Captain would have remained marooned by this type of disaster....but after a bit of consolation from my first mate (the dog) I tried again........
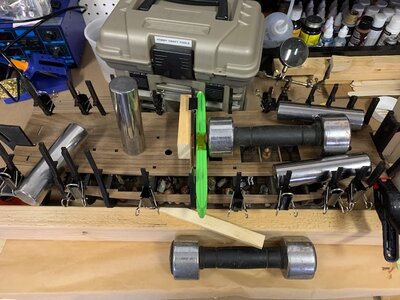
Hopefully, we can now continue on our voyage...leaving this island of foil and folly behind us.
With the gun deck firmly down and in place, a new day brings new hope.
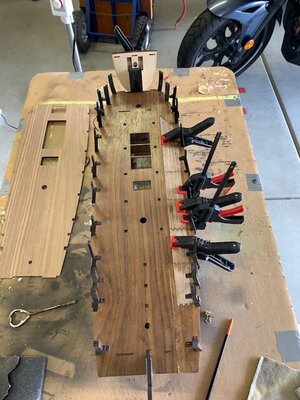
I soaked the "removable deck" portion above in hot water for a 1/2 hour or so to let it dry out in place to better conform to the pitch of the deck. With Step 85, I set the posts and beams Parts 5B-15B and Parts C4-C11. I recall Jodie @MystRacing talking about rounding out the posts. I twirled the posts on the belt sander and put some knicks and notches into them before applying the Ebony stain.
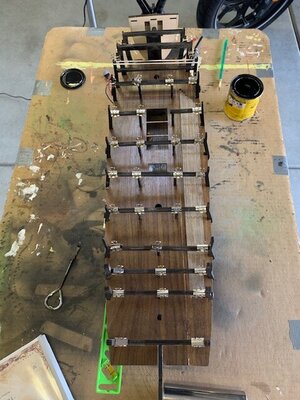
The deck has two coats of Golden Oak Minwax stain and a coat of satin polyurethane. I plan to display the ship with the deck completely covered....when someone asks, "why two different deck colors"?, I'll flip it up and let them peek down to get a better look at the lower deck goodies. Under natural light, the difference is not as dramatic as it seems.
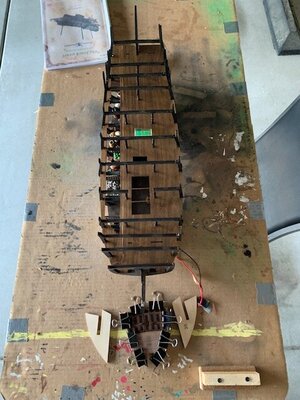
I now glued Parts K5 & J21 together to make Bulkhead #3. Also secured (2) parts #20 and dry fitted them to the keel after the glue set on Bulkhead #3. I did a little bit of sanding prior to placing the bulkhead, but since this is my first build ever, I'm not sure how much of a bevel is needed so I prefer to err on the side of caution.
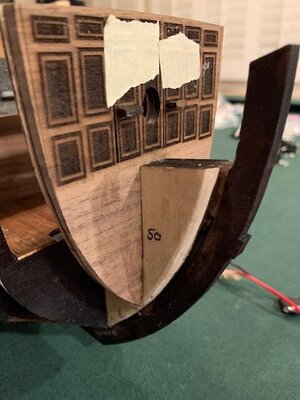
In looking at the First Pole instructions, I see no mention of Bulkhead #16, until it is pictured in Step 101. Just more intrigue...so I decided to install it now. I beveled the edge to match the keel and did my best to not flatten it out as it has a natural curve to it.
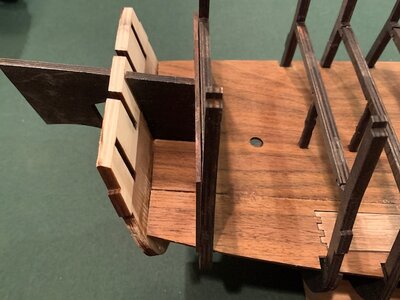
In Step 88, you need bionic eyes to read the yellow text on a white background. I think it calls for Part #E4 to be placed. This requires you place the hinges and pins for the two doors as well. After I set the doors and did the appropriate staining, I glued part #E4 to the frontside of the #6 Bulkhead facing the bow.
Finally, after such a brutal start, avoiding disaster and sailing toward our final treasure, I jumped ahead and finished Step #99 and installed Part #E3 to the backside of Bulkhead #15 facing the bow. I also added a personal touch by revealing the location of the cursed Aztec treasure on a map I placed in the gun deck, between the stern doors.
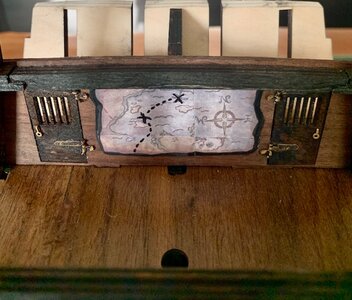
Who left the doors open?
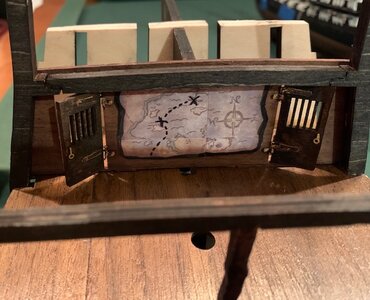
Well mates, we're finally back on course and its time for weekend shore duty.
Next week we secure the lanterns for the gun deck. A special shout out to Jodie @ MystRacing for mailing me his extra brass parts for the lanterns, since my kit only came with 24.
We have completed 94 of 268 Steps of the First Pole....for 35% completion of this part of the build.
Until next time....Ahoy all.
Build time today: 4 hours
Total build time: 58 hours
Construction for the Black Pearl (All-Scenario version)
Build guidelines:
Steps 78-92
Secure the following parts.
Parts 15, 16, 22, 22A (attached to 22, Deck), 4B-15B, 20(2), Parts E3 & E4, K5 & J21, Z6, C4-C8 (2), C9-C11 (1)
"Just sit right back and you'll hear a tale.....

Murphy's law states..."Anything that can go wrong will go wrong". I am witness to this fact as I thought things were going along very good and that laying the gun deck would be a snap. I diligently filed the slots of the deck to fit the bulkheads and to my surprise after doing one final check before gluing, I realized that I put the two-piece deck upside down and backwards. I tried to blame the dog but the Admiral was not having any of it. Finally, I blamed the directions which show the ship one way and then another....why don't they keep things pointed one way...when explaining a new Step?
Between looking at pics from Step 74 to Step 93 the ship is in a whirlpool of configuration which would match any amusement park ride that spins you in a circle and when you got off you're wobbling like a top.
Filing this way will leave the following gaps when you flip the deck the right way with the smaller section on the starboard side.

So, now I get out the wood dough and hit it with super glue after it hardened....

At this point I figure all will be OK because the deck is glued down and I'll just clean up the joint later after everything is dry and with some cleanup, stain and varnish....we can survive the f-up! Now, with a lot of weight on the deck, I figure all will be fine.

I decided to glue in the deck with the "removable panel" out as one piece because I figure with my luck, there's no way I won't glue it down and I wanted to have a look of having it lay in or be able to lift it up for better viewing. Now, I should have left the weights well enough alone....no, I take one of the 5lb dumbbells and balance it off one of the stain tins...that pic has long been deleted for stupidity...

Here's where the fun starts.....in San Diego, my home gets a nice breeze off the ocean. As the ocean winds blow inland, it creates a vacuum in my house like a portal between two dimensions. The kitchen slider when opened allows the breeze to enter the home and the kitchen door that leads to the garage will often slam if you have the garage door opened and you let go of the kitchen door. The draft is that strong, our own wind tunnel on select days.
I had the kitchen door propped open with a shoe and the garage door and kitchen slider was open...the perfect storm for a cataclysmic slam of the kitchen door if any variable changes the air flow too drastically...With the deck in place. I decided to close the kitchen slider a bit too fast, as my dog picked up the shoe holding the kitchen door open at the same time. The perfect storm for the kitchen door to slam shut as the air gets flushed out of the kitchen, into and out the garage door...BOOM!
I hear a crash in the garage and go OH $hit! As I run past my dog, who is holding my shoe in his mouth, I looked into the garage and there the Pearl was, tilted on its side, hanging onto dear life at the edge of my worktable....#10 Rib snapped like a wishbone and a piece of the lower deck ornaments on the floor....
SHIPWRECK!


#10 broken rib, smashed by a 5lb dumbbell....call in the medic....

Wood dough filled in after the super glue set.....
A couple hours later before the Admiral returned home from grocery shopping....

Passed the Admiral's inspection....but she didn't have to deal with the frustration that I had to pull the deck and glue it all over because it popped in several places....I really was ready to give up for the day and perhaps a lesser Captain would have remained marooned by this type of disaster....but after a bit of consolation from my first mate (the dog) I tried again........

Hopefully, we can now continue on our voyage...leaving this island of foil and folly behind us.
With the gun deck firmly down and in place, a new day brings new hope.

I soaked the "removable deck" portion above in hot water for a 1/2 hour or so to let it dry out in place to better conform to the pitch of the deck. With Step 85, I set the posts and beams Parts 5B-15B and Parts C4-C11. I recall Jodie @MystRacing talking about rounding out the posts. I twirled the posts on the belt sander and put some knicks and notches into them before applying the Ebony stain.

The deck has two coats of Golden Oak Minwax stain and a coat of satin polyurethane. I plan to display the ship with the deck completely covered....when someone asks, "why two different deck colors"?, I'll flip it up and let them peek down to get a better look at the lower deck goodies. Under natural light, the difference is not as dramatic as it seems.

I now glued Parts K5 & J21 together to make Bulkhead #3. Also secured (2) parts #20 and dry fitted them to the keel after the glue set on Bulkhead #3. I did a little bit of sanding prior to placing the bulkhead, but since this is my first build ever, I'm not sure how much of a bevel is needed so I prefer to err on the side of caution.

In looking at the First Pole instructions, I see no mention of Bulkhead #16, until it is pictured in Step 101. Just more intrigue...so I decided to install it now. I beveled the edge to match the keel and did my best to not flatten it out as it has a natural curve to it.

In Step 88, you need bionic eyes to read the yellow text on a white background. I think it calls for Part #E4 to be placed. This requires you place the hinges and pins for the two doors as well. After I set the doors and did the appropriate staining, I glued part #E4 to the frontside of the #6 Bulkhead facing the bow.
Finally, after such a brutal start, avoiding disaster and sailing toward our final treasure, I jumped ahead and finished Step #99 and installed Part #E3 to the backside of Bulkhead #15 facing the bow. I also added a personal touch by revealing the location of the cursed Aztec treasure on a map I placed in the gun deck, between the stern doors.

Who left the doors open?

Well mates, we're finally back on course and its time for weekend shore duty.
Next week we secure the lanterns for the gun deck. A special shout out to Jodie @ MystRacing for mailing me his extra brass parts for the lanterns, since my kit only came with 24.
We have completed 94 of 268 Steps of the First Pole....for 35% completion of this part of the build.
Until next time....Ahoy all.
Last edited:
I like your map and your doors. Are you going to leave them open at all? I painted the inside of my room black in case I wanted to leave them open.Captain's Log ~~~April 16, 2021
Build time today: 4 hours
Total build time: 58 hours
Construction for the Black Pearl (All-Scenario version)
Build guidelines:
Steps 78-92
Secure the following parts.
Parts 15, 16, 22, 22A (attached to 22, Deck), 4B-15B, 20(2), Parts E3 & E4, K5 & J21, Z6, C4-C8 (2), C9-C11 (1)
"Just sit right back and you'll hear a tale.....
View attachment 228040
Murphy's law states..."Anything that can go wrong will go wrong". I am witness to this fact as I thought things were going along very good and that laying the gun deck would be a snap. I diligently filed the slots of the deck to fit the bulkheads and to my surprise after doing one final check before gluing, I realized that I put the two-piece deck upside down and backwards. I tried to blame the dog but the Admiral was not having any of it. Finally, I blamed the directions which show the ship one way and then another....why don't they keep things pointed one way...when explaining a new Step?
Between looking at pics from Step 74 to Step 93 the ship is in a whirlpool of configuration which would match any amusement park ride that spins you in a circle and when you got off you're wobbling like a top.
Filing this way will leave the following gaps when you flip the deck the right way with the smaller section on the starboard side.
View attachment 228041
So, now I get out the wood dough and hit it with super glue after it hardened....
View attachment 228042
At this point I figure all will be OK because the deck is glued down and I'll just clean up the joint later after everything is dry and with some cleanup, stain and varnish....we can survive the f-up! Now, with a lot of weight on the deck, I figure all will be fine.
View attachment 228043
I decided to glue in the deck with the "removable panel" out as one piece because I figure with my luck, there's no way I won't glue it down and I wanted to have a look of having it lay in or be able to lift it up for better viewing. Now, I should have left the weights well enough alone....no, I take one of the 5lb dumbbells and balance it off one of the stain tins...that pic has long been deleted for stupidity...
View attachment 228048
Here's where the fun starts.....in San Diego, my home gets a nice breeze off the ocean. As the ocean winds blow inland, it creates a vacuum in my house like a portal between two dimensions. The kitchen slider when opened allows the breeze to enter the home and the kitchen door that leads to the garage will often slam if you have the garage door opened and you let go of the kitchen door. The draft is that strong, our own wind tunnel on select days.
I had the kitchen door propped open with a shoe and the garage door and kitchen slider was open...the perfect storm for a cataclysmic slam of the kitchen door if any variable changes the air flow too drastically...With the deck in place. I decided to close the kitchen slider a bit too fast, as my dog picked up the shoe holding the kitchen door open at the same time. The perfect storm for the kitchen door to slam shut as the air gets flushed out of the kitchen, into and out the garage door...BOOM!
I hear a crash in the garage and go OH $hit! As I run past my dog, who is holding my shoe in his mouth, I looked into the garage and there the Pearl was, tilted on its side, hanging onto dear life at the edge of my worktable....#10 Rib snapped like a wishbone and a piece of the lower deck ornaments on the floor....
SHIPWRECK!
View attachment 228044
View attachment 228045
#10 broken rib, smashed by a 5lb dumbbell....call in the medic....
View attachment 228046
Wood dough filled in after the super glue set.....
A couple hours later before the Admiral returned home from grocery shopping....
View attachment 228047
Passed the Admiral's inspection....but she didn't have to deal with the frustration that I had to pull the deck and glue it all over because it popped in several places....I really was ready to give up for the day and perhaps a lesser Captain would have remained marooned by this type of disaster....but after a bit of consolation from my first mate (the dog) I tried again........
View attachment 228049
Hopefully, we can now continue on our voyage...leaving this island of foil and folly behind us.
With the gun deck firmly down and in place, a new day brings new hope.
View attachment 228050
I soaked the "removable deck" portion above in hot water for a 1/2 hour or so to let it dry out in place to better conform to the pitch of the deck. With Step 85, I set the posts and beams Parts 5B-15B and Parts C4-C11. I recall Jodie @MystRacing talking about rounding out the posts. I twirled the posts on the belt sander and put some knicks and notches into them before applying the Ebony stain.
View attachment 228051
The deck has two coats of Golden Oak Minwax stain and a coat of satin polyurethane. I plan to display the ship with the deck completely covered....when someone asks, "why two different deck colors"?, I'll flip it up and let them peek down to get a better look at the lower deck goodies. Under natural light, the difference is not as dramatic as it seems.
View attachment 228052
I now glued Parts K5 & J21 together to make Bulkhead #3. Also secured (2) parts #20 and dry fitted them to the keel after the glue set on Bulkhead #3. I did a little bit of sanding prior to placing the bulkhead, but since this is my first build ever, I'm not sure how much of a bevel is needed so I prefer to err on the side of caution.
View attachment 228053
In looking at the First Pole instructions, I see no mention of Bulkhead #16, until it is pictured in Step 101. Just more intrigue...so I decided to install it now. I beveled the edge to match the keel and did my best to not flatten it out as it has a natural curve to it.
View attachment 228054
In Step 88, you need bionic eyes to read the yellow text on a white background. I think it calls for Part #E4 to be placed. This requires you place the hinges and pins for the two doors as well. After I set the doors and did the appropriate staining, I glued part #E4 to the frontside of the #6 Bulkhead facing the bow.
Finally, after such a brutal start, avoiding disaster and sailing toward our final treasure, I jumped ahead and finished Step #99 and installed Part #E3 to the backside of Bulkhead #15 facing the bow. I also added a personal touch by revealing the location of the cursed Aztec treasure on a map I placed in the gun deck in between the stern doors.
View attachment 228055
Who left the doors open?
View attachment 228056
Well mates, we're finally back on course and its time for weekend shore duty.
Next week we secure the lanterns for the gun deck. A special shout out to Jodie @ MystRacing for mailing me his extra brass parts for the lanterns, since my kit only came with 24.
We have completed 94 of 268 Steps of the First Pole....for 35% completion of this part of the build.
Until next time....Ahoy all.
- Joined
- Mar 1, 2021
- Messages
- 315
- Points
- 168

That's a good point Vic, didn't give it much thought yet...but I think its a good idea that I will follow through with. I still don't have a real mental image of how the ship comes together yet? Next week is the lights and once the sides go on, I think I'll have a better feel for things.I like your map and your doors. Are you going to leave them open at all? I painted the inside of my room black in case I wanted to leave them open.
You, sir, may have just about the most entertaining build log on the forum. Though my favorite line today was, "I prefer to err on the side of caution" coming from a guy who just put a dumbbell on his ship...  .
.
 .
.- Joined
- Mar 1, 2021
- Messages
- 315
- Points
- 168

Err and caution, an oxymoron that I discovered in life during my 66 years...ha! The Admiral so enjoyed your comment! I warned everyone in my first log this build would be a mix of entertainment and education....serious modelers wouldn’t learn much from me. I have really enjoyed the small sense of accomplishment to this point on something I have never done before! Anyone expecting precision and accuracy from my novice Neanderthal approach will be highly disappointed. Bear paws and modeling...another oxymoron! Love hearing from you and enjoy your input Paul!You, sir, may have just about the most entertaining build log on the forum. Though my favorite line today was, "I prefer to err on the side of caution" coming from a guy who just put a dumbbell on his ship....
Last edited:
- Joined
- Mar 1, 2021
- Messages
- 315
- Points
- 168

Captain's Log ~~~ April 25, 2021
Build time today: 0 hours
Total build time: 80 hours
Construction for the Black Pearl (All-Scenario version)
Build guidelines:
Steps 93-104 excluding Step 99 (already completed)
Secure the following parts:
Parts: The total number of lanterns for the gun deck, plus some additional odds and ends like making hammocks (if desired), placing more resin pieces on the deck, and some sanding of the front & rear bulkheads (Steps 102 & 103)
Today's log is all about the wiring in my ship. Shiver me timbers, why didn't we just keep it simple?
(KISS) Keep it simple stupid....Naw, I had to add switches, and then a remote to screw things up because I didn't wire things correctly for the effect that I wanted...had to basically start wiring "surgery" on my previous work which I had completed with the barrel switch not connected to the remote.
The remote wire leading out of the receiver (+) must be wired into the LED's....which if running switches to function independently of each other, requires separate power feeds. So, it was back to the Captain's Quarters to rethink the design and what it was that I was really attempting to do....which really wasn't clear to me...LOL!

Surely, those of you with a brain for electrical design would devise a better plan than what I came up with, but in the end, as you watch my video......IT WORKS and to me that in itself is a sense of accomplishment for a guy with bear paws, a mean soldering iron, and poor eyesight.
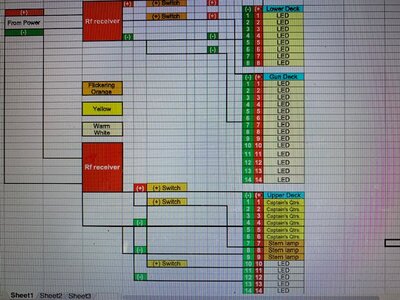
So, as they say, "Plan your work, and work your plan." It was a new day and I planned surgery to start early enough in the day so that if things went haywire, I could salvage the day by doing something else. The body of the Beast on the operating table:
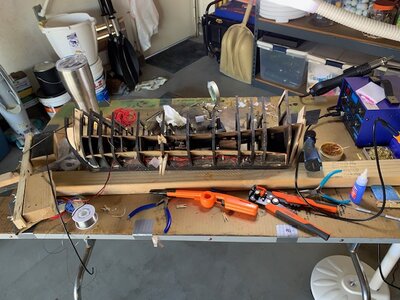
Well, we survived surgery and we have now entered the rehab stage. The results in the following video:
I plan to utilize the coffin design that came with the ZHL kit but with the 3V AC power adapter using two of the copper posts (instead of 4) from the coffin top that will contact the two copper strips that I will place into the keel, both (+) and (-).
I plan to take some time to come up with how I will design my cannons and it looks like I may be jumping around the manual's steps going forward. With 104 Steps completed in the !st Pole of this build, we have reached 39% toward its completion. A fun and educational start for the 1st thirty days of this voyage.
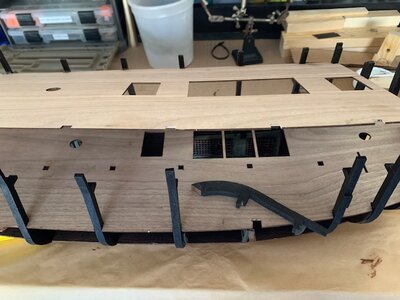
Looking ahead, I dry fitted the side plywood panels and it looks like things are lining up.
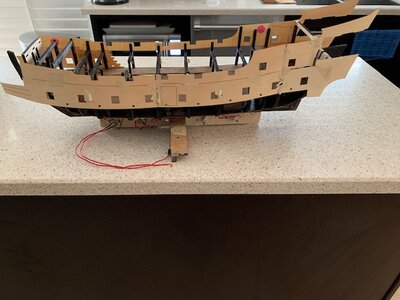
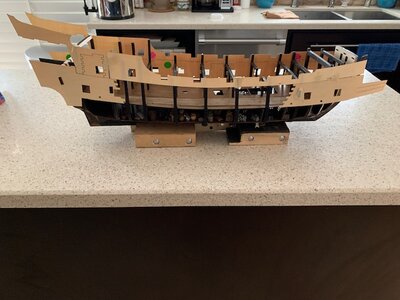
Signing off, until the next log......Ahoy all!
Rick
Build time today: 0 hours
Total build time: 80 hours
Construction for the Black Pearl (All-Scenario version)
Build guidelines:
Steps 93-104 excluding Step 99 (already completed)
Secure the following parts:
Parts: The total number of lanterns for the gun deck, plus some additional odds and ends like making hammocks (if desired), placing more resin pieces on the deck, and some sanding of the front & rear bulkheads (Steps 102 & 103)
Today's log is all about the wiring in my ship. Shiver me timbers, why didn't we just keep it simple?
(KISS) Keep it simple stupid....Naw, I had to add switches, and then a remote to screw things up because I didn't wire things correctly for the effect that I wanted...had to basically start wiring "surgery" on my previous work which I had completed with the barrel switch not connected to the remote.
The remote wire leading out of the receiver (+) must be wired into the LED's....which if running switches to function independently of each other, requires separate power feeds. So, it was back to the Captain's Quarters to rethink the design and what it was that I was really attempting to do....which really wasn't clear to me...LOL!

Surely, those of you with a brain for electrical design would devise a better plan than what I came up with, but in the end, as you watch my video......IT WORKS and to me that in itself is a sense of accomplishment for a guy with bear paws, a mean soldering iron, and poor eyesight.

So, as they say, "Plan your work, and work your plan." It was a new day and I planned surgery to start early enough in the day so that if things went haywire, I could salvage the day by doing something else. The body of the Beast on the operating table:

Well, we survived surgery and we have now entered the rehab stage. The results in the following video:
I plan to utilize the coffin design that came with the ZHL kit but with the 3V AC power adapter using two of the copper posts (instead of 4) from the coffin top that will contact the two copper strips that I will place into the keel, both (+) and (-).
I plan to take some time to come up with how I will design my cannons and it looks like I may be jumping around the manual's steps going forward. With 104 Steps completed in the !st Pole of this build, we have reached 39% toward its completion. A fun and educational start for the 1st thirty days of this voyage.
Looking ahead, I dry fitted the side plywood panels and it looks like things are lining up.


Signing off, until the next log......Ahoy all!
Rick
Last edited:
Get your black sails video yet?
- Joined
- Mar 1, 2021
- Messages
- 315
- Points
- 168

No Ken....said it was shipped last week! I think it was an EBay scammer for the price. Will have to get my money back from EBay and reorder from someone different! Several for under $25. Did you look up the factual Netflix documentary “The Lost Pirate Kingdom”?


