It's time 

 |
The beloved Ships in Scale Magazine is back and charting a new course for 2026! Discover new skills, new techniques, and new inspirations in every issue. NOTE THAT OUR NEXT ISSUE WILL BE MARCH/APRIL 2026 |
|
 |
As a way to introduce our brass coins to the community, we will raffle off a free coin during the month of August. Follow link ABOVE for instructions for entering. |
|

 .
. . ).
. ).Well, come on! Where are the pics, man? We don't care if your workplace is messy! (And what's your first name again? You're about to enter sailboat domain...not rowboat!)A post but no pictures
I must say that building this ship with all it's parts and instructions is awesome!
What took me months to due with my Enterprise 1799 has taken only a few days.
The hull is assembled, lower deck installed, keel, stem and stern pieces all attached
It's almost to easy ( bet I'll regret saying that
Anyway at my current rate of build I could be done by month's end ( ....not saying which month though).


")

Continuing......
Setting the Keel, Stem and Stern
View attachment 224747
View attachment 224748
Started some painting ....
View attachment 224749View attachment 224750View attachment 224751View attachment 224752
Back to real work..
Dry fitting, staining (walnut) and gluing.
View attachment 224753View attachment 224754
Obviously things have been going to well, so then came this issue.
The book showing how to place piece 8A.
View attachment 224762
Here are the 2 8A pieces ...
View attachment 224756
... and now here they are on the ship View attachment 224757View attachment 224758
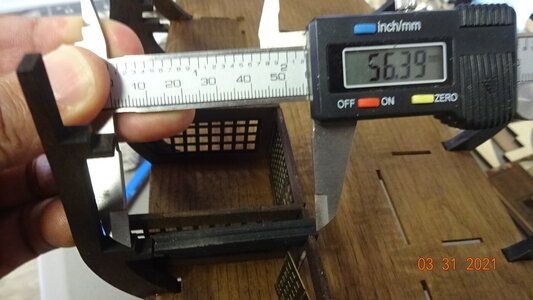
Taking some measurements shows a massive 4.57mm variance (ok, not that massive).
Did anyone have this issue?
I plan to just glue a 4mm piece to the end of the beam unless I'm missing something on how this piece attaches.
View attachment 224760
View attachment 224761
My deck was walnut. Interesting.Finally found some time to post pictures.
Does this deck look straight?
View attachment 224736
Attaching the frames to the bulkhead.
Main issue I had was that some of the components were in box 2.
I freaked out when I didn't find them in Box 1 thinking all the parts for the first part of the build would be in Box one.
Silly me
Basically just set them in place and glued them in.View attachment 224737
View attachment 224738
Remember that deck, I put a little water on it then glued it in place.
I put this heavy safe on top to get it straight.
NO money in it
View attachment 224739
Taking the puzzle apart....
View attachment 224740
Putting the puzzle together....
View attachment 224740View attachment 224741View attachment 224743View attachment 224742
View attachment 224744
View attachment 224745
Nobody will be able to see it. But there might be a problem later in the next two decks if it’s off that much there.Continuing......
Setting the Keel, Stem and Stern
View attachment 224747
View attachment 224748
Started some painting ....
View attachment 224749View attachment 224750View attachment 224751View attachment 224752
Back to real work..
Dry fitting, staining (walnut) and gluing.
I fitted my grates in between the frames. Yes, involves sanding..
Spray painted with matte black first then use a oil bronze spray on top.
Misted the bronze spray as opposed to spraying straight on the the grates.
View attachment 224753View attachment 224754
Obviously things have been going to well, so then came this issue.
The book showing how to place piece 8A.
View attachment 224762
Here are the 2 8A pieces ...
View attachment 224756
... and now here they are on the ship View attachment 224757View attachment 224758
Taking some measurements shows a massive 4.57mm variance (ok, not that massive).
Did anyone have this issue?
I plan to just glue a 4mm piece to the end of the beam unless I'm missing something on how this piece attaches.
View attachment 224760
View attachment 224761
Now everyone is up-to-date on the build.
Unfortunately I did not test fit the main deckDid you put the main deck in when you glued the walnut ribs on the starboard side? If not the walnut frames are probably to far out from the center of the ship. See if the main deck fits. There was a bit of play between the frames and those beam pieces but only a mm or so on each side on mine. You may have to adjust the frames. It can be done if that is where the problem is, not easy but don't panic.
 ..
.. .
.Rowboat, that’s a good question! From my perspective, I don’t know because I‘m running three switches (1 for each deck) and a remote control. I’m not sure where I will place the last two switches yet and wiring up all the LED’s to the remote will be a cruise I’m nit looking forward too! I fear if I place wires now, it’ll look like a pile of angel hair pasta underneath. I tried to keep the lower level wiring as neat as possible. One of my wires broke lose from the solder joint and just tracing it down in the harness of (+’s) was a trip for old eyes.Unfortunately I did not test fit the main deck
Here I thought this was going to be an easy build
I did just test the 2nd level deck and it needed some trimming but nothing excessive.
Currently working on the wiring.
Should I run all 28 wires now or just do each set according to the level?
My guess is the second choice but just thought I might run in to issues running wire after each deck gets sealed off (glued down).
Spending time now re-reading BP build logs trying to get all the hints and suggestions everyone has put together.
I fear I'll still miss an important issue and end up having to tear something apart
 .
.") .
.