
Mine was off a bit, too.Rowboat, great tip on the masts! I never checked to align my masks....rookie mistake. So, I checked and the fire and main mast were OK. The mizzenmast mast gave me a headache...ok from main deck to gun deck but a no-go through the lower deck! I drilled through but still mis-aligned tilting left of the other two masts. Luckily, I didn’t go further with the drill! I was getting pissed! So, I decided rather than create more damage, (worrying I would hit a wire or something) I’ll just make a slight ring around the mast from some scrap wood and sink the mast through and as far as it can go to the lower deck! Then of course the deck above the Captain’s Qtrs is a 4th hole....I’ll deal with securing this mast when I get to the end! But, I learned a valuable lesson for when I do my San Felipe.....

-

SUBSCRIBE TO SHIPS IN SCALE TODAY!
The beloved Ships in Scale Magazine is back and charting a new course for 2026!
Discover new skills, new techniques, and new inspirations in every issue.
NOTE THAT OUR NEXT ISSUE WILL BE MARCH/APRIL 2026 -

Win a Free Custom Engraved Brass Coin!!!
As a way to introduce our brass coins to the community, we will raffle off a free coin during the month of August. Follow link ABOVE for instructions for entering.
You are using an out of date browser. It may not display this or other websites correctly.
You should upgrade or use an alternative browser.
You should upgrade or use an alternative browser.
Black Pearl - Zhl 1:50 by Rowboat
- Thread starter Rowboat
- Start date
- Watchers 12
-
- Tags
- black pearl zhl
- Joined
- Mar 1, 2021
- Messages
- 315
- Points
- 168

Vic, I decided to stop for a couple days until I cool off. In my case, I should have not drilled anything, sunk the mast through the gun deck and left well enough alone. I would have had to top off the mast, but it would have been better than drilling around messing up my main deck and gun deck. Luckily for me it won’t be visible in the finished model!Mine was off a bit, too.

I did start about 3 months before you based on our build logs.Your Golden BP version is looking great!
I just found your build log last week and started reading up on it.
Seems like everyone builds faster then me.
I just decided the pirates had just drunk too much rum and set it in wrong. At least, this pirate did. Without the rum, that is.Vic, I decided to stop for a couple days until I cool off. In my case, I should have not drilled anything, sunk the mast through the gun deck and left well enough alone. I would have had to top off the mast, but it would have been better than drilling around messing up my main deck and gun deck. Luckily for me it won’t be visible in the finished model!
Jan,
I'm checking out your list of build ships and potential builds.
That is getting to be a long list.
Built - Constructo 1799 Enterprise
Built - Bluejacket Lobster Boat
Built - Bluejacket Tug Seguin
In progress - Krick UCS Alert
In progress - Kolderstok Duyfken
On the shelf - Canoe Build
On the shelf - Model Expo Chaperon
On the shelf - MM Sopwith Pup
If I remember correctly the Enterprise was your first build and it seems like you just finished it
 .
.Three builds on the shelf !
I have no other builds, looking at many but waiting till I get further along with the BP.
There are soooo many good choices....
I think I'll move up to a 3 deck ship with at least 3 masts and a plank on frame build but that's not written in stone.
Keep up the good work .
I did start about 3 months before you based on our build logs.
I'll have to compare in 3 months and see how I'm doing.
Rowboat, great tip on the masts! I never checked to align my masts...rookie mistake. So, I checked and the fore and main mast were OK. The mizzenmast gave me a headache...ok from main deck to gun deck but a no-go through the lower deck! I drilled through but still mis-aligned tilting left of the other two masts. Luckily, I didn’t go further with the drill! I was getting pissed! So, I decided rather than create more damage, (worrying I would hit a wire or something) I’ll just make a slight ring around the mast from some scrap wood (because I enlarged the main deck hole too much) and sink the mast through and as far as it can go to the lower deck! Then of course the deck above the Captain’s Qtrs is a 4th hole which I’ll have to align but it should help secure the mizzenmast since I enlarged the main deck hole too much. I’ll deal with securing this mast when I get to the end! But, I learned a valuable lesson for when I do my San Felipe.....
I'm running into a similar situation, the main mast won't push through to the bottom hull without major leaning of the mast (probably 5 degrees to the bow).
Still working on a solution but if no luck then I'll use your idea and trim the top.
Three years, now I'm start'in to feel better, lol.I am going on my 3rd year of my Le Mirage build and I am nowhere near finished. It seems that as I complete the model, I find myself wanting to add more and more details that aren't included with the original kit. I don't know where to stop...
I agree that adding details prolongs the build.
I have seen some enhancements of the BP that I would like on my ship.
There are some great ship molders out there that almost force me to upgrade my skill set.
I'll check in on your build and see how it's coming along.
- Joined
- Oct 9, 2020
- Messages
- 2,371
- Points
- 488

Rowboat, great tip on the masts! I never checked to align my masts...rookie mistake. So, I checked and the fore and main mast were OK. The mizzenmast gave me a headache...ok from main deck to gun deck but a no-go through the lower deck! I drilled through but still mis-aligned tilting left of the other two masts. Luckily, I didn’t go further with the drill! I was getting pissed! So, I decided rather than create more damage, (worrying I would hit a wire or something) I’ll just make a slight ring around the mast from some scrap wood (because I enlarged the main deck hole too much) and sink the mast through and as far as it can go to the lower deck! Then of course the deck above the Captain’s Qtrs is a 4th hole which I’ll have to align but it should help secure the mizzenmast since I enlarged the main deck hole too much. I’ll deal with securing this mast when I get to the end! But, I learned a valuable lesson for when I do my Sa
Thanks gentlemen for the support.
I did end up using "liquid tape" on the solder wires (a member suggested that).
Much easier than wrapping with electrical tape.
To jump back in time a bit regarding the installment of the corner braces on the 2nd level beams, pieces J11 through J20.
The instructions are on page 134 and it states "It is up to you to install J11 and J20 or not."
What they fail to mention is that if you do install J20 then the doors will not open.
That would have been pertinent information to know.
I ended up cutting away much of those two corner supports as I wanted to open the doors.
Another note: Make sure to align the mast holes between each deck.
Now, I know that doesn't need to be stated but I've found that the deck can shift slightly when the glue is setting.
This happened to me and my mast holes were off center line about 1mm or 2mm. Rather than pull the deck up I enlarged the holes.
Hopefully this doesn't come back to bite me in the a$$.
Rowb
I have completed the hull and some of the stays. Currently working on the lower ratlines. The instructions are not the best, but that's ok. The drawings are pretty good and it's not my first rodeo. I should include some photos, but I am a little reluctant to show my work because I don't know if it's good enough to show on this site. The thing with this kit is that you always need to look forward before doing something. What I mean is that in the drawings they would show some particular stays and ratlines being done at the same time, for example, but in reality you need to do the stays first because the ratlines actually get in the way. I have several OOPS moments in this build and I don't want to show my mistakes... but overall, I am having fun, which I guess is the thing that attracts one to this hobby. My next project is to use the ropewalk machine that I purchased to make ropes. Again another delay to my project lol. But from what I read in several posts on another one of these Ship Building sites is that ropemaking is actually fun and there is a science/art to it. I have purchased some polyester thread of various sizes to see what I can get in terms of final product. The next bit is to research what rope size is required for each of the running and standing rigging lines. That should be an interesting task. I think it depends on the country and period of the ship, but don"t quote me on that.Three years, now I'm start'in to feel better, lol.
I agree that adding details prolongs the build.
I have seen some enhancements of the BP that I would like on my ship.
There are some great ship molders out there that almost force me to upgrade my skill set.
I'll check in on your build and see how it's coming along.
- Joined
- Oct 9, 2020
- Messages
- 2,371
- Points
- 488
Not sure if this will help or not, but I have stopped using PVA glue to plank the deck because this water-based glue warps the false decks, I use contact cement and it doesn't seem to warp the decks anymore. I am not sure if it will help with aligning the holes or not, but it may be something to considerI'm running into a similar situation, the main mast won't push through to the bottom hull without major leaning of the mast (probably 5 degrees to the bow).
Still working on a solution but if no luck then I'll use your idea and trim the top.
Maybe you can just call it "planned" forward rake to the mast.I'm running into a similar situation, the main mast won't push through to the bottom hull without major leaning of the mast (probably 5 degrees to the bow).
Still working on a solution but if no luck then I'll use your idea and trim the top.

Sounds cool, let us know how it all turns out with the rope making (maybe even some picsI have completed the hull and some of the stays. Currently working on the lower ratlines. The instructions are not the best, but that's ok. The drawings are pretty good and it's not my first rodeo. I should include some photos, but I am a little reluctant to show my work because I don't know if it's good enough to show on this site. The thing with this kit is that you always need to look forward before doing something. What I mean is that in the drawings they would show some particular stays and ratlines being done at the same time, for example, but in reality you need to do the stays first because the ratlines actually get in the way. I have several OOPS moments in this build and I don't want to show my mistakes... but overall, I am having fun, which I guess is the thing that attracts one to this hobby. My next project is to use the ropewalk machine that I purchased to make ropes. Again another delay to my project lol. But from what I read in several posts on another one of these Ship Building sites is that ropemaking is actually fun and there is a science/art to it. I have purchased some polyester thread of various sizes to see what I can get in terms of final product. The next bit is to research what rope size is required for each of the running and standing rigging lines. That should be an interesting task. I think it depends on the country and period of the ship, but don"t quote me on that.
")
I , for one, would love to see it. If you’ve read any of my posts, it will be obvious that I have no qualms about sharing my “oops” moments. That’s how we learn. It’s also how others learn from our mistakes so they won’t have to make them too. We mostly all have our strengths also. Some of us are strong at planking. Others are strong at painting. Still other are great at rigging or sails. A rare few are good at everything. And then, there’s me. But I think we all have a great story to share, and that’s one thing I love about this forum.I have completed the hull and some of the stays. Currently working on the lower ratlines. The instructions are not the best, but that's ok. The drawings are pretty good and it's not my first rodeo. I should include some photos, but I am a little reluctant to show my work because I don't know if it's good enough to show on this site. The thing with this kit is that you always need to look forward before doing something. What I mean is that in the drawings they would show some particular stays and ratlines being done at the same time, for example, but in reality you need to do the stays first because the ratlines actually get in the way. I have several OOPS moments in this build and I don't want to show my mistakes... but overall, I am having fun, which I guess is the thing that attracts one to this hobby. My next project is to use the ropewalk machine that I purchased to make ropes. Again another delay to my project lol. But from what I read in several posts on another one of these Ship Building sites is that ropemaking is actually fun and there is a science/art to it. I have purchased some polyester thread of various sizes to see what I can get in terms of final product. The next bit is to research what rope size is required for each of the running and standing rigging lines. That should be an interesting task. I think it depends on the country and period of the ship, but don"t quote me on that.
Not much time in the ship yard or on this site in July, actually none.
Busy with more important items, major remodeling.
Some work started in August:
I have the false skin attached on the port and starboard side and am working on the backing inserts with the cannon hole cutouts.
I think the parts are "L" and "LC".
Those inserts all need cutting and sanding as others have already mentioned.
Built the coffin as that was an easy win. NO electronics, just the coffin.
Cannon frames are built thanks to help from a friend.
I'll post pictures as soon as I find the camera.
I'll need to take a day and catch up on everyone's progress.
Everyone have a great day.
- Joined
- Mar 1, 2021
- Messages
- 315
- Points
- 168
Hey Rowboat….good to hear from you! Looking forward to the updated pics!Not much time in the ship yard or on this site in July, actually none.
Busy with more important items, major remodeling.
Some work started in August:
I have the false skin attached on the port and starboard side and am working on the backing inserts with the cannon hole cutouts.
I think the parts are "L" and "LC".
Those inserts all need cutting and sanding as others have already mentioned.
Built the coffin as that was an easy win. NO electronics, just the coffin.
Cannon frames are built thanks to help from a friend.
I'll post pictures as soon as I find the camera.
I'll need to take a day and catch up on everyone's progress.
Everyone have a great day.
Here's some pics of the support pieces for the hull skin.
As you may be able to tell the support pieces are not all the same height.
This may because of how I cut them to fit or they came that way, not sure.
I hope it doesn't become a problem when I start planking the inside of the hull.


And some cannon work.
Not as sophisticated as my previous build (Enterprise 1799) but I'm still working on them.
These came out of the packaging in fairly good order and were quite usable, so I used them.")


More work ahead on fitting those hull skin supports.
Sail on, Rowboat.
As you may be able to tell the support pieces are not all the same height.
This may because of how I cut them to fit or they came that way, not sure.
I hope it doesn't become a problem when I start planking the inside of the hull.
And some cannon work.
Not as sophisticated as my previous build (Enterprise 1799) but I'm still working on them.
These came out of the packaging in fairly good order and were quite usable, so I used them.
More work ahead on fitting those hull skin supports.
Sail on, Rowboat.
Attachments
Well I finally made a "holy crap" blunder.
In my work, to be more productive, I look ahead in the manual for stuff I can do while parts are drying.
When I built the second level beams I also installed the corner pieces to help support the beams.

And I did a good job of securing all of them.

A proud day that was.......
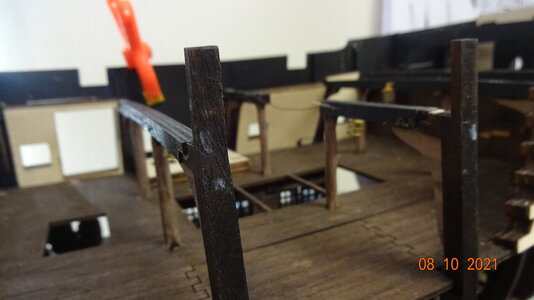
..... However after putting on the outside hull skins I came to the page in the manual where I am to installed the inner hull side walls. I initially was worried about how to cut out the drain holes and cannon opening. My worry was misguided as the real issue became apparent. Those corner pieces were in the way of me installing long planks on the inner side hulls.
In this photo there is a long plank that may fit along the deck and hull but you should be able to see the corner braces are going to be a problem.

Looks like my resolution is to custom cut each beam section and place it between the hull frames .
.
Below I placed one section of the sidewall above the cannon cutout.
I just created a large amount of work unnecessarily.

To make matters interesting, there is a limited number of walnut planks for the sidewalls.
I hope I can cut each piece exactly, so I have no extra unused parts otherwise I will have to mill new walnut planks.
Ah, the joy of model ship building.
In my work, to be more productive, I look ahead in the manual for stuff I can do while parts are drying.
When I built the second level beams I also installed the corner pieces to help support the beams.
And I did a good job of securing all of them.
A proud day that was.......
..... However after putting on the outside hull skins I came to the page in the manual where I am to installed the inner hull side walls. I initially was worried about how to cut out the drain holes and cannon opening. My worry was misguided as the real issue became apparent. Those corner pieces were in the way of me installing long planks on the inner side hulls.
In this photo there is a long plank that may fit along the deck and hull but you should be able to see the corner braces are going to be a problem.
Looks like my resolution is to custom cut each beam section and place it between the hull frames
.Below I placed one section of the sidewall above the cannon cutout.
I just created a large amount of work unnecessarily.
To make matters interesting, there is a limited number of walnut planks for the sidewalls.
I hope I can cut each piece exactly, so I have no extra unused parts otherwise I will have to mill new walnut planks.
Ah, the joy of model ship building
.Well, I'm not going to report it's slow going as I believe this is just my normal speed, lol .
I finished decking the inside of the hull , no major issues except for the one I posted earlier.
A few pics to keep me honest.


Now it's time to tackle the electrical wiring.
I need to solder all the red wires together and then separately each of the 3 black wires will need to be soldered.
This turned out to be easier than I imagined.
As well I had to attach the copper (or brass) pieces that wires will be soldered to.
Here's the work....


Not much soldering to see as I taped everything up , oops
I did grab a piece of planking and lay it against the keel to make sure my solders were below the plank.
Took about 2 tries before I got them to lay right..
Next up was drilling the holes in the coffin lid, easy enough...
..below you should see how the pins match up to the copper on the keel.

Now don't go thinking I did a great job until you see the following .....

... for the life of me I could not measure correctly, as proven by the many holes in the coffin.
All I can think is that I was so hyped up about the electrical that when I was done my brain cells took a break.
Still some work to finish the electrical then on to putting stuff on the 2nd level deck.
Have a great day, from smokey California...
.I finished decking the inside of the hull , no major issues except for the one I posted earlier.
A few pics to keep me honest.
Now it's time to tackle the electrical wiring.
I need to solder all the red wires together and then separately each of the 3 black wires will need to be soldered.
This turned out to be easier than I imagined.
As well I had to attach the copper (or brass) pieces that wires will be soldered to.
Here's the work....
Not much soldering to see as I taped everything up , oops
I did grab a piece of planking and lay it against the keel to make sure my solders were below the plank.
Took about 2 tries before I got them to lay right..
Next up was drilling the holes in the coffin lid, easy enough...
..below you should see how the pins match up to the copper on the keel.
Now don't go thinking I did a great job until you see the following .....
... for the life of me I could not measure correctly, as proven by the many holes in the coffin
.All I can think is that I was so hyped up about the electrical that when I was done my brain cells took a break
.Still some work to finish the electrical then on to putting stuff on the 2nd level deck.
Have a great day, from smokey California...
I love the look of the lights, but I don’t think I’ll ever do that again.
why not, Vic?I love the look of the lights, but I don’t think I’ll ever do that again.