
One light on the inside quit working, I broke one of the deck lanterns and would have had to do major surgery taking out stuff that was epoxied on, and my daughter accidentally broke a second lantern. So much work with so little reward for me. And they only last about 200 hours. And then you can't go back and fix things later because they're embedded in the ship. It wasn't worth the effort or the money to me. But I don't have the electrical skills of Jodie or Rich either.why not, Vic?

-

SUBSCRIBE TO SHIPS IN SCALE TODAY!
The beloved Ships in Scale Magazine is back and charting a new course for 2026!
Discover new skills, new techniques, and new inspirations in every issue.
NOTE THAT OUR NEXT ISSUE WILL BE MARCH/APRIL 2026 -

Win a Free Custom Engraved Brass Coin!!!
As a way to introduce our brass coins to the community, we will raffle off a free coin during the month of August. Follow link ABOVE for instructions for entering.
You are using an out of date browser. It may not display this or other websites correctly.
You should upgrade or use an alternative browser.
You should upgrade or use an alternative browser.
Black Pearl - Zhl 1:50 by Rowboat
- Thread starter Rowboat
- Start date
- Watchers 12
-
- Tags
- black pearl zhl

It would be nice if there was a way to repair a light but that isn't going to happen.
Also the 200 hour life line is an issue, and I thought LEDS lasted for 10,000 hours, lol.
I am learning a thing or two , so that's always a reward.
I would probably attempt another "lighted" model if it looked really cool.
Maybe a model shrimp boat with a lights on top of the pilot house would be nice.
One main pointing forward on a swivel, two or three deck lights..
My dad and grandfather were both shrimpers, I was for about a day or two.")
One of my relatives, back when I was a youngster, had a working model of a shrimp boat in his living room.
The pilot house windows moved up and down, doors opened, riggers moved in and out.
This was back around 1965ish... it looked so cool to me.. probably one reason why I got into this hobby.
Only saw it once but still remember it to this day, must have left an impression on me.
Also the 200 hour life line is an issue, and I thought LEDS lasted for 10,000 hours, lol.
I am learning a thing or two , so that's always a reward.
I would probably attempt another "lighted" model if it looked really cool.
Maybe a model shrimp boat with a lights on top of the pilot house would be nice.
One main pointing forward on a swivel, two or three deck lights..
My dad and grandfather were both shrimpers, I was for about a day or two.
One of my relatives, back when I was a youngster, had a working model of a shrimp boat in his living room.
The pilot house windows moved up and down, doors opened, riggers moved in and out.
This was back around 1965ish... it looked so cool to me.. probably one reason why I got into this hobby.
Only saw it once but still remember it to this day, must have left an impression on me.
That sounds like it would be fun to build and to have.It would be nice if there was a way to repair a light but that isn't going to happen.
Also the 200 hour life line is an issue, and I thought LEDS lasted for 10,000 hours, lol.
I am learning a thing or two , so that's always a reward.
I would probably attempt another "lighted" model if it looked really cool.
Maybe a model shrimp boat with a lights on top of the pilot house would be nice.
One main pointing forward on a swivel, two or three deck lights..
My dad and grandfather were both shrimpers, I was for about a day or two.
One of my relatives, back when I was a youngster, had a working model of a shrimp boat in his living room.
The pilot house windows moved up and down, doors opened, riggers moved in and out.
This was back around 1965ish... it looked so cool to me.. probably one reason why I got into this hobby.
Only saw it once but still remember it to this day, must have left an impression on me.
Worked on the lower level ladder today.
I initially cut the bottom and top of the stair beams at 45 degree angles.
This stretched out the staircase more horizontally and made it come to close the bottom of the second deck, if one was going down the stairs.
So I recut to a more vertical 60 degrees, this fit worked better in my opinion.
To get the stairs to match the 60 degree angle I used a piece of the previous beam, the piece on the right in the pic below

Then slid that under each stair until the stair angles matched.

Glue and let dry.

Lastly I drilled small pilot holes where I wanted the handles to be and glued in place.


Moving forward I'll be stepping away from gluing anything to the second level as many others have suggested.
I'll start planking the keel to the first level.
The manual jumps all over the place again as many have mentioned.
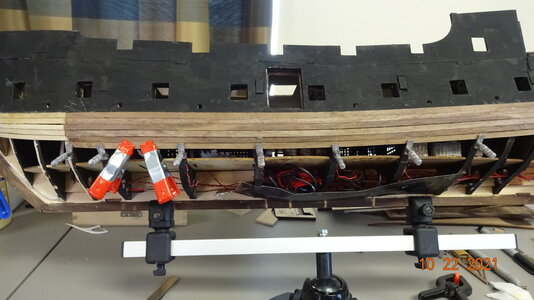
First thing I decided was to shore up the aft of the ship.
I put on the decking for that area as well as put in the top deck , no worries as neither is glued down.
In this pic I haven't yet put in the last 2 brace pieces on each side.
I did no cutting or sanding of the pieces as a few of the BP builders had done.
My sanding and cutting will come later when applying the backing for this area.


I next plan on some planking work till then have a great day.
I initially cut the bottom and top of the stair beams at 45 degree angles.
This stretched out the staircase more horizontally and made it come to close the bottom of the second deck, if one was going down the stairs.
So I recut to a more vertical 60 degrees, this fit worked better in my opinion.
To get the stairs to match the 60 degree angle I used a piece of the previous beam, the piece on the right in the pic below
Then slid that under each stair until the stair angles matched.
Glue and let dry.
Lastly I drilled small pilot holes where I wanted the handles to be and glued in place.
Moving forward I'll be stepping away from gluing anything to the second level as many others have suggested.
I'll start planking the keel to the first level.
The manual jumps all over the place again as many have mentioned.
First thing I decided was to shore up the aft of the ship.
I put on the decking for that area as well as put in the top deck
, no worries as neither is glued down.In this pic I haven't yet put in the last 2 brace pieces on each side.
I did no cutting or sanding of the pieces as a few of the BP builders had done.
My sanding and cutting will come later when applying the backing for this area.
I next plan on some planking work till then have a great day.
Attachments

You’re doing a masterful job. You have a great deal of patience. I’m more like a bull in a China shop.Worked on the lower level ladder today.
I initially cut the bottom and top of the stair beams at 45 degree angles.
This stretched out the staircase more horizontally and made it come to close the bottom of the second deck, if one was going down the stairs.
So I recut to a more vertical 60 degrees, this fit worked better in my opinion.
To get the stairs to match the 60 degree angle I used a piece of the previous beam, the piece on the right in the pic below
View attachment 262670
Then slid that under each stair until the stair angles matched.
View attachment 262669
Glue and let dry.
View attachment 262667
Lastly I drilled small pilot holes where I wanted the handles to be and glued in place.
View attachment 262672 View attachment 262673
Moving forward I'll be stepping away from gluing anything to the second level as many others have suggested.
I'll start planking the keel to the first level.
The manual jumps all over the place again as many have mentioned.
First thing I decided was to shore up the aft of the ship.
I put on the decking for that area as well as put in the top deck
In this pic I haven't yet put in the last 2 brace pieces on each side.
I did no cutting or sanding of the pieces as a few of the BP builders had done.
My sanding and cutting will come later when applying the backing for this area.
View attachment 262674 View attachment 262675
I next plan on some planking work till then have a great day.
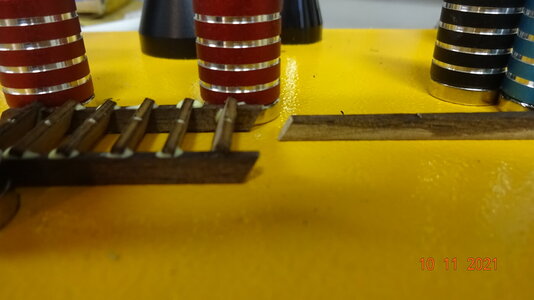
So I have started planking the port side of the ship with 2mm walnut.
The first plank fits up against the "skin hull".
This is not my build in the below picture as I'm not there yet, I used another members build to get a visual of what I'm describing.

The issue is the skin is only 1.0 mm thick , but the first plank sticks out almost 1.5mm above the skin.
Am I supposed to even this out with wood putty?
Did I put the skin hull on wrong?
Did anyone else run into this issue, I haven't read about it in the blogs.
Thanks for any help.
The first plank fits up against the "skin hull".
This is not my build in the below picture as I'm not there yet, I used another members build to get a visual of what I'm describing.
The issue is the skin is only 1.0 mm thick , but the first plank sticks out almost 1.5mm above the skin.
Am I supposed to even this out with wood putty?
Did I put the skin hull on wrong?
Did anyone else run into this issue, I haven't read about it in the blogs.
Thanks for any help.
Last edited:
Yeah, that doesn’t sound right. Can you show a close up picture of it? If I remember correctly, the 2mm planks should line up with the plywood. If it doesn’t quite, you’ll have to sand it down so the thin black walnut will lie smooth on it where it meets. I’d have to see it to be sure of what you’re saying.
Well the images are not the best but here's what I'm working with.
Since the skin hull glues directly onto the hull frames, and the walnut planks glue down to the hull frames then it seems that there will be this mismatch of depth. They are both attached to the same substrate but one is .5mm thick and the other is 2mm thick.
Or .... maybe I did something wrong.
This picture is looking down from the top of the skin hull, one should be able to make out the 2mm walnut plank sticking out.

Here I use a piece of walnut wood to show the gap..

Here I use a white piece of wood to show the gap..

Here is my progress, obviously I'm not letting a little wood get in my way of building, lol.

Since the skin hull glues directly onto the hull frames, and the walnut planks glue down to the hull frames then it seems that there will be this mismatch of depth. They are both attached to the same substrate but one is .5mm thick and the other is 2mm thick.
Or .... maybe I did something wrong
.This picture is looking down from the top of the skin hull, one should be able to make out the 2mm walnut plank sticking out.
Here I use a piece of walnut wood to show the gap..
Here I use a white piece of wood to show the gap..
Here is my progress, obviously I'm not letting a little wood get in my way of building, lol.
Are these planks on the port side so that when you look inside the wood wall is dark? Double check to see if they are the right planks. They should be the same width as the pawlonia planks. If not, they go somewhere else. I almost put the wrong planks in the right place until I accidentally looked at the instructions and the part numbers.
Thanks for checking up on me.Are these planks on the port side so that when you look inside the wood wall is dark? Double check to see if they are the right planks. They should be the same width as the pawlonia planks. If not, they go somewhere else. I almost put the wrong planks in the right place until I accidentally looked at the instructions and the part numbers.
Yes, port side planks.
The manual states to use part #29 which correlates to 2mmX4.5mmX450mm, which is what I'm using.

They are the same width as the pawlonia planks but that's not the issue.
The issue is the hull skin is much narrower than the walnut planks and this creates the gap I've described above.
I'll just keep doing what I'm doing and deal with the mismatch when the time comes
 .
.How thick is the plywood skin? Was there an inset in the bulkhead where you have to plank over it with pawlonia? I can't remember that far back and I must have pitched my plans.
It is time for a Birthday .....It's time
Hallo @Rowboat
we wish you all the BEST and a HAPPY BIRTHDAY

Woot woot! Have a good one, Rowboat!
Thanks fellow members for the BDay shout out. 
Let's drink to that.
Let's drink to that
. How did you work out the difference in plank to plywood thickness?
Haven't yet, probably some sanding, wood putty, sanding ......How did you work out the difference in plank to plywood thickness?
- Joined
- Oct 14, 2021
- Messages
- 26
- Points
- 48

I recently completed the ZHL Black Pearl. It was by far my most satisfying build ever!It's time
There are different versions. I did the all scenario version, first and second pole along with the optional third pole.
Enjoy your build!
We would love to see your complete model. Is this possible? If yes, you can post some images in this sectionI recently completed the ZHL Black Pearl. It was by far my most satisfying build ever!
There are different versions. I did the all scenario version, first and second pole along with the optional third pole.
Submit Images of Completed Models Here
This forum is for those that would like to upload their completed ships for the Showcase.
shipsofscale.com
BTW, welcome aboard SOS!
Any pics to see?I recently completed the ZHL Black Pearl. It was by far my most satisfying build ever!
There are different versions. I did the all scenario version, first and second pole along with the optional third pole.
Enjoy your build!
Morning mates,
Work continues on the first planking and I have pictures to prove it.
Here's the starboard side, about half way done with the first planking.
I've broken 2 planks, so not to bad.
I use a cotton swab to apply water to both sides of any area on the planks that will undergo bending.
This technique works pretty good for this type of wood.
Once the initial swabbing has soaked in I apply a saturating layer to the planks.
That is, I apply water until it starts to bead up on the plank.
I think this works because no planks fit the full length of the ship.
So I'm usually only twisting or bending one end of the plank.
I slowly tighten the pins down until I finally get the bend I need.
I let it dry in place and come back later for the gluing.

The port side is complete!

Random pics of the work follow ....


These little pins work great for this build as the hull frames are thick enough to hold the pin without cracking the frame.
I initially only had 10 and was doing 1 plank a day.
I ordered another set of 10 after finishing the port side, wish I had done it earlier .
.


The walnut plank in the middle of the picture below is attached so that it matches the curve of the deck.
This is for the open side of the ship.
This threw off my planking as I didn't need to do it like that on the port side planking.

Here you can see how the symmetry of the planks, port to starboard, is off on the lower bow portion of the ship, which is the upper part of the picture. This is acceptable for the first planking but I'll need a better fix for the final planking.

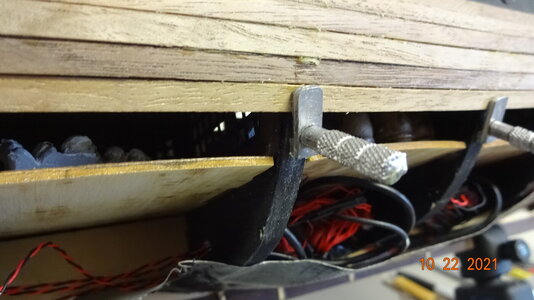
I've had to glue in support shims to be able to glue the end planks down.
Here you see a support glued to the bottom decking, which I will later attach planks to.
It's located between the 3rd and 4th frames.
IN the pic below, looking closely you might see the support piece glued down and the plank
being attached to it. It's between the first and second hull frame just above the single middle white plank.
The stern symmetry looks to be okay.

Maybe another week or two on the first planking left.
Later.....
Work continues on the first planking and I have pictures to prove it
.Here's the starboard side, about half way done with the first planking.
I've broken 2 planks, so not to bad.
I use a cotton swab to apply water to both sides of any area on the planks that will undergo bending.
This technique works pretty good for this type of wood.
Once the initial swabbing has soaked in I apply a saturating layer to the planks.
That is, I apply water until it starts to bead up on the plank.
I think this works because no planks fit the full length of the ship.
So I'm usually only twisting or bending one end of the plank.
I slowly tighten the pins down until I finally get the bend I need.
I let it dry in place and come back later for the gluing.
The port side is complete!
Random pics of the work follow ....
These little pins work great for this build as the hull frames are thick enough to hold the pin without cracking the frame.
I initially only had 10 and was doing 1 plank a day.
I ordered another set of 10 after finishing the port side, wish I had done it earlier
.The walnut plank in the middle of the picture below is attached so that it matches the curve of the deck.
This is for the open side of the ship.
This threw off my planking as I didn't need to do it like that on the port side planking.
Here you can see how the symmetry of the planks, port to starboard, is off on the lower bow portion of the ship, which is the upper part of the picture. This is acceptable for the first planking but I'll need a better fix for the final planking.
I've had to glue in support shims to be able to glue the end planks down.
Here you see a support glued to the bottom decking, which I will later attach planks to.
It's located between the 3rd and 4th frames.
IN the pic below, looking closely you might see the support piece glued down and the plank
being attached to it. It's between the first and second hull frame just above the single middle white plank.
The stern symmetry looks to be okay.
Maybe another week or two on the first planking left.
Later.....
Attachments
Last edited: