BN at the Mississippi River . . .

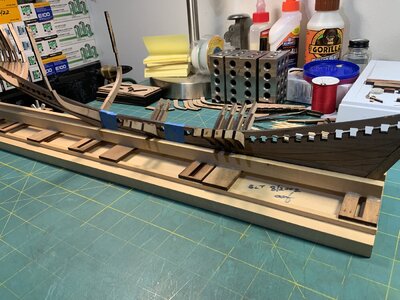
Keel is all glued together, 36-hours-cured well-weighted on my 1/2 inch plate of plexi and is perfectly straight, final scraped and ready for fitting each frame slot. The Parts 19/65 subassemblies are glued up but not yet beveled. I have glued up 30 frames and just now I have begun the laborious process of "tuning" each individual frame. My steps in that seem to be: 1) dry fitting each frame to its own slot in both the keel and keelson by judicious filing of every mating face not only in the frame slots but in keel and keelson slots as well. (a lot of delicate filing of maybe some 200 slots). and 2) hand sanding the outer and inner faces of each frame to get it roughly conforming with the laser etched lines. I believe I'm pretty sure that I do not want to go through all of this slot filing after I have already hard-glued any combination of assembly fixture/frame(s)/keel.

I haven't yet sanded the bottom/front of the keel/stem sandwich. I will get that accomplished before going to work on the stern overhang. I also believe I will add the keel shoe as I see Peter has done.

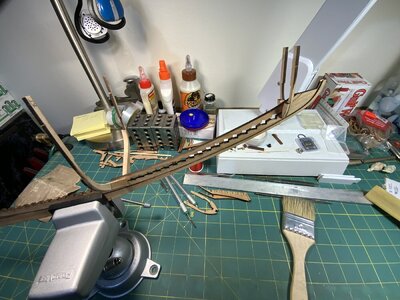
Note three bottles of glue there plus a small one of super. I do not like the Gorilla at all. The Elmers is just household GLUE ALL and while it's OK, it ain't like my favorite Elmers Carpenter which I can't find right now. The third there is Titebond Original Wood which of these three, is my preferred. Meanwhile I'll keep looking for the Elmers Carpenter in some appropriate benchtop quantity packaging (not the damn gallon size which I have seen!)
alf in Iowa
DDC284FB-BEFA-4801-956E-E3B26FA8C0DA.jpeg
 
Nice progress you're showing, Alf and yes, it's an awful lot of sanding, filing and fitting.
Unfortunately very essential, but rewarding in the long run.
As far as adhesives go, I am using a water-soluble adhesive, I don't think it's available in the US, Bison D2. It saved me on a couple of occasions.

242CF4AE-E36D-4A50-8083-E93169251497.jpeg
 
Keel is all glued together, 36-hours-cured well-weighted on my 1/2 inch plate of plexi and is perfectly straight, final scraped and ready for fitting each frame slot. The Parts 19/65 subassemblies are glued up but not yet beveled. I have glued up 30 frames and just now I have begun the laborious process of "tuning" each individual frame. My steps in that seem to be: 1) dry fitting each frame to its own slot in both the keel and keelson by judicious filing of every mating face not only in the frame slots but in keel and keelson slots as well. (a lot of delicate filing of maybe some 200 slots). and 2) hand sanding the outer and inner faces of each frame to get it roughly conforming with the laser etched lines. I believe I'm pretty sure that I do not want to go through all of this slot filing after I have already hard-glued any combination of assembly fixture/frame(s)/keel.

I haven't yet sanded the bottom/front of the keel/stem sandwich. I will get that accomplished before going to work on the stern overhang. I also believe I will add the keel shoe as I see Peter has done.

Note three bottles of glue there plus a small one of super. I do not like the Gorilla at all. The Elmers is just household GLUE ALL and while it's OK, it ain't like my favorite Elmers Carpenter which I can't find right now. The third there is Titebond Original Wood which of these three, is my preferred. Meanwhile I'll keep looking for the Elmers Carpenter in some appropriate benchtop quantity packaging (not the damn gallon size which I have seen!)
alf in Iowa
View attachment 333575
Nice to see this picture with the steps you made, Alf. The keel, keelson and some frames. A lot of work to do with removing all that char. What I read: you take your time for the bevels on the frames. The results will follow.
Regards, Peter
 
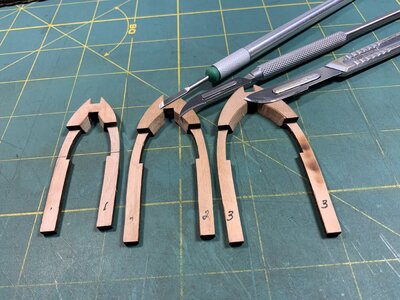
Just a quickie here to mention a technique that just seemed to happen unplanned.

Carving at least the frame inboard bevels. I began by filing but soon found I was spending more time cleaning the chaff from the file teeth than I was actually filing. I picked up a mini diagonal chisel blade and did some draw carving. Hey! that removes a lot of material at a time and is very controllable.

Even though I've never been a whittler I did quickly pick up on this or at least as much as I need for doing this job. I'll have to see how it goes as the frames get up in numbers with their wider stance and thinner cross section percentage (flimsier, more prone to breaking).
alf in Iowa
B7B14062-07CB-483C-8EEE-3ACC8778B60F.jpeg
 
Nice progress you're showing, Alf and yes, it's an awful lot of sanding, filing and fitting.
Unfortunately very essential, but rewarding in the long run.
As far as adhesives go, I am using a water-soluble adhesive, I don't think it's available in the US, Bison D2. It saved me on a couple of occasions.

View attachment 333584
What a glue - Bison D2 is the number!
 
I wish I had thought ahead about fitting the lap joint notches of each frame to its corresponding one in the keel and keelson. I would have done all that fitting to just the lower subassembly of each frame before finishing out each frame with the rather spindly uppers. Lotta chances of frame breakage during all that fitting filing.
5728F6A7-0896-4A2D-9A4C-0103A458FA23.jpeg
 
Just a quickie here to mention a technique that just seemed to happen unplanned.

Carving at least the frame inboard bevels. I began by filing but soon found I was spending more time cleaning the chaff from the file teeth than I was actually filing. I picked up a mini diagonal chisel blade and did some draw carving. Hey! that removes a lot of material at a time and is very controllable.

Even though I've never been a whittler I did quickly pick up on this or at least as much as I need for doing this job. I'll have to see how it goes as the frames get up in numbers with their wider stance and thinner cross section percentage (flimsier, more prone to breaking).
alf in Iowa
View attachment 333643
I wish I had thought ahead about fitting the lap joint notches of each frame to its corresponding one in the keel and keelson. I would have done all that fitting to just the lower subassembly of each frame before finishing out each frame with the rather spindly uppers. Lotta chances of frame breakage during all that fitting filing.
View attachment 334530
At some point, the same ideas often come up. 'Somewhere' in one of the build logs it must have shown ..... but which ..... so many pages ..... ;)
But preventing 'breaking spindly uppers' is well thought out.
With a nice view on your shipyard, Alf. :)
Regards, Peter
 
I wish I had thought ahead about fitting the lap joint notches of each frame to its corresponding one in the keel and keelson. I would have done all that fitting to just the lower subassembly of each frame before finishing out each frame with the rather spindly uppers. Lotta chances of frame breakage during all that fitting filing.
View attachment 334530
I think that after a number of frames I started doing the same, first ensuring the frames matched the keel and keelsons, then followed by further frame assembly.
Nevertheless, a member of the BFC you will be, the delicate upper frame parts will make sure of that.
 
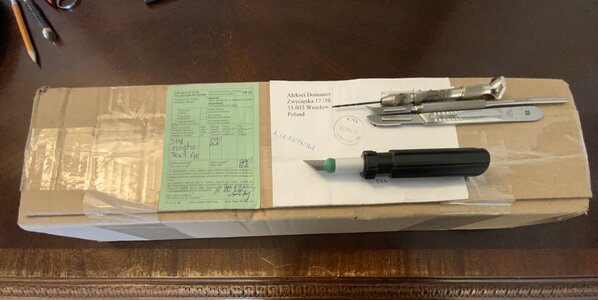
Ach du leiber! This ain't like tying flies.
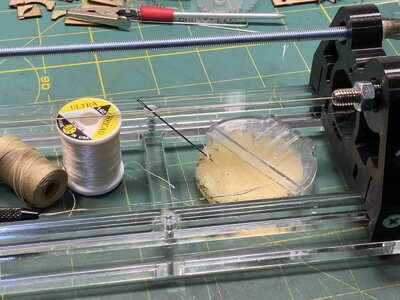
Today I tried a test run of the server I got from Poland. The "rope" I used was a junker roll of what Revell packed in their 1994 iteration of AMERICA, and the serving "rope" I used was a white (I'd hoped for old-guy poor vision visibility reasons) pretty fine fly tying thread. Both bees waxed before using.

Well aside from the apparent poor choice of materials, there is the matter of the aspiring craftsman's technique . . . yeah, I definitely gots some learning to do there! :rolleyes: (You have to focus hard at the rope line just above the wax cake)
CE4AC321-F89A-43CD-9A6C-4C42C7485154.jpegFBCCEBE5-0995-4233-BAF2-0118A0DA2D13.jpeg
 
Ach du leiber! This ain't like tying flies.
Today I tried a test run of the server I got from Poland. The "rope" I used was a junker roll of what Revell packed in their 1994 iteration of AMERICA, and the serving "rope" I used was a white (I'd hoped for old-guy poor vision visibility reasons) pretty fine fly tying thread. Both bees waxed before using.

Well aside from the apparent poor choice of materials, there is the matter of the aspiring craftsman's technique . . . yeah, I definitely gots some learning to do there! :rolleyes: (You have to focus hard at the rope line just above the wax cake)
View attachment 336643View attachment 336644
A nice looking machine, Alf.
Regards, Peter
 
Ach du leiber! This ain't like tying flies.
Today I tried a test run of the server I got from Poland. The "rope" I used was a junker roll of what Revell packed in their 1994 iteration of AMERICA, and the serving "rope" I used was a white (I'd hoped for old-guy poor vision visibility reasons) pretty fine fly tying thread. Both bees waxed before using.

Well aside from the apparent poor choice of materials, there is the matter of the aspiring craftsman's technique . . . yeah, I definitely gots some learning to do there! :rolleyes: (You have to focus hard at the rope line just above the wax cake)
View attachment 336643View attachment 336644
Impressive. Can wait to see those self-made ropes on your Bluenose.
 
Hi Kurt. When it is pure for the calculation from Imperial to Metric, then I use this site with many kinds of calculation tables.
This one is very handsome:

Here I posted a short manual:

Regards, Peter
Google has a great conversion ability. Anything to anything :)
 
Well it's been maybe three weeks with really nothing to post that hasn't been already well covered maybe by even several logs. Frames, damned frames. I find myself subconsciously grasping for things to do which don't involve carving and sanding frames.

Reading or more succinctly studying photos, in the other previous and current logs makes for pleasant and enlightening activity. Striving to develop my own block stropping methodology is more complex than I knew. The prototype BN apparently was fully rigged with internally stropped blocks; I am not planning to attempt that. I will be doing external, either rope or wire and likely both.

That backs me into a personal corner: I am a Prototype Modeler, that is in my psyche. I model a prototype to the best that my skill level permits. If I were to build internally stropped blocks, even shitty ones, for me that would be prototype modeling of the BN. If I don't even attempt using internally stropped blocks, no matter how well I model external stropping then to me I'm no longer modeling BN but rather I'm freelancing a rather handsome gaff rigged fisher/yacht schooner along the lines of BN 1921.

Now don't everybody reflexively jump up, spilling your drinks and possibly injuring your manhoods with the bottoms of your computer desktops, stay calm. This is just _my_ approach to modeling. It evolved over more than 70 years of modeling, planes, trains, military, automotive, maritime, structures, whatever; it is what it is and I'm stuck with it. It has nothing to do with any other modeler's work anywhere on earth anytime, ever.

Anyway to cut this short, my BN model may very likely not carry a ship's name for the above reason.

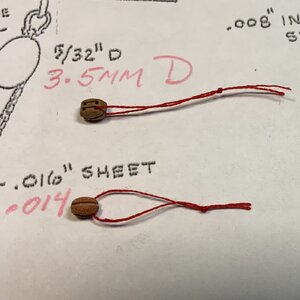
Now for a piccy: Here's how I manage to very seldom if ever, lose a tiny part. The red thread is easy to spot on the carpet or under extraneous junk on the workbench. Maybe for 50 years or more I have always kept a spool of red thread on my benchtop.66447DB9-17C2-4FD8-B4D6-26ECC40D81F9.jpeg
alf in Iowa
 
That backs me into a personal corner: I am a Prototype Modeler, that is in my psyche. I model a prototype to the best that my skill level permits. If I were to build internally stropped blocks, even shitty ones, for me that would be prototype modeling of the BN. If I don't even attempt using internally stropped blocks, no matter how well I model external stropping then to me I'm no longer modeling BN but rather I'm freelancing a rather handsome gaff rigged fisher/yacht schooner along the lines of BN 1921.
Good morning, Alf
Wow, you've got it bad! This is the first time ever I read about internal stropped blocks; I had to look up to understand what you're talking about. Never too old to learn something new. :cool:
When looking at the size of the blocks, coming with the kit, I fail to see how one ever will be able to apply internal stopping. Personally, I won't even attempt going there.
Without heavy modding the kit, it's impossible to "model BN"; the time I spent here on SOS ánd building the model has shown me that I am building something that resembles the BN and you know what? I'm perfectly fine with that.
But now I'm shifting a bit forward on my seat, eagerly anticipating your coming updates...
Kind regards,
Johan
 
Last edited:
Well it's been maybe three weeks with really nothing to post that hasn't been already well covered maybe by even several logs. Frames, damned frames. I find myself subconsciously grasping for things to do which don't involve carving and sanding frames.

Reading or more succinctly studying photos, in the other previous and current logs makes for pleasant and enlightening activity. Striving to develop my own block stropping methodology is more complex than I knew. The prototype BN apparently was fully rigged with internally stropped blocks; I am not planning to attempt that. I will be doing external, either rope or wire and likely both.

That backs me into a personal corner: I am a Prototype Modeler, that is in my psyche. I model a prototype to the best that my skill level permits. If I were to build internally stropped blocks, even shitty ones, for me that would be prototype modeling of the BN. If I don't even attempt using internally stropped blocks, no matter how well I model external stropping then to me I'm no longer modeling BN but rather I'm freelancing a rather handsome gaff rigged fisher/yacht schooner along the lines of BN 1921.

Now don't everybody reflexively jump up, spilling your drinks and possibly injuring your manhoods with the bottoms of your computer desktops, stay calm. This is just _my_ approach to modeling. It evolved over more than 70 years of modeling, planes, trains, military, automotive, maritime, structures, whatever; it is what it is and I'm stuck with it. It has nothing to do with any other modeler's work anywhere on earth anytime, ever.

Anyway to cut this short, my BN model may very likely not carry a ship's name for the above reason.

Now for a piccy: Here's how I manage to very seldom if ever, lose a tiny part. The red thread is easy to spot on the carpet or under extraneous junk on the workbench. Maybe for 50 years or more I have always kept a spool of red thread on my benchtop.View attachment 341874
alf in Iowa
Hi Alf. A good idea with the red thread. But what to do if the small block jumps away during the application of the red thread? ;)

I had also in mind to use those 'internal stropped block's'. Not to made them myself. I found this on the internet:
Perhaps the manual give you a hunch:
But the smallest was only 5mm / 3/16".
And I suppose strapped is the same as stropped? Looking forward to see what you can make.

It's almost the same with the ratlines. They where set between the shroud with on both ends with a lash eye splice. I saw that on the pictures and the MS drawing, so I had to make an attempt! But the outcome, even with the tiny Serafil, was to big to make it representative in 1:72.
But I know very well what's going on in your mind.:) And maybe you also have an idea about that and you will succeed.
Regards, Peter
 
Last edited:
Hi Alf. A good idea with the red thread. But what to do if the small block jumps away during the application of the red thread? ;)

I had also in mind to use those 'internal stropped block's'. Not to made them myself. I found this on the internet:
Perhaps the manual give you a hunch:
But the smallest was only 5mm / 3/16".
And I suppose strapped is the same as stropped? Looking forward to see what you can make.

It's almost the same with the ratlines. They where set between the shroud with on both ends with a lash eye splice. I saw that on the pictures and the MS drawing, so I had to make an attempt! But the outcome, even with the tiny Serafil, was to big to make it representative in 1:72.
But I know very well what's going on in your mind.:) And maybe you also have an idea about that and you will succeed.
Regards, Peter
Peter, I saw those Syren Company internal blocks and just like you, saw they were all too large for 1/72 scale.

Personally I can't imagine me even attempting to go the internal strap route. No, my blocks will be limited to stropping with rope and wire.
 
Hi Alf. A good idea with the red thread. But what to do if the small block jumps away during the application of the red thread
When working with "eentsie-weentzies" I always wear an old kitchen apron that is tucked into a cross piece under the desk above my legs. Normally the apron hangs over the top of the room door and only comes down for the micro parts.
 
When working with "eentsie-weentzies" I always wear an old kitchen apron that is tucked into a cross piece under the desk above my legs. Normally the apron hangs over the top of the room door and only comes down for the micro parts.
That also my approach!
Too much information... ROTF
 
Back
Top