Performmax 9 inch bench band saw, can I adjust the guides on my band saw the instructions have a section on it. THANKS LOADS Don
-

Win a Free Custom Engraved Brass Coin!!!
As a way to introduce our brass coins to the community, we will raffle off a free coin during the month of August. Follow link ABOVE for instructions for entering.
-

PRE-ORDER SHIPS IN SCALE TODAY!
The beloved Ships in Scale Magazine is back and charting a new course for 2026!
Discover new skills, new techniques, and new inspirations in every issue.
NOTE THAT OUR FIRST ISSUE WILL BE JAN/FEB 2026
You are using an out of date browser. It may not display this or other websites correctly.
You should upgrade or use an alternative browser.
You should upgrade or use an alternative browser.
Bomb vessel cross section - scale 3/8 or 1:32
- Thread starter Dave Stevens (Lumberyard)
- Start date
- Watchers 16
DAVE CHECK YOUR PMs, some information on the Hahn archives. THANKS Don
- Joined
- Dec 1, 2016
- Messages
- 6,383
- Points
- 728

Performmax 9 inch bench band saw, can I adjust the guides on my band saw the instructions have a section on it. THANKS LOADS Don
try this your saw will take up to a 1/2 wide blade this is best for resawing but you can not cut tight curvers. cool blocks can ride against the blade and holds the blade in place.
you need to ask proformax if they or anyone makes roller bearings for their 9 inch saw.
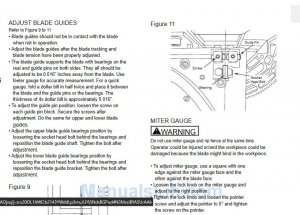
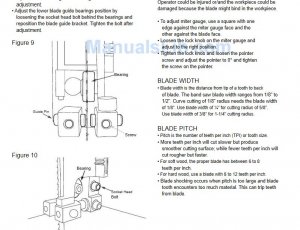
THANK YOU SO MUCH DAVE, I know you are swamped> THANKS SO MUCH Don
- Joined
- Dec 1, 2016
- Messages
- 6,383
- Points
- 728

when the first section was stacked I checked the last frame to make sure I was still square to the keel.
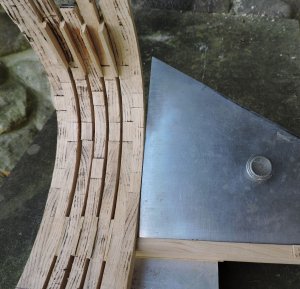
then I checked to make sure I was still at 90 degrees to the keel and the top of the frames is dead on the mark.
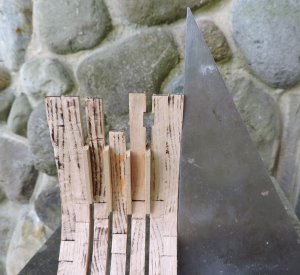
now I will move on to section 2 which are frames 4 a double frame then 5,6,7 single frames.
back when I was stacking frames starting with D and stacking C, B, A and midship the frames were getting slightly wider. so I was watching the space from frame to frame on the inside. Now that I am past the midship the frames will begin to get narrower and narrower so now I will watch the space on the outside of frames to frame.

then I checked to make sure I was still at 90 degrees to the keel and the top of the frames is dead on the mark.

now I will move on to section 2 which are frames 4 a double frame then 5,6,7 single frames.
back when I was stacking frames starting with D and stacking C, B, A and midship the frames were getting slightly wider. so I was watching the space from frame to frame on the inside. Now that I am past the midship the frames will begin to get narrower and narrower so now I will watch the space on the outside of frames to frame.
Last edited:
- Joined
- Dec 1, 2016
- Messages
- 6,383
- Points
- 728

the only mishap I had was dropping frame 3 and breaking it. That was no big deal because I just reassembled it right on the top of frame 2.
The problem can be avoided by using a wood glue rather than a super glue and pegging the chocks in place. Another advantage to a different glue and pegging the chocks is the frames are stronger as a unit. This gives you a little flexibility to pull the tops of the frame outward or push them inward to line up with the frame under it. There is enough flex in the frames and I could bend the frames even with the brittle super glue and no pegs.
So if the building of each frame is not dead on the drawing it's no big problem because you can bend the frames to fit the hull,
Last edited:
Good progress, Dave! Interesting witching the chocked frames come to life.
Dave is the kit going to have a jig. Don
- Joined
- Dec 1, 2016
- Messages
- 6,383
- Points
- 728

I would still use Super Glue to assemble the hull because it grabs in 30 seconds and there is no need to figure out how to clamp the frame in the exact spot while a slow drying glue sets. Besides the strength of the hull will be provided by the clamps, wales and planking, so for those I would switch to a wood glue.
- Joined
- Dec 1, 2016
- Messages
- 6,383
- Points
- 728

Dave is the kit going to have a jig. Don
to my knowledge there will be no kit, however the bomb ketch project may be offered à la carte to members of the forum.
Oh did not know that, was under the assuption it was going to be a kit. Don
- Joined
- Dec 1, 2016
- Messages
- 6,383
- Points
- 728

Oh did not know that, was under the assuption it was going to be a kit. Don
I did not want to call it a "kit" because that implies your getting a prefab, predesigned bunch of parts in a box. à la carte means you design the kit or no kit from available list of stuff.
for example
just plans
just sheet stock or laser cut frames
milled or not milled wood
a jig or no jig you design your own kit or go totally scratch
NOW DAVE MY GOOD FRIEND THAT IS THE WAY TO GO, always ahead of the game. Don PS check wit Ev sent her an email. Don
- Joined
- Dec 1, 2016
- Messages
- 6,383
- Points
- 728

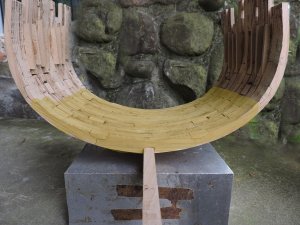
another check of the hull is how accurate are the actual frame shapes lining up.
lets first look at the floors lookin' good to me this tells me there is no twist to the hull
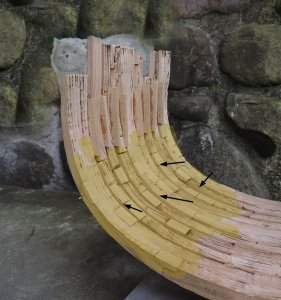
looking at the turn of the bildge you can see by the black arrows there are high and low spots from frame to frame. I figured that into the design and offset the laser cut .035 inside and out to compensate for frame assembly and setting up the frames in the hull and the fact I rushed the frame sanding and was not all that careful.
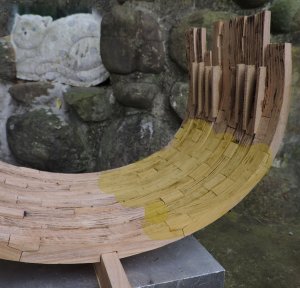
with just a sanding block I gave the frames a rough sanding and they all smoothed out from frame to frame with material to spare.
lets first look at the floors lookin' good to me this tells me there is no twist to the hull

looking at the turn of the bildge you can see by the black arrows there are high and low spots from frame to frame. I figured that into the design and offset the laser cut .035 inside and out to compensate for frame assembly and setting up the frames in the hull and the fact I rushed the frame sanding and was not all that careful.

with just a sanding block I gave the frames a rough sanding and they all smoothed out from frame to frame with material to spare.

- Joined
- Dec 1, 2016
- Messages
- 6,383
- Points
- 728

I have now finished the hull. It went quite well the frames lined up without any major issues, there were a few places where the frames were not exactly in line but nothing a sanding block could not straighten out. Using spacers made a very solid and strong hull as a matter of fact you can set the hull on end and stand on it.
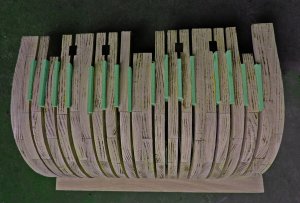
looking down the inside of the hull all the frames line up pretty good. Now i will sand down the spacers even with the frames. I did use a softer material for the spacers than the frames because i wanted a fast and easy sanding job and also i did not want to sand into the frames while sanding the spacers.
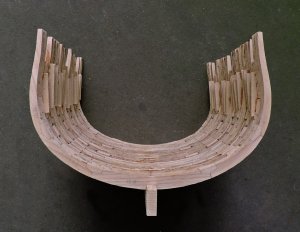

looking down the inside of the hull all the frames line up pretty good. Now i will sand down the spacers even with the frames. I did use a softer material for the spacers than the frames because i wanted a fast and easy sanding job and also i did not want to sand into the frames while sanding the spacers.

- Joined
- Dec 1, 2016
- Messages
- 6,383
- Points
- 728

At one time the Hahn jig method was all the rage among model ship builders. Then it fell out favor because some builders felt it used to much material and ships were not built upside down. The next craze in model ship building was to build the model like a real ship which was keel first and erect each frame. That proved to be very difficult keeping all the frames in line. Then there is the gantry system and the idea of placing the hull down into a jig. All in all each method does work and it comes down to the preference of the builder. As far as the stacking method I used here seemed to work just fine and it was simple and easy to do. What about stacking frames for a full hull from stem to stern, you can't stack a hull with the stem or stern sitting on a flat surface.
I did stack a hull one time doing it in sections
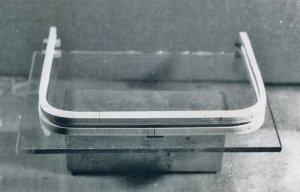
I started by stacking 2 frames with spacers on a pieces of glass.
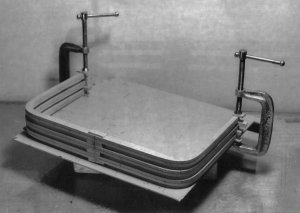
then I continued to stack spacers and frames
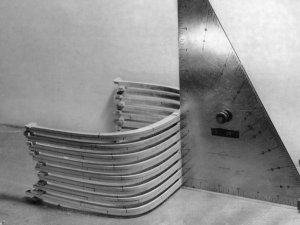
I would continue to stack until I had a section of the hull complete
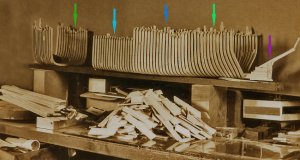
the hull was large measuring around 42 inches so I build stacked sections making sure each section was square and even. The I lined up each section along the keel and added the missing frames between the sections.
I did stack a hull one time doing it in sections

I started by stacking 2 frames with spacers on a pieces of glass.

then I continued to stack spacers and frames

I would continue to stack until I had a section of the hull complete

the hull was large measuring around 42 inches so I build stacked sections making sure each section was square and even. The I lined up each section along the keel and added the missing frames between the sections.
Last edited:
Hi Dave, It looks like stacking would be my best bet, the only thing i would be worried about is side to side movement i guess you could solve that by using some battenens, i have a perfectly flat table can that be used instead of glass. THANKS AGAIN Don
- Joined
- Dec 1, 2016
- Messages
- 6,383
- Points
- 728

I let the hull sit for a day just to let the glue set. The container did say 30 seconds grab time and 24 hours for a complete cure of the glue. Once again with a home made sanding disk on my Dremel tool i sanded the spacers even with the frames. This is a job i would recommend doing out doors. As you can see sanding the hull does produce a lot of dust. i suppose you could hold a vacuum nozzle close to the work and suck up the dust as you work. This kind of sanding would over whelm even the best room size air filtration. Sanding the MDF board produced a very fine power that stuck to everything. The larger disk with a 40 grit did a fast job of grinding down the spacers.
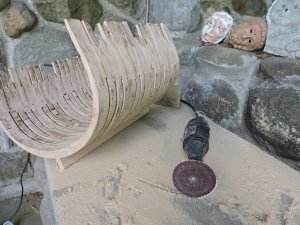
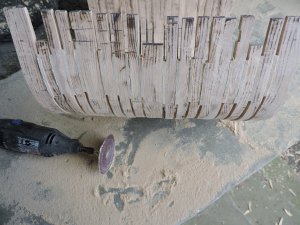
Once i got the spacers down to the frames i did continue a little more and evened out the frames so the side of the hull was even from frame to frame. you got to be careful because 40 grit cuts real fast.
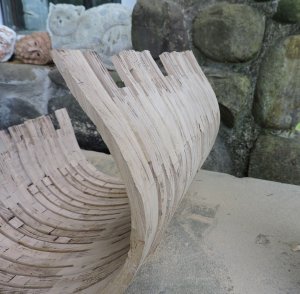
i did the same thing inside and outside of the hull
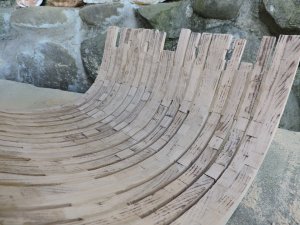
i also went down the center of the floors to make sure i have a flat surface to set the keelson on.
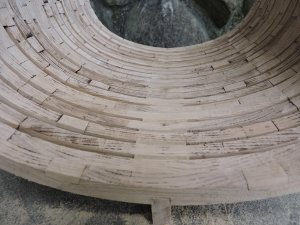
If I were to be building a "finished" model I would swap out the 40 grit for a finer sandpaper and sand any left over char and give the frames more of a finished surface. But to save time and effort on the build I will skip this and move on. Most of the frames will be covered by planking so no need for a finish sanding.


Once i got the spacers down to the frames i did continue a little more and evened out the frames so the side of the hull was even from frame to frame. you got to be careful because 40 grit cuts real fast.

i did the same thing inside and outside of the hull

i also went down the center of the floors to make sure i have a flat surface to set the keelson on.

If I were to be building a "finished" model I would swap out the 40 grit for a finer sandpaper and sand any left over char and give the frames more of a finished surface. But to save time and effort on the build I will skip this and move on. Most of the frames will be covered by planking so no need for a finish sanding.
Last edited:
OH Dave I sure know about dust, and I MEAN DUST, if you read one of my threads you can see what happened to me, by the grace of GOD know glacoma or type 2 diabets damage but do have a problem and i hope using the drops and other perscriptions that the eye doctor perscribed it will get better, it took me almost a full day to wipe down everything and ordered a Wen air infiltration machine, witch comes in on wensday this is the reason no work is being done on THE MATTHEW, can not work outdoors due to the BEAUTIFUL WEATHER HERE IN KANSAS 10 days of heavy rains and TORNADO WATCHES< hope it clears up soon and i agree it has to be outside even with the WEN MACHINE, witch had very good reviws. AGAIN DAVE THANKS FOR ALL THE HELP FROM YOU AND EV. Don PS CHECK YOUR PMs in about an hour from now
- Joined
- Dec 1, 2016
- Messages
- 6,383
- Points
- 728

up to this point the frames were built from laser cut parts the idea for this project is to offer the build custom made for the builder. If you do not have the tools such as a scroll saw and drum sander to cut your own frames as Mike did here
then you can purchase a set of laser cut frames.
if you have the tools but no way to mill out the sheet stock needed, that is no problem you can purchase just sheet stock in any wood you choose.
To build this hull I did use a drum sander and a 4 inch disk sander, however if you do not have either of these you can use a tool such as a Dremel with home made disks. The hull can be built and finished with a minimal of tools.
HMS Ontario 1780 Cross Section scale 1:32 1.0(Version 1)
Like this area of the Euralysus
shipsofscale.com
then you can purchase a set of laser cut frames.
if you have the tools but no way to mill out the sheet stock needed, that is no problem you can purchase just sheet stock in any wood you choose.
To build this hull I did use a drum sander and a 4 inch disk sander, however if you do not have either of these you can use a tool such as a Dremel with home made disks. The hull can be built and finished with a minimal of tools.
Last edited:

