Build Log: Harvey 1847 (Artesania Latina)

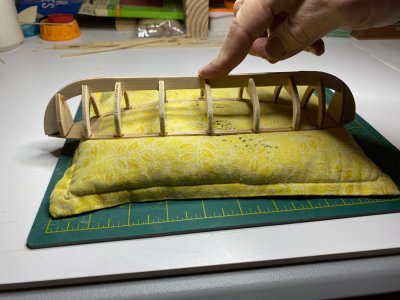
I've using a rice-filled bean bag - typically used as a "hot bag" for stiff neck (e.g. pop it into the microwave for 60 seconds and it comes out hot to place on the back of your neck) - to prop my Harvey 1847 on while I work on it. I decided the other day to start on the little Morgan Whaleboat I picked up at a flea market for $10 a few years ago. (This after I watched a really good movie by Ron Howard called "In the Heart of the Sea" - a movie about a whaling crew/ship and the disasters that befell them) I found a new used for the bag.
I needed to attach a fake deck to the ribs - which have a compound angle to them. After considering it for a few minutes, I turned the keel/ribs upside down and pressed it into the mould-able bean bag on top of the fake deck. The bean bag allowed the fake deck to bend and conform to the shape of the ribs. On the bottom of the fake deck I marked the locations where the ribs touch the deck, applied a few drops of CA Titebond to the deck, pressed the keel/ribs down - aligning the ribs to the marks - and 60 seconds later it was fast.
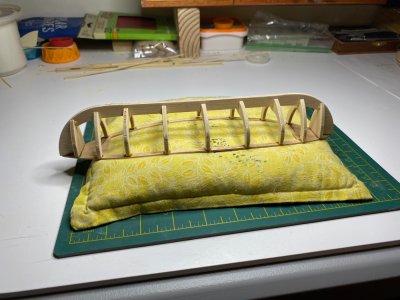
Bean Bag A.jpg

Bean Bag B.jpg
 
I'm making headway. I'm finishing up laying down the base plank layer (yes, I'm a rookie, so need to go with a double planking). There's a few more pieces to patch in, and then some wood filler and a whole heck of a lot of sanding to make it smooth and flowing from stem to stern. This process has been fun. I've enjoyed learning as I go. I realize that I should've done some thing much different during this stage and I'll pay for it as I go along. I'm not sure when I'll lay down the final planking on the hull, but I'm already thinking about the need to lay it out in great detail. Of course, that begs the question: How do I do that on an initial layer of planking?
I'll look to see if this question has been asked/answered in the forum. If nothing of substance there, I'll start a new thread.

2.2.2025_a.jpg

2.2.2025_b.jpg
 
I'm making headway. I'm finishing up laying down the base plank layer (yes, I'm a rookie, so need to go with a double planking). There's a few more pieces to patch in, and then some wood filler and a whole heck of a lot of sanding to make it smooth and flowing from stem to stern. This process has been fun. I've enjoyed learning as I go. I realize that I should've done some thing much different during this stage and I'll pay for it as I go along. I'm not sure when I'll lay down the final planking on the hull, but I'm already thinking about the need to lay it out in great detail. Of course, that begs the question: How do I do that on an initial layer of planking?
I'll look to see if this question has been asked/answered in the forum. If nothing of substance there, I'll start a new thread.

View attachment 499122

View attachment 499123
BTW, the plans on the table top are for a whaleboat kit I got for a great price last year at a garage sail. I'm working on both of them at the same time.
 
Update: I finished the base plank step, sanded, filled the gaps, and sanded some more. It's a bit rough, but I realize that the final layer goes on top of this layer.
Now, after 1.3 years, I'm picking up the instructions to find out what the next step is.

We're moving at glacial speed!!

2.23.2025.b.jpg

2.23.2025_c.jpg

2.23.22025_a.jpg
 
Wow, I feel like such a Noob after reading all of the remarks and tips on this thread. . to be quite honest I am very new to this awesome hobby. I always wanted to build an all wooden ship with great detail, and well one day not too long ago I just so happened to see on an app/site for buying/selling (Marketplace via Facebook) someone had posted their Artesania Latina "Harvey" 1.847 for sale at a very reasonable price, and well I saw my golden moment and took it, even though the kit had been previously opened and started by someone else (whomever that was didn't put the pieces they had began to assemble with the rest of the kit) I took a chance that I am now semi-regretting yet the enjoyment I'm getting while constricting this ship certainly trumps the added degree of difficulty and complications arising from previous owner issues. To sum.it up shortly, the kit was missing all of the main parts of the framework of hull, and I'm thinking there are also a few pages of build instructions missing and quite possibly
some pictures of various things that I bet would prove useful to this noob.
So needless to say I am truly winging it here, am definitely green in this hobby, a bit wet behind the ears as they say. . But thank God I am crafty enough to use my head and apply the skill sets I have to make this build not a nightmare and waste of time and money no... But a very enjoyable experience and all around fun!
 
Back
Top