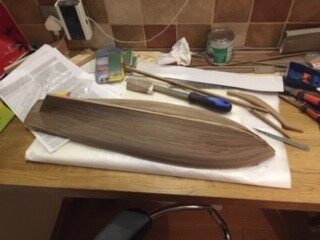
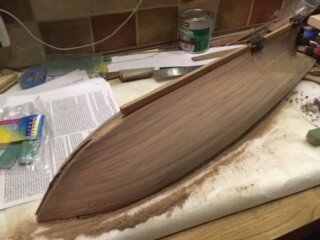
Great to have you back, Stu! 
-

Win a Free Custom Engraved Brass Coin!!!
As a way to introduce our brass coins to the community, we will raffle off a free coin during the month of August. Follow link ABOVE for instructions for entering.
-

PRE-ORDER SHIPS IN SCALE TODAY!
The beloved Ships in Scale Magazine is back and charting a new course for 2026!
Discover new skills, new techniques, and new inspirations in every issue.
NOTE THAT OUR FIRST ISSUE WILL BE JAN/FEB 2026
You are using an out of date browser. It may not display this or other websites correctly.
You should upgrade or use an alternative browser.
You should upgrade or use an alternative browser.
Harvey (Artesania Latina Kit circa 1990's)
- Thread starter Stu Jessop
- Start date
- Watchers 10
Water for the buckets Stu, buckets were for swabbing out the cannons  Perhaps some clear bathroom caulk with a blue-ish painted bottom of the bucket?
You are on a good way with you Harvey.
I have a small hint and comment if it is allowed.....
Due to the fact, that you installed the guns already completely, I interpret this, that you do not want to blacken the muzzles and will keep them in the brass color.
What I would is maybe to color the trunnion cap / cap square in black
I marked this part with the red arrows - on original carriages it was much shorter and bended, in order to take over the round trunnions of the muzzle. Here the detail of the kit is (let us say in this way) incorrect
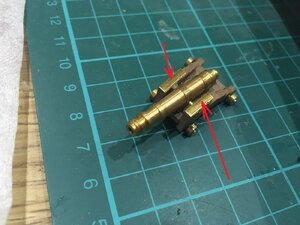
a gun and carriage was looking like this
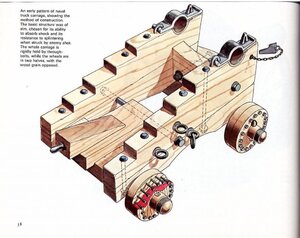
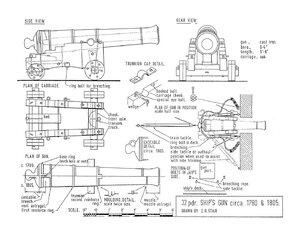
with some paintwork the wrong form of the caps will be not so prominent
I have a small hint and comment if it is allowed.....
Due to the fact, that you installed the guns already completely, I interpret this, that you do not want to blacken the muzzles and will keep them in the brass color.
What I would is maybe to color the trunnion cap / cap square in black
I marked this part with the red arrows - on original carriages it was much shorter and bended, in order to take over the round trunnions of the muzzle. Here the detail of the kit is (let us say in this way) incorrect

a gun and carriage was looking like this


with some paintwork the wrong form of the caps will be not so prominent
You are on a good way with you Harvey.
I have a small hint and comment if it is allowed.....
Due to the fact, that you installed the guns already completely, I interpret this, that you do not want to blacken the muzzles and will keep them in the brass color.
What I would is maybe to color the trunnion cap / cap square in black
I marked this part with the red arrows - on original carriages it was much shorter and bended, in order to take over the round trunnions of the muzzle. Here the detail of the kit is (let us say in this way) incorrect
with some paintwork the wrong form of the caps will be not so prominent
Thanks Uwek! That's really helpful actually. I can easily sort that out and remove the trunnion caps. I wasn't aware that they looked like that so really good to see the images. I will sort it out and let you have a pic once it's done. My OCD will never let that go once I know it's wrong
I must admit I just assumed that Harvey's guns were small enough to have been cast in bronze as opposed to iron. I guess not so painting would be sense. All these things to think about before putting them all together. Anyway given I'll be taking the caps off anyway, it will be simple to paint the guns. I'm assuming I paint them? As opposed to some other method of blackening?
Hmmm I do seem to recall that now actually... Been too long since I read any Hornblower clearly!Water for the buckets Stu, buckets were for swabbing out the cannonsPerhaps some clear bathroom caulk with a blue-ish painted bottom of the bucket?
Good, that you try to improve them - you will realize the difference afterwards.Thanks Uwek! That's really helpful actually. I can easily sort that out and remove the trunnion caps. I wasn't aware that they looked like that so really good to see the images. I will sort it out and let you have a pic once it's done. My OCD will never let that go once I know it's wrong
I must admit I just assumed that Harvey's guns were small enough to have been cast in bronze as opposed to iron. I guess not so painting would be sense. All these things to think about before putting them all together. Anyway given I'll be taking the caps off anyway, it will be simple to paint the guns. I'm assuming I paint them? As opposed to some other method of blackening?
Blackening: often modelers are painting such metal parts like the muzzles, caps etc.. When they are made out of brass often these parts are blackened on a chemical way......
a relative good overview of the possible stuff you can find in this thread:
Brass photo-etchs treatment for blackening
Hi all What treatment(s) do you do to your kit brass photo-etch parts for blackening ? I think they are cover with "something" to protect the brass for years to come. The blackening chemicals i tried are not working directly on them. I tried Acetone and then a soft sanding before blackening...
shipsofscale.com
BTW: The wheels of naval gun carriages were made out of wood, so maybe you will treat them also
BTW2: There are a modelers, who like the appearance of the shiny brass, and do not like to blacken them - although it is technically not correct
-> a pure question of taste.....
45 Hours in Total
Well Uwek I've been working on the guns again this week and this is where I've ended up. Thanks so much for pointing out where I'd gone wrong.
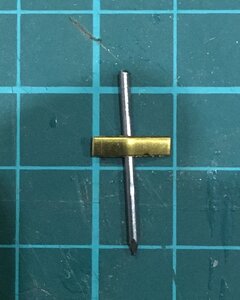
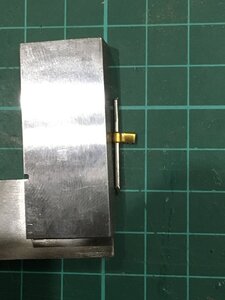
I first had to bend the Trunnion caps so I used a nail and my small square with a steel rule to get that right as below.
Initial bend to find centre and just ensure the brass doesn't move.
Then getting the "crimp" into the brass and making sure I get a nice edge on it using the small square on one side and steel rule on the other.
This got me a reasonable result with the trunnion caps
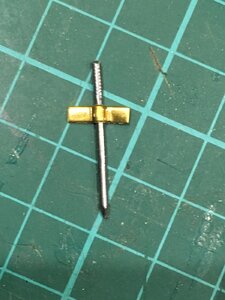
Then just making sure they were flat and taking the edges off
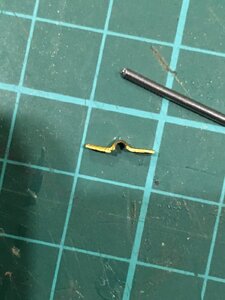
I decided to paint the brass rather than etch it. I must admit trying to get all of that kit going for a few bits of brass seemed a bit too much for me . Anyway I have had reasonable success with the paint and I'm happy with the way they've turned out. Just need some final finishing - shortening a few bits and some filing with a last touch of point to cover any spots and I'm there I think.
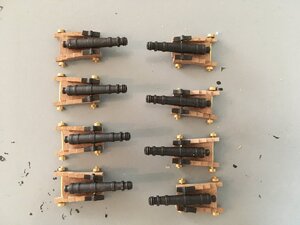
I am going to leave the wheels brass as buying the right paint to get them wooden would mean I've got a lot of brown paint left over. Maybe next time!
I'll post a completed gun when I'm done and they are "bang on"
Good, that you try to improve them - you will realize the difference afterwards.
Well Uwek I've been working on the guns again this week and this is where I've ended up. Thanks so much for pointing out where I'd gone wrong.
I first had to bend the Trunnion caps so I used a nail and my small square with a steel rule to get that right as below.
Initial bend to find centre and just ensure the brass doesn't move.

Then getting the "crimp" into the brass and making sure I get a nice edge on it using the small square on one side and steel rule on the other.

This got me a reasonable result with the trunnion caps

Then just making sure they were flat and taking the edges off

I decided to paint the brass rather than etch it. I must admit trying to get all of that kit going for a few bits of brass seemed a bit too much for me

I am going to leave the wheels brass as buying the right paint to get them wooden would mean I've got a lot of brown paint left over. Maybe next time!
I'll post a completed gun when I'm done and they are "bang on"
And a quick update on the hull too. I managed to insert a drop plank which I'm pretty happy with. Bit of a fuss to get it right but I enjoyed it, made logical sense and Harvey is really about teaching me the basics so I wanted to get this right.
Doing ok with the rest so far. Need to start on the garboard plank now and work my way up from there I believe.
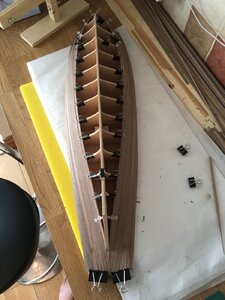
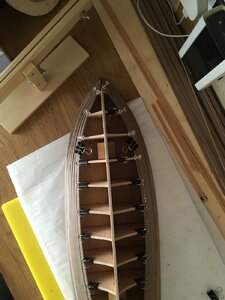
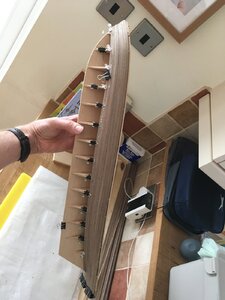
Doing ok with the rest so far. Need to start on the garboard plank now and work my way up from there I believe.


And then for those interested in the deck I'm trying all sorts of options. I've had to use incredibly thin deck planks at 0.5mm and I thought they would be too thin to stick the cartridge paper to so I laid the planks, glued the edge, lined up a strip of the paper and then glued the next plank in behind and butted it up against the paper and the adjoining plank. This method has worked but when I cut the paper off it leaves it quite rough. I'm told that when I'm done I need to then varnish and sand and that will leave me with very fine lines between the planks. I made the mistake of sanding the first two planks and it did leave a nice finish. Looks rough at the moment though!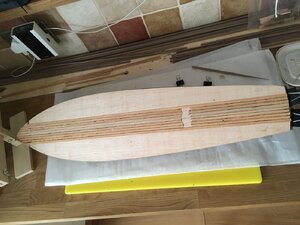
I have also now switched to gluing the edge of the 0.5mm strips and butting the paper up against them before gluing to the deck. Hopefully this will give me a cleaner edge to begin with. Will let you know!

I have also now switched to gluing the edge of the 0.5mm strips and butting the paper up against them before gluing to the deck. Hopefully this will give me a cleaner edge to begin with. Will let you know!
50 Hours so far
Morning all
Been a busy few weeks at work so not managed to get as much done as I would have liked but we are slowly getting there. A few planks a day and the deck has come on reasonably well too.
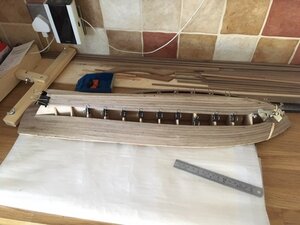
I've started to work from the garboard strake up now and that is going quite well. Gap across most of the bulkheads is exactly the same with just some significant narrowing at the stem obviously. I'm still taking 2mm off each strake to make sure I don't crowd up too much. Should fit well though - easier to see now that there are only a few strakes left. The edge setting on the top strakes has meant I've got some small gaps to fill but these are about 0.5mm and this is my first model so I'm not going to be too critical. I think I'll try spiling next time just to see what it's like. Seems like the only way to get a perfect fit. Read a good article about edge setting a plank and that is exactly what happened to me the first time and this time. Can't bend in 3 planes Who'd have thought?
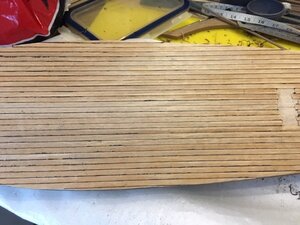
The deck is starting to take shape now. I'm scraping it down with a razor blade held perpendicular and that is working reasonably well to get the paper and the deck planks level. I have then been told to varnish once before sanding? Thoughts?
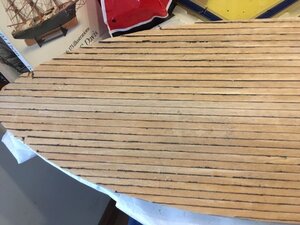
This is what the deck looked like before scraping i.e. after I've just sliced as much of the paper excess off as I could.
Starting to feel like something now and still enjoying myself so that has to be a positive
Trust everyone is doing well!
Morning all
Been a busy few weeks at work so not managed to get as much done as I would have liked but we are slowly getting there. A few planks a day and the deck has come on reasonably well too.

I've started to work from the garboard strake up now and that is going quite well. Gap across most of the bulkheads is exactly the same with just some significant narrowing at the stem obviously. I'm still taking 2mm off each strake to make sure I don't crowd up too much. Should fit well though - easier to see now that there are only a few strakes left. The edge setting on the top strakes has meant I've got some small gaps to fill but these are about 0.5mm and this is my first model so I'm not going to be too critical. I think I'll try spiling next time just to see what it's like. Seems like the only way to get a perfect fit. Read a good article about edge setting a plank and that is exactly what happened to me the first time and this time. Can't bend in 3 planes

The deck is starting to take shape now. I'm scraping it down with a razor blade held perpendicular and that is working reasonably well to get the paper and the deck planks level. I have then been told to varnish once before sanding? Thoughts?

This is what the deck looked like before scraping i.e. after I've just sliced as much of the paper excess off as I could.
Starting to feel like something now and still enjoying myself so that has to be a positive
Trust everyone is doing well!
54 hours in
Evening all. Been a bit of a busy week but still managing a few things every evening.
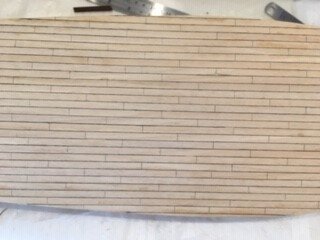
Spent a bit of time cleaning up the deck itself as below.
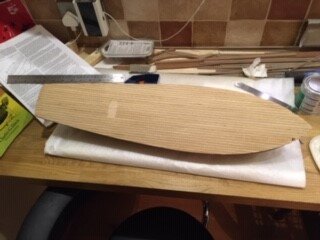
Then I marked out the butts.
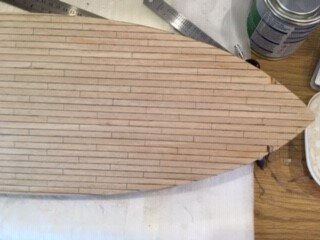
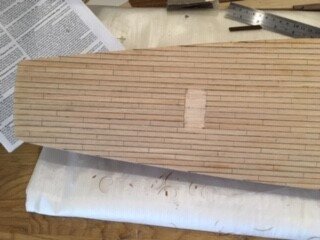
And applied some clear matt varnish afterwards
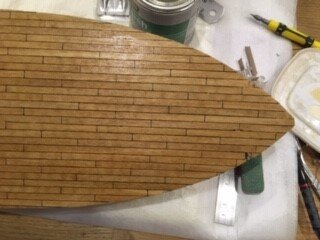
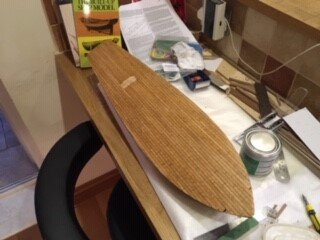
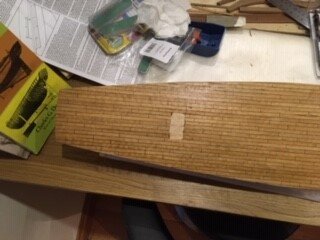
In general I'm happy with the way it's come out. I know what I won't do next time Use the 0.5mm decking strips that came with the kit!! Nightmare trying to glue paper to the side of a 0.5mm plank - will go for something a little bit more robust next time I think! I will now give it a final sand with a very fine grit and that should do it for me I think.
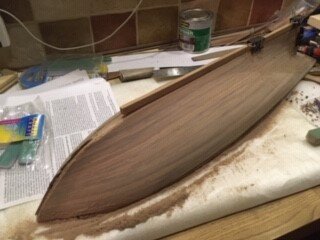
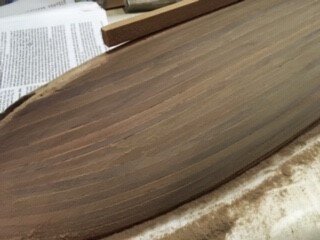
And then I have taken some more steps with the hull as well. It's been a really interesting experience and once again I've learnt a lot about what to do and what not to do. Really should have separated the hull into sections as all the planking guides tell you to. It's worked out ok but I had to use two drop planks and 3 stealers. I know the stealers would have been necessary anyway but I think I could probably have avoided the drop planks if I had been more careful. Still at least I know how the principle works.
Pics from the point where I'm just about to put the last two strakes in.
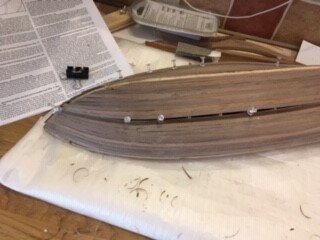
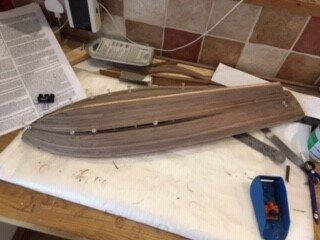
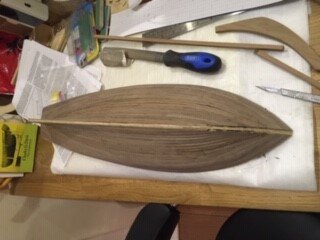
And then a few more in various stages. I've begun sanding the hull down now and there are a few small areas that need filling between some of the planks where the edge setting pushed them away a bit. Made up some filler from the sanding dust which should work well and I'm happy with how she is coming out.
Will post some more pics when the final sanding is done and the keel, stem and stern pieces are fitted. Bulwarks and Transom also going on soon!
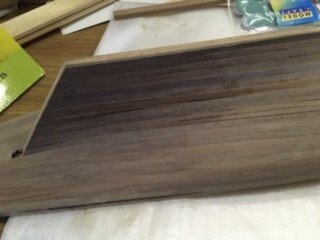
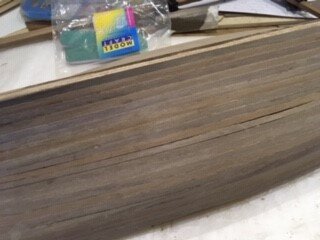
Chat soon!
Evening all. Been a bit of a busy week but still managing a few things every evening.
Spent a bit of time cleaning up the deck itself as below.

Then I marked out the butts.


And applied some clear matt varnish afterwards


In general I'm happy with the way it's come out. I know what I won't do next time
And then I have taken some more steps with the hull as well. It's been a really interesting experience and once again I've learnt a lot about what to do and what not to do. Really should have separated the hull into sections as all the planking guides tell you to. It's worked out ok but I had to use two drop planks and 3 stealers. I know the stealers would have been necessary anyway but I think I could probably have avoided the drop planks if I had been more careful. Still at least I know how the principle works.
Pics from the point where I'm just about to put the last two strakes in.


And then a few more in various stages. I've begun sanding the hull down now and there are a few small areas that need filling between some of the planks where the edge setting pushed them away a bit. Made up some filler from the sanding dust which should work well and I'm happy with how she is coming out.
Will post some more pics when the final sanding is done and the keel, stem and stern pieces are fitted. Bulwarks and Transom also going on soon!


Chat soon!
Attachments
Last edited:


