
-

SUBSCRIBE TO SHIPS IN SCALE TODAY!
The beloved Ships in Scale Magazine is back and charting a new course for 2026!
Discover new skills, new techniques, and new inspirations in every issue.
NOTE THAT OUR NEXT ISSUE WILL BE July/August 2026 -

Win a Free Custom Engraved Brass Coin!!!
As a way to introduce our brass coins to the community, we will raffle off a free coin during the month of August. Follow link ABOVE for instructions for entering.
You are using an out of date browser. It may not display this or other websites correctly.
You should upgrade or use an alternative browser.
You should upgrade or use an alternative browser.

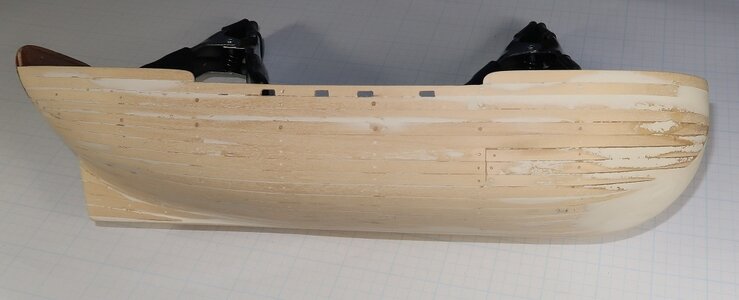
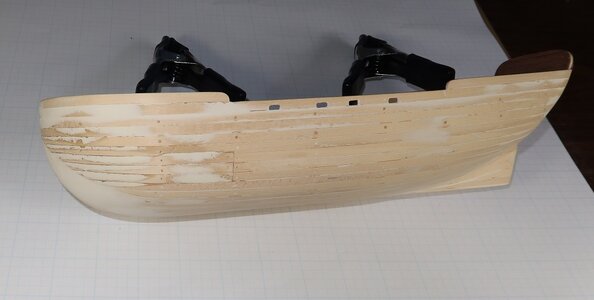
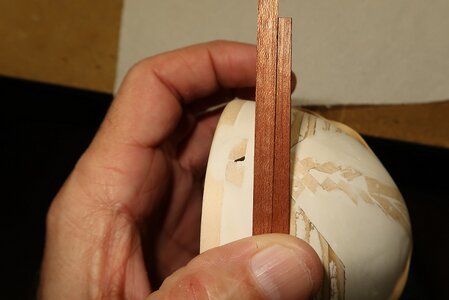
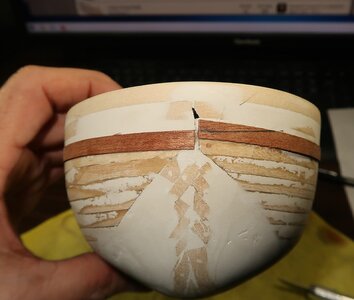
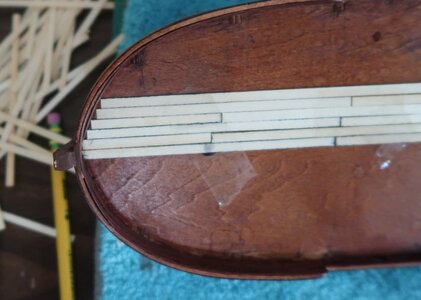
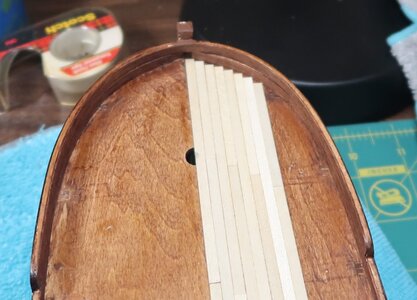
So as not to make the same mistakes with the second layer of planking, I hope the attached pics will help describe my situation.
For the second layer of planking, the instructions say to basically repeat the steps of the first layer. On the first layer, the first plank is laid flush with the deck and does not require any tapering. Hopefully you can see in the first two pics (sorry, I'm not very good at photography) that the deck sweeps a little upward at the bow and stern. I don't know if this is by design or something I did, but I noticed on the first layer of planking it did the same thing. Thinking it was suppose to do that, I started working that upward sweep into the planking, which is where I think things started going south for me.
Should I follow that sweep at the bow and stern or just let the first plank lay straight and then fix the sweep with the planks that will go above the first plank?
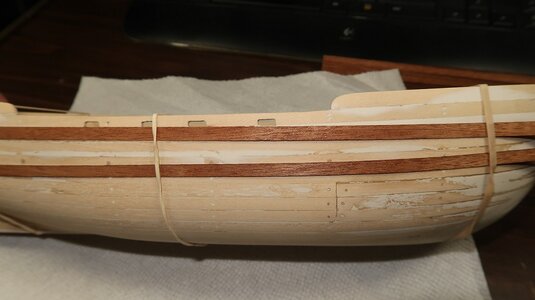
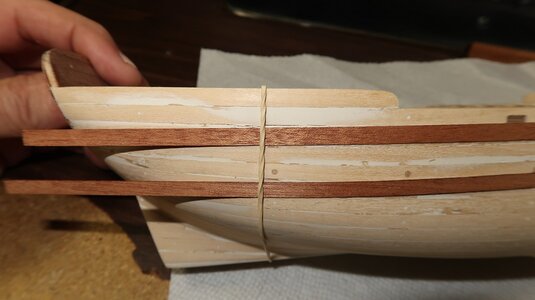
On the third pic, while it might be hard to tell, when I wrap the two planks around the bow, the lower plank wants to bend up under the top plank. According to the instructions, I'm not suppose to taper the top plank since the bottom of the top plank is where I start my measurements for tapering the remaining planks. Also, according to the instructions, I am only supposed to taper the bottom of the planks, never the top.
If I make the second plank lie flush with the bottom of the first plank, I start getting that tendency for that second plank to want to bow outward a little bit. Should I bite the bullet on this second plank and keep it flush with the bottom of the top plank and only taper the bottom of the second plank based on my measurements?
Regarding the tapering, per the instructions, starting at the bottom of the first plank, I measure down the hull along the bulkheads to the bottom of the keel. It takes roughly 16 5mm planks to cover each side of the hull, but, after the 10th plank is installed, I have to cut that angle at the bow and stern to allow for the planks that change direction at the bottom of the hull. My question is, do I still want to make those measurements based on 16 planks, or do them based on 10 planks since most of the taper at the bow and some at the stern will be cut away?
Thanks;
Charles
For the second layer of planking, the instructions say to basically repeat the steps of the first layer. On the first layer, the first plank is laid flush with the deck and does not require any tapering. Hopefully you can see in the first two pics (sorry, I'm not very good at photography) that the deck sweeps a little upward at the bow and stern. I don't know if this is by design or something I did, but I noticed on the first layer of planking it did the same thing. Thinking it was suppose to do that, I started working that upward sweep into the planking, which is where I think things started going south for me.
Should I follow that sweep at the bow and stern or just let the first plank lay straight and then fix the sweep with the planks that will go above the first plank?
On the third pic, while it might be hard to tell, when I wrap the two planks around the bow, the lower plank wants to bend up under the top plank. According to the instructions, I'm not suppose to taper the top plank since the bottom of the top plank is where I start my measurements for tapering the remaining planks. Also, according to the instructions, I am only supposed to taper the bottom of the planks, never the top.
If I make the second plank lie flush with the bottom of the first plank, I start getting that tendency for that second plank to want to bow outward a little bit. Should I bite the bullet on this second plank and keep it flush with the bottom of the top plank and only taper the bottom of the second plank based on my measurements?
Regarding the tapering, per the instructions, starting at the bottom of the first plank, I measure down the hull along the bulkheads to the bottom of the keel. It takes roughly 16 5mm planks to cover each side of the hull, but, after the 10th plank is installed, I have to cut that angle at the bow and stern to allow for the planks that change direction at the bottom of the hull. My question is, do I still want to make those measurements based on 16 planks, or do them based on 10 planks since most of the taper at the bow and some at the stern will be cut away?
Thanks;
Charles
Attachments

You are not the first to do this. I have to be sure to take a look at the alignment of each strake as I lay them down to be sure of the alignment. RichThink I'm going to christen this the USS Kindling and start over.
Believe it or not, both of those planks are dead straight across the hull, they lined up fine at the stern, I must have something really jacked up on the bow.
Charles.
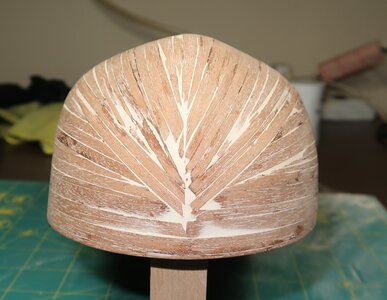
Your hull now looks good.
One of the biggest drawbacks of double layer planking is facing you now.
The planks are so thin that they only bend one way. This makes it more tedious and you have to really work hard to get it right.
Never removing material from the top of the plank is incorrect. It depends on which way you are trying to bend it and if it is at the bow or stern. It can vary.
A better way is to say never from the inside edge. Removing material from the inside edge means you have to bend it further.
Here is an extract from my booklet on planking. It should help. You need to divide the planking into belts or sections as the natural lay of the planks changes as you plank towards the keel. I always start at the wales and work up and down from there. Leaving a few planks off near the keel. Lay the garboard strake and work the last 3 to 4 planks upwards.
Regards
Allan
Attachments
Thanks Allan;
Very informative and helpful as always.
So to make sure I understand, in Figure 10, lines 1 and 2 appear to have that upward slope at the bow and stern, same as my model. Am I seeing that right, or is that more of an optical illusion because of the curve of the hull?
If it does actually sweep up a little bit, is the planking supposed to follow that sweep, or should the planks be laid as straight as possible using the tapering, wedges, etc. to finish?
Thanks;
Charles
- Joined
- Dec 1, 2016
- Messages
- 6,699
- Points
- 728

So to make sure I understand, in Figure 10, lines 1 and 2 appear to have that upward slope at the bow and stern, same as my model. Am I seeing that right, or is that more of an optical illusion because of the curve of the hull?
the planking is actually sweeping up at the bow and stern
If it does actually sweep up a little bit, is the planking supposed to follow that sweep, or should the planks be laid as straight as possible using the tapering, wedges, etc. to finish?
hull planking should follow the shape of the hull and sweep up. Laying planking as straight will cause the planks to buckle.
- Joined
- Dec 1, 2016
- Messages
- 6,699
- Points
- 728
check this out
planking the Matthew
LINING OFF THE HULL It is very common for kits to provide planking material unsuitable for the purpose, thus causing a number of problems for the model builder. Every commercial wood has its properties some are suitable for bending while others are not. Some common problems are, providing...
shipsofscale.com
Thanks Dave.hull planking should follow the shape of the hull and sweep up. Laying planking as straight will cause the planks to buckle.
Things started going south with the second planking pretty quickly so I just started laying the planks across the hull and cutting them to fit. The mahogany seemed a little brittle, it bent OK, but it would splinter pretty easily when cutting. But then again, I've never worked with mahogany before so I'm sure it's more me than the wood.
I still have a little work left to do on it, then I'm going to hit it pretty heavy with some mahogany tinted shellac to cover things up. Decided to go with a more "weathered" look than a museum piece on this one.
I keep reminding myself that this was just meant to be a practice/burner type project, but damn, this is embarrassing.
Attachments
I figured out where things went south for me on the planking. Tucked away underneath an inventory sheet in the box were two instruction sheets, one for tips on planking, the other tips on rigging. In the tips on planking, they use a much different method of planking the hull than what's shown in the instruction book.
Instead of laying 10 planks starting at deck level and going downward, you lay one plank at deck level, then count down 5 planks and temporarily attach the second plank. The second plank gives you that upward sweep at the bow and stern and then you have two regions to plank, the one between the first two planks, and then after permanently attaching that temporary second plank, you go from there to the bottom of the keel. Also it says in that tip sheet to make all tapers on the top of planks rather than the bottom. I must have misread something somewhere about only tapering the bottom of the planks.
I've cut new pieces for the keel and bulkheads and will give that method a try, see if it works any better.
Rule number 1 here, always check the contents of the box first, right??
Forging ahead, I have a couple of questions on doing something with the keel, stern, and bow plates. For reasons too numerous to mention here, I want to cover those plates with some mahogany veneer so they will match better with the hull.
The first pic shows the hull and the veneer I'm going to rip and cut to shape. The second pic shows a rough hand drawing of what I was thinking about doing.
Does that drawing look OK, or is there a more realistic way of cutting that out, especially at the stern, I'm not sure if having the stern plate joined to the keel plate like that is correct.
Also, where the wales hit the bow plate, should I notch out the veneer so the wales appear to go inside that plate, or should the wales butt up against the veneer?
My apologies for the use of any incorrect terms in the above.
Many thanks;
Charles
Need some advice on planking the deck.
Per the instructions, I'm supposed to cut the deck planking in lengths of 100 mm, mark a line down the center of the deck, start laying the planks end to end along that line, then on the next line of planking, per the instructions,
"For the next line of planks on the right hand side, off set them by half the length of the plank. Repeat this process until the right hand side of the deck is covered."
You then go on and repeat the process for the left side.
Doing it that way looks like I'm going to end up with a lot of weird butt joints at the stern. Is that how it's suppose to go?
Looking online it seems a lot of people just use planks that run the length of the deck and then score them for the butt joint affect.
Any advice or suggestions appreciated.
Thanks;
Charles
Charles
While the kit is maximizing the wood and minimizing your work, I recommend that you think of the scale of the ship/model and realize what is feasible for the shipwrights to have actually been able to employ as sawn limber pieces. Those shorter lengths would butt end to end on the centers of the deck beams and staggered so as to not have butted ends too close in their separation. One plank is insufficient width. I like to set the deck planks in actual lengths which is more tedious and without scribed faux joints. Just a suggestion for your consideration. Rich (PT-2)Need some advice on planking the deck.
Per the instructions, I'm supposed to cut the deck planking in lengths of 100 mm, mark a line down the center of the deck, start laying the planks end to end along that line, then on the next line of planking, per the instructions,
"For the next line of planks on the right hand side, off set them by half the length of the plank. Repeat this process until the right hand side of the deck is covered."
You then go on and repeat the process for the left side.
Doing it that way looks like I'm going to end up with a lot of weird butt joints at the stern. Is that how it's suppose to go?
Looking online it seems a lot of people just use planks that run the length of the deck and then score them for the butt joint affect.
Any advice or suggestions appreciated.
Thanks;
Charles
CharlesView attachment 266531
I attached a couple more photos, hopefully they will better show what I am referring to.
The pattern of the butted ends of the planks at the bow have a more consistent pattern versus the pattern at the stern which appears a bit haphazard.
It may just be a matter of cosmetics at this point, but not wanting to make the same mistakes I made on the hull planking by not fully understanding the instructions, I just wanted to make sure that cutting and laying the planks per the instructions in the manual, which is what I have done in the pictures, is fine, regardless of the resulting pattern at the stern.
Hope that makes sense.
Charles
Attachments
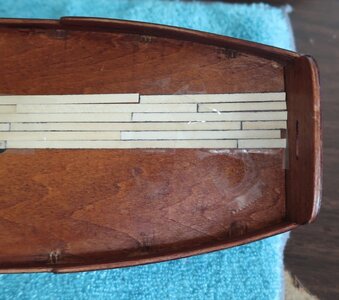
 The planks were probably up to 20 feet long. They would have only butted the planks where necessary. I think butts only in the longer runs.
Last edited:
Note that the butted ends have three planks between those aligned joints which is the separation that I mentioned before. I am sure that your eye will guide you along with the deck plan. Rich (PT-)View attachment 266551The planks were probably up to 20 feet long. They would have only butted the planks where necessary. I think butts only in the longer runs.
Thanks
So I'm cruising along planking the deck, everything going OK, then I stop after looking at the drawings Al posted and looked at the bow.
Nothing in the instructions about tapering or cutting those corners off along the bulwarks. I guess maybe it was assumed I would know to do that. Can't say why I spaced out and didn't notice it earlier. Side affects of the arthritis meds no doubt.
All the pictures show those planks tapered and fitting into some type of slotted frame or border that runs along the deck against the bulwarks, you can see that in the drawing above, but I can't find anything like that in the box, and nothing about any of that is mentioned in the instructions. Same thing with along the sides, going to require some tapering there as well. Oh well!!
This should be an interesting fix, especially given I'm not even slightly interested in cutting little corner pieces to fill those gaps. I'll probably just end up throwing some fill in there and say the hell with it.
Charles
Attachments
PT-2 Corrected, I fixed the drawing. Note the date on the drawing. Time flies when your having fun.Note that the butted ends have three planks between those aligned joints which is the separation that I mentioned before. I am sure that your eye will guide you along with the deck plan. Rich (PT-)
Most people don't bother and the kits usually don't mention it. You will not be critisised for just running the planks to the edges at the bow and stern.So I'm cruising along planking the deck, everything going OK, then I stop after looking at the drawings Al posted and looked at the bow.
Nothing in the instructions about tapering or cutting those corners off along the bulwarks. I guess maybe it was assumed I would know to do that. Can't say why I spaced out and didn't notice it earlier. Side affects of the arthritis meds no doubt.
All the pictures show those planks tapered and fitting into some type of slotted frame or border that runs along the deck against the bulwarks, you can see that in the drawing above, but I can't find anything like that in the box, and nothing about any of that is mentioned in the instructions. Same thing with along the sides, going to require some tapering there as well. Oh well!!
This should be an interesting fix, especially given I'm not even slightly interested in cutting little corner pieces to fill those gaps. I'll probably just end up throwing some fill in there and say the hell with it.
Charles