Bushnell’s Turtle. Revolutionary war submersible. 1:35 3D design and print

Yay! 1:32 is a thing. I’ve ordered some photo etch for the cogs though.

IMG_20211026_172147.jpg

IMG_20211027_094131.jpg

IMG_20211027_094200.jpg

IMG_20211027_094302.jpg

It will be possible to leave the starboard side unglued so you can show off the detail.

It has to be said I have the 'Professor Fate" music from the Great Race going pretty constantly through my head at this point…
 
Question: Do you think the inside would have been painted white? I know that ships from the Napoleonic era were painted white below decks to help spread the light around, how far back does this practice go historically?

I'm thinking three possible options.

Natural wood with blackened iron and grease and grime.

White. As above, but with a layer of chipped white paint.

...or full steampunk with polished brass and varnished wood.

Also: A bit more detail

Screenshot 2021-10-31 094816.jpg

and some rendering, for when I get to doing instructions:

Screenshot 2021-10-31 151141.jpg
 

Attachments

  • Screenshot 2021-10-31 094816.jpg
    Screenshot 2021-10-31 094816.jpg
    255.2 KB · Views: 2
Last edited:
Nobody knows historical correct how the inside of the "hull" was treated, me personally I would go for the light white painting - with this you also see the interior mechanics better - more contrast.
 
Looks like the port and starboard shells fit okay with the inner frame. Just a tiny bit of fettling on the files and they should be good to go.

IMG_20211102_094615.jpg

It’s important to me that the main parts fit as nicely as reasonably possible. I don’t want people having to fight with my kits more than absolutely necessary.
 
First reasonably successful print of Mister bubbles!

IMG_20211107_233338.jpg

These parts are approximately 125mm (15 barleycorns) tall. I haven’t cleaned anything up for fit yet. There are a few facets from the CAD process, but they will sand off very easily.

Next effort will entail final test build, efficiently laying out parts for printing and a final price estimate.
 
Arrrrgh. This little guy is kicking my ar$e. I’m trying so hard to make this as pleasant an experience as possible for prospective builders, but that means being WAY more fussy than if I’m just building it for myself.

Tiny changes to details, parts fit and printing alignment, sometimes (often) repeatedly until I’m happy.

With a normal, do-it-myself model, most of this doesn’t matter, as I can file things down and add bits 'till it works.

Perhaps I’m working to hard.

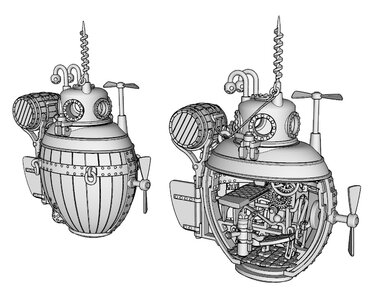
Anyhoo, NEARLY there now. Here’s a bunch o’ bits that will make up the interior. there are about 15 more parts for the outside, and I completely forgot to print the cranks (printing now…). These are the parts for the 1:32 version. The 1:16 is pretty much the same, just bigger.IMG_20211126_120259.jpg

First parts for the first subassembly.

IMG_20211126_120353.jpg

In other news, I’m going to go with putting the instructions on a USB to be included in each kit. I’ll also make them downloadable. Sure, it’s not as classy as a nicely printed booklet, but that would be challenging to fit in the box unless it’s kinda tiny.
 
Back
Top