Thanks Terry I have seen that site and yes they have some very good products in fact I nearly brought a kit from them but decided to go with ZHL.Hi Tony have been watching with interest fixing up your victory . Came across this store buying usb"s some good stuff brand names also model parts for wood ships worth a look ALiExpress then zj cn model co ltd have bought a few tools and parts cheap but quite good terry l
-

Win a Free Custom Engraved Brass Coin!!!
As a way to introduce our brass coins to the community, we will raffle off a free coin during the month of August. Follow link ABOVE for instructions for entering.
-

PRE-ORDER SHIPS IN SCALE TODAY!
The beloved Ships in Scale Magazine is back and charting a new course for 2026!
Discover new skills, new techniques, and new inspirations in every issue.
NOTE THAT OUR FIRST ISSUE WILL BE JAN/FEB 2026
You are using an out of date browser. It may not display this or other websites correctly.
You should upgrade or use an alternative browser.
You should upgrade or use an alternative browser.
Caldercraft HMS Victory 1:72 TonyH
- Thread starter Tony H
- Start date
- Watchers 19
-
- Tags
- caldercraft jotika victory
Good evening I think I'm at a stage where I know what needs fixing before I can continue with this ship.
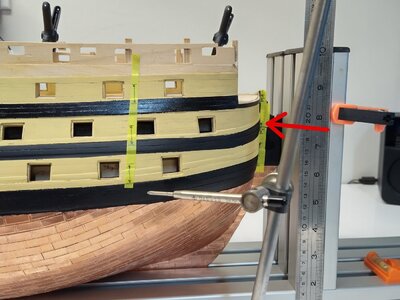
Firstly I wanted to check the drawing size of the gunports from the outside in relation to the keel. On the drawing I measured from the bottom of the keel to the slot at the top of the keel ( red arrow ) this was correct. Then I marked the gunport heights now it's clear that they're to high to the drawing.
Now the stern, on checking most of the rear bulkheads are high, as are the gunports.
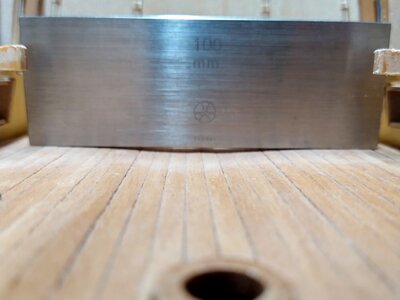
This gap in the middle indicates the bulkhead is around 4mm high.
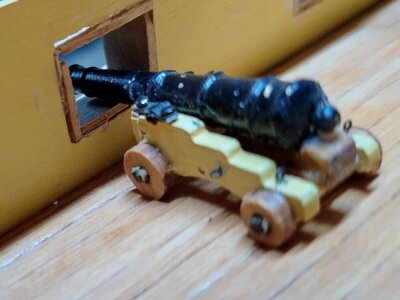
The gun barrel is just resting on the frame.
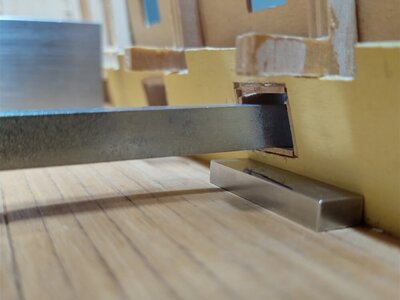
The 5mm block is the correct height from the deck to the gunport, most of the gunports are incorrect. A lot of the gunport height issues are due to the inner gunport pattern being placed high causing the inside bottom frame to higher than the outside one (frame is angled down).
It's my best guess is things started to go wrong right at the start of this build. If the bulkheads weren't seated property it could have led to the gunport patterns being placed too high and the deck to be uneven. If the quarter gallerie windows were lined up with the gunports at the front and the stern windows at the back maybe that's why they drop down at the back.
Now I have a much clearer picture of what needs to be done the hard part is how? I can see a number of options. Easiest first.
1 As most of them won't show I could put some wooden blocks under the guns on the upper gundeck (to get the height right) . Adjust quarter galleries. Square up gunports and replace the wales. Make sure the quarter deck is level before fitting.
2 Remove the upper gundeck and level it at the right height for the gunports, chances are the deck will have to be replaced. Carry on as above.
3 These two options don't correct the gunport height issue maybe while squaring up the gunports I could remove some extra material from the bottom and pack up the top only problem is 3-4mm per port and they all need doing.
4 Replace this hull with a scratch built one and use the parts from the kit to complete it.
5 Maybe Jokita would sell me enough parts to remake the hull from the beginning, I wonder what it would cost?
Any suggestions would be appreciated.

Firstly I wanted to check the drawing size of the gunports from the outside in relation to the keel. On the drawing I measured from the bottom of the keel to the slot at the top of the keel ( red arrow ) this was correct. Then I marked the gunport heights now it's clear that they're to high to the drawing.
Now the stern, on checking most of the rear bulkheads are high, as are the gunports.

This gap in the middle indicates the bulkhead is around 4mm high.

The gun barrel is just resting on the frame.

The 5mm block is the correct height from the deck to the gunport, most of the gunports are incorrect. A lot of the gunport height issues are due to the inner gunport pattern being placed high causing the inside bottom frame to higher than the outside one (frame is angled down).
It's my best guess is things started to go wrong right at the start of this build. If the bulkheads weren't seated property it could have led to the gunport patterns being placed too high and the deck to be uneven. If the quarter gallerie windows were lined up with the gunports at the front and the stern windows at the back maybe that's why they drop down at the back.
Now I have a much clearer picture of what needs to be done the hard part is how? I can see a number of options. Easiest first.
1 As most of them won't show I could put some wooden blocks under the guns on the upper gundeck (to get the height right) . Adjust quarter galleries. Square up gunports and replace the wales. Make sure the quarter deck is level before fitting.
2 Remove the upper gundeck and level it at the right height for the gunports, chances are the deck will have to be replaced. Carry on as above.
3 These two options don't correct the gunport height issue maybe while squaring up the gunports I could remove some extra material from the bottom and pack up the top only problem is 3-4mm per port and they all need doing.
4 Replace this hull with a scratch built one and use the parts from the kit to complete it.
5 Maybe Jokita would sell me enough parts to remake the hull from the beginning, I wonder what it would cost?
Any suggestions would be appreciated.
Good afternoon Tony. Whew….quite a project you have embarked upon. One easy option for the gun port is to adjust the quoin on the cannon. (The one in your picture)This will lower the rear of the cannon barrel and the front will end up centred with the port? You won’t have to put blocks under them. These cannon as you mentioned are hardly visible.Good evening I think I'm at a stage where I know what needs fixing before I can continue with this ship.
View attachment 349607
Firstly I wanted to check the drawing size of the gunports from the outside in relation to the keel. On the drawing I measured from the bottom of the keel to the slot at the top of the keel ( red arrow ) this was correct. Then I marked the gunport heights now it's clear that they're to high to the drawing.
Now the stern, on checking most of the rear bulkheads are high, as are the gunports.
View attachment 349608
This gap in the middle indicates the bulkhead is around 4mm high.
View attachment 349609
The gun barrel is just resting on the frame.
View attachment 349610
The 5mm block is the correct height from the deck to the gunport, most of the gunports are incorrect. A lot of the gunport height issues are due to the inner gunport pattern being placed high causing the inside bottom frame to higher than the outside one (frame is angled down).
It's my best guess is things started to go wrong right at the start of this build. If the bulkheads weren't seated property it could have led to the gunport patterns being placed too high and the deck to be uneven. If the quarter gallerie windows were lined up with the gunports at the front and the stern windows at the back maybe that's why they drop down at the back.
Now I have a much clearer picture of what needs to be done the hard part is how? I can see a number of options. Easiest first.
1 As most of them won't show I could put some wooden blocks under the guns on the upper gundeck (to get the height right) . Adjust quarter galleries. Square up gunports and replace the wales. Make sure the quarter deck is level before fitting.
2 Remove the upper gundeck and level it at the right height for the gunports, chances are the deck will have to be replaced. Carry on as above.
3 These two options don't correct the gunport height issue maybe while squaring up the gunports I could remove some extra material from the bottom and pack up the top only problem is 3-4mm per port and they all need doing.
4 Replace this hull with a scratch built one and use the parts from the kit to complete it.
5 Maybe Jokita would sell me enough parts to remake the hull from the beginning, I wonder what it would cost?
Any suggestions would be appreciated.
I do think if you adjust one part of the ship something, somewhere will be out of symmetry. If you go bashing, I’m sure you also know that the kits provide just enough wood so you will have to buy more.
Adjusting each port individually is a lot of work however these could be lowered, reframed and the gap above fixed without noticing. Lowering these, reposition the wales, aligning the quarter galleries and the waterline would all be possible - it like starting the build from the start again.
Enjoy bashing the muck out of this. Going to be fun once you decide which way to go.
Cheers Grant
Hi GrantGood afternoon Tony. Whew….quite a project you have embarked upon. One easy option for the gun port is to adjust the quoin on the cannon. (The one in your picture)This will lower the rear of the cannon barrel and the front will end up centred with the port? You won’t have to put blocks under them. These cannon as you mentioned are hardly visible.
I do think if you adjust one part of the ship something, somewhere will be out of symmetry. If you go bashing, I’m sure you also know that the kits provide just enough wood so you will have to buy more.
Adjusting each port individually is a lot of work however these could be lowered, reframed and the gap above fixed without noticing. Lowering these, reposition the wales, aligning the quarter galleries and the waterline would all be possible - it like starting the build from the start again.
Enjoy bashing the muck out of this. Going to be fun once you decide which way to go.
Cheers Grant
I'm going to have a go at removing the upper gun deck and see where that leads me. I thought about changing the height of the guns with the quoin but that would lead to the guns pointing up and down at different angles.
The more I think about it I really like the idea of starting again from the beginning.
Tony
As painful as starting over might feel - this ship is a major undertaking and if I was building it, I would regret not fixing things that could have been fixed. Anyway, just my passing thought...I really like the idea of starting again from the beginning.
I'll try making some enquiries with Jokita and see if I can get all the parts required to remake the hull. If not it could be my first scratch project. While I'm waiting I'll try taking the upper gun deck off and see what it would take to make it right.As painful as starting over might feel - this ship is a major undertaking and if I was building it, I would regret not fixing things that could have been fixed. Anyway, just my passing thought...
Sorry it's taken me so long to update this log. We sold our house and have moved interstate, our new house is about 20kms from Canberra.
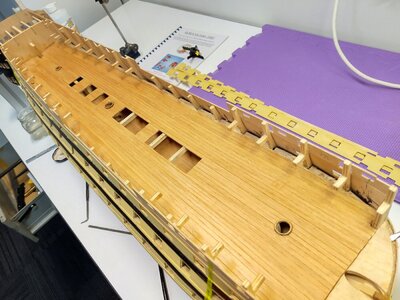
The last work l did on the Victory was to remove the inner bulwarks (part 275) this correct the height of the gunports in most cases. Where the bulkheads are placed to high there is still an issue.
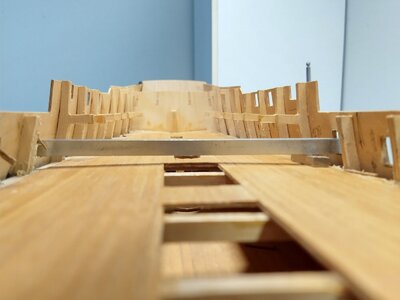
Here you can see the gunport height is correct and the camber on the deck is correct.
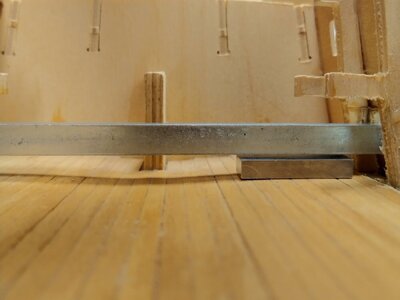
At the stern some of the frames are high causing the deck camber to go the wrong way.
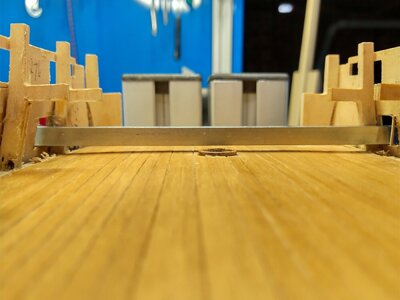
At the front two bulkheads are to high resulting in the gunports being low, the deck in this area is not very straight.
Next up I'll remove the deck and get a better idea of how much the bulkheads are out of position.

The last work l did on the Victory was to remove the inner bulwarks (part 275) this correct the height of the gunports in most cases. Where the bulkheads are placed to high there is still an issue.

Here you can see the gunport height is correct and the camber on the deck is correct.

At the stern some of the frames are high causing the deck camber to go the wrong way.

At the front two bulkheads are to high resulting in the gunports being low, the deck in this area is not very straight.
Next up I'll remove the deck and get a better idea of how much the bulkheads are out of position.
Good morning Tony. Good to have you back with your Victory “restoration “ project. Cheers GrantSorry it's taken me so long to update this log. We sold our house and have moved interstate, our new house is about 20kms from Canberra.
View attachment 365770
The last work l did on the Victory was to remove the inner bulwarks (part 275) this correct the height of the gunports in most cases. Where the bulkheads are placed to high there is still an issue.
View attachment 365769
Here you can see the gunport height is correct and the camber on the deck is correct.
View attachment 365768
At the stern some of the frames are high causing the deck camber to go the wrong way.
View attachment 365771
At the front two bulkheads are to high resulting in the gunports being low, the deck in this area is not very straight.
Next up I'll remove the deck and get a better idea of how much the bulkheads are out of position.
This restoration is getting more and more ambitious Tony...
Thank Grant hopefully in a few more weeks I'll be able to start setting up a new shipyard.Good morning Tony. Good to have you back with your Victory “restoration “ project. Cheers Grant
At least I'm on the NSW side of the boarder.Don't move too close to Canberra, it is toxic! )):=
János
Thanks Paul the more I look at it I think this restoration is going to be a total rebuild.This restoration is getting more and more ambitious Tony...
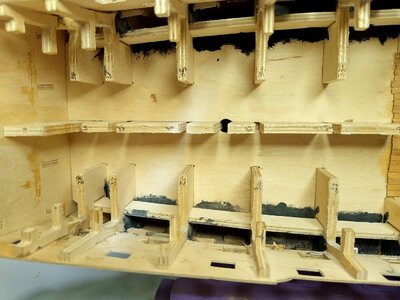
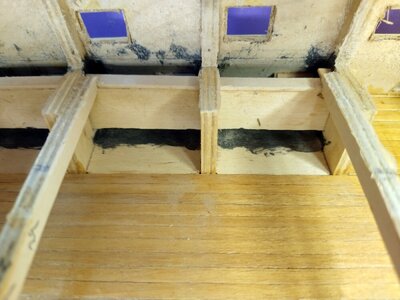
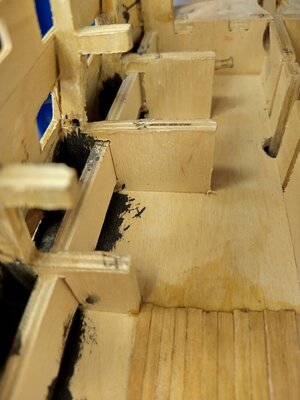
Hi slowly getting settled in the new house and finally getting round to updating my log. I did this work awhile ago and I been considering the best way to fix things up.
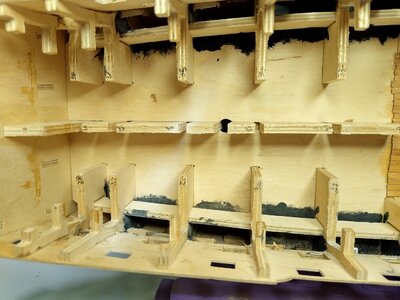
I removed the deck so I could measure the deck height more accurately. At the stern the last 5 bulkheads are 2mm higher than the keel section.
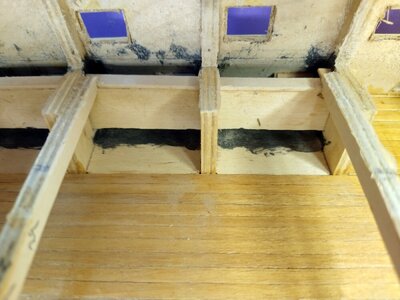
The middle section is OK.
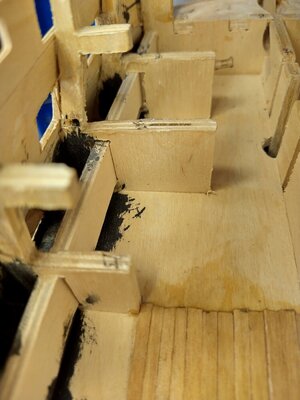
The worst bulkheads second and third are 3.5mm to high.
I could add packing at the rear and cut down the bulkheads at the front to correct the deck.
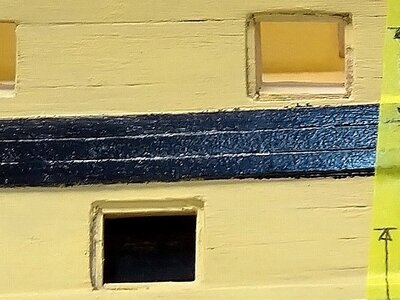
It looks to me that the planks where cut around the gunport linings which is why the sizes are inconsistent.
I have decided the only way I'm going to be happy with this kit is to start from scratch. I'm going to try getting the parts from Caldercraft if this is unsuccessful then I'll have a go at making up the parts myself.

I removed the deck so I could measure the deck height more accurately. At the stern the last 5 bulkheads are 2mm higher than the keel section.

The middle section is OK.

The worst bulkheads second and third are 3.5mm to high.
I could add packing at the rear and cut down the bulkheads at the front to correct the deck.

It looks to me that the planks where cut around the gunport linings which is why the sizes are inconsistent.
I have decided the only way I'm going to be happy with this kit is to start from scratch. I'm going to try getting the parts from Caldercraft if this is unsuccessful then I'll have a go at making up the parts myself.


Kurt Konrath
Kurt Konrath
Good to see you back at it again. At least now you know what your current task at hand is and have a plan of action.
Tony, you have done an amazing amount of deconstruction and analysis. Incredible to see and I admire your tenacity. Working on the same kit myself now and I'm by no means sure that my results would stand up to your scrutiny.Hi slowly getting settled in the new house and finally getting round to updating my log. I did this work awhile ago and I been considering the best way to fix things up.
View attachment 373859
I removed the deck so I could measure the deck height more accurately. At the stern the last 5 bulkheads are 2mm higher than the keel section.
View attachment 373860
The middle section is OK.
View attachment 373861
The worst bulkheads second and third are 3.5mm to high.
I could add packing at the rear and cut down the bulkheads at the front to correct the deck.
View attachment 373862
It looks to me that the planks where cut around the gunport linings which is why the sizes are inconsistent.
I have decided the only way I'm going to be happy with this kit is to start from scratch. I'm going to try getting the parts from Caldercraft if this is unsuccessful then I'll have a go at making up the parts myself.
View attachment 373825
View attachment 373826
View attachment 373827
Thanks for your comments, I was really hoping I could just continue this build. Most people I know would never see anything wrong with the hull, but I would rather start again. This is fantastic kit and I want to do it justice.Good to see you back at it again. At least now you know what your current task at hand is and have a plan of action.
Thanks for your kind words for my reverse log. I really wanted to find a way to fix it up to no avail. I've taken a number of planks off, this proved to be a difficult process. I don't know what type of glue was used but it was very hard in places and had no be cut away.Tony, you have done an amazing amount of deconstruction and analysis. Incredible to see and I admire your tenacity. Working on the same kit myself now and I'm by no means sure that my results would stand up to your scrutiny.Really hope you have good luck with Caldercraft and that they can get you the necessary parts to rebuild.
I can only imagine. I use Titebond glue for wood to wood joints and, on the occasion that I mess something up, separating the pieces without breaking them is a challenge. I would guess that in your case the glue has had a very long time to cure which probably makes it even harder. Again, very impressed with your analyses and hope Caldercraft gives you some help.Thanks for your kind words for my reverse log. I really wanted to find a way to fix it up to no avail. I've taken a number of planks off, this proved to be a difficult process. I don't know what type of glue was used but it was very hard in places and had no be cut away.
Hi a quick update I have been in touch with Caldercraft and need to make a list of all the parts I need. I can see this is going to be a long process so I'm going to put this kit on hold till I have everything I need to complete it.
I've decided to start a new build the one I planned to start last year before we decided to move house.
Check out my USS Constitution log.
I've decided to start a new build the one I planned to start last year before we decided to move house.
Check out my USS Constitution log.


