-

Win a Free Custom Engraved Brass Coin!!!
As a way to introduce our brass coins to the community, we will raffle off a free coin during the month of August. Follow link ABOVE for instructions for entering.
-

PRE-ORDER SHIPS IN SCALE TODAY!
The beloved Ships in Scale Magazine is back and charting a new course for 2026!
Discover new skills, new techniques, and new inspirations in every issue.
NOTE THAT OUR FIRST ISSUE WILL BE JAN/FEB 2026
You are using an out of date browser. It may not display this or other websites correctly.
You should upgrade or use an alternative browser.
You should upgrade or use an alternative browser.
Cazador Xebec 1750 - OcCre - scale 1:60 [COMPLETED BUILD]
- Joined
- Oct 11, 2021
- Messages
- 740
- Points
- 403

Bell tower, Stern decoration & woodcarving
Hello my friends,
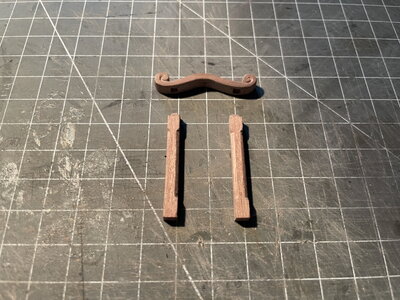
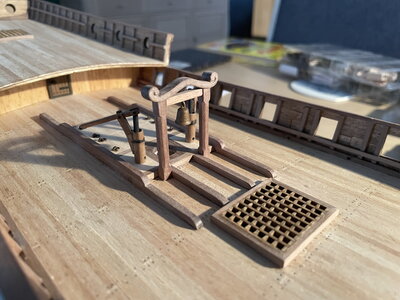
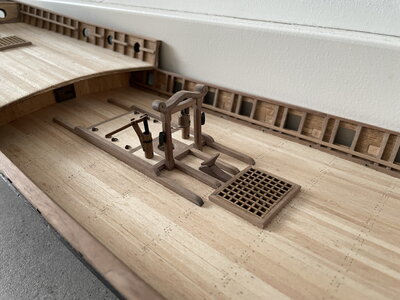
It's been a while since my last update., but I like to share my progress so far. This update is about the stern, decorations and finally rebuilding the upper part of the stern. Before we're going to start with the stern, first I made some progress on the bell tower which I made out of walnut.
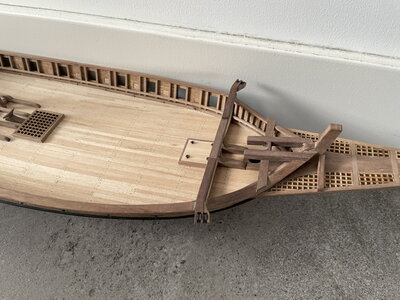
So, eventually I had to demolish the stern of the ship a bit. I needed to remove the upper part to completely remodel it.
I had some time to figure it out and now I have to do it. It wasn't an easy task and let me show you the progress....
After the upper back plate of the stern was removed, I covered the outward facing part with walnut veneer. Second was to make some profile strips out of walnut. I used a profile scraper to do the job. After this was done, I assembled the parts and it was finished however.....
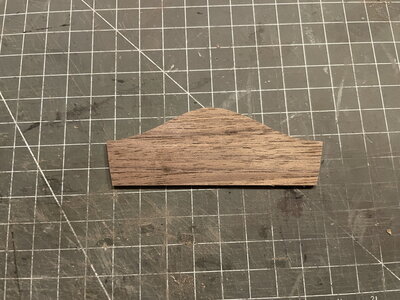
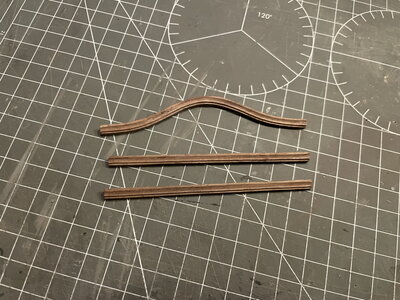
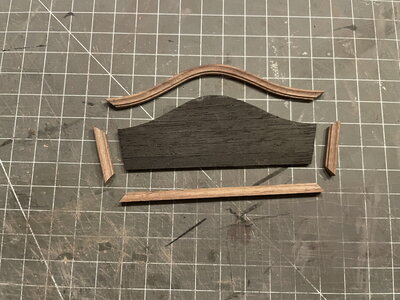
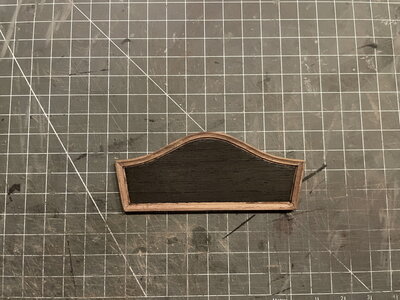
This time I made a mistake. The part is too high. I have to recut everything, and to re-assemble.
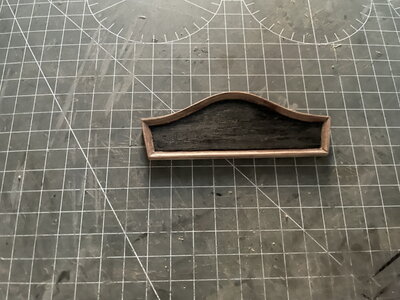
Ah well, it kept me awake for one night. Nothing is worse when you put blood, sweat and tears into the fabrication of a part, but the take it all apart due to a miscalculation. Sh*t happens they say, so I needed to fix it, do the job all over and live with the consequences... lol
So now my frame is finished to replace it on the ship again....
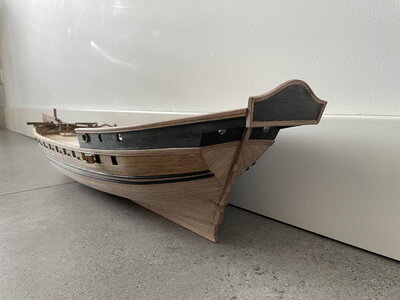
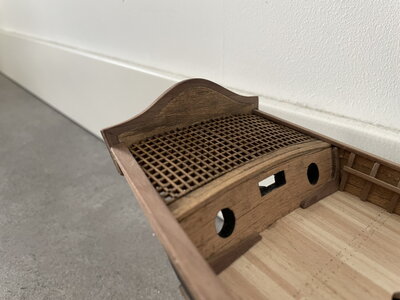
See how the profile follows the boards instead of placed on top of the boards.
Next step is to start with some woodcarving. I did some carving in the past with my Pfeill tools. I just needed a design and I chose a Baroque theme with Acanthus leaves. After I made the drawing, I needed it to transfer it onto the wood. I use real boxwood for this matter. The carving is very small and has a dimension of 60x25mm.
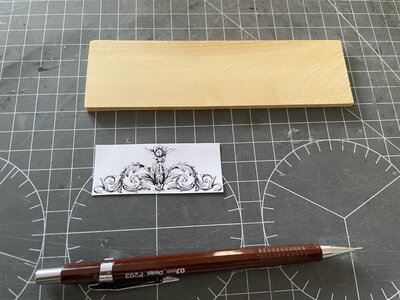
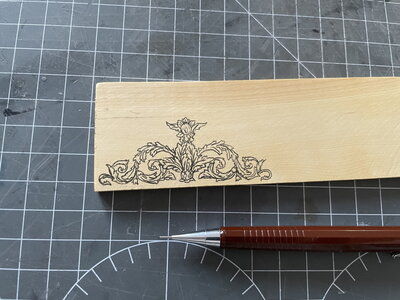
When been transferred onto the wood, I use a scroll saw to saw out the basic shape / outline of the carving.
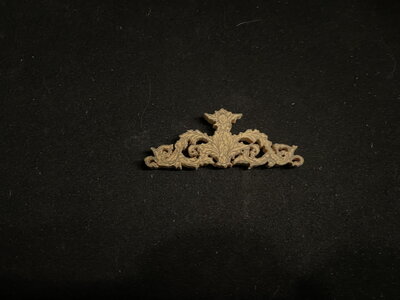
Time to start, which I do in parts. So I start with the flower on top...
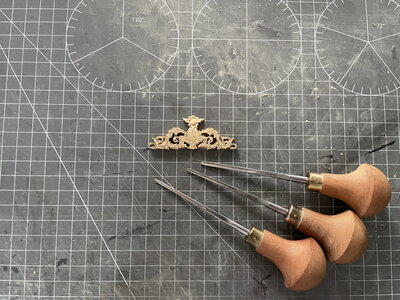
Then one of the sides....
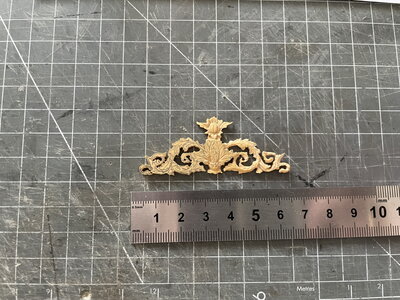
Other side as well....
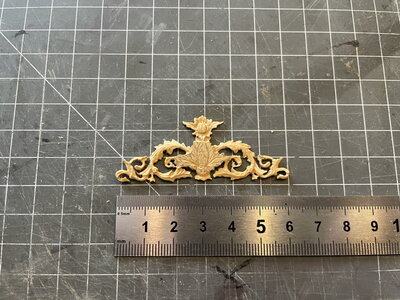
All that is left is the center part....but this will have to wait until sunday...
Let's have a sneak-peak how this will gonna look onto the ship shall we?? I'm curious, can't wait....
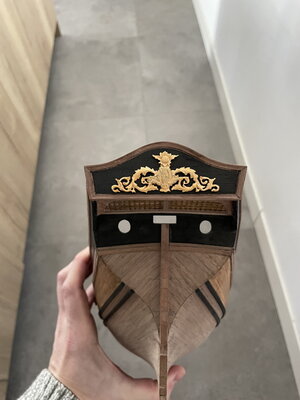
So, the carving will be finished hopefully this weekend and I can show the full details. Until then, thank you for alle the likes and comments.
See you soon,
Pter
Hello my friends,
It's been a while since my last update., but I like to share my progress so far. This update is about the stern, decorations and finally rebuilding the upper part of the stern. Before we're going to start with the stern, first I made some progress on the bell tower which I made out of walnut.


So, eventually I had to demolish the stern of the ship a bit. I needed to remove the upper part to completely remodel it.
I had some time to figure it out and now I have to do it. It wasn't an easy task and let me show you the progress....
After the upper back plate of the stern was removed, I covered the outward facing part with walnut veneer. Second was to make some profile strips out of walnut. I used a profile scraper to do the job. After this was done, I assembled the parts and it was finished however.....


This time I made a mistake. The part is too high. I have to recut everything, and to re-assemble.

Ah well, it kept me awake for one night. Nothing is worse when you put blood, sweat and tears into the fabrication of a part, but the take it all apart due to a miscalculation. Sh*t happens they say, so I needed to fix it, do the job all over and live with the consequences... lol
So now my frame is finished to replace it on the ship again....


See how the profile follows the boards instead of placed on top of the boards.
Next step is to start with some woodcarving. I did some carving in the past with my Pfeill tools. I just needed a design and I chose a Baroque theme with Acanthus leaves. After I made the drawing, I needed it to transfer it onto the wood. I use real boxwood for this matter. The carving is very small and has a dimension of 60x25mm.


When been transferred onto the wood, I use a scroll saw to saw out the basic shape / outline of the carving.

Time to start, which I do in parts. So I start with the flower on top...

Then one of the sides....

Other side as well....

All that is left is the center part....but this will have to wait until sunday...
Let's have a sneak-peak how this will gonna look onto the ship shall we?? I'm curious, can't wait....

So, the carving will be finished hopefully this weekend and I can show the full details. Until then, thank you for alle the likes and comments.
See you soon,
Pter
- Joined
- Jan 9, 2020
- Messages
- 10,566
- Points
- 938

Dear Peter. I have already commented on Modelbouwforum but such an update deserves a comment. As to the stern - the change was well warranted and you now have perfect synergy in combination with the excellent carvings !
Great job on the carving! Looks like you have previous experience. Nice set of gouges. 
- Joined
- Feb 2, 2018
- Messages
- 126
- Points
- 183

Ptèr you have done a great job on the stern and magnificent carving.
- Joined
- Oct 11, 2021
- Messages
- 740
- Points
- 403

Finishing the stern
Hello my friends,
I would like to thank you all for the positive reactions and likes. It's much appreciated.
I have finished the carving of the stern and placed it on the ship. I hope you like it. But before I'll go to that, first some other things I placed on the ship.
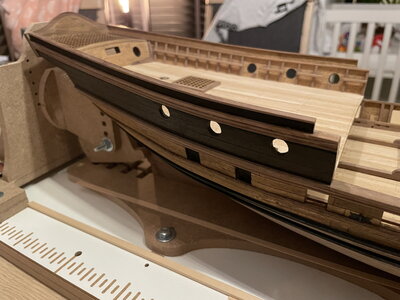
First I made a profile strip of 1,5x2mm and placed in just below the gunports. Second, I placed the upper railings on the stern.
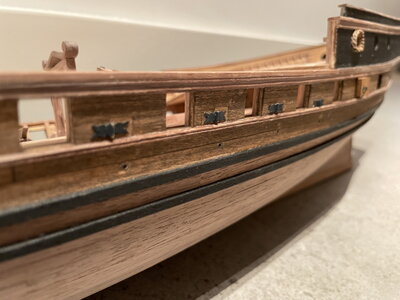
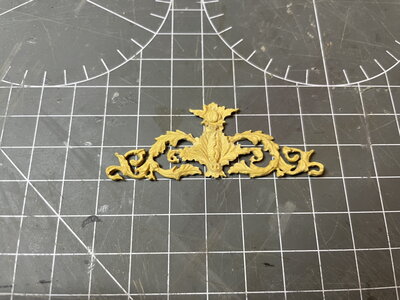
The carving finished!
And placed on the ship...
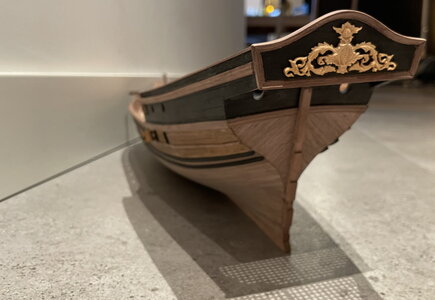
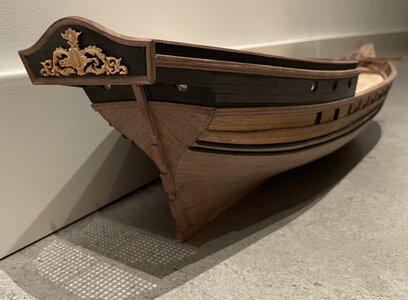
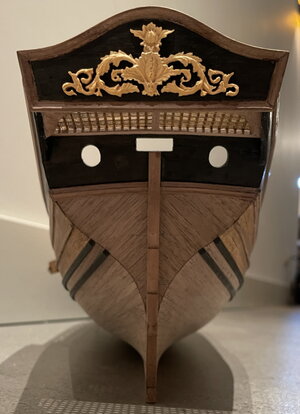
It's just out of alignment I see, not entirely placed in the middle. But in the end..... I'm pleased with the end result.
regards,
Pter
Hello my friends,
I would like to thank you all for the positive reactions and likes. It's much appreciated.
I have finished the carving of the stern and placed it on the ship. I hope you like it. But before I'll go to that, first some other things I placed on the ship.
First I made a profile strip of 1,5x2mm and placed in just below the gunports. Second, I placed the upper railings on the stern.


The carving finished!

And placed on the ship...


It's just out of alignment I see, not entirely placed in the middle. But in the end..... I'm pleased with the end result.
regards,
Pter
Carving is brilliant Pter! Congratulations on such a fine piece.
Hello Pter....Wow...just wow.Bell tower, Stern decoration & woodcarving
Hello my friends,
It's been a while since my last update., but I like to share my progress so far. This update is about the stern, decorations and finally rebuilding the upper part of the stern. Before we're going to start with the stern, first I made some progress on the bell tower which I made out of walnut.
View attachment 288691
View attachment 288692
View attachment 288699
View attachment 288700
So, eventually I had to demolish the stern of the ship a bit. I needed to remove the upper part to completely remodel it.
I had some time to figure it out and now I have to do it. It wasn't an easy task and let me show you the progress....
After the upper back plate of the stern was removed, I covered the outward facing part with walnut veneer. Second was to make some profile strips out of walnut. I used a profile scraper to do the job. After this was done, I assembled the parts and it was finished however.....
View attachment 288702
View attachment 288701
View attachment 288703
View attachment 288704
This time I made a mistake. The part is too high. I have to recut everything, and to re-assemble.
View attachment 288705
Ah well, it kept me awake for one night. Nothing is worse when you put blood, sweat and tears into the fabrication of a part, but the take it all apart due to a miscalculation. Sh*t happens they say, so I needed to fix it, do the job all over and live with the consequences... lol
So now my frame is finished to replace it on the ship again....
View attachment 288706
View attachment 288707
See how the profile follows the boards instead of placed on top of the boards.
Next step is to start with some woodcarving. I did some carving in the past with my Pfeill tools. I just needed a design and I chose a Baroque theme with Acanthus leaves. After I made the drawing, I needed it to transfer it onto the wood. I use real boxwood for this matter. The carving is very small and has a dimension of 60x25mm.
View attachment 288693
View attachment 288694
When been transferred onto the wood, I use a scroll saw to saw out the basic shape / outline of the carving.
View attachment 288695
Time to start, which I do in parts. So I start with the flower on top...
View attachment 288696
Then one of the sides....
View attachment 288697
Other side as well....
View attachment 288698
All that is left is the center part....but this will have to wait until sunday...
Let's have a sneak-peak how this will gonna look onto the ship shall we?? I'm curious, can't wait....
View attachment 288708
So, the carving will be finished hopefully this weekend and I can show the full details. Until then, thank you for alle the likes and comments.
See you soon,
Pter
- Joined
- Oct 11, 2021
- Messages
- 740
- Points
- 403

Woodcarving continues
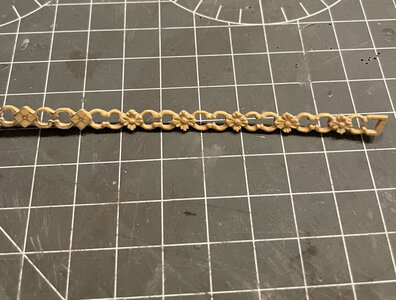
In this update I'll continue with carving. This time the upper part of the bulwark aft.
It starts with a drawing of the design. Because the pattern repeats itself over and over again, I only needed to draw a section.

I made a cardboard template and drew the outlines on a piece of wood. With my bandsaw I sawed a slide of 3mm. It need to be thinned down to approx. 2mm. However this is for later.


A dry-fit of the wooden part, just to be sure my measurements are fine...

Before we start with carving, the outline has to be cut out. Because of the small size of the carving, I couldn't use my scrollsaw and used my Proxxon / Dremel and my needlefiles.


Another dry-fit...

Time to carve. I'll start with the flowers, then the "C" parts. The three flowers on the right are done for the first step. (first step is to carve the depth and the shape) Step 2 is carving the details.

It will take some while to do both sides of the ship but luckily there is no deadline...
To be continued,
Peter
In this update I'll continue with carving. This time the upper part of the bulwark aft.
It starts with a drawing of the design. Because the pattern repeats itself over and over again, I only needed to draw a section.

I made a cardboard template and drew the outlines on a piece of wood. With my bandsaw I sawed a slide of 3mm. It need to be thinned down to approx. 2mm. However this is for later.


A dry-fit of the wooden part, just to be sure my measurements are fine...

Before we start with carving, the outline has to be cut out. Because of the small size of the carving, I couldn't use my scrollsaw and used my Proxxon / Dremel and my needlefiles.


Another dry-fit...

Time to carve. I'll start with the flowers, then the "C" parts. The three flowers on the right are done for the first step. (first step is to carve the depth and the shape) Step 2 is carving the details.

It will take some while to do both sides of the ship but luckily there is no deadline...
To be continued,
Peter
Peter, your carvings just blow me away! What a wonderful gift you have.
- Joined
- Feb 2, 2018
- Messages
- 126
- Points
- 183

spectacular, very good.
Hello Peter. I’m with Daniel here. Brilliant job.
- Joined
- Oct 11, 2021
- Messages
- 740
- Points
- 403

Mini tutorial - woodcarving part 1
So along the way I got some questions about carving, which tools I use and how I do it. First off all, it's not only the tools.
It's a combinations of the right tools, the right type of wood, a very good drawing and some insight how to carve. Experience and skills do help as well...

You have to start somewhere so I tried to find stuff about woodcarving. Well, guess what. Most of the material I have found was about carving on a big scale like make a bear out a log with a chainsaw or carving a human form, leaves or animals with expensive chisels. None of it that really comes close to the scale we ship modelers have to work on.
However I found one document of a fellow ship modeler "modelshipwright" or Bill Short, also a member of this forum, who made a very good and detailed document of how to carve with a rotary drill. I believe he uses an oldschool dental drill with belt drive.
Again seeing experienced French model shipbuilders using "Boxwood" to carve the smallest details into, I figured out just to try it, buy the wood and tools and experience a bit. This was a couple of years ago, and this is what I want to share with you.
First of all let's get the obvious out of the way and you perhaps question yourself which tool is better, handtool or rotary tool? Well there isn't really a "better" tool only your personal preferences counts. This topic isn't a contest to see which one is better, (I know you Americans out there loves a good contest or two ) but a comparison of both to show you that you can get the same result with both tools.
I'll hope you find this tutorial helpfull, there was some time involved to make it...
Carving with handtools
I'll start with the handtools. I use wood gouges of the Pfeil brand. They are very small Lino wood gouges which comes in different shapes and sizes.
You can get them online at various webshops. There are of course a lot of brands selling micro gouges. I just like the shape of the handle, it fits my hand perfectly compares to others.
As you can see in the picture below. I have a couple selected. I have a choise of more than a couple because I really love the gouges, however for this tutorial I use only two of them.

So, I'll show you step by step how to carve a simple flower. As always you need to do the following prior to carving.
1) Make a good drawing on scale
2) Select a piece of wood and shape the wood so it can accept your drawing
3) take away the excess of wood so only the outline of the piece to carve remains.
When you did all that, time to carve!
Find the deepest point and the highest point. In my case for this flower, the center of the flower is the highest point and also the edges of the leaves.
The deepest point is just around the center part of the flower. So, I use a half round gouge to start from the highest point of the leaves and carve into the wood in the direction of the center. Be sure you don't cut away the center!!!


After this step, your reference lines / drawing is gone. So for the next step is to re-draw the lines you want to remove for the next step.

The next step is to carve on the lines you just drew, only the shape of your object guides you in which direction you should work.
For this instance in need to separate the leaves from one another. The line is wide and deep on the edge of the leave and becomes thinner and shallower in the direction of the center. So I start from the center en work towards the edge and I use a different gouge with a "V"shape.


Next step is again to draw your lines to carve...In my example the line that divides the leaves into three sections.

To carve these lines I use the same gouge as the step before with a "V" shape. Again from inside towards the edge of the leave.

When finished with carving, it's time to clean-up the work. You can use some fine grid sandpaper, a sanding pad, a polishing disk etc etc.
What you want to achieve is to soften the hard lines and to smoothen all the details a little bit. It will improve the overall appearance.

For this tutorial with handtools, I did not fixate my work piece. It is however a preferred way to do so. You're working with very very sharp tools and you do not want this into your fingers, believe me. Second, when your piece is securely fixate to your workbench, cutting mat etc, it's much easier to operate your tools with both hands. You can use double sides tape to fixate your piece. You can also use a mild glue. It depends on your preferences again.
And last but not least, to quote Norm Abraham "the most important safety rule is to use "these" (pointing at his glasses) safety glasses". You don't want a chip of wood into your precious eyes.
Next part will be part 2 where I use my Proxxon rotary tool to carve the same flower. Different tool, different technique, same result!
Cheers,
Pter
So along the way I got some questions about carving, which tools I use and how I do it. First off all, it's not only the tools.
It's a combinations of the right tools, the right type of wood, a very good drawing and some insight how to carve. Experience and skills do help as well...

You have to start somewhere so I tried to find stuff about woodcarving. Well, guess what. Most of the material I have found was about carving on a big scale like make a bear out a log with a chainsaw or carving a human form, leaves or animals with expensive chisels. None of it that really comes close to the scale we ship modelers have to work on.
However I found one document of a fellow ship modeler "modelshipwright" or Bill Short, also a member of this forum, who made a very good and detailed document of how to carve with a rotary drill. I believe he uses an oldschool dental drill with belt drive.
Again seeing experienced French model shipbuilders using "Boxwood" to carve the smallest details into, I figured out just to try it, buy the wood and tools and experience a bit. This was a couple of years ago, and this is what I want to share with you.
First of all let's get the obvious out of the way and you perhaps question yourself which tool is better, handtool or rotary tool? Well there isn't really a "better" tool only your personal preferences counts. This topic isn't a contest to see which one is better, (I know you Americans out there loves a good contest or two
I'll hope you find this tutorial helpfull, there was some time involved to make it...
Carving with handtools
I'll start with the handtools. I use wood gouges of the Pfeil brand. They are very small Lino wood gouges which comes in different shapes and sizes.
You can get them online at various webshops. There are of course a lot of brands selling micro gouges. I just like the shape of the handle, it fits my hand perfectly compares to others.
As you can see in the picture below. I have a couple selected. I have a choise of more than a couple because I really love the gouges, however for this tutorial I use only two of them.

So, I'll show you step by step how to carve a simple flower. As always you need to do the following prior to carving.
1) Make a good drawing on scale
2) Select a piece of wood and shape the wood so it can accept your drawing
3) take away the excess of wood so only the outline of the piece to carve remains.
When you did all that, time to carve!
Find the deepest point and the highest point. In my case for this flower, the center of the flower is the highest point and also the edges of the leaves.
The deepest point is just around the center part of the flower. So, I use a half round gouge to start from the highest point of the leaves and carve into the wood in the direction of the center. Be sure you don't cut away the center!!!


After this step, your reference lines / drawing is gone. So for the next step is to re-draw the lines you want to remove for the next step.

The next step is to carve on the lines you just drew, only the shape of your object guides you in which direction you should work.
For this instance in need to separate the leaves from one another. The line is wide and deep on the edge of the leave and becomes thinner and shallower in the direction of the center. So I start from the center en work towards the edge and I use a different gouge with a "V"shape.


Next step is again to draw your lines to carve...In my example the line that divides the leaves into three sections.

To carve these lines I use the same gouge as the step before with a "V" shape. Again from inside towards the edge of the leave.

When finished with carving, it's time to clean-up the work. You can use some fine grid sandpaper, a sanding pad, a polishing disk etc etc.
What you want to achieve is to soften the hard lines and to smoothen all the details a little bit. It will improve the overall appearance.

For this tutorial with handtools, I did not fixate my work piece. It is however a preferred way to do so. You're working with very very sharp tools and you do not want this into your fingers, believe me. Second, when your piece is securely fixate to your workbench, cutting mat etc, it's much easier to operate your tools with both hands. You can use double sides tape to fixate your piece. You can also use a mild glue. It depends on your preferences again.
And last but not least, to quote Norm Abraham "the most important safety rule is to use "these" (pointing at his glasses) safety glasses". You don't want a chip of wood into your precious eyes.
Next part will be part 2 where I use my Proxxon rotary tool to carve the same flower. Different tool, different technique, same result!
Cheers,
Pter
- Joined
- Oct 11, 2021
- Messages
- 740
- Points
- 403

Mini tutorial - woodcarving part 2
So I'll use this post to show you guys how to carve the same flower only using a different tool and to be more precise a rotary drill.
I've used a Dremel, it broke down. Changed it to a Proxxon recently and to me it's all the same and does the job fine.
So, do not fixate to much on brand but more on what's available and how the handle lies or fits into your hands. It's again a personal preference.
Some of the users prefer a old school dental drill, the one with belt drive. Again, it's up to you!

With a rotary drill, you need bits. Please use good ones made out of strong hardened metal. You only need a few so it is wise to spend your dollar / Euro etc on good bits. I use a medium to low RPM to carve. With sharp bits you'll get through the wood easy as a hot knife through butter and you don't burn your bits.

Again the same preparations are in order prior to carving as with is mentioned with the handtools.
1) Make a good drawing on scale
2) Select a piece of wood and shape the wood so it can accept your drawing
3) take away the excess of wood so only the outline of the piece to carve remains.
When you did all that, time to carve! With a rotary tool, you need to use a different technique, but you can follow the same steps as with hand tools.
Find the deepest point and the highest point. In my case for this flower, the center of the flower is the highest point and also the edges of the leaves.
The deepest point is just around the center part of the flower. So, for my example I use a pointed bit to carve a circle on the deepest point.


With the first two steps, your lines are gone. You need to redraw the lines for the step you want to execute.


When finished with the previous step, your lines are gone again. So you need to draw the lines for you next step.


When finished with carving, it's time to clean-up the work. You can use some fine grid sandpaper, a sanding pad, a polishing disk etc etc.
What you want to achieve is to soften the hard lines and to smoothen all the details a little bit. It will improve the overall appearance.

This is the end of the second part of this tutorial. Maybe you want to try woodcarving? I would say, give it a go and perhaps you will like it.
I think it will enhance your model and personalize your model ship more.
And last but not least, to quote Norm Abraham "the most important safety rule is to use "these" (pointing at his glasses) safety glasses". You don't want a chip of wood into your precious eyes.
Good luck with yours and perhaps you will show it here on this forum as well. I'm looking forward to it.
If you have any questions related to this tutorial, please feel free to comment in my buildlog or send me a pm.
Cheers,
Pter
So I'll use this post to show you guys how to carve the same flower only using a different tool and to be more precise a rotary drill.
I've used a Dremel, it broke down. Changed it to a Proxxon recently and to me it's all the same and does the job fine.
So, do not fixate to much on brand but more on what's available and how the handle lies or fits into your hands. It's again a personal preference.
Some of the users prefer a old school dental drill, the one with belt drive. Again, it's up to you!

With a rotary drill, you need bits. Please use good ones made out of strong hardened metal. You only need a few so it is wise to spend your dollar / Euro etc on good bits. I use a medium to low RPM to carve. With sharp bits you'll get through the wood easy as a hot knife through butter and you don't burn your bits.

Again the same preparations are in order prior to carving as with is mentioned with the handtools.
1) Make a good drawing on scale
2) Select a piece of wood and shape the wood so it can accept your drawing
3) take away the excess of wood so only the outline of the piece to carve remains.
When you did all that, time to carve! With a rotary tool, you need to use a different technique, but you can follow the same steps as with hand tools.
Find the deepest point and the highest point. In my case for this flower, the center of the flower is the highest point and also the edges of the leaves.
The deepest point is just around the center part of the flower. So, for my example I use a pointed bit to carve a circle on the deepest point.


With the first two steps, your lines are gone. You need to redraw the lines for the step you want to execute.


When finished with the previous step, your lines are gone again. So you need to draw the lines for you next step.


When finished with carving, it's time to clean-up the work. You can use some fine grid sandpaper, a sanding pad, a polishing disk etc etc.
What you want to achieve is to soften the hard lines and to smoothen all the details a little bit. It will improve the overall appearance.

This is the end of the second part of this tutorial. Maybe you want to try woodcarving? I would say, give it a go and perhaps you will like it.
I think it will enhance your model and personalize your model ship more.
And last but not least, to quote Norm Abraham "the most important safety rule is to use "these" (pointing at his glasses) safety glasses". You don't want a chip of wood into your precious eyes.
Good luck with yours and perhaps you will show it here on this forum as well. I'm looking forward to it.
If you have any questions related to this tutorial, please feel free to comment in my buildlog or send me a pm.
Cheers,
Pter


