
-

SUBSCRIBE TO SHIPS IN SCALE TODAY!
The beloved Ships in Scale Magazine is back and charting a new course for 2026!
Discover new skills, new techniques, and new inspirations in every issue.
NOTE THAT OUR NEXT ISSUE WILL BE MARCH/APRIL 2026 -

Win a Free Custom Engraved Brass Coin!!!
As a way to introduce our brass coins to the community, we will raffle off a free coin during the month of August. Follow link ABOVE for instructions for entering.
You are using an out of date browser. It may not display this or other websites correctly.
You should upgrade or use an alternative browser.
You should upgrade or use an alternative browser.
Cazador-Xebec Occre 1:60 by Paul V
- Thread starter paulv1958
- Start date
- Watchers 6
-
- Tags
- cazador-xebec occre


Tks Gemma.
Tks Brian
Got used to it by now. Its 3 ships old and till going strong. IT may be the fact that is been really hot for the last few weeks.
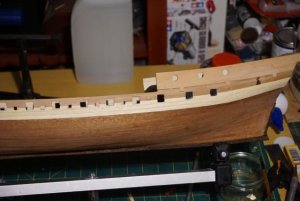
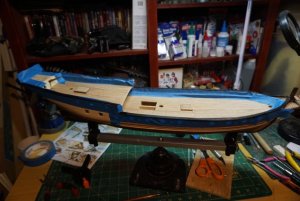
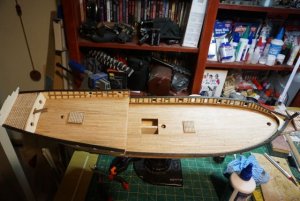
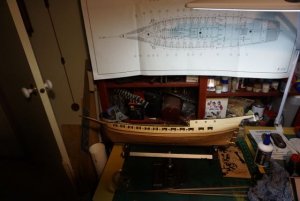
Well the First and second layer planking is complete and the rubbing strakes have been added. The majority of the core superstructure is now finished with stern and stem to be competed next.
I have to say that this kit has been a real pleasure to do so far with lots of extra wood for the hull. This is my 4th kit from Occre ( Stevenson's Rocket ( Loco), the Albatross, Occre Workbench and this and I have t say I have not been disappointed yet). There is lots of left over wood, unlike AL kits, where there is JUST the right amount if your careful.
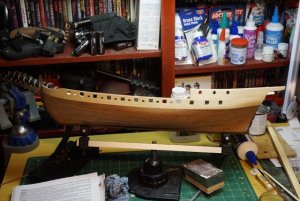
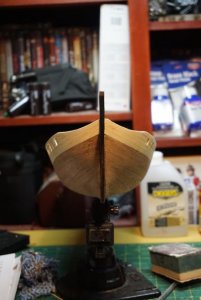
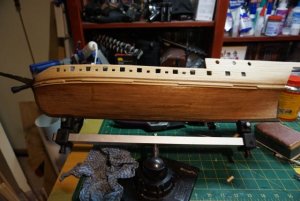
The hull came together very nicely and I am really happy with the final result. The effort put in with the planking payed off big tine ant it all came together with no issued and has lined up perfectly on both sides.
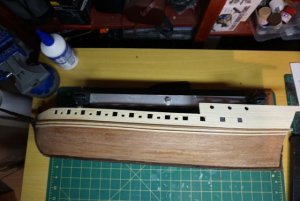
Lower planking complete and above deck started.
Only issue being that the sappelli planks were a little rough on the edges and needed clearing up
120
121
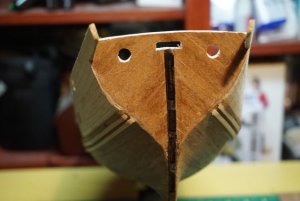
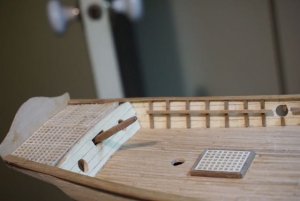
Upper planking completed and lightly sanded and holes re cut.
122
123
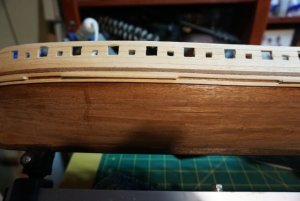
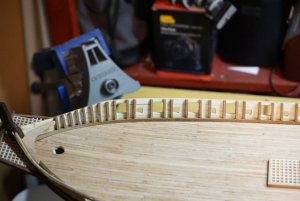
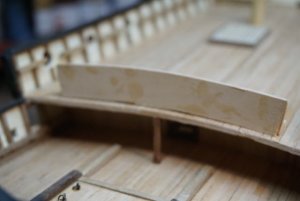
Rubbing strakes added at the lower to upper deck change point.
Spacing between the strakes done with special consistency measuring device.
124
125
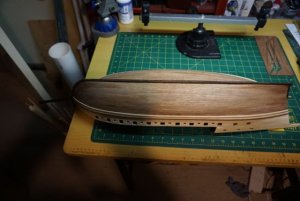
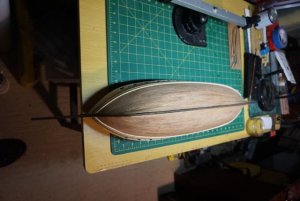
The hull finally completed
126
127
128
129
133
BRB same BAT time
Same BAT Channel
Paul
Tks Brian
Got used to it by now. Its 3 ships old and till going strong. IT may be the fact that is been really hot for the last few weeks.
Well the First and second layer planking is complete and the rubbing strakes have been added. The majority of the core superstructure is now finished with stern and stem to be competed next.
I have to say that this kit has been a real pleasure to do so far with lots of extra wood for the hull. This is my 4th kit from Occre ( Stevenson's Rocket ( Loco), the Albatross, Occre Workbench and this and I have t say I have not been disappointed yet). There is lots of left over wood, unlike AL kits, where there is JUST the right amount if your careful.
The hull came together very nicely and I am really happy with the final result. The effort put in with the planking payed off big tine ant it all came together with no issued and has lined up perfectly on both sides.
Lower planking complete and above deck started.
Only issue being that the sappelli planks were a little rough on the edges and needed clearing up
120
121
Upper planking completed and lightly sanded and holes re cut.
122
123
Rubbing strakes added at the lower to upper deck change point.
Spacing between the strakes done with special consistency measuring device.
124
125
The hull finally completed
126
127
128
129
133
BRB same BAT time
Same BAT Channel
Paul
Attachments
-
 DSC03120.jpg48.1 KB · Views: 288
 -
 DSC03121.jpg35.6 KB · Views: 290
 -
 DSC03122.jpg57.1 KB · Views: 288
 -
 DSC03123.jpg34.8 KB · Views: 294
 -
 DSC03124.jpg45.3 KB · Views: 297
 -
 DSC03125.jpg35.5 KB · Views: 298
 -
 DSC03126.jpg37.7 KB · Views: 293
 -
 DSC03127.jpg38.2 KB · Views: 290
 -
 DSC03128.jpg40 KB · Views: 292
 -
 DSC03129.jpg35 KB · Views: 293
 -
 DSC03133.jpg33.3 KB · Views: 292


Very nice looking model. Like the spacing device. :lol:
Tks Gemma
Tks Gary
Appreciated.
Tks Gary
Appreciated.
Hi All
With the hill being completed, its time to move on to the fit out.
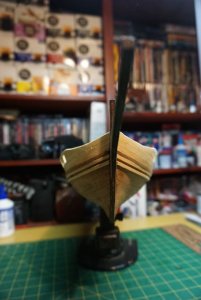
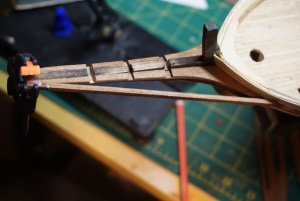
First up the stem
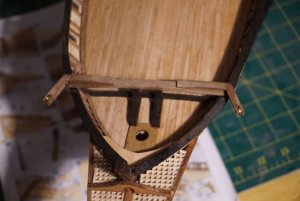
The stem on the cazador is an elongated affair that looks alot like the bottom par of a birds beak.
IT consists of the keel stem, support bracing and lattice work. The kit parts were easily formed and added. The only difficulty was cutting each of the gratings as they were odd shaped and small. Occre give you lots of grating parts that were made of very cleanly cut pieces. A lot nice than the stuff in AL kits. Two full gratings where required to provide the 4 gratings.
Adding the Stem supports
136
Stem completed awating grating supports.
137
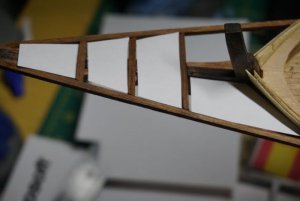
Grating supports added
140
Templates made from paper for gratings
141
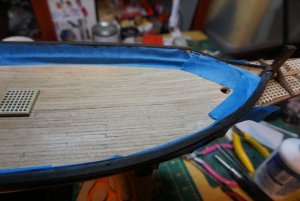
Gratings added and left over .5 mm hull planking used to neat up stem center
142
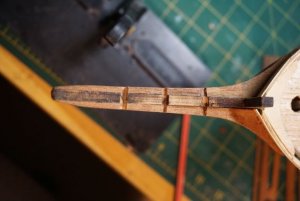
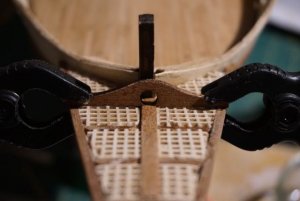
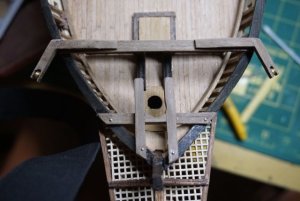
Bowsprit support added
143
Next up all the bulwark re enforcement ( lots of little bits of gluing.)....
With the hill being completed, its time to move on to the fit out.
First up the stem
The stem on the cazador is an elongated affair that looks alot like the bottom par of a birds beak.
IT consists of the keel stem, support bracing and lattice work. The kit parts were easily formed and added. The only difficulty was cutting each of the gratings as they were odd shaped and small. Occre give you lots of grating parts that were made of very cleanly cut pieces. A lot nice than the stuff in AL kits. Two full gratings where required to provide the 4 gratings.
Adding the Stem supports
136
Stem completed awating grating supports.
137
Grating supports added
140
Templates made from paper for gratings
141
Gratings added and left over .5 mm hull planking used to neat up stem center
142
Bowsprit support added
143
Next up all the bulwark re enforcement ( lots of little bits of gluing.)....
Attachments
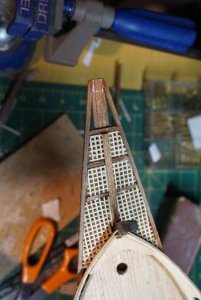
I have never built an Occre model, but those gratings look large However, I am used to 1:78 scale where the correct spacing is about .8 or .9 mm. So these would be bigger at about 1.1 mm.
the grate kit is a std 52 x 52 2mm hole kit
at 1:60 it works out to about a ( .5mm per inch) or 4 inch square hole. This would be close enough. Given there are no specifics about these ships, who knows.
I build for these fun, not for precision scale accuracy.
If I wanted precision, it would not be a kit build and we would only be guessing as there are no scale plans around of these ships and their actual fittings.
Greetings
The hull fit out continues.
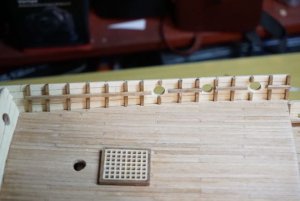
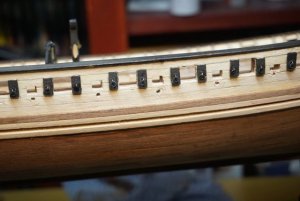
Next up was fitting the small gratings, inner stanchions and inner rail. The only issue here was a LARGE error in the instructions.
The instructions say to cut 106 25mm stanchions. The height of the bulwark is 8-15mm varying on the lower deck and 15 on the upper. So if you cut all lengths then you would have 106 spare bits of 10mm wood. I doubt that they would have supplied that much spare.
Solution measure & cut each piece against the bulwark as you go.
There is no scale plan for the placement of the stanchions on the lower deck. Following the photos its line up with oar port and cannon opening.
145
For the keen eyed, the spacing looks wrong and not centered over the holes, but this is how its supposed to be, equal distance spacing not lined up with holes. ( i assume the stanchions represent the hull ribs.)
149
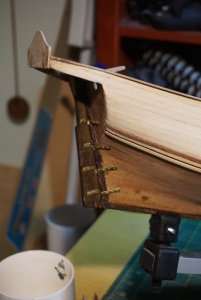
Adding the lower inner rails (girders)
146
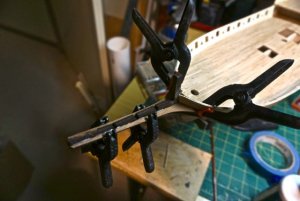
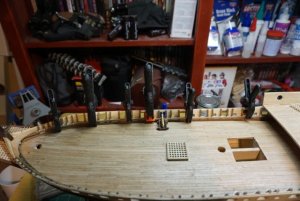
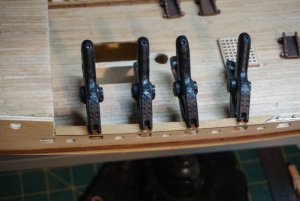
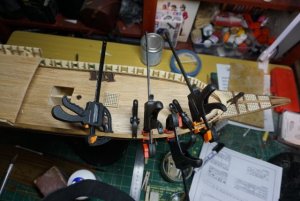
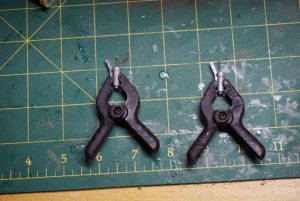
Next up was the bulwark railing / capping. This came in three sections due to the curve and shaping of the hull. The difficulty came in holding the railing in place and shape whilst the glue dried
NEVER enough clamps
148
150
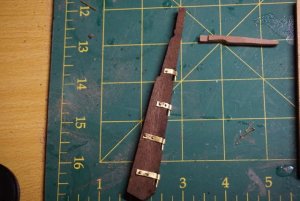
Next up the rudder.
No big issues here. Tiller has to be hand formed from 4x4mm walnut
151
152
Rudder and tiller fitted. ( it looks short, but any longer and it would hit the mast.)
153
154
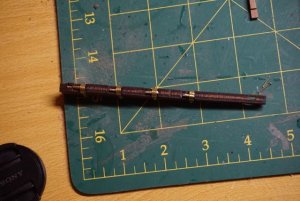
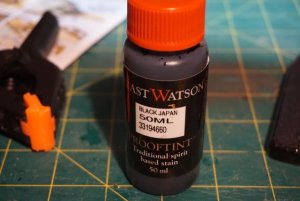
The instructions call for the bulwark railing to be stained walnut or use pitch. ( yeh sure). I tried some walnut stain but it was to light and showed up ply layers. No wanting to paint it black, i decided use a Jap black stain from Feast Watson.
Taping it up
155
Stain applied
156
The bottle used is a sample bottle that Bunnings hardware in Aus sell. It is a lot cheaper than buying a big tin and lasts a long while
157
The final result.
158
Given that I bought this kit on a whim at a bargain price of $299 new, so far the kit has been a absolute Joy to build and is shaping up nicely.
so far I would not hesitate to recommend it.
The hull fit out continues.
Next up was fitting the small gratings, inner stanchions and inner rail. The only issue here was a LARGE error in the instructions.
The instructions say to cut 106 25mm stanchions. The height of the bulwark is 8-15mm varying on the lower deck and 15 on the upper. So if you cut all lengths then you would have 106 spare bits of 10mm wood. I doubt that they would have supplied that much spare.
Solution measure & cut each piece against the bulwark as you go.
There is no scale plan for the placement of the stanchions on the lower deck. Following the photos its line up with oar port and cannon opening.
145
For the keen eyed, the spacing looks wrong and not centered over the holes, but this is how its supposed to be, equal distance spacing not lined up with holes. ( i assume the stanchions represent the hull ribs.)
149
Adding the lower inner rails (girders)
146
Next up was the bulwark railing / capping. This came in three sections due to the curve and shaping of the hull. The difficulty came in holding the railing in place and shape whilst the glue dried
NEVER enough clamps
148
150
Next up the rudder.
No big issues here. Tiller has to be hand formed from 4x4mm walnut
151
152
Rudder and tiller fitted. ( it looks short, but any longer and it would hit the mast.)
153
154
The instructions call for the bulwark railing to be stained walnut or use pitch. ( yeh sure). I tried some walnut stain but it was to light and showed up ply layers. No wanting to paint it black, i decided use a Jap black stain from Feast Watson.
Taping it up
155
Stain applied
156
The bottle used is a sample bottle that Bunnings hardware in Aus sell. It is a lot cheaper than buying a big tin and lasts a long while
157
The final result.
158
Given that I bought this kit on a whim at a bargain price of $299 new, so far the kit has been a absolute Joy to build and is shaping up nicely.
so far I would not hesitate to recommend it.
Attachments
-
 DSC03145.jpg36.1 KB · Views: 304
 -
 DSC03146.jpg45.6 KB · Views: 298
 -
 DSC03148.jpg36.6 KB · Views: 294
 -
 DSC03149.jpg32.2 KB · Views: 291
 -
 DSC03150.jpg46.9 KB · Views: 297
 -
 DSC03151.jpg45.5 KB · Views: 298
 -
 DSC03152.jpg45.4 KB · Views: 301
 -
 DSC03153.jpg30.8 KB · Views: 304
 -
 DSC03154.jpg28.1 KB · Views: 297
 -
 DSC03155.jpg45.3 KB · Views: 296
 -
 DSC03156.jpg39 KB · Views: 303
 -
 DSC03157.jpg34.4 KB · Views: 302
 -
 DSC03158.jpg51.9 KB · Views: 301

Hi Paul,The Cazador shaping up nicely!
Tks Zoltan.
Its a fun kit.
Long way to go yet.
Its a fun kit.
Long way to go yet.
Sounds like the kit was never assembled by the company. So, nice to catch the error and looks great. Ships follow rules so I am sure your solution is probably exactly how the real one was built.
Tks Gary,
I don't think I've come across the perfect instructions on any kit yet.
Panart is the worst I've done, followed by AL, who do not only get the instructions wrong, they just leave any info out. ]
I hear billings sucks...
The AL "San Juan XII" is a classic case. Its a really nice kit and model but....
The build info ends at hull completion and the advice is " The most hard and dedicated work is done . All the superstructure parts shown on the photographs( 2 of them) are very easy to build up. You just have to assemble and glue them together" and "Due to the amount of cordage that makes up the rigging, we feel that an explanation referring to each one would only lead to confusion."
I'm not kidding...
I've since discovered that an 'AL' Classic Kit means . No info , we trust you know what your doing.....
Pity the first timer...
Thankfully this is where forums and members build sharing are awesome.
Only problem is I keep picking ships that don't have a log or their in an Italian / Polish / Russian site, with google translate doing an :angry-banghead: :lol: :music-rockout: job.
Your task here is to put that all right Paul and give us a build log we can all follow. 
Regarding Billing I have the Bounty as my next big build, here are the instructions that come with it:
http://www.billingboats.com/components/com_redshop/assets/document/extrafields/1484740754%C2%A9BB492%20HMS%20Bounty.pdf
Glad I started with the Pearl, at least that has lots of images of an actual build, even if it is a bit short on words.
Just a quick update:
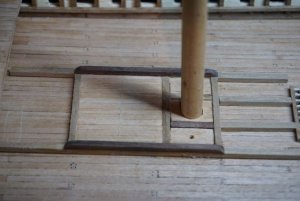
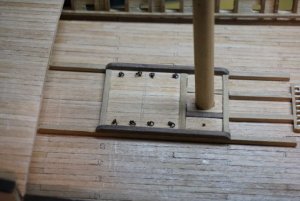
Main deck hatch and slide way added. No issues
159
161
Bow knightheds & Tack added. The tack precut was way to long and had to be significantly shorted to fit. Just a PIA to modify, but all worked in the end
160
Cat Davit added next, This was an interesting build as there was no pre cut and it consisted of 1 2 x 6mm walnut piece and 4 5 x 5 walnut pieces that had to be shaped and glued. The final Davits were pinned and glued together for strength. A slot was cut ( love the dremel) on each for the sheave.
163
Finally the mast Çarling was added to complete the structure.
166
Oh and BTW I did not know the names of these items nor their use, I'm just repeating from the parts list. BUT I will look it up. The Davits are used for the anchor I know that...
PS
1: A davit is any of various cranelike devices used on a ship for supporting, raising, and lowering boats, anchors, etc.
2; A carling is,Fore and aftdeck timbers set between the deck beams to stiffen them and support the ledges.
FYI ref: https://brown.edu/Departments/Joukowsky_Institute/courses/maritimearchaeology11/files/17920584.pdf
See you soon.
Attachments

Nice detail with the brass pulleys.
Donnie
Donnie
Tks Donnie, Sometimes Occre surprise you with little added details, but other manufacturing decisions...
As you will see in the following photos, some strange manufacturing decisions were made.
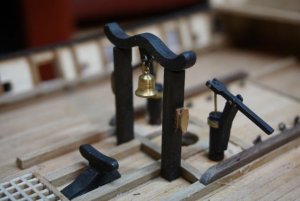
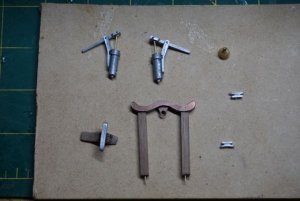
Next up was the pumps and ships bell housing, & major cleats.
The parts consisted of wood and metal combinations, with the metal being white metal, a brown metal ( ??) and brass.
Why?? only they can tell you. Also the kit suggested painting the metal parts light brown or cream. ( to simulate wood ?). It looked bad.
My solution paint / stain black as per most kits. Whilst not as occre suggested. I was happy with the final result.
Gluing up the pump parts. ( CA thick)
168
All the parts, note the brown metal?
169
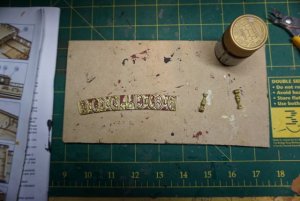
Stained and painted and added to ship. There is still a brown clrat to give show how bad it looks painted as suggested. Will paint black later.
170
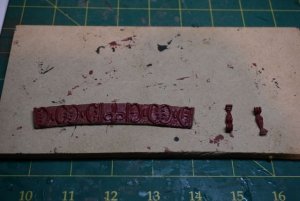
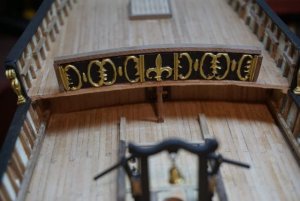
Upper deck balustrade & carving work
The backing board is not the same size as the metal carving piece. Its longer and higher so has to be sanded to pit. I did this pre-fitting so that once the decoration was added later it fitted. Also to line up the balustrade position mid deck, I used the center symbol of the carving to line up with the center of the lower deck and column support
171
supports added
172
Display carving relief, primer added to metal to prevent paint peel later.
173
Another personal decision was made due to the instructions to painting the relief cream / brown to paint all relief work black /gold leaf. I think it looks a lot nicer.
Adding the gold leaf to the relief work ( Tamiya Gild leaf Acrylic) ( back added after)
174
Completed Balustrade, capping added.
175
Next was to add back the cannon port doors and associated ring pulls / handles ( 92 eyelets & rings). The kit also called for the oar openings to be re added and closed. As the kit supplied full oars for all the ports. I have decided to place the oar in rowing position rather than bundled on deck as suggested. ( see later in log when I get to it.)
176
Cannon port doorways
179
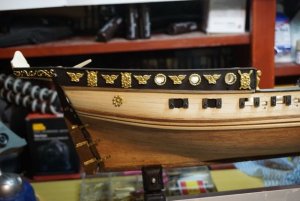
Finally the upper bulwark was painted black and external carvings added ( leaf gold as per previous decision)
182
183
The metal castings were in good condition, the only modification needed was the flower below on the lighter wood. I used the dremel to grind out the spacing between the petals as it was closed up and looked odd and did not show off the petals clearly.
As you will see in the following photos, some strange manufacturing decisions were made.
Next up was the pumps and ships bell housing, & major cleats.
The parts consisted of wood and metal combinations, with the metal being white metal, a brown metal ( ??) and brass.
Why?? only they can tell you. Also the kit suggested painting the metal parts light brown or cream. ( to simulate wood ?). It looked bad.
My solution paint / stain black as per most kits. Whilst not as occre suggested. I was happy with the final result.
Gluing up the pump parts. ( CA thick)
168
All the parts, note the brown metal?
169
Stained and painted and added to ship. There is still a brown clrat to give show how bad it looks painted as suggested. Will paint black later.
170
Upper deck balustrade & carving work
The backing board is not the same size as the metal carving piece. Its longer and higher so has to be sanded to pit. I did this pre-fitting so that once the decoration was added later it fitted. Also to line up the balustrade position mid deck, I used the center symbol of the carving to line up with the center of the lower deck and column support
171
supports added
172
Display carving relief, primer added to metal to prevent paint peel later.
173
Another personal decision was made due to the instructions to painting the relief cream / brown to paint all relief work black /gold leaf. I think it looks a lot nicer.
Adding the gold leaf to the relief work ( Tamiya Gild leaf Acrylic) ( back added after)
174
Completed Balustrade, capping added.
175
Next was to add back the cannon port doors and associated ring pulls / handles ( 92 eyelets & rings). The kit also called for the oar openings to be re added and closed. As the kit supplied full oars for all the ports. I have decided to place the oar in rowing position rather than bundled on deck as suggested. ( see later in log when I get to it.)
176
Cannon port doorways
179
Finally the upper bulwark was painted black and external carvings added ( leaf gold as per previous decision)
182
183
The metal castings were in good condition, the only modification needed was the flower below on the lighter wood. I used the dremel to grind out the spacing between the petals as it was closed up and looked odd and did not show off the petals clearly.
Attachments
-
 DSC03170.jpg32.3 KB · Views: 306
 -
 DSC03171.jpg24.5 KB · Views: 297
 -
 DSC03172.jpg32.9 KB · Views: 296
 -
 DSC03173.jpg37 KB · Views: 298
 -
 DSC03175.jpg39.1 KB · Views: 306
 -
 DSC03176.jpg38.1 KB · Views: 310
 -
 DSC03179.jpg37.2 KB · Views: 306
 -
 DSC03168.jpg52.6 KB · Views: 303
 -
 DSC03169.jpg36 KB · Views: 312
 -
 DSC03182.jpg41.7 KB · Views: 316
 -
 DSC03183.jpg38.5 KB · Views: 329
 -
 DSC03174.jpg45 KB · Views: 311
Nice decisions. This makes the model come alive.