
Hi Jim, Are you still posting on the Charles Royal Yacht, loved your posts an threads on tool, glue, etc PLEASE CONTINUE, and hope every thing is OK. Don

-

SUBSCRIBE TO SHIPS IN SCALE TODAY!
The beloved Ships in Scale Magazine is back and charting a new course for 2026!
Discover new skills, new techniques, and new inspirations in every issue.
NOTE THAT OUR NEXT ISSUE WILL BE MARCH/APRIL 2026 -

Win a Free Custom Engraved Brass Coin!!!
As a way to introduce our brass coins to the community, we will raffle off a free coin during the month of August. Follow link ABOVE for instructions for entering.
You are using an out of date browser. It may not display this or other websites correctly.
You should upgrade or use an alternative browser.
You should upgrade or use an alternative browser.
Charles Royal Yacht, 1674, Scale 1:64, by Woody Joe (Japan)
@Norway Thank you with your compliments Knut!! This tool is called drawplate, I bought the same one here: https://www.byrnesmodelmachines.com/drawplate5.html Personally, I like it very much! It is good quality for the money you spend! I have other drawplates, but this is the only one I made wooden treenails.Where did you buy the tool for making wooden nails.

You are more than welcome. Please do ask again if you have any question!Thanks for the tips


Jim,
Just catching up - excellent. Need to learn how to solder really like your technique for the eye bolts as well
Just catching up - excellent. Need to learn how to solder really like your technique for the eye bolts as well
@md1400cs Thanks, Michael! Soldering is not hard, at all. It is all about learning to control temperature. You have to find the right temperature when the solder melts and move the torch (flame) to a spot where you need. You will see the melted solder follow your flame!! Another success for happy soldering is tight joints. Before even turn on the torch, make sure everything as tight as possible (no spaces)! Start with a larger diameter wire just to feel...
Cannons
Hello fellow modelers. As always, I would like to thank all of you who made an interest in this building log, for your encouraging comments and likes.")
Today we are making cannons. Woody Joe provides well-made but much-simplified cannon carriages. All parts are laser cut (except the barrels) and require some cleaning and gluing together.

Wheels, however, will require special attention. They need to be rounded first. Here how I do it:


Bellow is the assembled cannon carriages as by Woodie Joe. They are not bad and most-likely will suffice most of us.

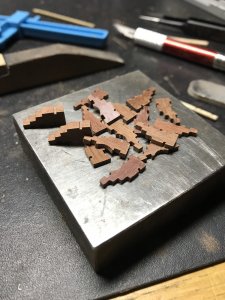
…but the kit suggested painting! Everything was great until the word ‘paint’. I decided to make my own. I use my wood stock and using the table saw cut all the steps\groves.


Once I satisfied with the shape, I sliced them for individual pieces.

I made track axles from a square blank 2 x 2 mm. To make them round, I cut a piece of brass tube and shape it like a cutter. Then, tighten the cutter in my Dremel tool, and while rotating moved one end of the square blanks in the tool until having the right length. Then switch to another end.


To be continued....
Hello fellow modelers. As always, I would like to thank all of you who made an interest in this building log, for your encouraging comments and likes.
Today we are making cannons. Woody Joe provides well-made but much-simplified cannon carriages. All parts are laser cut (except the barrels) and require some cleaning and gluing together.
Wheels, however, will require special attention. They need to be rounded first. Here how I do it:
- Find a drill bit with the same diameter as the inside hole in the wheel. Assemble all the wheels along the drill, and put the CA glue on the first and last wheel making sure all the wheels tight (* you may use scrap wood for the first and the last placeholders, we need them just to hold the rest of the wheels).
- Put the entire assembly in the power tool of your choice, here I used my Dremel.
- Use 500grit sandpaper on an even\flat surface. Turn ON the tool and sand the entire assembly controlling the level and pressure slightly moving. Turn off and check. If blanks where originally a good quality, you will not require much sanding. It has to be round!
Bellow is the assembled cannon carriages as by Woodie Joe. They are not bad and most-likely will suffice most of us.
…but the kit suggested painting! Everything was great until the word ‘paint’. I decided to make my own. I use my wood stock and using the table saw cut all the steps\groves.
Once I satisfied with the shape, I sliced them for individual pieces.
I made track axles from a square blank 2 x 2 mm. To make them round, I cut a piece of brass tube and shape it like a cutter. Then, tighten the cutter in my Dremel tool, and while rotating moved one end of the square blanks in the tool until having the right length. Then switch to another end.
To be continued....
Attachments

Jim great idea for rounding the wheels. I'll be using that. Thanks 

@BigMike and @DenisR Thank you, mates! I use brass tubing as it widely available in various diameters (easy to find). A much better Ideya to use steel tubes, they can hold the sharp edge longer. Edge should be sharp to cut, otherwise, it will burn the wood. You may need to experiment with sharpening, I use a disk cutter.
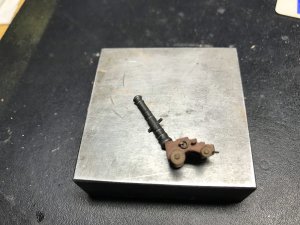
I shall continue. Woodie doesn't provide ready-made capsquare, I also didn't find material in the kit to make one. It was evident that I have to make one. I found some leftover strips from photoetch freet (when building plastic ships). Using two steel blanks I made a jig to bent capsquare. First, a measured the trunnion diameter and find drillbit and steel road. Then, I tighten together both steel blank in a wise and drill the hole right in between so it makes exact half on each of the blanks. using one of the halves CA steel rod to make a die. It works pretty simply:
On the second half (without the rod), place the strip of the desired size aligning the center of the gutter. Cover with the second half ( matrix) and clamp tightly in a vise. Unclench and get capsquare. Oh...yes, you would have to blacken it. capsquare eyebolt and joint bolt made out of steel loop.

Then I made a gun tackle loop, breeching ringbolt and train tackle loop. I have discussed how to make various ringbolts in the previous post: https://shipsofscale.com/sosforums/...-64-by-woody-joe-japan.2636/page-8#post-49831


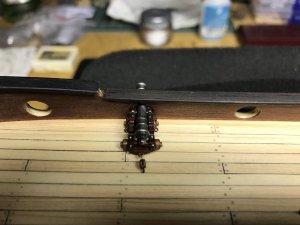
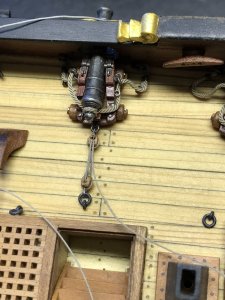
The real challenge where the blocks gun tackle loop. With the size of the gun and scale, it should be 1.5mm-2mm. I source some from e-bay but work with those is a nightmare! But for the most part, I managed them all. I made a simple jig to lay breeching rope and tackles.


This is how she looks now. Happy weekend everyone!!
On the second half (without the rod), place the strip of the desired size aligning the center of the gutter. Cover with the second half ( matrix) and clamp tightly in a vise. Unclench and get capsquare. Oh...yes, you would have to blacken it. capsquare eyebolt and joint bolt made out of steel loop.
Then I made a gun tackle loop, breeching ringbolt and train tackle loop. I have discussed how to make various ringbolts in the previous post: https://shipsofscale.com/sosforums/...-64-by-woody-joe-japan.2636/page-8#post-49831
This is how she looks now. Happy weekend everyone!!
Attachments

very nice work and great use of tools Brother I love the brass tube cutter. Its ideas like that that make this hobby great. I love to see folks making use of items they have laying around.
Beautiful view on top of the deck - it is looking very good


Great work again Jim on this tiny scale. You did it again, no paint.
It's a great masterclass. I´m sure it will be greatly appreciated by the colleagues.
My best regards.
My best regards.
Great presentation Jim. This will help me with my work. Thank you buddy.
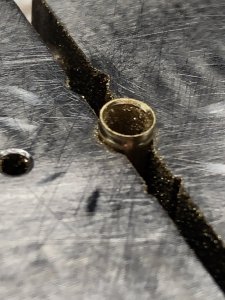
Greetings mates! As always, thank you for the comments and attention to building log! it is much appreciated. This will be just a small update and we will talk about Thimbles.
a. A metal ring fitted in an eye of a sail to prevent chafing.
b. A metal ring around which a rope splice is passed.
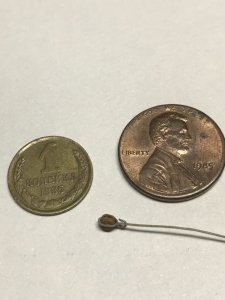
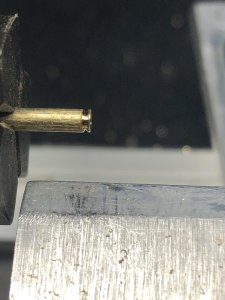
I know at least a few methods to make Thimbles but have only succeeded with the one I will describe. I use brass tubing and my Proxonn lathe. Everything else is just a matter of experience and repetition.
First, I made a channel using one of my cutting tools made out of 0-1 steel (kudos to @Maarten ) who show us a video to make small chisels. While tube still in the chuck, I bevel one of the sides using round bur.


Using the jewelry's wise and saw I cut out the thimble.

I bevel the second side of the thimble using the rotary tool and round bur.

Here the results


See you soon and happy modeling!!
a. A metal ring fitted in an eye of a sail to prevent chafing.
b. A metal ring around which a rope splice is passed.
I know at least a few methods to make Thimbles but have only succeeded with the one I will describe. I use brass tubing and my Proxonn lathe. Everything else is just a matter of experience and repetition.
First, I made a channel using one of my cutting tools made out of 0-1 steel (kudos to @Maarten ) who show us a video to make small chisels. While tube still in the chuck, I bevel one of the sides using round bur.
Using the jewelry's wise and saw I cut out the thimble.
I bevel the second side of the thimble using the rotary tool and round bur.
Here the results
See you soon and happy modeling!!
Attachments
Great tutorial again Jim. Such details is what makes a nice model great.