Chinese Mayflower POF Kit

Joined
Sep 6, 2017
Messages
289
Points
228

Group,

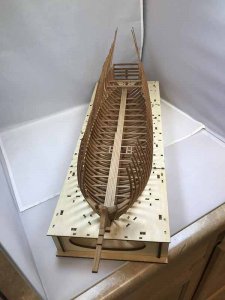
I've been working on a Chinese kit I purchased on eBay that is true POF of the Mayflower. It uses sister framing rather than the single futtock framing shown in the drawings in the book Mayflower II, but is still a fun build and results in a very nice looking model.

The kit does not come with planking for the lower hull and the upper hull is covered with a thin piece of etched walnut plywood. There are different versions of this kit. This particular kit costs $430.00 with free shipping. The more expensive version has stripwood for the lower hull.

The lower decks in the model are planked individually, on plank strip at a time. I'm not sure what kind of wood it is. It has that yellow brown color of boxwood and no visible grain but I know it isn't boxwood simply by its texture. It's kind of stringy, not as hard as boxwood, but provides a nice contrast to the cherry frames.

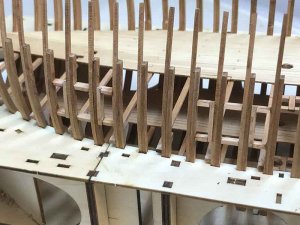
The one difficulty I've had is the thinness of the frames. In the upper area, they're only 1/8" x 1/8" and can easily be broken off if you're not extremely careful with your hands as you work on framing the decks inside.

Also, the inside deck framing is not historically correct. There's no beam shelf. All of the beams are glued to the sides of hanging knees so the ends of the beams will be visible from a profile point of view. I decided to just go with the standard method of framing them since they're not so visible from above.

After the first two lower decks, the kit switches over to one solid piece of deck with the individual planks etched in it. The deck below it has one area at the bow that is this way which you will see in the photos due to the difference in color.

So far I've been pleased with the kit. It's meant to be displayed in the admiralty fashion with only the lower portion of the masts and the lower shrouds. Here is a photo of what the finished model should look like.
s-l1600.jpg
 
These first photos show the framework at the bow. This area gave me some difficulty only because I had a difficult time understanding the way the frame parts were to fit together. Sometimes the drawings can be confusing because there's so many lines and that makes it difficult to decipher orientation and such.
IMG_1013.JPG
IMG_1015.JPG
IMG_1020.JPG
IMG_1021.JPG
 
These next two photos show the basic framing of the hull. The jig is actually several levels high but you don't add the additional levels until you get to certain points in the construction of the model. The jig is not glued together. The parts fit snugly. They're not too tight but they're not loose either. The fit of the frames is spot on.

The frames have a line etched along the outside edge which denotes the bevel line of the frame for the outside edge. You have to S.W.A.G. the bevel of the inside edge but that's pretty easy to do. The ZHL Le Requin kit is the same way.

The frames are assembled outside the jig and beveled before they're put into the jig. There are notches for the hanging knees which makes it easy to locate them. Also, in heavily curved areas like the bow, the knees don't have to be beveled to match the curvature of the hull. The notches in the frames makes it easy to install the hanging knees. The deck beams then get glued to the fore side of the knees with the top edge of the beams being aligned with the top edge of the hanging knee.
IMG_1133.jpgIMG_1134.jpg
 
In the next set of photos, all of the hanging knees and deck beams for the lowest deck have been added and I've begun to add the deck planking but only on the starboard side of the deck. There's some framing where the elm tree pumps reach down from a deck above. I've also added two deck beams and some of the hanging knees for the next deck above this one.

Originally i was going to leave the lower deck planking off but as I started framing the next deck up, I decided to go ahead and add the planking on the lower deck. I had some trouble getting the angle of the planks cut at the edges where the planks meet the frames but other than that, planking was easy.
IMG_1191.jpg
IMG_1192.jpg
IMG_1193.jpg
 
In the next two photos, the lower deck has been completely planked now on the starboard side. I've begun adding the hanging knees and deck beams to the next deck up. This model has a lot of decks! This second level deck is again planked one plank at a time.IMG_1210.jpg
IMG_1211.jpg
 
Hi Bob, that is quite an intricate model, What scale is it and length? I would have preferred to have deck planking strips on the top deck.
I am building a ModelShipways Mayflower which is 400mm / 15.75 inches long.
I am taken with the hull base/support/jig, looks like it would have taken a couple of hours to assemble.
Regards
Eric
 
These remaining photos show the second deck planked and some of the deck beams for the third deck. This second deck had an area at the bow that was one solid piece of planking where the individual planks were etched into the wood. The openings are for the bowsprit bitts which get installed later. There's also an opening for the elm tree pump and the main mast.

These parts need to be fitted beforehand to ensure that they will fit when all of the decks have been added. There is a mast step on the keelson to accept the lower end of the main mast. There's also one for the fore mast.

I'll install the elm tree pumps and the bowsprit bitts just before I start adding the next deck. You can also see where I broke off the upper portion of several frames. I'm just holding those pieces aside for now, because I had the same problem with my Le Requin model. I found that its better to reattach the frame parts when you have some outer planking installed as that helps to hold the pieces together. There's so little area of wood to apply glue to due to the thinness of the fames.

Also, you can clearly see the notches in the jig where the next layer of the jig will be added after I frame the third deck up from the bottom. The stern transom has beams built into it and the other deck beams align perfectly creating a nice smooth flow of the planking.


These next two photo show the framing of the gunports and some of the deck beams for the third deck up.IMG_1261.jpgIMG_1262.jpgIMG_1263.jpg
 
eric61 post_id=22227 time=1504942720 user_id=3108 said:
Hi Bob, that is quite an intricate model, What scale is it and length?
I am building a ModelShipways Mayflower which is 400mm / 15.75 inches long.
I am taken with the hull base/support/jig, looks like it would have taken a couple of hours to assemble.
Regards
Eric

Hi Eric,

The model is 1/4" scale or 1:48. I haven't measured it but the eBay ad says it's 31" long but I think that includes the bowsprit. Here's a link to the current eBay ad but keep in mind, when that auction ends this link probably won't work. The seller of the kit is jiangxuezuimei .

http://www.ebay.com/itm/Mayflower-Full-Ribs-Scale-1-48-31-2017-Version-Wood-Model-Ship-Kit/253113039569?_trkparms=aid%3D111001%26algo%3DREC.SEED%26ao%3D1%26asc%3D20160727114228%26meid%3D841b52d1a06c4dcf8722a8793cd387b3%26pid%3D100290%26rk%3D1%26rkt%3D4%26sd%3D253113039569&_trksid=p2060778.c100290.m3507
 
This is wonderful. I have seen this on e-bay, but its hard to tell the quality of the timber from the photos.

From your pictures Bob, it looks top notch.
 
Hi Brian,

Yes, the quality of the wood is excellent, all cherry, solid wood mostly in the kit along the lines of the ZHL Le Requin kit. It comes with sail cloth but the sails aren't made. There's rigging line and laser cut blocks. All of the parts are laser cut and of excellent quality. I did a review of the kit on my blog as well as a review of Le Requin. I also built a 1:48 scale laser cut longboat Chinese kit (cost just 22.50 and free shipping) and wrote a 2 chapter practicum on it that costs $20.00 but you get a coupon code for $20.00 off your next purchase. That kit was neat. Each plank was cut to shape so there was nothing to do but glue them on. It has a jig as well to hold the frameowrk in alignment.

Bob
 
Bob,
this is incredible. OH,,,only that I could build something like this.....

Donnie
 
Hallo Zoltán,
Thanks to make this topic actual.....did not see it before.....great kit
Would be great, when Bob could show the actual progress
 
I would love to see the progress on this ship,not to big and I would incorporate it in a dockyard diorama for a change ☝️;)
 
It's been a while. I still have the kit but haven't done any new work on it since I posted these photos. I got burned out for a while and put all of my models under construction aside to do more writing. I've been working on a 12 volume set of practicums I call the Detailed Guide to Building Model Ships. It's generic in nature drawing from my 30 years of experience and 17 other practicums I've written and a half dozen kits I've designed and produced. I have 3 volumes left to write, then I'll get back to work on my Mayflower.

Thanks,

Bob
 
G'day Bob, just read through your log again, fantastic work, and as you say so delicate parts to be put together, I look forward to the rest of your build when you get time,

best regards John.
 
Back
Top