Amen Brother.

-

SUBSCRIBE TO SHIPS IN SCALE TODAY!
The beloved Ships in Scale Magazine is back and charting a new course for 2026!
Discover new skills, new techniques, and new inspirations in every issue.
NOTE THAT OUR NEXT ISSUE WILL BE July/August 2026 -

Win a Free Custom Engraved Brass Coin!!!
As a way to introduce our brass coins to the community, we will raffle off a free coin during the month of August. Follow link ABOVE for instructions for entering.
You are using an out of date browser. It may not display this or other websites correctly.
You should upgrade or use an alternative browser.
You should upgrade or use an alternative browser.
Constructo 1799 Enterprise help
- Thread starter Pathfinder65
- Start date
- Watchers 30

Some more progress:
I’ve had an hour here and there in the past two weeks to add items to the Enterprise. I think I’ve managed to interpret Constructo’s rigging plan. I’ve completed the bowsprit rigging and have started on the masts. I’ve also learned to protect the poop deck rails (the big black clips). I’ve damaged that area several times while installing the caronnades and their associated rigging. (Clumsy fingers, small blocks and hard to reach spaces all contributed to some very choice words).
But we are determined to continue until the last knot is tied.
Last edited:
A reflective moment.
If only my fingers were thirty years younger and my eyes forty years, I could probably accomplish these rigging tasks a lot faster. I resorted to making copies of Constructos rigging plans and using different color markers to trace the rigging lines. Once I had done that I was able to follow those lines to see the start and end points.
The build instructions indicated that I should start the shrouds and ratlines. But looking at my progress notes I decided to start with the interior rigging since the shrouds would just be another item I would have to work around. So the to-do work notes were modified to start rigging at the bowsprit, complete the Fore mast area and then move on to the Main mast area and then to the stern. I’ve found that the more I get done the more I have be careful not to damage something. I’ve had to reposition my work light to prevent damage to the masts when I inadvertently turned the hull while trying to tie a knot.
So here is step 1)


Even this small step was a puzzle. Way back in the build the instructions showed a double block attached to the deck. The rigging instructions showed a double block attached to the down stay. Not being familiar with ship rigging I could see from the rigging plans that one end of the block rigging would be attached to a belaying pin, but what about the other end? The light bulb moment came after a quick sketch. The end in question needed to be attached to the bottom of the block on the down stay. So it goes.
If only my fingers were thirty years younger and my eyes forty years, I could probably accomplish these rigging tasks a lot faster. I resorted to making copies of Constructos rigging plans and using different color markers to trace the rigging lines. Once I had done that I was able to follow those lines to see the start and end points.
The build instructions indicated that I should start the shrouds and ratlines. But looking at my progress notes I decided to start with the interior rigging since the shrouds would just be another item I would have to work around. So the to-do work notes were modified to start rigging at the bowsprit, complete the Fore mast area and then move on to the Main mast area and then to the stern. I’ve found that the more I get done the more I have be careful not to damage something. I’ve had to reposition my work light to prevent damage to the masts when I inadvertently turned the hull while trying to tie a knot.
So here is step 1)
Even this small step was a puzzle. Way back in the build the instructions showed a double block attached to the deck. The rigging instructions showed a double block attached to the down stay. Not being familiar with ship rigging I could see from the rigging plans that one end of the block rigging would be attached to a belaying pin, but what about the other end? The light bulb moment came after a quick sketch. The end in question needed to be attached to the bottom of the block on the down stay. So it goes.
Rigging continued:

The progress is one line at a time. I’ve found that contrary to the instructions that some steps need to be done ahead of time. The rings that will hold the sails (Jiggers) to both the Main and Fore masts should be added to the masts before the masts are placed. I think that would be much easier than trying to “force” them on to the masts after a lot of the rigging is done. Adding the rings to the lines that will hold the Jib sails early in the rigging process seems much easier than trying to add those items later. ( The blue tape on the stay is temporarily holding the jib rings in place).

The first two shrouds tied off to the dead eyes. To get the approximate length for the shrouds I made a quick jig. Two pins to hold the deadeyes and one pin to hold the shroud. The distance between the pins was the approximate length required. I then tied off the deadeyes.
A bit of research was required to figure out how to tie the shrouds to the channels.

I’m found the book to be a great source of information.

This pictorial will be my guide the next several weeks while I work on the shrouds.
I highly recommend this book for the novice modeler.
The progress is one line at a time. I’ve found that contrary to the instructions that some steps need to be done ahead of time. The rings that will hold the sails (Jiggers) to both the Main and Fore masts should be added to the masts before the masts are placed. I think that would be much easier than trying to “force” them on to the masts after a lot of the rigging is done. Adding the rings to the lines that will hold the Jib sails early in the rigging process seems much easier than trying to add those items later. ( The blue tape on the stay is temporarily holding the jib rings in place).
The first two shrouds tied off to the dead eyes. To get the approximate length for the shrouds I made a quick jig. Two pins to hold the deadeyes and one pin to hold the shroud. The distance between the pins was the approximate length required. I then tied off the deadeyes.
A bit of research was required to figure out how to tie the shrouds to the channels.
I’m found the book to be a great source of information.
This pictorial will be my guide the next several weeks while I work on the shrouds.
I highly recommend this book for the novice modeler.

Its the little things that are irksome. I thought early on in the build that the stanchions and the nets were a build around problem. I didn’t sew, glue or wire in the nets. But I did place the stanchions and rig the the yarn between them. So far I’ve broken the yarn in several places while moving the hull around to get a better work angle. My note to the next modeler would be to drill the holes for the stanchions but leave the assembly of stanchions and nets until the carronades, interior rigging, shroud rigging and sail placement is completed.
Last edited:

Meant to post this picture earlier. A quick jig to get the approximate length of the shrouds. I found this helps quite a bit because of my big fumble fingers, it has also decreased the number and tone of bad words while rigging. A lot less money for the "BAD WORD JAR".
A whatever works tool:
I was having trouble keeping the shroud lines under a little bit of tension while trying to rig the deadeyes. The winning moment was a trip to the basement and looking in the fishing tackle box.
The result.

One lead weight recycled into a rigging tool.
I was having trouble keeping the shroud lines under a little bit of tension while trying to rig the deadeyes. The winning moment was a trip to the basement and looking in the fishing tackle box.
The result.
One lead weight recycled into a rigging tool.
Ro-oh, another do over:
I’ve been working off and on rigging the dead eyes. I was pleased that I had finished the Fore mast area when I noticed my mistake.

The distance between the dead eyes is twice what is shown on the plans. Somehow I got carried away.
Oh, well new dead eyes and associated material have been ordered.
I’ve been working off and on rigging the dead eyes. I was pleased that I had finished the Fore mast area when I noticed my mistake.
The distance between the dead eyes is twice what is shown on the plans. Somehow I got carried away.
Oh, well new dead eyes and associated material have been ordered.
Last edited:
The Yards:
Had a little time today between cleaning the recently opened pool and mowing the lawn. I started working on the yards. I very quickly decided that trying to wrap/string/mount the blocks with Constructor's fine wire wasn't what I wanted to do. The look of the fine wire wrapped around the yard just didn't fit with what I was envisioning. I marked the locations of the blocks on the the yard and drilled .6mm holes through the yard at those points. I did attach the blocks to the fine wire and pushed the twisted wire through the holes drilled in the yard and added a dap of Gorilla AC to hold them in place.
The yard layout.

Attaching everything to the yard.

The final product.

I had done some research on You Tube about tying the blocks to the yards, but after several attempts I decided my manual dexterity and big fumble fingers made that effort impossible. So I think I will use my new found method to complete the remaining yards the same way.
Had a little time today between cleaning the recently opened pool and mowing the lawn. I started working on the yards. I very quickly decided that trying to wrap/string/mount the blocks with Constructor's fine wire wasn't what I wanted to do. The look of the fine wire wrapped around the yard just didn't fit with what I was envisioning. I marked the locations of the blocks on the the yard and drilled .6mm holes through the yard at those points. I did attach the blocks to the fine wire and pushed the twisted wire through the holes drilled in the yard and added a dap of Gorilla AC to hold them in place.
The yard layout.
Attaching everything to the yard.
The final product.
I had done some research on You Tube about tying the blocks to the yards, but after several attempts I decided my manual dexterity and big fumble fingers made that effort impossible. So I think I will use my new found method to complete the remaining yards the same way.
Last edited:
Your work is good looking and the yards will fit very well.
I have only one small remark about your blocks, and I have the feeling, that you installed the small blocks by accident with the wrong direction.
I am looking usually at this detail, because I made it once on one of my models also completely wrong.

I think, that the holes for the rope should be were the red dotts are. Blue would be later the rope (sorry, but I am not the specialist for "paint")
Take also a look at the detail from Peterssons book (just used one photo from Book Review)

Please take a look and check
I have only one small remark about your blocks, and I have the feeling, that you installed the small blocks by accident with the wrong direction.
I am looking usually at this detail, because I made it once on one of my models also completely wrong.
I think, that the holes for the rope should be were the red dotts are. Blue would be later the rope (sorry, but I am not the specialist for "paint")
Take also a look at the detail from Peterssons book (just used one photo from Book Review)
Please take a look and check
Your work is good looking and the yards will fit very well.
I have only one small remark about your blocks, and I have the feeling, that you installed the small blocks by accident with the wrong direction.
I am looking usually at this detail, because I made it once on one of my models also completely wrong.
View attachment 97327
I think, that the holes for the rope should be were the red dotts are. Blue would be later the rope (sorry, but I am not the specialist for "paint")
Take also a look at the detail from Peterssons book (just used one photo from Book Review)
View attachment 97326
Please take a look and check
Uwe,
Thank you for the information. I have Peterson’s book and it never occurred to me which direction the blocks hole should face. The build drawings aren’t much help, you need a magnifying glass to see that there is a orientation (upper/lower end) of the hole in the block.
It’s an easy fix at this point in the build.
Currently I’m struggling with the dead eyes and rat lines, I’m on my fourth attempt and still not satisfied with the results. I’ve spent some time finding pictures of the 1799 Enterprise looking for good examples of completed builds. It seems that every build has a different distance between the ropes from the rat line dead eyes to the channel dead eyes. The Constructo plan for that part of the build seem to be a compromise between other kit manufacturers.
Uwe,
Thank you for the information. I have Peterson’s book and it never occurred to me which direction the blocks hole should face. The build drawings aren’t much help, you need a magnifying glass to see that there is a orientation (upper/lower end) of the hole in the block.
It’s an easy fix at this point in the build.
Good to hear that it is easy to fix....
Look at this drawings and it will be clearer:


In the center of such a block a sheave is running, so the rope will go around this "disc"


Uwe,
Thank you. Great examples. Looks like I need to make some more “corrections” to other blocks.
Another addition to the future how to do book.
Thank you. Great examples. Looks like I need to make some more “corrections” to other blocks.
Another addition to the future how to do book.

I'm too late to be of help for your mast taper, but I have improvised a very simple, effective collet for similar use. I made it for turning cribbage pegs, using a drill chuck in the head stock of my lathe. It will work as well in a drill press or a portable drill. The collet is made from a piece of small metal tubing. I used 1/4" OD copper tube which has an ID of about 3/16", exactly what I needed for turning over 100 pegs in walnut & maple. Besides finding tubing with the right ID for your needs, the only critical dimension is the overall length. I found the most convenient length was to have little or no protrusion past the chuck jaws when the tube is fully inserted into the chuck. The other thing to watch is to rotate the tube as you are tightening the chuck so that each of the three jaws are nearly centered on the three cut strips of tube.


Attachments
I'm too late to be of help for your mast taper, but I have improvised a very simple, effective collet for similar use. I made it for turning cribbage pegs, using a drill chuck in the head stock of my lathe. It will work as well in a drill press or a portable drill. The collet is made from a piece of small metal tubing. I used 1/4" OD copper tube which has an ID of about 3/16", exactly what I needed for turning over 100 pegs in walnut & maple. Besides finding tubing with the right ID for your needs, the only critical dimension is the overall length. I found the most convenient length was to have little or no protrusion past the chuck jaws when the tube is fully inserted into the chuck. The other thing to watch is to rotate the tube as you are tightening the chuck so that each of the three jaws are nearly centered on the three cut strips of tube.
Thats a great idea for future use. I had wrapped the ends of the yard dowels in a few turns of masking tape before chucking the ends into my Drill Press. I managed to mangle a few dowels ends before I got the process perfected.
I'm back for another try. I think I forgot to click submit. Anyway, attached are a few photos of an improvised collet chuck that I built for use on my lathe with a drill chuck in the headstock. It will work just as well in a drill press, except for falling out if you don't hold on when tightening/loosening the chuck. I used this collet to make over 100 cribbage pegs last December. Hopefully, the photos are self-explanatory.


Looks like my second attempt sent both attempts. Lesson learned!
Shrouds and dead eyes:
The start of todays effort to correct the stringing of the Shrouds and Dead Eyes.

I think I'm finally on the right track. Only seventeen more to go.
The start of todays effort to correct the stringing of the Shrouds and Dead Eyes.
I think I'm finally on the right track. Only seventeen more to go.
Two good attempts, it takes little bit to get used to posting on this site. But if you make an error the Admins are great at helping you out.Looks like my second attempt sent both attempts. Lesson learned!
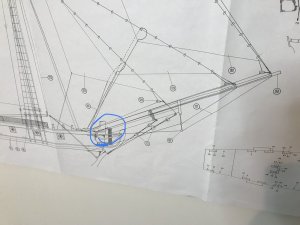
Bowsprit:
Constructo’s rigging plan isn’t helping much as to how to rig the Bowsprit. The 2D drawing showing the Bowsprit is hard to decipher
.
The circled area is where the Shrouds?( probably wrong terminology) end at the Cathead. But there are two blocks on the Cathead. There is one small picture in the build manual that when magnified does show both blocks being used. The rigging plan only shows one.