Cutty Sark, Vintage Billing Boats BB564, 1:75.

Joined
Sep 23, 2021
Messages
137
Points
113

I will not be starting my next build for a while but I thought I would give it a “heads up” now that I have the kit in the shipyard.

Part 1 - Start of a Long Voyage

Choice of Kit - an Odd (or Familiar) Story?


The windjammers/clippers from the mid to late 19th century have always fascinated me for their sleek hull lines and sheer amount of sail. The Cutty Sark is a classic model to build of this type and there are a number of kits to choose from. I looked at some reviews and builds of Cutty Sark kits on the SOS forums and other web sites. Robertd’s recent build of the Sergal/Mantua kit < R'Ds CS > came out very nicely. I was intending to buy that kit later this year but I spotted an estate clearance auction listing for an “old” model boat kit of the Cutty Sark. It turned out to be Billing Boats BB564 complete with the separate fittings kit that had been purchased as a “project” but never started. I left a silly low commission bid and to my surprise won the auction. When I received it I found that it was still in its original shipping box and wrapping paper and had only been opened for inspection. The kit itself is in near mint condition, just some slight damage to the box where the sealing tape had been. The fittings box ( that you had to purchase separately back then) was unopened.
IMG_4635.JPG

Judging from the postage labels the kit was bought in the mid 80’s and has spent the past 37+ years languishing at the back of a cupboard (it makes me wonder just how many model kits have been bought with good intentions but are now just collecting dust?).

I think that it is time for this Cutty Sark to see the light of day and spread her sails (probably not the Stuns’ls!).

Gathering My Thoughts on a Build Plan

Although it is not my first choice of kit it will be a good challenge (but I may also regret this one). It will also be the biggest model I have attempted. The completed model is 1.1m (43”) long and the desk I use for my hobby work is 1.4m wide so I am going to struggle (I also have no idea where I will put it when it’s done!). I am also sure that the rigging will test my patience (and my eyesight!) to the limit but that stage is a long way off into the future for now. I don’t have a lot of space to display my models so it is my intention to take my time over this build, add extra detail and make more parts from scratch. I think I will also need plenty of advice on building this one!

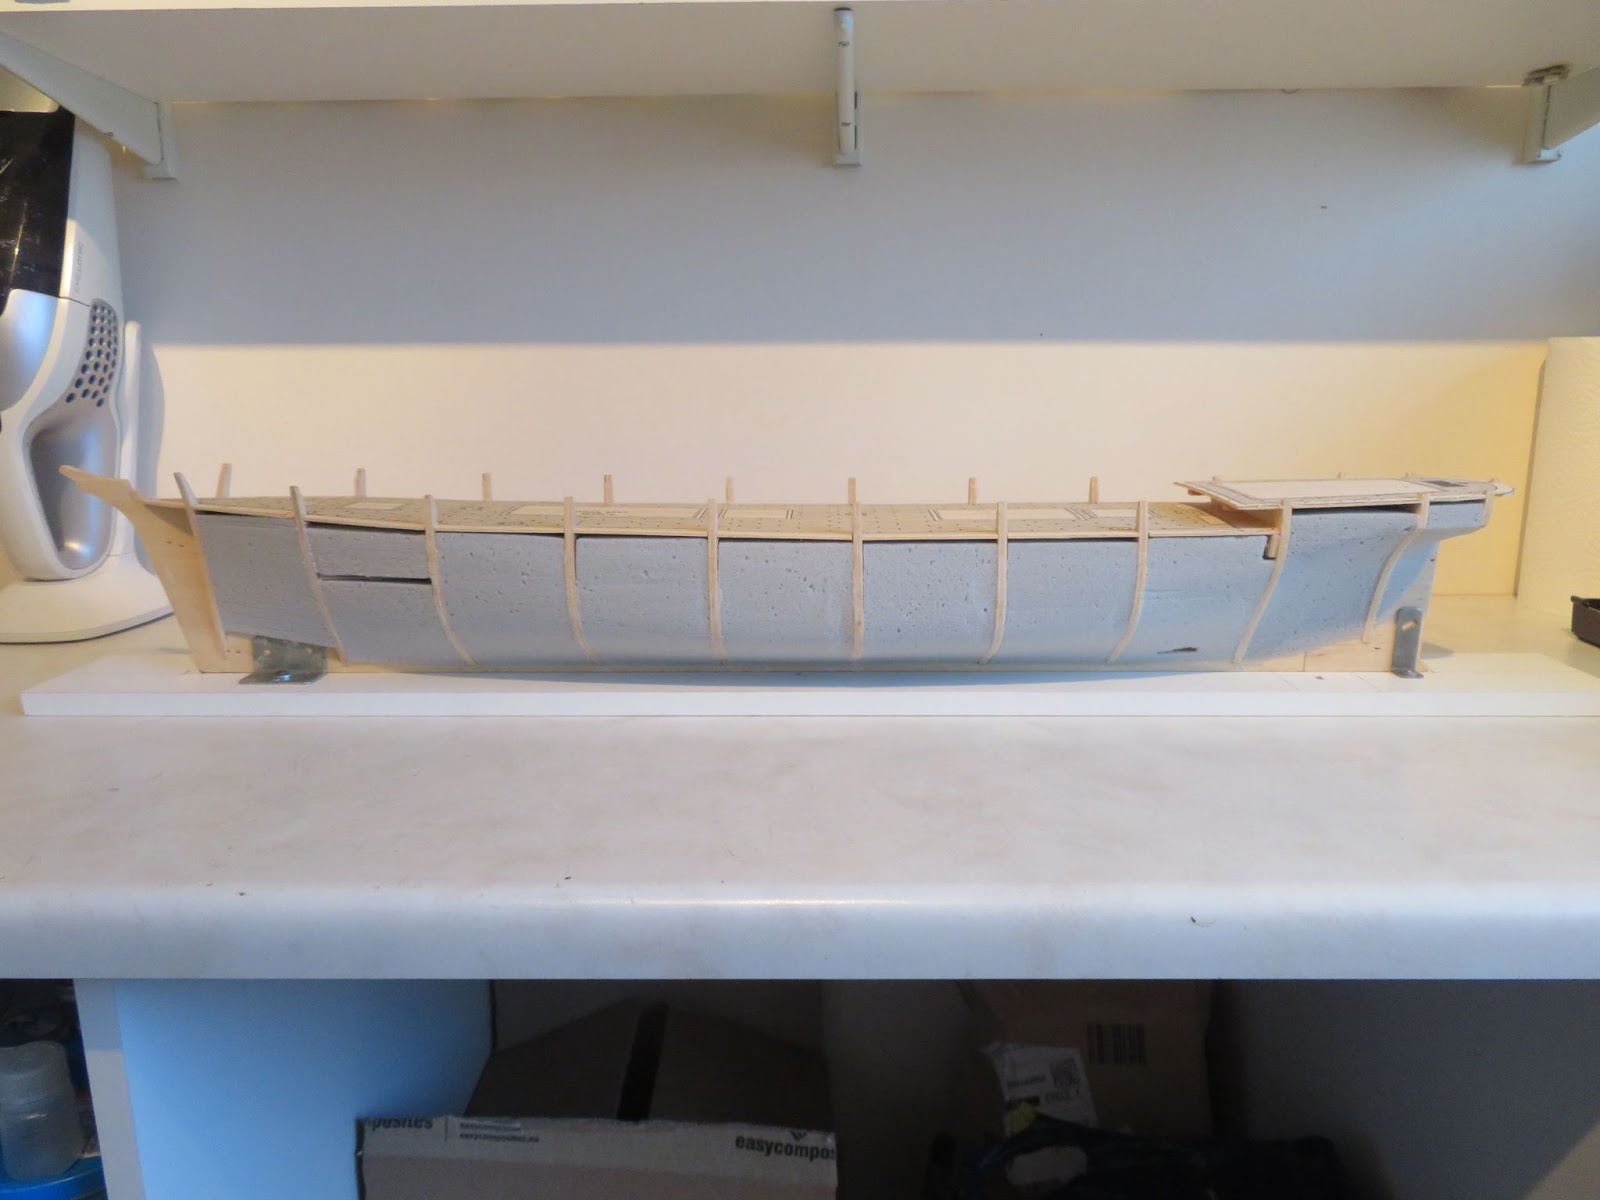
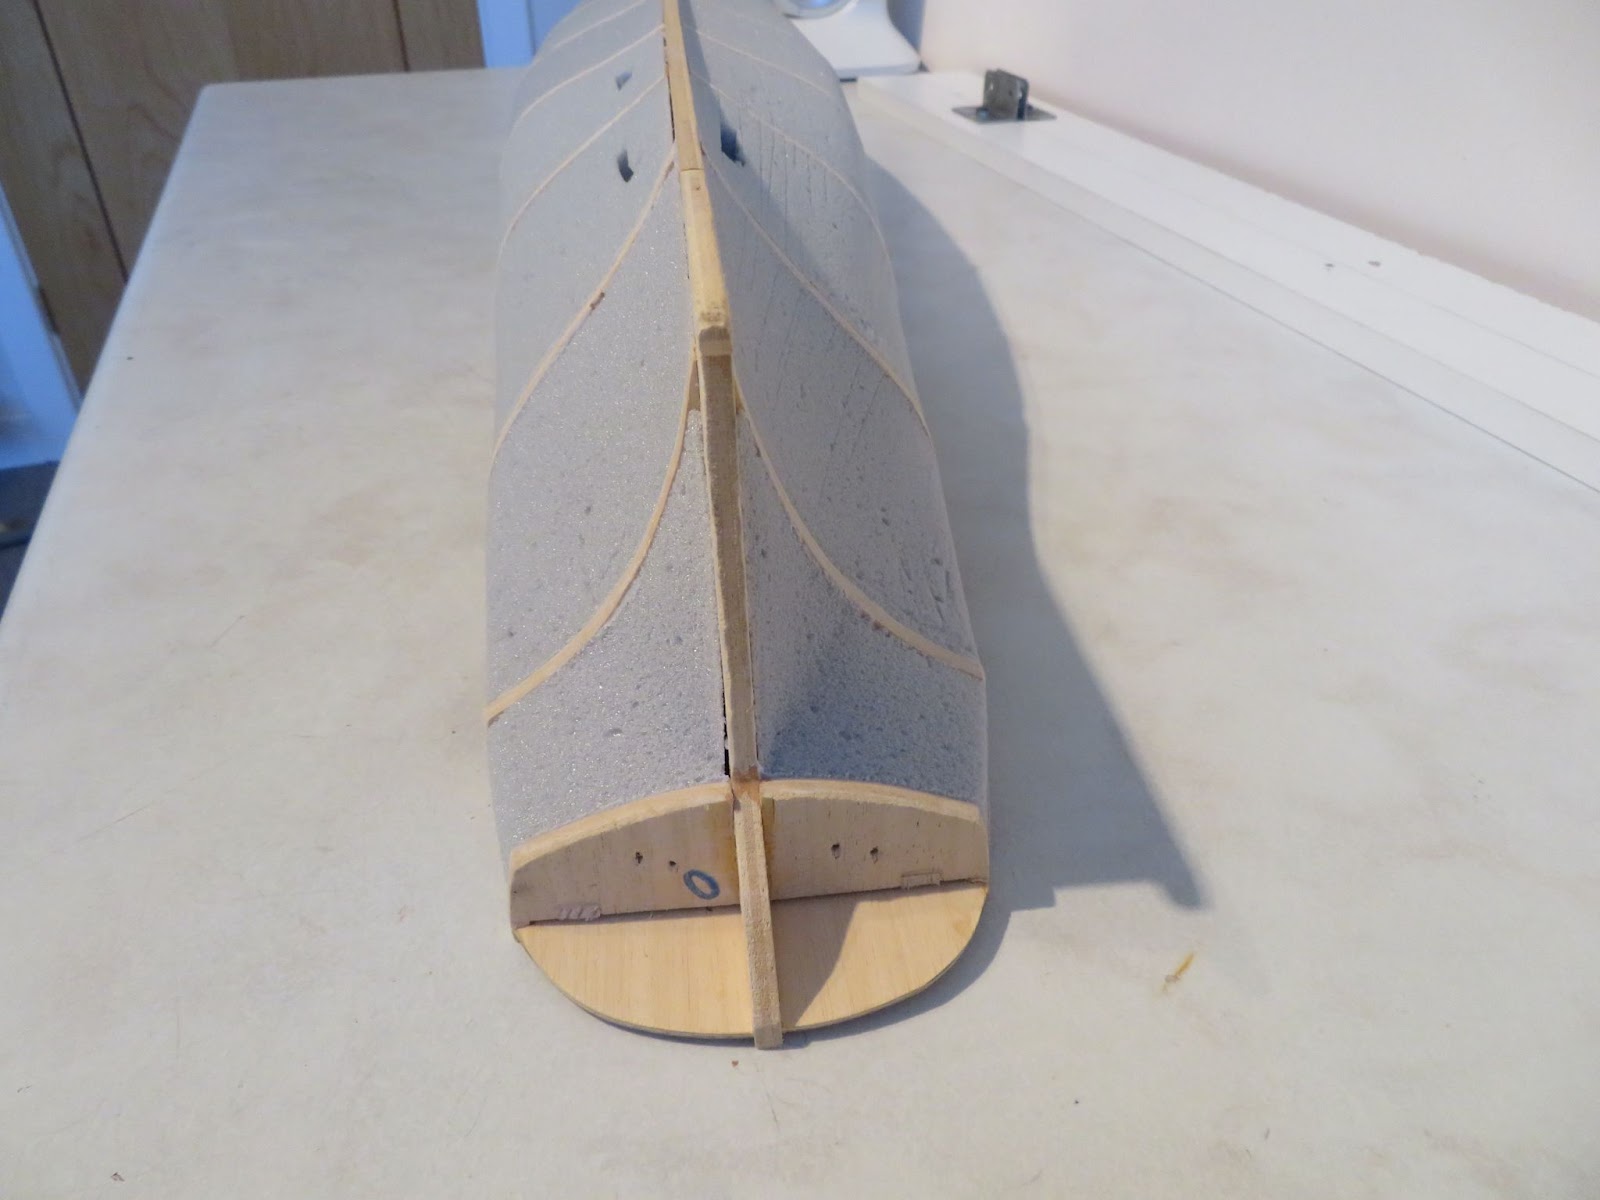
The kit is definitely “vintage” (no laser cut parts). I know that Billing kits from this time were not of the best quality but I will be using this as a base kit for the model build so I’m quite OK with the out-of-the-box quality issues from the day. All of the frames are jig cut and some of the ply parts are die-cut. Other detailing parts are just printed onto ply sheets and need to be cut out (I will probably just use them as templates and make new parts from solid wood). The decorative mouldings and service boats are plastic as are the rigging blocks and deadeyes. The rear transom decoration is a decal. The instructions are the usual basic ones from BB with four plan drawings of layout, sails, pins and rigging.

decks.jpgFittings.jpgframes.jpgin the box.jpg

Because I paid very little for the kit I will upgrade it as I go through the build by replacing all of the plastic parts with wood/brass and making new parts where I think the model will benefit.

I have already purchased a set of photo-etched decor parts and a full set of walnut CNC rigging blocks from HisModel. The rigging blocks came in two sets, one for the standing rigging (224 pieces) and one for the running rigging (535 pieces). The blocks are of the correct type and size for this model (759 blocks to rig is however very intimidating!).

I will replace the plastic service boats with wooden ones of the correct type and scale. If anyone knows where I can find some suitable 1:75 kit replacements (or some scale plans so that I could make them myself) that would be great, please let me know through the forum.

I will also replace the rigging thread with some decent rope when I reach that point (I think I will purchase rather than try to make my own).

The BB kit has no hull plates included and the lower hull is suggested to be painted (I think even the latest version of this kit does not offer plates as an option). I would like to sheath the hull because the real ship was sheathed and I will consider options for that upgrade when I reach that point.

To help with the build and rigging I have bought a set of G.F. Campbell’s plans (General Layout, Rigging and Sail Plan) from the Royal Museums Greenwich. I also found Olha’s book review “Cutty Sark, The Ship and the Model/Longridge. C Nepean'' on her YouTube Channel < CS ref book > and I was able to locate a good used copy of the book in the UK. I do not intend to go the “whole hog” on the model by super-detailing it, my intention is to improve it to a level that I am happy with (whatever that is?).

manuals.jpglayout.jpgrigging.jpgsails.jpg

I will take a long holiday soon and I have some home improvement projects to do when I return, so it will be a while before I can get started on the framing (probably late autumn). Now that the pandemic is over (I hope!) I have many other things to do, so I will have less time to spend on the ship hobby. I will mainly work on this model during the winter weather months and I will intersperse the work between projects. I am expecting that I will be working on this one for quite some time to come (?years?!) but I am in no hurry.

I will give an update once I have kicked-off the framing.
 
Very interesting model, Dom. Billings may not be everyone's cup of tea, but I have seen some beautiful ships built from Billings' kits. @PeterG Peter and @Daniel20 Daniel's VASA models are a case in point. Good luck with her and don't make us wait too long.
 
Hi Dom,

I was intrigued by your story of how you came upon this Billings kit. My first large wooden ship build used this same kit - well before we had the internet and certainly before the access to the wonderful resource of Build Logs here.

Let me tell you a story. In 1975, I was employed for my job, to sail and live for 12 months in Antarctica. I was then 23 years old. I knew I would have a lot of spare time on my hands, and so, in a rash decision, I thought I would buy a ship kit and use the time productively while living and working ’Down South’ . The kit I bought was exactly the same Billings kit, with the extension box (plastic parts and all). I managed to secure the same Longridge book plus another small book by Alan Villiers called Cutty Sark - The Last of a Glorious Era’ published in 1953. I also had to buy glues and modelling tools etc, some of which I still use today.

Well, I built that model over the 12 month period I was away. I did not rig her while away as I realised the difficulty of returning the model with masts fitted, to Australia so I fitted them but did not secure them in the hull and so it was a much smaller ‘package’ to ship back.

Additionally, (and now it is with some regret), that because I was where I was, I had no opportunity to make or purchase substitute plastic parts (eg blocks or ships boats), and to this day, this model which sits in a glass case at one end of my house, still has all these original fittings. If I had time, I could take the ship out of the case and refit much of the rigging and plastic blocks etc, but my focus is on other ships (Vasa and Victory) at the moment.

The Billings model of the Cutty Sark of this vintage however has rewarded me over the interim years and is now bringing joy to grandkids who always marvel at it every time they visit. It is a wonderful model and well worth the effort of construction.

3F426A04-5FAE-451A-AF8F-DDF87902DB8B.jpeg

Take your time, replace the parts you want (rope, blocks and boats), but the ship kit itself, will provide you with many, many hours of enjoyment.

I look forward to reading your Build Log.

Regards,

PeterG
 
1665439758565.png
Hi Dom

Pulling up a chair...

My daughter started up a new job in London recently and she sent me this photo during an amble through Greenwich. What a novel way to preserve a ship and give her access to the public.

I hope you live close by and are able to take advantage of the real time reference material :)

- Mark
 
Hi Mark,

yes, a visit is definitely on my to-do list, but when I can-do is another question! I thought I might be able to start the CS later in November, but the way things are going I doubt very much if I will even be able to get the skeleton built-up before the end of the year if I am lucky - very frustrating.

I hope your daughter enjoys the London life (very expensive though!).

Dom
 
Hi Dom,

I was intrigued by your story of how you came upon this Billings kit. My first large wooden ship build used this same kit - well before we had the internet and certainly before the access to the wonderful resource of Build Logs here.

Let me tell you a story. In 1975, I was employed for my job, to sail and live for 12 months in Antarctica. I was then 23 years old. I knew I would have a lot of spare time on my hands, and so, in a rash decision, I thought I would buy a ship kit and use the time productively while living and working ’Down South’ . The kit I bought was exactly the same Billings kit, with the extension box (plastic parts and all). I managed to secure the same Longridge book plus another small book by Alan Villiers called Cutty Sark - The Last of a Glorious Era’ published in 1953. I also had to buy glues and modelling tools etc, some of which I still use today.

Well, I built that model over the 12 month period I was away. I did not rig her while away as I realised the difficulty of returning the model with masts fitted, to Australia so I fitted them but did not secure them in the hull and so it was a much smaller ‘package’ to ship back.

Additionally, (and now it is with some regret), that because I was where I was, I had no opportunity to make or purchase substitute plastic parts (eg blocks or ships boats), and to this day, this model which sits in a glass case at one end of my house, still has all these original fittings. If I had time, I could take the ship out of the case and refit much of the rigging and plastic blocks etc, but my focus is on other ships (Vasa and Victory) at the moment.

The Billings model of the Cutty Sark of this vintage however has rewarded me over the interim years and is now bringing joy to grandkids who always marvel at it every time they visit. It is a wonderful model and well worth the effort of construction.

View attachment 324507

Take your time, replace the parts you want (rope, blocks and boats), but the ship kit itself, will provide you with many, many hours of enjoyment.

I look forward to reading your Build Log.

Regards,

PeterG
Hi Peter,

sorry for the late reply. The models were what they were back then, and the Billings kit was pretty much one of the best kits of its day for the CS, plastic blocks and all. I think this model kit has not actually changed very much over the intervening years apart from laser cut wooden parts and wooden blocks, everything else is pretty much the same - even the plans that you can download from the Billing website are dated 1973! The fact that your model was built in the Antarctic and survived a Southern Ocean crossing (hopefully by ship - but by plane is still a crossing!) is a very impressive story to tell. It would be a shame to make any changes to it because keeping it as it is preserves that part of its history - and it looks wonderful in its case! You have certainly done the ship justice.

I am really struggling to find time to get my CS started so I am just making notes from Longbridge's book, going over the plans and looking at some other build logs that I have found for when I do finally get underway. One thing I have come across is that some people recommend blocking the hull to make the planking easier. Did you do any in-filling of the bulkheads, or did you just plank across them? Any useful tips are very welcome!


Thanks again for sharing the story of your CS

Dom
 
Hi Dom,

I too have this kit. Purchased it cheap on Facebook marketplace, but mine had the Fittings inside, all in the one box. What I am interested in is those sets of rigging you purchased and the photo etch decor. Did HiSmodel carry them as a standard pack/item? I will have to have a look at their site. I had a quick look and what a range they have! I will see if there is anything remotely like it here in Australia, but no doubt will have to reach out overseas.

Rob
 
Hi Rob,

Yes, he had the block sets and decor parts in stock and they were sent out very quickly ( I think he also sells the block sets through ebay). If you email him, he will give you an all in price inc. delivery. The blocks were quite expensive, but they are very good quality, and they are the proper scale for this model. The sets include all the types of blocks needed. I also bought a set of signal flags and the draft markers as he offered a discount all together. I am thinking of buying a set of the CNC sails from him, they are a slightly smaller scale at 1/78 but they will work with the Billing model, and I think the material and finish is much better than the standard Billing cloth.

Dom
 
Part 2 - Getting Started - Making the Skeleton (Finally!)

After a much-needed holiday hiking in the high Italian Alps in the late summer, my superior officer ordered an overhaul and refit of our home port, so all of my spare time has been taken up by that project since we returned. It was a lot of work but I am glad to report that everything is now “Shipshape and Bristol Fashion”. That said, I've now finally found some time to get back to the shipyard and start this new project!

Small Steps to Start

While my build was stalled in its box, I looked through Longridge’s book of the Cutty Sark, went through the plans and looked at other build logs that I had found. This has given me quite a lot of information which I will put to good use as I progress. At some point I will head down to Greenwich to visit the ship with my camera and take lots of photographs so that I have a proper set of reference images to work from. It is not a good time to go at the moment now that we are into the short days and bad weather season here but hopefully, I will go down to see her in the spring and have a nice day out.

So, first up was to glue the keel, bow and stern sections together. The hull is long and narrow, so I clamped the keel using some angle brackets to a piece of scrap board to keep everything straight. There are no cut-outs in the keel board so placing the centre bulkhead was critical because all of the others are spaced from that (the fun of vintage kits!). Before starting to glue up the bulkheads my wife thought it would be nice to have some cargo visible in one of the holds as I did for my Baltic Trader (some tea chests?). Looking at where the bulkheads are in the hull relative to the hatchways I decided I will open up the forward hold and fit a false lower deck below the hatchway so that I can place some cargo that would be visible if you peer inside.

Because of the error I found on my Baltic Trader I had the good sense to check the bulkhead spacings as shown in the instructions and sure enough I found the gap between the number 8 and 9 bulkheads was incorrectly labelled and the number 10 bulkhead was too high. Very happy that I found those errors before setting the bulkheads because it would have been very hard to correct later. I also thought it would be better to use large cross sectional pieces for the bulkhead spacers rather than the suggested 5x5mm in order to make the skeleton very stiff while I plank. I cut some 25x25mm basswood that I had spare and fixed them at the correct spacing between the bulkheads using some off-cuts to raise them off the keel -total overkill - but why not! With such a long hull each bulkhead has to be precisely placed - so lots of engineering angles and measuring was the order of the day.
IMG_4910.JPG

With all the bulkheads done I made up the forward hold deck and glued it to the spacer, fitted the deck stringers and roughly fitted the main deck to check that it sat properly on the top of the bulkheads. I will refine the deck fit later so that the edges meet the planking strips.

It’s a start and now that I have the skeleton assembled I have a better sense for the size of the model ……… IT’S A MONSTER! ……… “I’m gonna need a bigger bench!”.


IMG_4913.JPG

IMG_4912.JPG

IMG_4916.JPG

Before I start the planking, I am thinking about blocking the hull - any advice on this would be really welcome. Is it necessary? The bulkhead spacing is about 80mm which is quite large. When I built the Lilla Dan the spacing was 45mm and I did have to use clips to keep the edges of some of the planks together while the glue cured so I expect it will be a lot worse for the CS and I do not want to end up having to use lots of filler.

I have also started a discussion on sheathing the hull < Vintage Billing Boats Cutty Sark - Sheathing the Hull? | Ships of Scale > . I would like to sheath the hull in brass as the actual ship is and I am looking at options for doing that. I am experimenting with some shim brass to see if I can make my own plates but the problem is cutting the brass precisely so that all the plates are the same size (all 3000 of them) and without creasing or buckling the edges. I don’t have any particular kit to do this other than sharp blades and small metal shears so it is very time consuming to make even a few. I also purchased a ponce wheel to see if I can emboss the brass with a rivet pattern. However, so far I am not too impressed by my efforts and if I am not able to make the plates to what I would consider a “good enough” standard I will consider other options such as some custom etched plates (quite expensive) or revert to copper and use the Amati photo-etched plates which are good quality (also quite pricey). Any comments from members are very welcome!
 
Dom,
Since you asked, I'll give you my 2 cents regarding blocking/filling the framework.
While it certainly requires additional work, I feel it's justified to fill the areas between the bulkheads. Not only does it provide additional surface for adhesive and pinning it also enhances the fairing process. Of course, this is my opinion and I'm sure others will probably differ. ;)

10_Prior to planking.jpg

This is 'one' of my current builds with everything filled/blocked and almost ready for planking to commence. The widest between bulkheads is 42mm.
Another plus is that it makes for a very robust structure.
 
Dom,
Since you asked, I'll give you my 2 cents regarding blocking/filling the framework.
While it certainly requires additional work, I feel it's justified to fill the areas between the bulkheads. Not only does it provide additional surface for adhesive and pinning it also enhances the fairing process. Of course, this is my opinion and I'm sure others will probably differ. ;)

View attachment 339406

This is 'one' of my current builds with everything filled/blocked and almost ready for planking to commence. The widest between bulkheads is 42mm.
Another plus is that it makes for a very robust structure.

Hi,

I can definitely see the advantage of using in fill for my model. The bulkheads are quite widely spaced and any warps in the planking strips will soon make the planking job a lot harder than needed. What type of wood did you use for the filler? One of problems I have is that I don't have a table top circular saw so cutting all the infill pieces so that they fit snugly between the bulkheads will be a task all by itself (I'll probably buy one anyway so that would solve that issue).
 
Last edited:
Hi,

I can definitely see the advantage of using in fill for my model. The bulkheads are quite widely spaced and any warps in the planking strips will soon make the planking job a lot harder than needed. What type of wood did you use for the filler? One of problems I have is that I don't have a table top circular saw so cutting all the infill pieces so that they fit snugly between the bulkheads will be a task all by itself (I'll probably buy one anyway so that would solve that issue).

I cut pieces the proper width for between the bulkheads on my bandsaw from 2" x 3" material then layout and cut the individual segments on my scroll saw.
I use hard balsa. You'll hear all kinds of opinions regarding wood type however never had an issue with balsa if you align the grain properly and it sure sands much easier than others such as basswood. I know some use pine.....Whew, way too much sanding for me. I block sand everything by hand not power tools starting with 60 grit working my way to finer grits with 220 as my final grit.
Been using this method for over 50 years building RC aircraft.

06_Filler blocks.jpg
 
I cut pieces the proper width for between the bulkheads on my bandsaw from 2" x 3" material then layout and cut the individual segments on my scroll saw.
I use hard balsa. You'll hear all kinds of opinions regarding wood type however never had an issue with balsa if you align the grain properly and it sure sands much easier than others such as basswood. I know some use pine.....Whew, way too much sanding for me. I block sand everything by hand not power tools starting with 60 grit working my way to finer grits with 220 as my final grit.
Been using this method for over 50 years building RC aircraft.

View attachment 339464
Thanks for the info. I do have a scroll saw - but it's rubbish (or I can't use it properly!). I will pop into our local craft shop and buy some balsa pieces and ty it out and see how I get on. I did buy some shapeable modelling PU foam blocks a while back for a totally different project. It's quite dense material, easy to sand and it will take most types of adhesives so I might have a go with that as well.
 
Part 4 - Filling the Hull Spaces (and a Few Other Little Sub-Projects).

I have not had much time** for the build, but I have made a bit of progress on blocking the hull ready for planking. The options were using balsa, scrap wood or some foam. By adding the spine to the skeleton I decided that I did not need anything structural and only wanted something to support the planking span between the bulkheads. I already had some PU foam which I thought would save me a lot of time and be “good enough” for the job so I went with that. The foam is very easy to cut and shape so it did make the job of filling the frames much easier. I then faired in the frames where needed.

The only issue I had was shaping the foam so that I could get the correct profile below the water line at the stern where the planks come in to meet the stern post. Thank you to the people who sent me the nice images from my request for help, they were very helpful. I think I am about there but I will refine the stern a little bit more as I plank. I cut the bottom of the foam away between frames 1&2 so that I could still mount the hull on my temporary build stand. I will make another temporary stand once I start to close up the hull. I still have to shape the counter stern but I think I will do that once I have placed a few planks at the top so that I get a nice joint.


6A-FO01GUBPlmGJSOfS--RFQmD8rMwFB3PoWtL3Xdj02ZLeNUGn21o3zjIM11USVdykxRMbfU-iuZTxXoDJCJXKA8tmoscRjHoJlOPaTUqckMRqiLbwsqSZWrVrzlP6iwGSa8kOpq-Uel0pWIsrZ7_Og7TDFSvH2aGbcdE1yq72Fg2OJC4tfO9SAQy8s0Q


i6Hjk1B52dTl5GrKuY8zz1s-SoarpXBjpdJ6pLV7aPkVHr5C3Xy9NUSaFhPt0zlRslw8p1ir8F1_6lbGD7hTFmRK0YtmH9bDYpZ3RqLKOIN31e63vOlq-43AshCNdJfoqRluqP3LB7hI1QwEO9dcXTf1iZCZUfglHA9_cbxk-5EBOmK5oGlOEFhXwEtQdA


For the next stage I will deal with the main decking before moving onto the planking.

**
I made a bit of time to work on a few other little projects at the end of last year and over the Xmas and New Year if you are interested to see.

Sub Project #1. Something That I Wish I Had Done Earlier!

I needed to improve dust collection when I am working in my room. I have a home-made paint spray/dust booth that I made from some scrap board, plexiglass, bathroom extractor fans, cooker hood filter cloth and some flexi-pipe to vent fumes to the outside. I use some old wall paper to line it which I can just strip out when everything gets too messy. It looks very crude but it works very well and cost only a few £’s to make but, it is too small for the CS and it also needs a space of its own so I have to decamp to use it (it is also in an unheated space so it is not very nice to use in cold weather).

-GljDoRZ0vor9Oeem-7OLl0iy_yByUmvvjjjAGCMx_8TwFnL1L3W2KkACk2_GYFJp7IKOqpcCjXcEgUmhypcPj8dPfe7pPdF64oHsvQ9LNIyzlWYL8h1o45DBQYDOoKzX01VLwTGr6LbbX7uUgJTnMokPObH7v-3BmM81iIVFunn1TOz9VFWIaEEMiWpTg


I therefore made a bench top vacuum table that I could use on my hobby desk for when I am doing sanding or generating dust. I used an off-cut piece of perforated steel mesh sheet which I purchased very cheap from a local fabricator and then set it on top of a frame made from some scrap wood, a fibreboard base and held down with some PVC angle pieces. For the vacuum extraction I found it did not work well by just connecting a tube into the base so I used some 22mm PVC plumbing pipes and joints and randomly drilled some holes in them to distribute the vacuum across the whole base. I am using a (very) old vacuum cleaner and the total cost was about £20. I also made up a couple of free standing side panels so that I can place a piece of clear polysheet across the top to add a bit more containment if needed but so far the table works really well without. The dust gets sucked down into the table and the airflow is enough to stop any fine dust floating around.

kUedlqfDpKLyYPYZoIAn3RTjpr-8gnncxmDHm9FWaH1l9lkHCj-8Zc47FaC_HeU_ac3xd0knm7YJheevKQOm2QRahgwKcevV4kVhk7lx_5fJ15Wj7AG4x4SRHtR5fo8lghti9CdNwUsPMO0qbzHBQtK-6SyLXhn2oyWtEYMQx9xMISy4_lNYuXxtFmmAzw


mjmjP77IPptLlNtXlc2SJhzawUry7PmUgWImjIWDOltubcMX0T8G1gpfHcJMCalYYXfGslVCuqS3WodcQ0M3e-PnhoX8RQGtXnPu-GYs9G9kHqocltiiiLDV9nFwRWN69PVzE9KIGo-CcYWamVpJInn28JHQDk9tPwGqr7WuEAH3JalqoV_ooiFL1luDVw


The mesh hole size is 1.5mm which is great for fine dust but larger particles tend to not go through and accumulate on the surface but that is still OK because they are sucked down onto the top and I can just clean them off with the vacuum hose periodically. 2 or 3mm holes would probably work a bit better but so far it is a massive improvement. At some point I will buy a small quiet portable vacuum that I can tuck under my desk because my old vacuum is rather noisy!


Sub Project #2. I Built a Railway!

This is a project that I have had on the go for a while but I finally decided to finish it off. It started as a little bit of fun and I have been adding to it every so often. It is an N-gauge layout with European outline locomotives. It runs along the shelf above my computer desk. I am not particularly a rail enthusiast but I just wanted to do it - why not! It has two main lines, an Alpine village and a mountain! I like to fix things so I bought all of the locomotives (10) as non-runners together with used rolling stock from various auction sites. I dismantled all of the engines to give them a full clean, serviced the mechanisms and made any repairs as necessary to return them to full working order. I can now run the layout as a nice de-stressing distraction when I am working at my computer!

rW5wjnp9y17TnpMFWW9RbmlzkYMNtDaYkj3kelZO4_u3zfWJos5HnafW54TUDf0RDhGYnK-y8QAh8h1FUEpuPOjZ8703meIMViqkQrThfrCFU3SgHQm0X5azJMTrcsbUV9NNIWmTgIclmtvkZgelqwKkGBNdVYAJuQIyQ_3UhokD3IGB4Trdk8rx7xXhLw


rfP-115Nmw2KpMcoZop8F6SUP1W1TrmvcLeDIcLyf8oiwRK6i6aol8VJJHcnmW3Ad_UsW3MeXjfTYdypOgz7o57uHlXMay7D7kX9A7Xc4Pzxh-3PVeaTqfBuVTG-d9shNAU5hw7r_QpGTs80HJuBdiwImGWjDbG5Rbfk3y-q7f6l9pe77qi01CNXYf9oOQ


trCAkwpQbnaJ4sulVipbCR8au-NlbYo5rBZd71kdYjpDLpAlKu0yBho42QiUpuY_sCPFkNcoU9FnUHCL7zAqJ4_yAIIWNpk6Hqrhg7FsTbjFDAgxqd2gHOWWloM6TKucm0GeRBLyhwfFo2SBctFcKI9aIMINYAM0pFHRLd5pNaSvr2b87epS2LqRqZD_0Q


GCU_Nz7Hnv5JRD-l4CgT8nTUrVwjylt7QrCH6Fw7EilROWRFqt28STgsrFG01SFb_5lShnUempLGY5cMtgKrmVvpV2DqUpxsYXZAE-qikDvk6vJCvP5KAZSTWNtEvMNw3fFEb355t3hUXjeliSHA9oiEAJqGwDzWahTNmSSBfXu-8zKwd7dTElVXESuWzg


And Finally Sub Project #3 - A Christmas/New Year Holiday Project

As a little holiday project I decided to spend a few hours restoring my teenage plastic models that I had kept for nostalgic reasons ( I also needed to clear out some storage space). It is something I have been meaning to do for a long time. They were built in the mid to late 70’s and then put into boxes when I left home to go to University 46 years ago! Two battleships by Heller at 1:400 scale: Bismarck ( still manufactured) and King George V (no longer available - it was also the last model I built until my first wooden model ship, the “Sir Winston Churchill”) and two tanks by Tamiya: 1:35 Centurion Mk III built and a 1:25 Panther V Ausf G built (both of which are no longer manufactured). Surprisingly they had survived the passage of time but were obviously in need of some TLC. Whilst rummaging around I also found a little Airfix kit that was a birthday present in the late 60’s (69?) - but it was sooooooo long ago I cannot remember! I had completely forgotten that I still had it but, having found it again, I decided to build it (only half a century+ to get around to doing it!).

The battleships were in reasonable shape but some parts had broken away but fortunately everything was still in the box so I could use them to make the repairs. I decided that I would restore them pretty much as I had finished them so it was mainly a case of reattaching the parts and cleaning.

The tanks were in a more battle weary state. I did not do a very good job of painting them when I built them and a lot of the detail parts had become detached over time so, I decided to do a complete rework rather than just fix them up. Fortunately the glue had become so brittle over the years it was a relatively easy task to remove most of the remaining detail parts without damaging them. I had painted them in Tamiya acrylic paint so I stripped the paint by soaking everything in isopropyl alcohol. I looked up some images and found some appropriate camouflage patterns for the models and repainted them accordingly. I decided that I would just paint them as “factory” and not weathered/battle damaged. I did not have any decals for the Centurion but I found some appropriate ones from Star Decals online. Incredibly I found the original decals for the Panther which I had kept with the assembly instructions and I had only used a few from the sheet so there were plenty left to reapply after I finished the painting.

As for the little airfix kit, it was a 1:72 Grumman Gosling and it was terrible!!!! I looked it up on the Vintage-Airfix website and found that it was a Series 1 kit first issued in 1959 and amazingly they were still making them until 2012. There were 37 pieces but the moulding was awful with lots of flash, the pieces were distorted and there was very little surface detail to speak about. Once I started I found that nothing fitted together, the seams did not match up and the small parts were barely recognisable as to what they actually were. I eventually managed to beat it into something that looked like an aircraft! For the paint I looked on Google and saw examples of this aircraft in yellow and red so I went with that combination. It must be the WORST kit EVER but I had a real laugh doing it because it was so bad!

It was fun doing the restorations and it brought back some memories. There was no such thing as photo-etch parts and the quality of many plastic models was pretty bad back then but I enjoyed doing them at the time so, that is all that really mattered. Building the little Airfix kit was a challenge because it was so bad and considering that it’s the first plastic kit I have built in over 46+ years I was surprised that it came out as well as it did.

Unfortunately, the SD card in my camera decided to corrupt itself and I lost the photos of the unrestored models and the unassembled Airfix kit but here are the restored/reworked models.

Heller 1/400 Bismarck

N-TcJ71Y0euU3Y4BI7n52I8cIC0GCvcCHm9nT15o8fxkp8RQUhWhFnvc8ZECbNDecfX3Quy2y_Svpk8oKrB_lybfLRZH0iXYNEz5t7wRLwona-Y_ah626Fcs-bwaEGFgCNFtT100cbJPLBZZBYV4lxCnWAlSqbHosJcnCftjWNXVIvr9ujr_ypKYkxZwOw


Heller 1/400 King George V


QmrS7B_1Z8ZEF9M5FvIFmpDskaVW6cJ57lNaGW9f2LmaOMFusvVQJKaNd2WB985_hkLbSHuX9OKpzJnQMtml3FXKpigWSKx5KmrF7WfGYKg7YExix9_6FaUfgwPaljHGquvK3eYHboaoQnVhNTp5oMI77U4dY5y_fGfwCrYKWvGkCP3oX_v2U6CIsgp0VQ


Tamiya 1/35 Centurion Mk III (rebuilt in Korean ‘53 camouflage)

G0itGKQZIZx2_ZQPhUyFDF3AVdiWAeyp2scQc3POniuXhZm6GFM_VnL731WDXMmmQIgzUXxnhkn7rOEfeIGK8oizlo5r-CjSzNAFSAy4SPejKyEDo9aAVZ3d5gqV9Z3c100vGKZxVzmlCkPbqo2QlJy1EPRcnlVEMIL809B42ny8srpuLiseOR2553irPA


Tamiya 1/25 Panther V Ausf G (rebuilt in Russian front summer ‘43 camouflage)

18jbEkZLlYnQG4_Udu_BAXraj7VbB274aT07yKEMYeDaLCGO146bkU8Zrk0aPc4AN-2USkp2r58_1eB7qN9YNLwjp5Zql7yrccm5CJ8017NASne0dvYETXPpzRS-DgmCwEpnZCUxNEqxvAWoPrX6A5ttm8BfZOgyvoUl4zKcDwMX1TVxtIIDTYwhsCyNmA


Airfix 1/72 Grumman Gosling kit from ca. 1969

ByjqWR4Sj-0qDZGYrvGcSXnelP8eYDYJjMz7T32brh4WW1KpjP6rYFPem5IM0xA7HKHzdTTp3CV-8hezZjH57EybL-JV6KPZhWHTQ8Jz_SgBQjsyC9dr6lj2ymO4EYY2_qhtubZZ_d9MliDEzFIa9oFx8OyA_lEAZ_JlNNLsy5qIkS6gwckwreHCioELFg


Hope you liked this excursion back in time!
 
Back
Top