
-

SUBSCRIBE TO SHIPS IN SCALE TODAY!
The beloved Ships in Scale Magazine is back and charting a new course for 2026!
Discover new skills, new techniques, and new inspirations in every issue.
NOTE THAT OUR NEXT ISSUE WILL BE July/August 2026 -

Win a Free Custom Engraved Brass Coin!!!
As a way to introduce our brass coins to the community, we will raffle off a free coin during the month of August. Follow link ABOVE for instructions for entering.
You are using an out of date browser. It may not display this or other websites correctly.
You should upgrade or use an alternative browser.
You should upgrade or use an alternative browser.
Cutty Sark, Vintage Billing Boats BB564, 1:75.
- Thread starter DomCee
- Start date
- Watchers 30
-
- Tags
- billing boats cutty sark


I am looking forward to see your sheating it will be interesting to see, so please do not hesitate to show us the working steps.
Hallo @DomCeeI will not be starting my next build for a while but I thought I would give it a “heads up” now that I have the kit in the shipyard.
Part 1 - Start of a Long Voyage
Choice of Kit - an Odd (or Familiar) Story?
The windjammers/clippers from the mid to late 19th century have always fascinated me for their sleek hull lines and sheer amount of sail. The Cutty Sark is a classic model to build of this type and there are a number of kits to choose from. I looked at some reviews and builds of Cutty Sark kits on the SOS forums and other web sites. Robertd’s recent build of the Sergal/Mantua kit < R'Ds CS > came out very nicely. I was intending to buy that kit later this year but I spotted an estate clearance auction listing for an “old” model boat kit of the Cutty Sark. It turned out to be Billing Boats BB564 complete with the separate fittings kit that had been purchased as a “project” but never started. I left a silly low commission bid and to my surprise won the auction. When I received it I found that it was still in its original shipping box and wrapping paper and had only been opened for inspection. The kit itself is in near mint condition, just some slight damage to the box where the sealing tape had been. The fittings box ( that you had to purchase separately back then) was unopened.
View attachment 323980
Judging from the postage labels the kit was bought in the mid 80’s and has spent the past 37+ years languishing at the back of a cupboard (it makes me wonder just how many model kits have been bought with good intentions but are now just collecting dust?).
I think that it is time for this Cutty Sark to see the light of day and spread her sails (probably not the Stuns’ls!).
Gathering My Thoughts on a Build Plan
Although it is not my first choice of kit it will be a good challenge (but I may also regret this one). It will also be the biggest model I have attempted. The completed model is 1.1m (43”) long and the desk I use for my hobby work is 1.4m wide so I am going to struggle (I also have no idea where I will put it when it’s done!). I am also sure that the rigging will test my patience (and my eyesight!) to the limit but that stage is a long way off into the future for now. I don’t have a lot of space to display my models so it is my intention to take my time over this build, add extra detail and make more parts from scratch. I think I will also need plenty of advice on building this one!
The kit is definitely “vintage” (no laser cut parts). I know that Billing kits from this time were not of the best quality but I will be using this as a base kit for the model build so I’m quite OK with the out-of-the-box quality issues from the day. All of the frames are jig cut and some of the ply parts are die-cut. Other detailing parts are just printed onto ply sheets and need to be cut out (I will probably just use them as templates and make new parts from solid wood). The decorative mouldings and service boats are plastic as are the rigging blocks and deadeyes. The rear transom decoration is a decal. The instructions are the usual basic ones from BB with four plan drawings of layout, sails, pins and rigging.
View attachment 323977View attachment 323978View attachment 323979View attachment 323981
Because I paid very little for the kit I will upgrade it as I go through the build by replacing all of the plastic parts with wood/brass and making new parts where I think the model will benefit.
I have already purchased a set of photo-etched decor parts and a full set of walnut CNC rigging blocks from HisModel. The rigging blocks came in two sets, one for the standing rigging (224 pieces) and one for the running rigging (535 pieces). The blocks are of the correct type and size for this model (759 blocks to rig is however very intimidating!).
I will replace the plastic service boats with wooden ones of the correct type and scale. If anyone knows where I can find some suitable 1:75 kit replacements (or some scale plans so that I could make them myself) that would be great, please let me know through the forum.
I will also replace the rigging thread with some decent rope when I reach that point (I think I will purchase rather than try to make my own).
The BB kit has no hull plates included and the lower hull is suggested to be painted (I think even the latest version of this kit does not offer plates as an option). I would like to sheath the hull because the real ship was sheathed and I will consider options for that upgrade when I reach that point.
To help with the build and rigging I have bought a set of G.F. Campbell’s plans (General Layout, Rigging and Sail Plan) from the Royal Museums Greenwich. I also found Olha’s book review “Cutty Sark, The Ship and the Model/Longridge. C Nepean'' on her YouTube Channel < CS ref book > and I was able to locate a good used copy of the book in the UK. I do not intend to go the “whole hog” on the model by super-detailing it, my intention is to improve it to a level that I am happy with (whatever that is?).
View attachment 323983View attachment 323982View attachment 323984View attachment 323985
I will take a long holiday soon and I have some home improvement projects to do when I return, so it will be a while before I can get started on the framing (probably late autumn). Now that the pandemic is over (I hope!) I have many other things to do, so I will have less time to spend on the ship hobby. I will mainly work on this model during the winter weather months and I will intersperse the work between projects. I am expecting that I will be working on this one for quite some time to come (?years?!) but I am in no hurry.
I will give an update once I have kicked-off the framing.
we wish you all the BEST and a HAPPY BIRTHDAY

Enjoy your special day
Happy Birthday!
- Joined
- Sep 23, 2021
- Messages
- 343
- Points
- 238

Part 12 - Brassing the Hull - Making a Start ( I think it’s going to take me a long time!!)
Jock Willis’ original spec. for the Cutty Sark states “Yellow Metal Sheathing. Vessel to be sheathed from Keel to 18 ft water mark on top of paper and tar, sheathing to be smoothly put on, sheets to be 22, 24, 26 oz. metal”. The Cutty Sark was sheathed in Muntz metal, a brass alloy which replaced copper as the sheathing metal for wooden hull’s from the 1830’s and was used right up to the end of the 19th century when iron hulls and then steel was the standard. To keep true to the ship, after looking at various options, I set myself the challenge that it should be brass, so brass it will be! My decision for the model was “new” brass but with the shine toned down a bit with a matt lacquer top coat.
At the moment scale brass plates are not available from any of the normal suppliers (Miguel92gom spotted some brass plates made by Eskadra Vintage Billing Boats Cutty Sark - Sheathing the Hull? | Ships of Scale however, I will not buy those for obvious reasons). The main thing about brass is that when new it is a pale golden yellow/green in colour and is obviously “nice and shiny”. However, many modellers will prefer a weathered appearance and the extent of the weathering will depend on many factors. Brass dulls down to a darker yellow and blackens in air unless lacquered.
In the absence of brass, copper is the default for most modellers. Amati’s etched copper plates are probably the best ones but are more suited to period ships. The gummed embossed copper tapes which are available from ZHL are much easier and faster to apply but again they are more suitable for larger scale period fighting ships (personally, I don’t like the look of the tapes). As to weathering, copper will only blacken Indoors but in the presence of moisture it will turn green due to corrosion but to produce the green verdigris on models chemicals need to be applied (some people like that look). However, at the end of the day, copper is wrong for the Cutty Sark.
I have gone into some detail in the following sections about how I decided to go about brassing the hull of my model and the other options I considered. No doubt there are (much) better ways of doing it - but this is how I went about it - warts and all.
Painting Option
At the start, I did consider just painting the hull (as suggested by Billing). The advantage of painting is that it is very quick to do but, the disadvantages are that it is not “metal” and it will always look painted. My thought was to use wood veneer strips as a second planking to mimic the plates and then overcoat with a brass metallic paint. I tested quite a number of paints and there are some that give quite good “metal-like” appearances. However, they varied quite a lot in colour/shade/metallic sheen. I found the metallic brass paints from Humbrol (no.54) and Revel (RV92) were a bit too dark and had a “glittery” appearance to them. The gold Humbrol paint (no. 16) was probably a bit closer to Muntz but had a slightly more darkish yellow tint to it (again, also a glittery finish). Some other “brass” paints were not “terrible” but I did not like the colour/finish they gave so I won't mention them here. The best paints I tested were the ALCLAD2, ALC-109 (polished brass) and ALC-108 (pale gold) < ALCLAD2 link >. The ALCAD2 paints are designed for airbrushing and I found that they were far superior to anything else - but you do need to follow their recommended painting method to get the best finish. They give an excellent metal like finish and in my tests the pale gold was probably the closest match to Muntz - but, that's just my thoughts. However, all the paints I tested are much better suited for painting smaller parts using an airbrush which are not the best thing to use over large areas. Painting the C-S is more like painting a barn door! It requires many passes with an airbrush and it is very difficult to achieve an even finish. You can use a large nozzle size (0.5 - 1.0mm) or a mini-spray gun but they need large volumes of paint to work properly. Hand brushing is always an option but I much prefer the finish that an airbrush or a rattle-can give.
I did find a specialist “veneer” brass paint (Metal Veneers | Luxury Metal Finishes) which is a two part paint with a very high metal particle content (they also do copper and bronze finishes). They provide the paint and activator in pots but they also supply it in custom spray cans. Once cured the coating is very hard and can be polished to a satin or bright metal finish. The caveat is that the paint has a very short life once activated so if you do not get the coating right in one shot it means buying new paint (which is very expensive), cutting back the paint surface and recoating. Isocyanate paints are also quite toxic so great care is needed to use them safely.
Using veneer strips and paint was tempting because it would simplify things but veneer strips are thicker (0.5~0.6mm) than using foil and if it all went horribly wrong I could have easily ruined the hull beyond recovery.
Brass Metal Sheet - Shim Stock
My first attempts at making my own plates did not work out because I could only find brass shim metal in 100mm wide sheet rolls. I had a lot of issues cutting it neatly and consistently mainly because brass is harder than copper and it has a tendency to curl up when it is cut in strips. Brass has some spring in it so flattening it out again without leaving marks is almost impossible. I tried a few types of hand cutters/scissors but, to some extent or other, they suffered from turning the edges over, curling and creasing the metal or were not able to keep to a good cut line. Carefully scoring the brass with a cutting blade and then bending it up and down against a flat edge worked to some extent but it was very difficult to do, very slow and …. repeat for 2000+ identical plates = good luck with that! I decided the time needed to make all the plates from sheet brass would be better spent doing other things.
Nail Pattern
People who have made their own copper plates have also embossed the nail pattern into them by using a jig (pins in a block) and a press. However, brass is quite hard to mechanically emboss and etching the patterns into the surface is the best way to do it but unless you have access to decent photomask equipment and know what you are doing, it is not something to do yourself unless you really want to learn how to do it. I did find a custom etch service that gave me a “ballpark” figure to make some sheets of brass plates (similar to the ones that Amati does in copper) but the full price turned out to be far too expensive so I quickly ruled that option out.
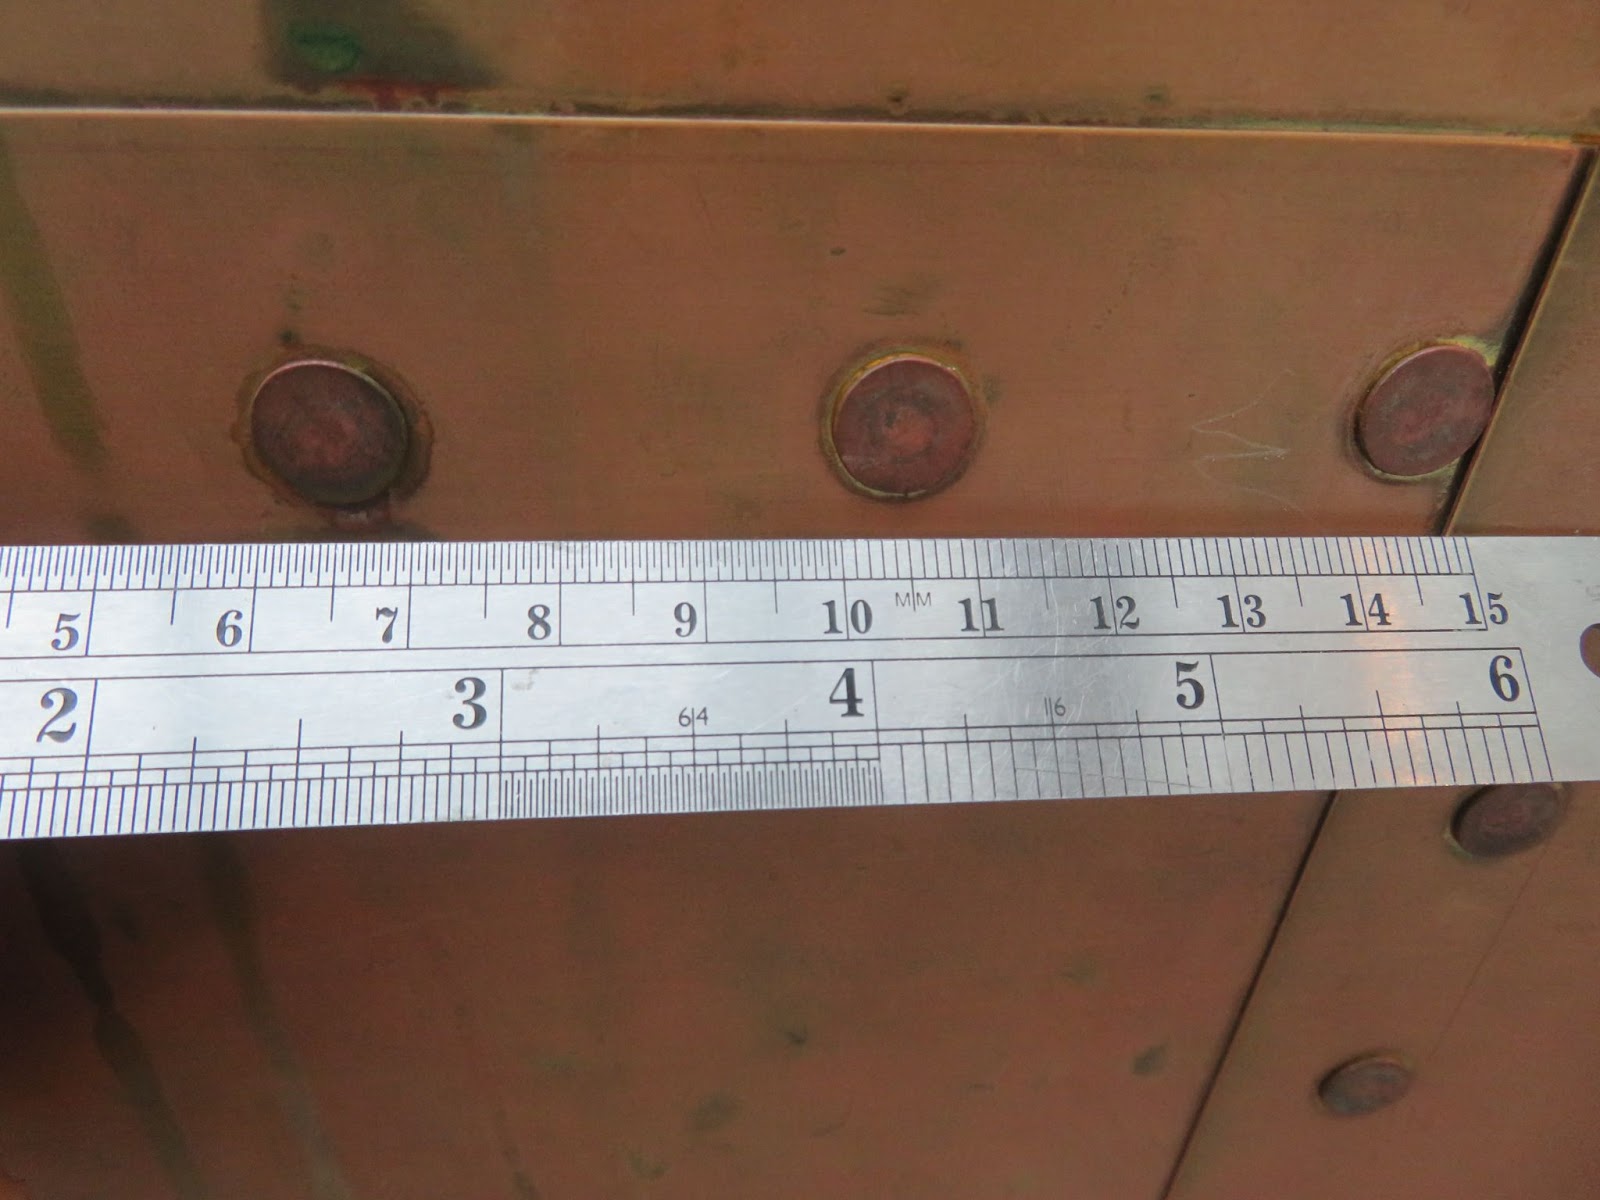
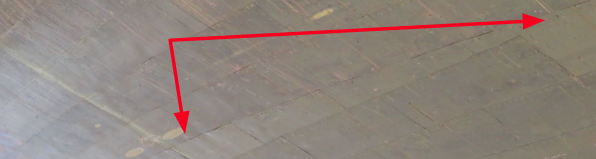
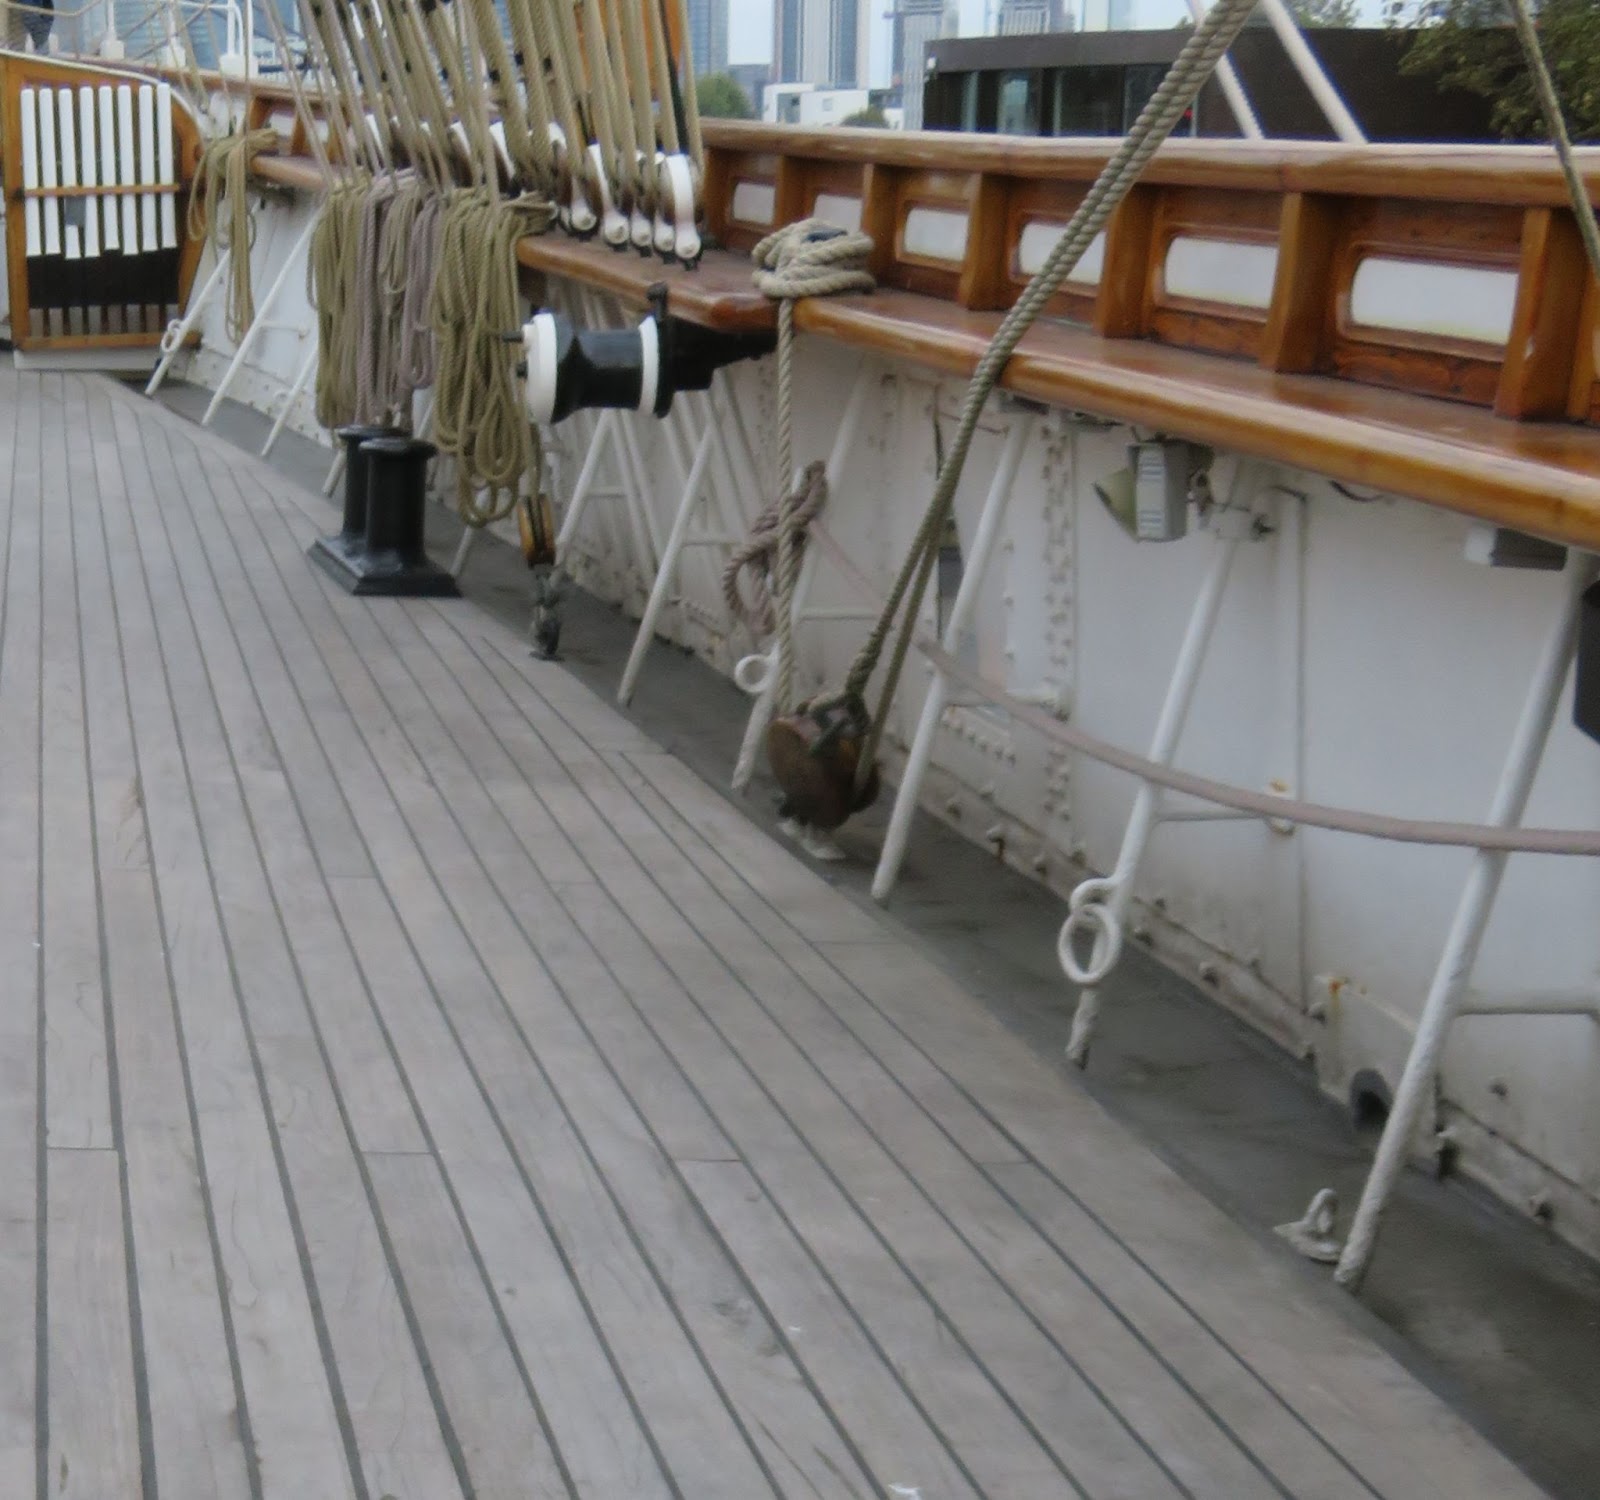
In reality, when you see the hull from any distance away it is almost impossible to see the nail heads (or the plate overlap) because the tacks that were used on the C-S were actually quite small. The image that I took on my visit shows the plates and tacks, the plates are between 0.8 and 1mm thick and the tack heads are 10mm in diameter and 1mm proud. Scaled to the model, the heads would be ~0.12mm in diameter but, more importantly, they would only be ~0.01mm proud of the surface - that’s about 1/8- 1/10th the width of a hair - microscopic! In fact the resolution of the human eye is only 0.1mm at 25 cm so properly scaled it would be impossible to see the nail pattern and overlap pattern when viewing it from more than a metre away. You can also see how the plates are overlapped along and down the hull (the image is oriented with the bow to the left). For the observant, the plates look very coppery in colour so I did some fact finding and discovered that the brass they used in the restoration was a cheaper alloy which has become oxidised giving the reddish tinge.
Not having the nail pattern on the plates greatly simplifies things and it is actually the correct thing to do from a scale factor - so that was my decision!
Plate Size and Positioning - Brass Reel
To get around the brass sheet problem I scoured the internet and eventually found a supplier of 0.1 mm x 5 mm brass foil. 0.1mm was the thinnest foil they do at 5 mm, they also had 8mm but I thought that was too wide. The scaled plate size for the model is about 16 mm x 5 mm . I decided to go for slightly longer plates at 18 mm x 5 mm to allow 1 mm overlap at the ends and I was able to buy a 50 m reel which meant that I could cut the plates from the strip very easily with some sharp cutters.
To cover the hull, the plating strakes need to more-or-less follow a straight line from bow to stern taking into account the complex curves (as shown in Cambell’s plans). In effect the plates run parallel to the water line.

On the model there are approx. 17-18 strakes of plates at the bow and stern but at the centre of the hull the girth expands to about 24-25 strakes. To accommodate the middle section of the hull without leaving gaps or needing wedges and/or stealers I marked off the hull at the top of the sheathing (which is just above the waterline) and used my waterline marker to draw a series of strake lines along the hull to act as a rough guide. The hull needs about 2000 plates to cover it (I think!). On the ship the plates are overlapped so that starting at the bow, the next plate overlaps and the strake below overlaps the top strake (as in the image). I could have tried to butt the plates together which would have given a smoother finish but I decided to overlap the plates that way l could adjust the overlap to follow the strake lines without leaving gaps and it is actually the correct way but, it does leave a slight step.
Attaching the Plates
In order to attach the plates to the hull I had to do a few experiments to see what worked best. Degreasing the brass with a suitable solvent such as acetone or rubbing alcohol is essential before applying any adhesive. I did not clean the surface with fine emery paper because the brass I bought was very clean but, if the brass is very dirty or heavily oxidised this may be necessary.
For the adhesives I tested a few of the common ones on some scrap to see which worked the best; CA, epoxy and contact,
CA
Generally I am not a fan of CA and avoid it. It is very messy to use and you have limited time to position parts. It is OK for small parts but is not very good for large pieces because the fast setting time does not allow for making fine adjustments. It does stick the brass down (as well as fingers!) but I found that it was also very easy to “ping” the brass off again without much force. Getting the CA on the surface and edges of the plates is inevitable and it needs to be cleaned off using a CA debonding solution. CA also has a problem of being quite brittle and from experience even well stuck metal parts gradually can become unstuck because of thermal cycling and humidity.
Epoxy
2-Part epoxy works better than CA but again it is a very messy adhesive to use and the pieces need to be held in place with masking tape (or something) while the glue sets up (and hope that nothing moves). You also have the choice of using the quick or long set epoxy. Like CA, excess adhesive squashes out from under the strip onto the edges and also smears on top of the brass. If it is not cleaned off before the glue cures, removing any excess hardened glue from the edges and face of the brass is a nightmare. The brass-wood bond is however more durable than the CA.
Contact
Contact adhesive works but you need to coat both the wood and the metal, let the glue air dry and then carefully apply the brass. Again, contact glue is very messy to use, it is high in volatiles and it is difficult to get an even coat on both the metal and the wood without excess. The grab is quite strong so if you get the positioning wrong it is very difficult to reposition parts.
Generally all the liquid glues are very difficult to apply thinly and evenly. Excess adhesive gets onto the edges and face of the metal which is then difficult to remove without marking the surface.
After my tests with all the liquid adhesives I was not happy with using any of them - small parts fine, just not very “user friendly” for large areas.
Bonding Tape
Using double sided bonding tape (similar to using the embossed adhesive copper tapes that some people use e.g. the ones available from ZHL Model) was my next consideration.
There are many types and brands of tape available but the best ones form extremely strong bonds to a variety of materials. I tested a number of types and found that 3M 9448a or 9495MP both worked very well. The 9448 is a tissue based carrier and the 9495 uses a PET film. Both are very thin tapes and are resistant to heat, chemicals and moisture. The tape bond reaches its maximum strength after 72 hrs but it is possible to reposition the plates by carefully warming it with a hair dryer. You can also use 3M 94 primer which improves the bonding but the plates are not supporting any load and just need to “stick” to the hull so I decided this was not necessary - in fact the plates are so well stuck if you try to lift them they will actually pull the wood away with it!
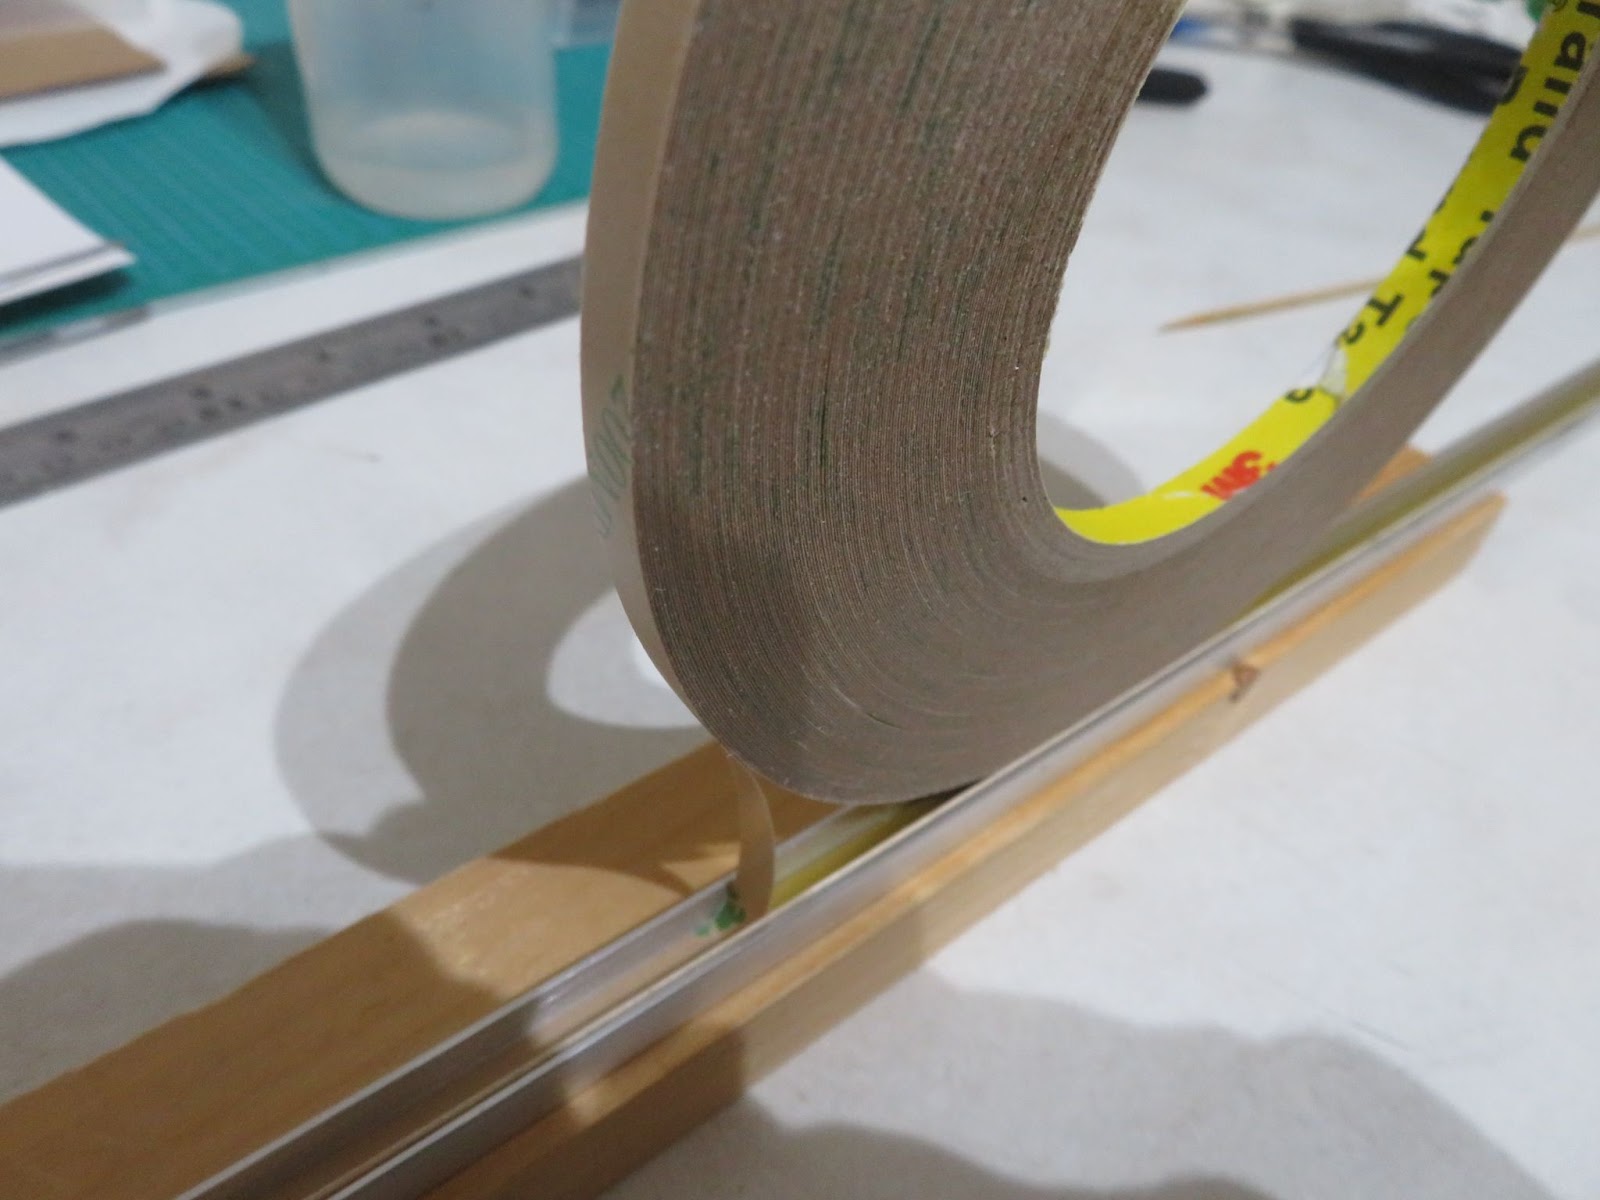
To make the plates I applied the tape to a length of the brass strip (about 1m at a time). I found the best way to do this was to place the brass in a narrow piece of C-channel and use that as a guide to unroll the tape down onto the brass.
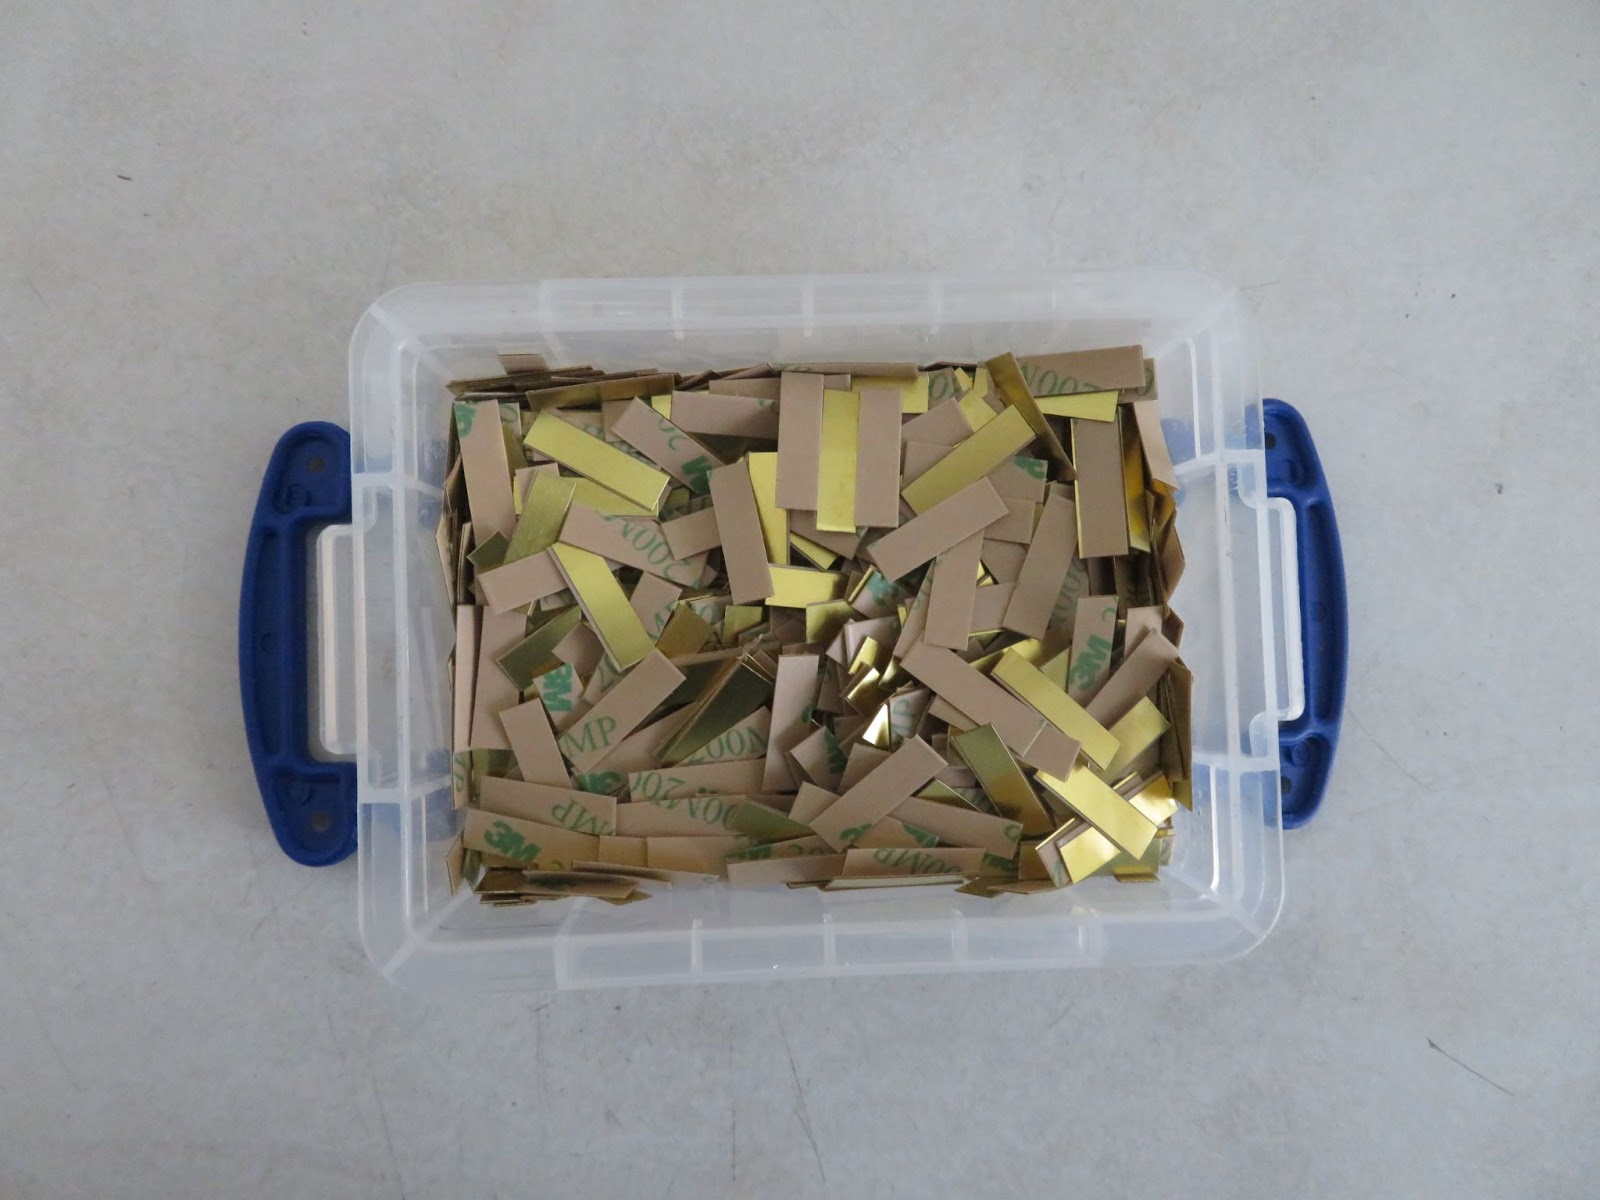
To ensure a good bond I ran a cork roller over the tape to firmly bond it and then cut the strip into 18mm tiles with some sharp flush cutters. The rinse and repeat cycle was rather tedious to say the least but I eventually ended up with a box of plates - I’ll probably need more but there is only so much fun that can be had at any one time! The only issue I found was that the tape is a tiny bit wider than the strip so there was a small overlap at the edge but it was easy enough to just run a scalpel blade along the edge to trim any excess off as I came to lay the plate.
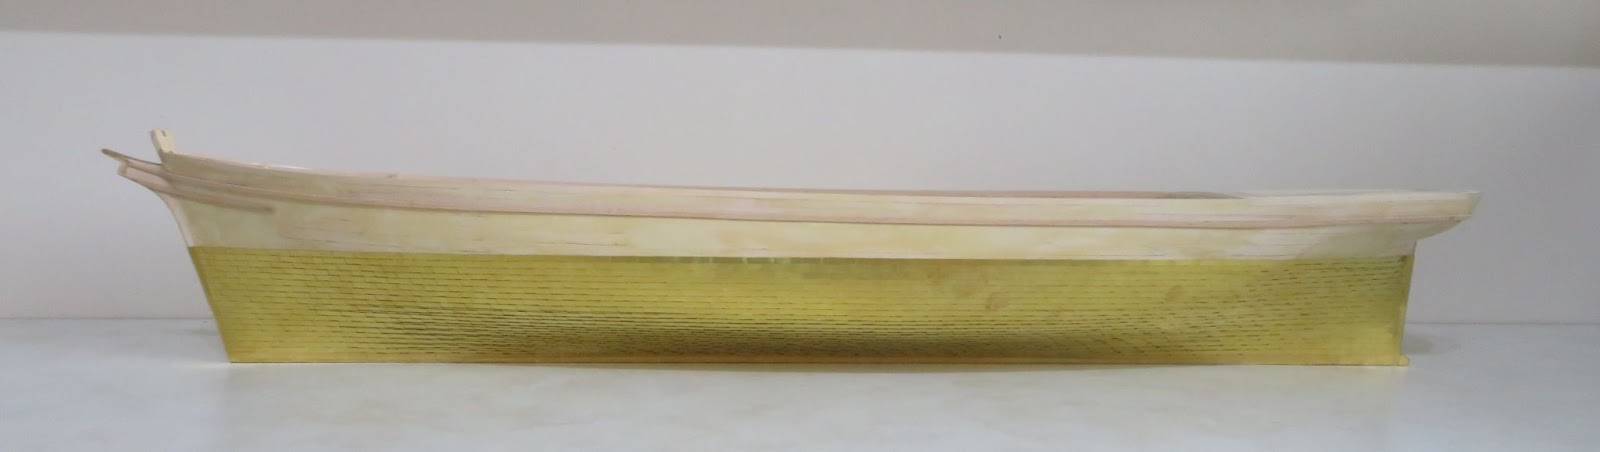
To get started I placed some masking tape along the top marked line and then carefully positioned each plate following the line with 1mm end overlap adjusting as I went. I brick tiled as I came down the hull. To ensure good bonding after laying a section, I ran a hair drier over the plates to warm them up slightly and then ran my cork roller over them to make sure they were well and truly stuck down. After I had put a couple of strakes on I checked and adjusted the next line to make sure the spacing would be more-or-less even as I worked down the hull.
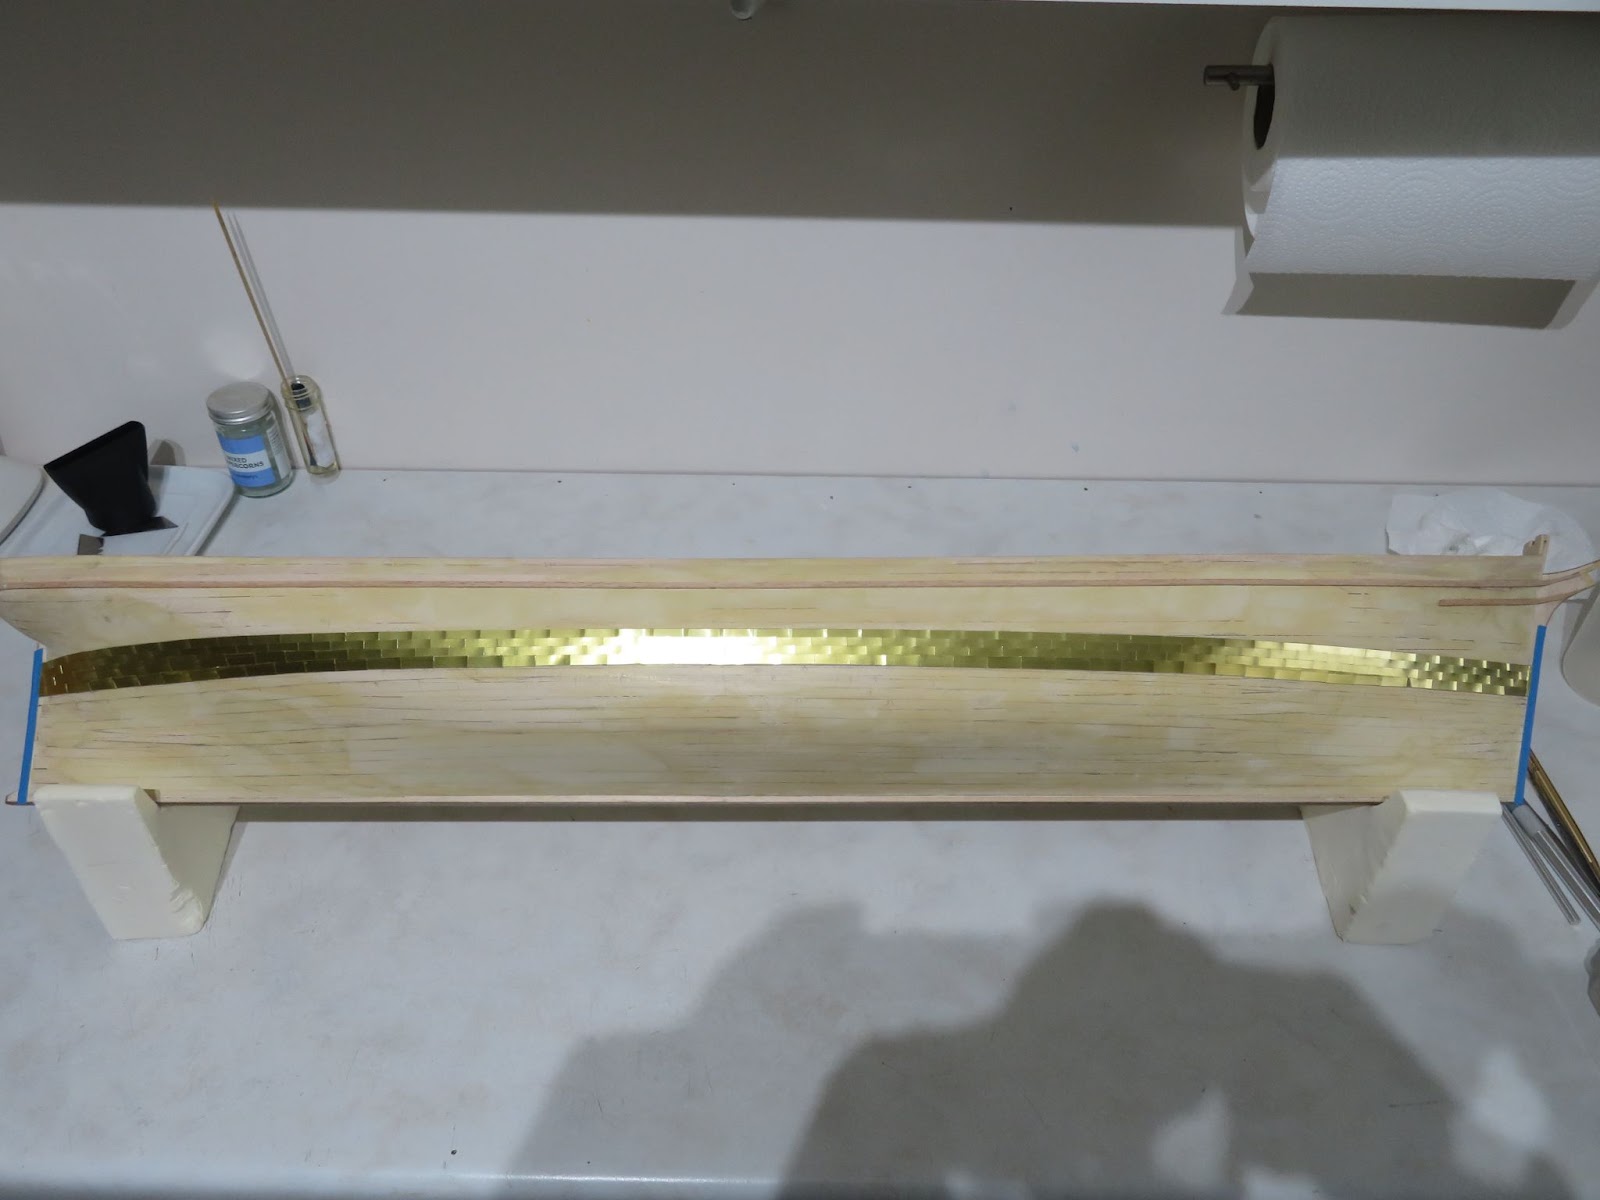
About 200 plates down, only another 1800+ to go!
I’ll post an up-date when I have worked my way down to the keel on this side but at the rate I am going I am estimating it’s going to take me most of Feb’ to finish the sheathing.
Jock Willis’ original spec. for the Cutty Sark states “Yellow Metal Sheathing. Vessel to be sheathed from Keel to 18 ft water mark on top of paper and tar, sheathing to be smoothly put on, sheets to be 22, 24, 26 oz. metal”. The Cutty Sark was sheathed in Muntz metal, a brass alloy which replaced copper as the sheathing metal for wooden hull’s from the 1830’s and was used right up to the end of the 19th century when iron hulls and then steel was the standard. To keep true to the ship, after looking at various options, I set myself the challenge that it should be brass, so brass it will be! My decision for the model was “new” brass but with the shine toned down a bit with a matt lacquer top coat.
At the moment scale brass plates are not available from any of the normal suppliers (Miguel92gom spotted some brass plates made by Eskadra Vintage Billing Boats Cutty Sark - Sheathing the Hull? | Ships of Scale however, I will not buy those for obvious reasons). The main thing about brass is that when new it is a pale golden yellow/green in colour and is obviously “nice and shiny”. However, many modellers will prefer a weathered appearance and the extent of the weathering will depend on many factors. Brass dulls down to a darker yellow and blackens in air unless lacquered.
In the absence of brass, copper is the default for most modellers. Amati’s etched copper plates are probably the best ones but are more suited to period ships. The gummed embossed copper tapes which are available from ZHL are much easier and faster to apply but again they are more suitable for larger scale period fighting ships (personally, I don’t like the look of the tapes). As to weathering, copper will only blacken Indoors but in the presence of moisture it will turn green due to corrosion but to produce the green verdigris on models chemicals need to be applied (some people like that look). However, at the end of the day, copper is wrong for the Cutty Sark.
I have gone into some detail in the following sections about how I decided to go about brassing the hull of my model and the other options I considered. No doubt there are (much) better ways of doing it - but this is how I went about it - warts and all.
Painting Option
At the start, I did consider just painting the hull (as suggested by Billing). The advantage of painting is that it is very quick to do but, the disadvantages are that it is not “metal” and it will always look painted. My thought was to use wood veneer strips as a second planking to mimic the plates and then overcoat with a brass metallic paint. I tested quite a number of paints and there are some that give quite good “metal-like” appearances. However, they varied quite a lot in colour/shade/metallic sheen. I found the metallic brass paints from Humbrol (no.54) and Revel (RV92) were a bit too dark and had a “glittery” appearance to them. The gold Humbrol paint (no. 16) was probably a bit closer to Muntz but had a slightly more darkish yellow tint to it (again, also a glittery finish). Some other “brass” paints were not “terrible” but I did not like the colour/finish they gave so I won't mention them here. The best paints I tested were the ALCLAD2, ALC-109 (polished brass) and ALC-108 (pale gold) < ALCLAD2 link >. The ALCAD2 paints are designed for airbrushing and I found that they were far superior to anything else - but you do need to follow their recommended painting method to get the best finish. They give an excellent metal like finish and in my tests the pale gold was probably the closest match to Muntz - but, that's just my thoughts. However, all the paints I tested are much better suited for painting smaller parts using an airbrush which are not the best thing to use over large areas. Painting the C-S is more like painting a barn door! It requires many passes with an airbrush and it is very difficult to achieve an even finish. You can use a large nozzle size (0.5 - 1.0mm) or a mini-spray gun but they need large volumes of paint to work properly. Hand brushing is always an option but I much prefer the finish that an airbrush or a rattle-can give.
I did find a specialist “veneer” brass paint (Metal Veneers | Luxury Metal Finishes) which is a two part paint with a very high metal particle content (they also do copper and bronze finishes). They provide the paint and activator in pots but they also supply it in custom spray cans. Once cured the coating is very hard and can be polished to a satin or bright metal finish. The caveat is that the paint has a very short life once activated so if you do not get the coating right in one shot it means buying new paint (which is very expensive), cutting back the paint surface and recoating. Isocyanate paints are also quite toxic so great care is needed to use them safely.
Using veneer strips and paint was tempting because it would simplify things but veneer strips are thicker (0.5~0.6mm) than using foil and if it all went horribly wrong I could have easily ruined the hull beyond recovery.
Brass Metal Sheet - Shim Stock
My first attempts at making my own plates did not work out because I could only find brass shim metal in 100mm wide sheet rolls. I had a lot of issues cutting it neatly and consistently mainly because brass is harder than copper and it has a tendency to curl up when it is cut in strips. Brass has some spring in it so flattening it out again without leaving marks is almost impossible. I tried a few types of hand cutters/scissors but, to some extent or other, they suffered from turning the edges over, curling and creasing the metal or were not able to keep to a good cut line. Carefully scoring the brass with a cutting blade and then bending it up and down against a flat edge worked to some extent but it was very difficult to do, very slow and …. repeat for 2000+ identical plates = good luck with that! I decided the time needed to make all the plates from sheet brass would be better spent doing other things.
Nail Pattern
People who have made their own copper plates have also embossed the nail pattern into them by using a jig (pins in a block) and a press. However, brass is quite hard to mechanically emboss and etching the patterns into the surface is the best way to do it but unless you have access to decent photomask equipment and know what you are doing, it is not something to do yourself unless you really want to learn how to do it. I did find a custom etch service that gave me a “ballpark” figure to make some sheets of brass plates (similar to the ones that Amati does in copper) but the full price turned out to be far too expensive so I quickly ruled that option out.
In reality, when you see the hull from any distance away it is almost impossible to see the nail heads (or the plate overlap) because the tacks that were used on the C-S were actually quite small. The image that I took on my visit shows the plates and tacks, the plates are between 0.8 and 1mm thick and the tack heads are 10mm in diameter and 1mm proud. Scaled to the model, the heads would be ~0.12mm in diameter but, more importantly, they would only be ~0.01mm proud of the surface - that’s about 1/8- 1/10th the width of a hair - microscopic! In fact the resolution of the human eye is only 0.1mm at 25 cm so properly scaled it would be impossible to see the nail pattern and overlap pattern when viewing it from more than a metre away. You can also see how the plates are overlapped along and down the hull (the image is oriented with the bow to the left). For the observant, the plates look very coppery in colour so I did some fact finding and discovered that the brass they used in the restoration was a cheaper alloy which has become oxidised giving the reddish tinge.
Not having the nail pattern on the plates greatly simplifies things and it is actually the correct thing to do from a scale factor - so that was my decision!
Plate Size and Positioning - Brass Reel
To get around the brass sheet problem I scoured the internet and eventually found a supplier of 0.1 mm x 5 mm brass foil. 0.1mm was the thinnest foil they do at 5 mm, they also had 8mm but I thought that was too wide. The scaled plate size for the model is about 16 mm x 5 mm . I decided to go for slightly longer plates at 18 mm x 5 mm to allow 1 mm overlap at the ends and I was able to buy a 50 m reel which meant that I could cut the plates from the strip very easily with some sharp cutters.
To cover the hull, the plating strakes need to more-or-less follow a straight line from bow to stern taking into account the complex curves (as shown in Cambell’s plans). In effect the plates run parallel to the water line.
On the model there are approx. 17-18 strakes of plates at the bow and stern but at the centre of the hull the girth expands to about 24-25 strakes. To accommodate the middle section of the hull without leaving gaps or needing wedges and/or stealers I marked off the hull at the top of the sheathing (which is just above the waterline) and used my waterline marker to draw a series of strake lines along the hull to act as a rough guide. The hull needs about 2000 plates to cover it (I think!). On the ship the plates are overlapped so that starting at the bow, the next plate overlaps and the strake below overlaps the top strake (as in the image). I could have tried to butt the plates together which would have given a smoother finish but I decided to overlap the plates that way l could adjust the overlap to follow the strake lines without leaving gaps and it is actually the correct way but, it does leave a slight step.
Attaching the Plates
In order to attach the plates to the hull I had to do a few experiments to see what worked best. Degreasing the brass with a suitable solvent such as acetone or rubbing alcohol is essential before applying any adhesive. I did not clean the surface with fine emery paper because the brass I bought was very clean but, if the brass is very dirty or heavily oxidised this may be necessary.
For the adhesives I tested a few of the common ones on some scrap to see which worked the best; CA, epoxy and contact,
CA
Generally I am not a fan of CA and avoid it. It is very messy to use and you have limited time to position parts. It is OK for small parts but is not very good for large pieces because the fast setting time does not allow for making fine adjustments. It does stick the brass down (as well as fingers!) but I found that it was also very easy to “ping” the brass off again without much force. Getting the CA on the surface and edges of the plates is inevitable and it needs to be cleaned off using a CA debonding solution. CA also has a problem of being quite brittle and from experience even well stuck metal parts gradually can become unstuck because of thermal cycling and humidity.
Epoxy
2-Part epoxy works better than CA but again it is a very messy adhesive to use and the pieces need to be held in place with masking tape (or something) while the glue sets up (and hope that nothing moves). You also have the choice of using the quick or long set epoxy. Like CA, excess adhesive squashes out from under the strip onto the edges and also smears on top of the brass. If it is not cleaned off before the glue cures, removing any excess hardened glue from the edges and face of the brass is a nightmare. The brass-wood bond is however more durable than the CA.
Contact
Contact adhesive works but you need to coat both the wood and the metal, let the glue air dry and then carefully apply the brass. Again, contact glue is very messy to use, it is high in volatiles and it is difficult to get an even coat on both the metal and the wood without excess. The grab is quite strong so if you get the positioning wrong it is very difficult to reposition parts.
Generally all the liquid glues are very difficult to apply thinly and evenly. Excess adhesive gets onto the edges and face of the metal which is then difficult to remove without marking the surface.
After my tests with all the liquid adhesives I was not happy with using any of them - small parts fine, just not very “user friendly” for large areas.
Bonding Tape
Using double sided bonding tape (similar to using the embossed adhesive copper tapes that some people use e.g. the ones available from ZHL Model) was my next consideration.
There are many types and brands of tape available but the best ones form extremely strong bonds to a variety of materials. I tested a number of types and found that 3M 9448a or 9495MP both worked very well. The 9448 is a tissue based carrier and the 9495 uses a PET film. Both are very thin tapes and are resistant to heat, chemicals and moisture. The tape bond reaches its maximum strength after 72 hrs but it is possible to reposition the plates by carefully warming it with a hair dryer. You can also use 3M 94 primer which improves the bonding but the plates are not supporting any load and just need to “stick” to the hull so I decided this was not necessary - in fact the plates are so well stuck if you try to lift them they will actually pull the wood away with it!
To make the plates I applied the tape to a length of the brass strip (about 1m at a time). I found the best way to do this was to place the brass in a narrow piece of C-channel and use that as a guide to unroll the tape down onto the brass.
To ensure a good bond I ran a cork roller over the tape to firmly bond it and then cut the strip into 18mm tiles with some sharp flush cutters. The rinse and repeat cycle was rather tedious to say the least but I eventually ended up with a box of plates - I’ll probably need more but there is only so much fun that can be had at any one time! The only issue I found was that the tape is a tiny bit wider than the strip so there was a small overlap at the edge but it was easy enough to just run a scalpel blade along the edge to trim any excess off as I came to lay the plate.
To get started I placed some masking tape along the top marked line and then carefully positioned each plate following the line with 1mm end overlap adjusting as I went. I brick tiled as I came down the hull. To ensure good bonding after laying a section, I ran a hair drier over the plates to warm them up slightly and then ran my cork roller over them to make sure they were well and truly stuck down. After I had put a couple of strakes on I checked and adjusted the next line to make sure the spacing would be more-or-less even as I worked down the hull.
About 200 plates down, only another 1800+ to go!
I’ll post an up-date when I have worked my way down to the keel on this side but at the rate I am going I am estimating it’s going to take me most of Feb’ to finish the sheathing.
GREAT Tutorial - and very informative information
and the first rows are looking extremely promising
Very good work and many thanks for sharing this with us
and the first rows are looking extremely promising
Very good work and many thanks for sharing this with us
About 200 plates down, only another 1800+ to go!
This hobby will make very patient men of us

Great work so far Dom

- Joined
- Sep 23, 2021
- Messages
- 343
- Points
- 238
Part 13 A Lot of Brass Later! - The Monster Now Has Scales on it! - What was I Thinking?
Which is worse…. laying plates or tying rat-lines?
Answer = Plates!
My advice for fellow modellers considering sheathing their models in a similar way is just replace the word “hull” with “HELL” and you’ll be about right!
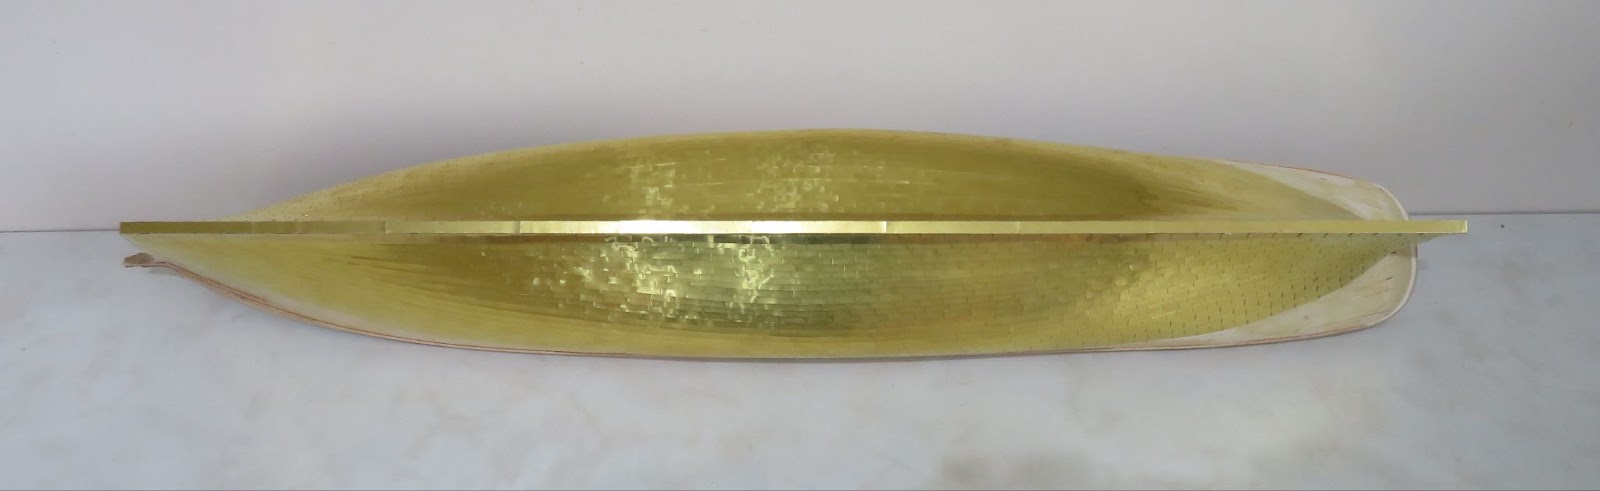
I made quite good progress at first and then it all became very messy! At the top of the sheathing the hull is fairly slab sided so laying the first strakes of plates was not too bad but, as soon as the hull started to curve, it became very difficult to keep a neat tiling pattern whilst maintaining a consistent overlap. As the curves increased further down the hull the problems became worse and worse. The only way was to continuously adjust the overlaps to compensate as necessary and use partial plates where needed. I thought I was really making a mess of it but I looked closely at my images of the CS hull and saw that they had done exactly the same thing - so there was a method to my madness!
Some of the plate spacings went awry at times but, over the whole hull, I decided it did not really matter so long as there was some offset to the plates so that it didn’t look too bad from a distance. The critical thing was to keep the plating strakes as parallel to the keel as possible. After I finished each strake, I used my waterline marker to check and adjust the next strake line and continued down the hull. Where the hull flattens out at the bottom the plates go from near vertical at the bow and stern to almost flat at the centre and it was very difficult to get a good line to plate to using my water-line marker so, I attached a scribe to my multi-arm DTI gauge stand and used that to mark the hull and, as a double check, I placed some masking tape along the line to make sure that it was correct. I really struggled where the plates meet the keel because I could not get them to fit neatly without leaving some small gaps. I did not want to use slivers of brass to fill the gaps so the only way I could do it was to cut each of the keel plates from foil sheet and trim each one to fit neatly.
I will give the plates a good clean and a light polish to remove any greasy fingerprints and coat them with a clear lacquer (matt or satin - I haven’t decided) because I do not want “super-shiny” brass.
I do not think I would use this method (EVER!) again if I were to sheath another model. It did become easier after I had put a few strakes of plates on the hull and the port side went a lot quicker (and I did a better job) than the starboard side but, never-the-less, it did take a lot of very tedious hours to finish. My initial estimate of 2000 plates was way off because I did not factor in how much area of each plate is lost because of the overlaps and wastage. In the end I used up all of the 50 m brass reel which was enough to make 2750 plates plus, I had to make the plates that fitted into the keel section from the brass sheet so it ended up around the 2900-3000 mark for the whole hull. Being able to cut the plates from the reel made life a “little” better, however, the whole process was very laborious and I could only complete a couple of strakes at a time before I lost the will to live and had to walk away and come back later. The bonding tape was probably the easiest way to attach the plates but you do have to accept that the tape does add some thickness which creates a step where the plates overlap - it’s not perfect but it does the job. However, plate + tape is <0.2mm so it is still less than the thickness of a veneer strip and on a hull that is over one metre long, it really doesn’t matter that much.
It may be possible to achieve a smoother finish on the hull by using some other types of adhesives (e.g. repositionable gel CA which takes about 60 seconds to bond) but I think that would be only for the really hard core modellers - it would allow the plates to lay slightly flatter, however, the prospect of sticking each plate on with any type of glue would challenge anybody and you would almost certainly end up with glue all over the surfaces.
If you took (a lot of ) your time you could trim every plate to butt up against the next but using the scale plate size would be a complete nightmare to even attempt to do so. You could probably do it with larger plates than scale (probably double or even triple size) if you weren’t bothered by the accuracy of the model.
Unfortunately, I did bump one of the bulwarks during the plating which was very annoying but, given how big and heavy the hull is now to move about, it was not unexpected. It would have been better to leave the false stanchions in place to give them some support until after the sheathing and then remove them. Fortunately it was not a major repair and the bulwarks will be reinforced when I fit the main rails.
Next up: Main decking/some painting/main rails
After lacquering the plates there are a few things that need to be done next but I need to give a bit of thought about the order of work or I will run into problems. I will sort out the covering for the main decking because that needs to be done before I can fix the main rails into place but that also necessitates painting the water channels and inner bulwarks first.
I'm trying to push on and get as much done on the hull as I can during March but, time in the shipyard is going to be limited as my spring projects are now starting to kick in and I am under orders to sort out the garden after a particularly wet and windy winter.
Which is worse…. laying plates or tying rat-lines?
Answer = Plates!
My advice for fellow modellers considering sheathing their models in a similar way is just replace the word “hull” with “HELL” and you’ll be about right!
I made quite good progress at first and then it all became very messy! At the top of the sheathing the hull is fairly slab sided so laying the first strakes of plates was not too bad but, as soon as the hull started to curve, it became very difficult to keep a neat tiling pattern whilst maintaining a consistent overlap. As the curves increased further down the hull the problems became worse and worse. The only way was to continuously adjust the overlaps to compensate as necessary and use partial plates where needed. I thought I was really making a mess of it but I looked closely at my images of the CS hull and saw that they had done exactly the same thing - so there was a method to my madness!
Some of the plate spacings went awry at times but, over the whole hull, I decided it did not really matter so long as there was some offset to the plates so that it didn’t look too bad from a distance. The critical thing was to keep the plating strakes as parallel to the keel as possible. After I finished each strake, I used my waterline marker to check and adjust the next strake line and continued down the hull. Where the hull flattens out at the bottom the plates go from near vertical at the bow and stern to almost flat at the centre and it was very difficult to get a good line to plate to using my water-line marker so, I attached a scribe to my multi-arm DTI gauge stand and used that to mark the hull and, as a double check, I placed some masking tape along the line to make sure that it was correct. I really struggled where the plates meet the keel because I could not get them to fit neatly without leaving some small gaps. I did not want to use slivers of brass to fill the gaps so the only way I could do it was to cut each of the keel plates from foil sheet and trim each one to fit neatly.
I will give the plates a good clean and a light polish to remove any greasy fingerprints and coat them with a clear lacquer (matt or satin - I haven’t decided) because I do not want “super-shiny” brass.
I do not think I would use this method (EVER!) again if I were to sheath another model. It did become easier after I had put a few strakes of plates on the hull and the port side went a lot quicker (and I did a better job) than the starboard side but, never-the-less, it did take a lot of very tedious hours to finish. My initial estimate of 2000 plates was way off because I did not factor in how much area of each plate is lost because of the overlaps and wastage. In the end I used up all of the 50 m brass reel which was enough to make 2750 plates plus, I had to make the plates that fitted into the keel section from the brass sheet so it ended up around the 2900-3000 mark for the whole hull. Being able to cut the plates from the reel made life a “little” better, however, the whole process was very laborious and I could only complete a couple of strakes at a time before I lost the will to live and had to walk away and come back later. The bonding tape was probably the easiest way to attach the plates but you do have to accept that the tape does add some thickness which creates a step where the plates overlap - it’s not perfect but it does the job. However, plate + tape is <0.2mm so it is still less than the thickness of a veneer strip and on a hull that is over one metre long, it really doesn’t matter that much.
It may be possible to achieve a smoother finish on the hull by using some other types of adhesives (e.g. repositionable gel CA which takes about 60 seconds to bond) but I think that would be only for the really hard core modellers - it would allow the plates to lay slightly flatter, however, the prospect of sticking each plate on with any type of glue would challenge anybody and you would almost certainly end up with glue all over the surfaces.
If you took (a lot of ) your time you could trim every plate to butt up against the next but using the scale plate size would be a complete nightmare to even attempt to do so. You could probably do it with larger plates than scale (probably double or even triple size) if you weren’t bothered by the accuracy of the model.
Unfortunately, I did bump one of the bulwarks during the plating which was very annoying but, given how big and heavy the hull is now to move about, it was not unexpected. It would have been better to leave the false stanchions in place to give them some support until after the sheathing and then remove them. Fortunately it was not a major repair and the bulwarks will be reinforced when I fit the main rails.
Next up: Main decking/some painting/main rails
After lacquering the plates there are a few things that need to be done next but I need to give a bit of thought about the order of work or I will run into problems. I will sort out the covering for the main decking because that needs to be done before I can fix the main rails into place but that also necessitates painting the water channels and inner bulwarks first.
I'm trying to push on and get as much done on the hull as I can during March but, time in the shipyard is going to be limited as my spring projects are now starting to kick in and I am under orders to sort out the garden after a particularly wet and windy winter.
Good afternoon. You have just convinced me never to do a copper plated hull ship….Great job though. Cheers GrantPart 13 A Lot of Brass Later! - The Monster Now Has Scales on it! - What was I Thinking?
Which is worse…. laying plates or tying rat-lines?
Answer = Plates!
My advice for fellow modellers considering sheathing their models in a similar way is just replace the word “hull” with “HELL” and you’ll be about right!
I made quite good progress at first and then it all became very messy! At the top of the sheathing the hull is fairly slab sided so laying the first strakes of plates was not too bad but, as soon as the hull started to curve, it became very difficult to keep a neat tiling pattern whilst maintaining a consistent overlap. As the curves increased further down the hull the problems became worse and worse. The only way was to continuously adjust the overlaps to compensate as necessary and use partial plates where needed. I thought I was really making a mess of it but I looked closely at my images of the CS hull and saw that they had done exactly the same thing - so there was a method to my madness!
Some of the plate spacings went awry at times but, over the whole hull, I decided it did not really matter so long as there was some offset to the plates so that it didn’t look too bad from a distance. The critical thing was to keep the plating strakes as parallel to the keel as possible. After I finished each strake, I used my waterline marker to check and adjust the next strake line and continued down the hull. Where the hull flattens out at the bottom the plates go from near vertical at the bow and stern to almost flat at the centre and it was very difficult to get a good line to plate to using my water-line marker so, I attached a scribe to my multi-arm DTI gauge stand and used that to mark the hull and, as a double check, I placed some masking tape along the line to make sure that it was correct. I really struggled where the plates meet the keel because I could not get them to fit neatly without leaving some small gaps. I did not want to use slivers of brass to fill the gaps so the only way I could do it was to cut each of the keel plates from foil sheet and trim each one to fit neatly.
I will give the plates a good clean and a light polish to remove any greasy fingerprints and coat them with a clear lacquer (matt or satin - I haven’t decided) because I do not want “super-shiny” brass.
I do not think I would use this method (EVER!) again if I were to sheath another model. It did become easier after I had put a few strakes of plates on the hull and the port side went a lot quicker (and I did a better job) than the starboard side but, never-the-less, it did take a lot of very tedious hours to finish. My initial estimate of 2000 plates was way off because I did not factor in how much area of each plate is lost because of the overlaps and wastage. In the end I used up all of the 50 m brass reel which was enough to make 2750 plates plus, I had to make the plates that fitted into the keel section from the brass sheet so it ended up around the 2900-3000 mark for the whole hull. Being able to cut the plates from the reel made life a “little” better, however, the whole process was very laborious and I could only complete a couple of strakes at a time before I lost the will to live and had to walk away and come back later. The bonding tape was probably the easiest way to attach the plates but you do have to accept that the tape does add some thickness which creates a step where the plates overlap - it’s not perfect but it does the job. However, plate + tape is <0.2mm so it is still less than the thickness of a veneer strip and on a hull that is over one metre long, it really doesn’t matter that much.
It may be possible to achieve a smoother finish on the hull by using some other types of adhesives (e.g. repositionable gel CA which takes about 60 seconds to bond) but I think that would be only for the really hard core modellers - it would allow the plates to lay slightly flatter, however, the prospect of sticking each plate on with any type of glue would challenge anybody and you would almost certainly end up with glue all over the surfaces.
If you took (a lot of ) your time you could trim every plate to butt up against the next but using the scale plate size would be a complete nightmare to even attempt to do so. You could probably do it with larger plates than scale (probably double or even triple size) if you weren’t bothered by the accuracy of the model.
Unfortunately, I did bump one of the bulwarks during the plating which was very annoying but, given how big and heavy the hull is now to move about, it was not unexpected. It would have been better to leave the false stanchions in place to give them some support until after the sheathing and then remove them. Fortunately it was not a major repair and the bulwarks will be reinforced when I fit the main rails.
Next up: Main decking/some painting/main rails
After lacquering the plates there are a few things that need to be done next but I need to give a bit of thought about the order of work or I will run into problems. I will sort out the covering for the main decking because that needs to be done before I can fix the main rails into place but that also necessitates painting the water channels and inner bulwarks first.
I'm trying to push on and get as much done on the hull as I can during March but, time in the shipyard is going to be limited as my spring projects are now starting to kick in and I am under orders to sort out the garden after a particularly wet and windy winter.
- Joined
- Sep 23, 2021
- Messages
- 343
- Points
- 238
Hi Grant,Good afternoon. You have just convinced me never to do a copper plated hull ship….Great job though. Cheers Grant
this was my experience of the job and I did not particularly want to put anybody off doing the same. However, I did find it very "testing" at times mainly because I had no experience of sheathing a model and it was a case of "try it and see what happens". There are plenty of modellers who have done very nice jobs on the sheathing of their models but, I think for me, this is probably the only model I will sheath. It is a feature of the model that I wanted to incorporate and I'm happy enough with the result but, it was a lot of work having to make so many tiles and fit them to the hull. I can now see why people use the ZHL coppered tape, doing it with that stuff is probably only a few hours of work. Fortunately I haven't suffered too much by way of PTSD!
Dom
Rather you than me Dom. After purchasing my HMS Fly I soon learnt that her sister ship HMS Pegasus is built along very similar lines, with the standout exception of having to copper-plate the hull as well. I think I dodged a bullet there! 3000 plates? Unreal
- Joined
- Sep 23, 2021
- Messages
- 343
- Points
- 238
Hi Mark,Rather you than me Dom. After purchasing my HMS Fly I soon learnt that her sister ship HMS Pegasus is built along very similar lines, with the standout exception of having to copper-plate the hull as well. I think I dodged a bullet there! 3000 plates? Unreal
I was at the extreme end of the plating "experience" for this one! The problem with the C-S is that the plating lines are parallel to the keel which made it very difficult and I made a rod for my back by going with scale size plates. I am going to give the plates a quick polish and lacquer but, I am waiting on a new airbrush compressor after my old one decided to go up in smoke and then I can get on with the build. I don't know how long it took Olha to copper her Pegasus, but she made a very nice job of it - I am jealous!
Suffice to say my next model will have a painted hull!
Great work on the long boat by the way!
- Joined
- Sep 23, 2021
- Messages
- 343
- Points
- 238
Part 14 Main Deck Covering/ Upper Bulwark Support for the Main Rails/ Painting the Upper Hull
As I expected, my spring/summer projects took priority over model building and I have not had much time to work on the model since finishing the brass work. I wasn’t able to do much outside recently because of bad weather so I was able to find some spare time to do a bit of “intensive” building in order to catch up.
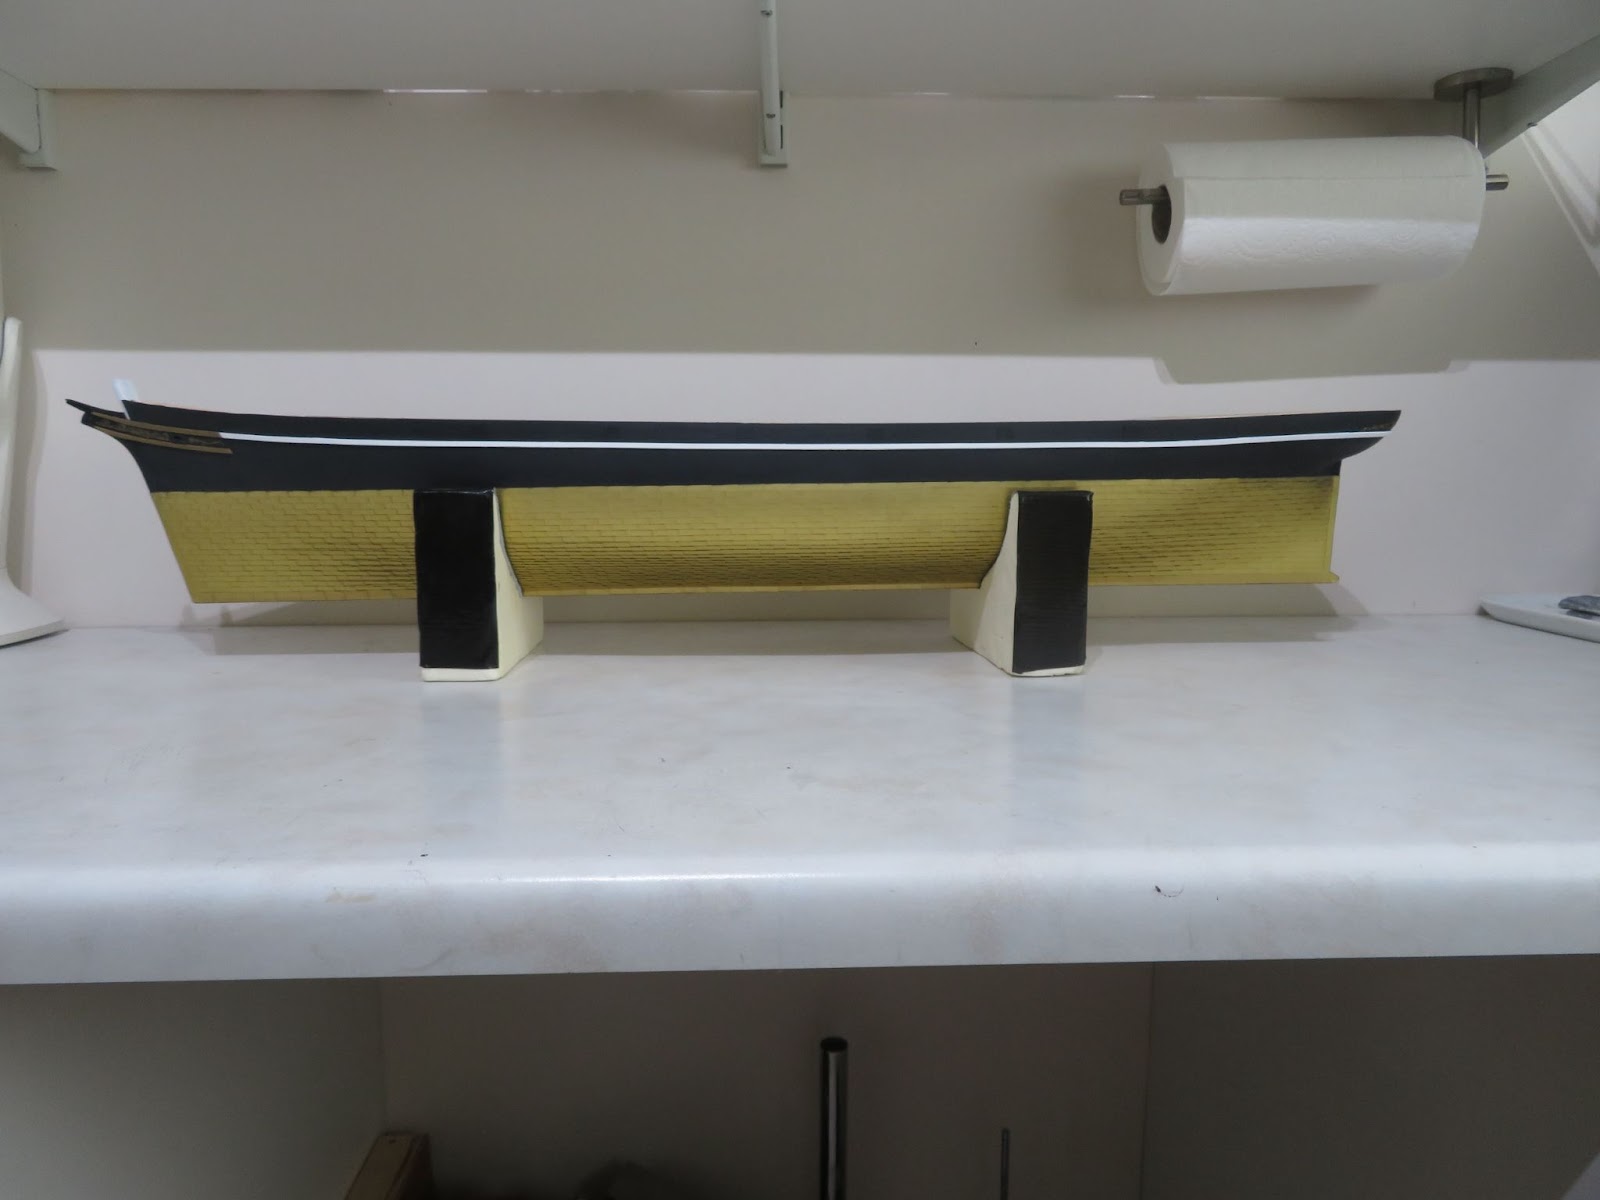
First up was to give the plates a degrease and a light polish before applying a couple of coats of clear satin lacquer to give them some protection and to take the shine down a tone. I then painted the inner bulwarks (white) and the water channels (grey) which needed to be done before working on the decking.
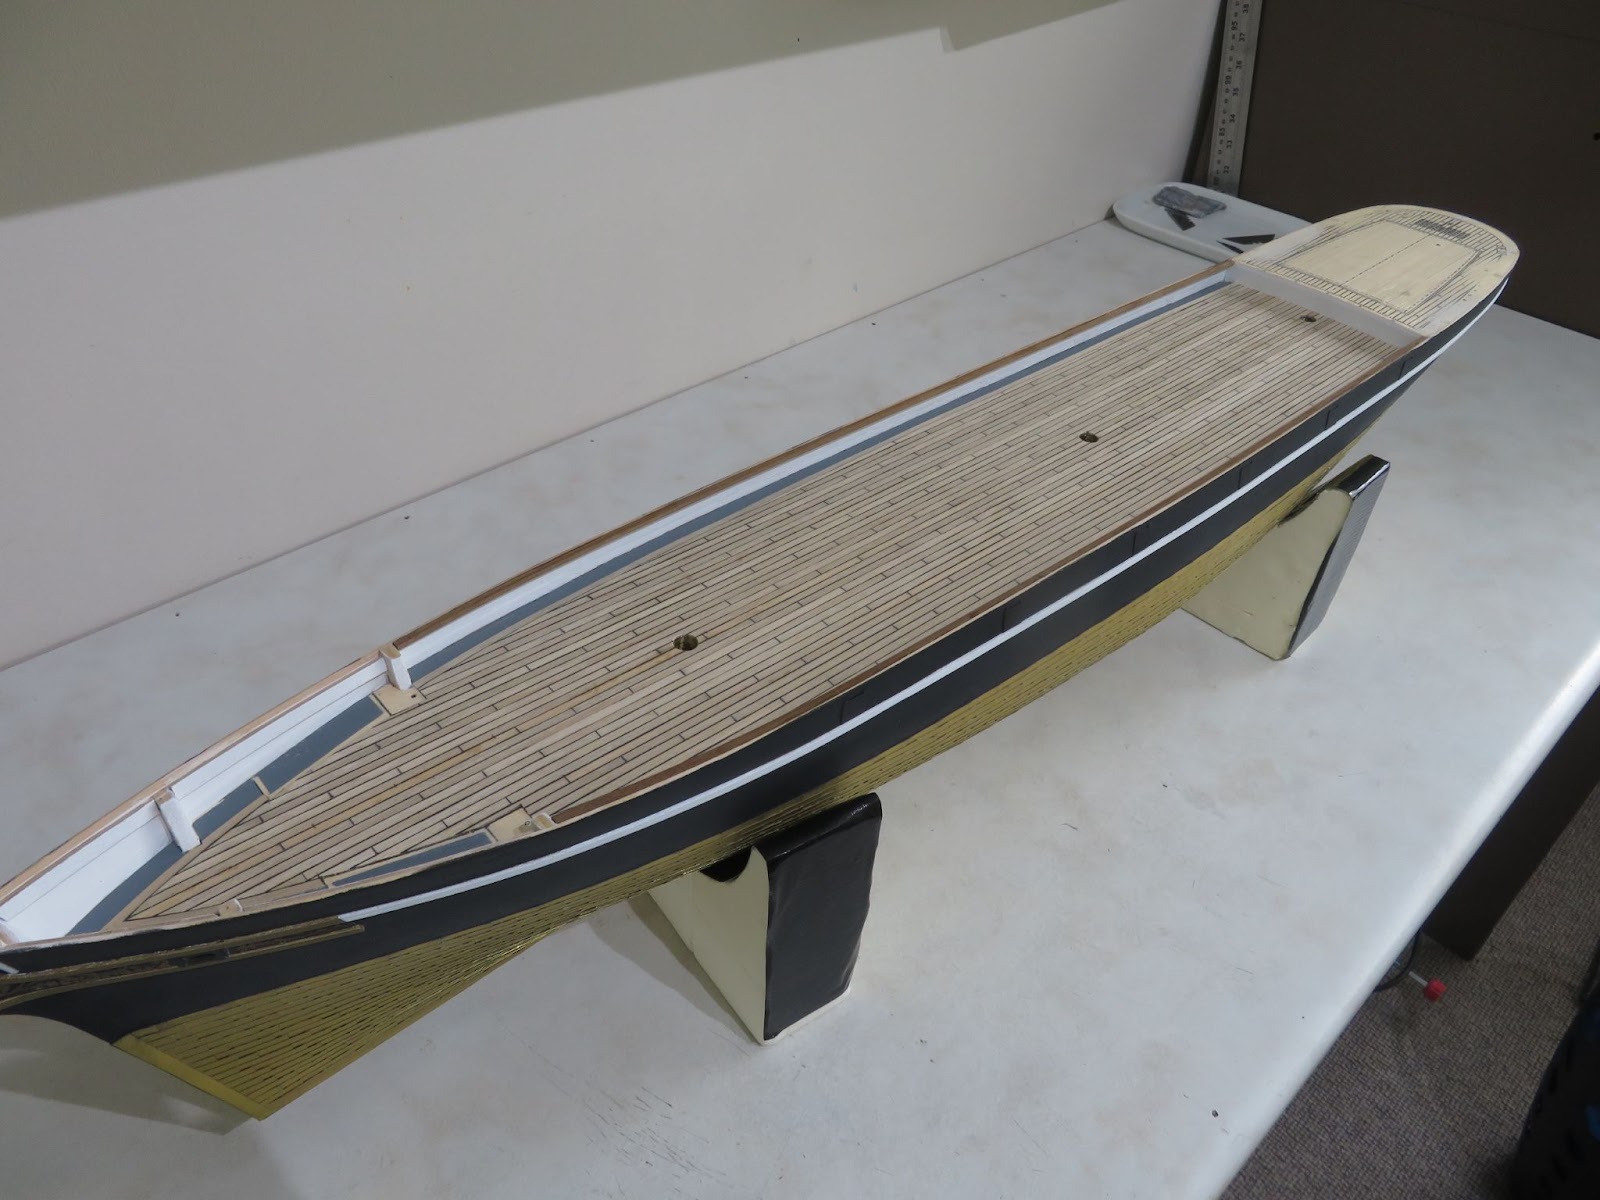
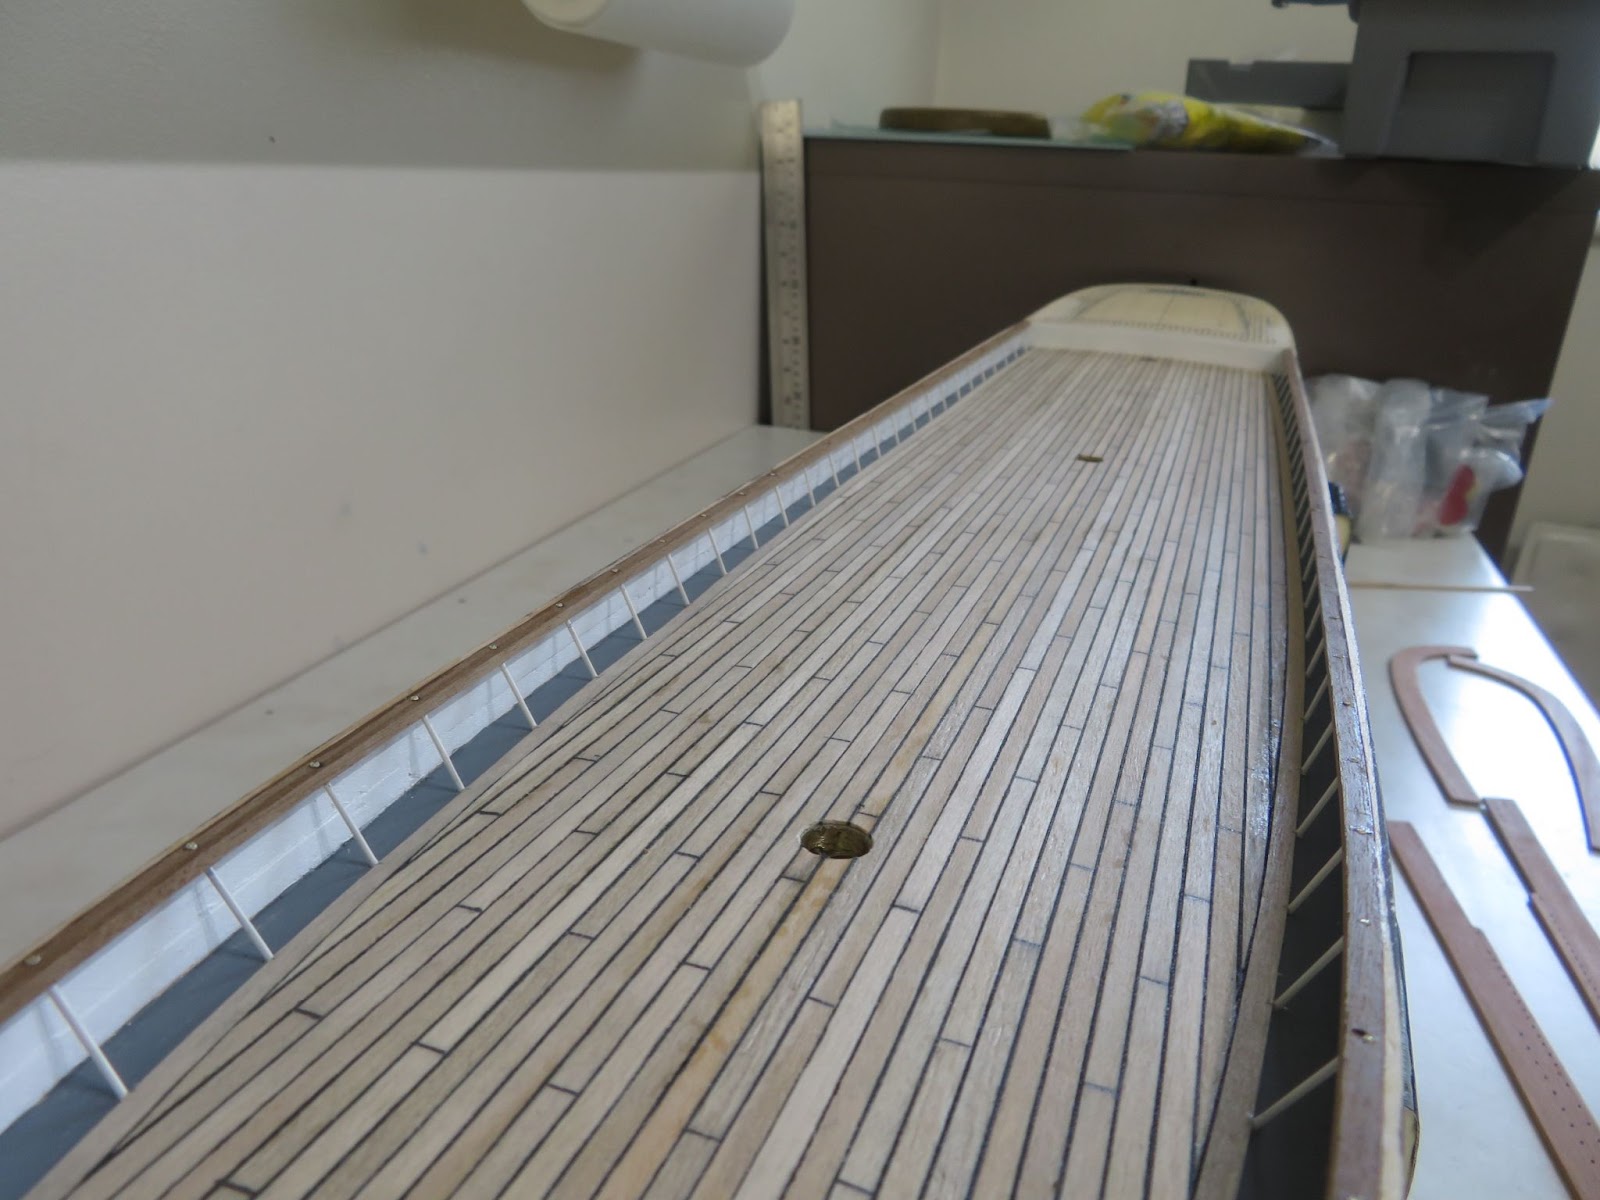
For the decking I decided right at the start of this build that I would go “sun bleached - weather washed”. I am using 3mm planks which are slightly wider than scale and I decided to use thread for the caulking rather than painting the edges of the planks but, to make life easier, I used pigment ink to mark the butt joints because using thread was too fiddly to do neatly. The main deck is open, so I decided to glue the strips down onto wax free tracing paper and then stick that to the false deck. It is my usual way to do the decking and it works very well and is a lot easier than doing it on the model. I traced out the main deck area onto the paper and used some grey wash to dye the strips before I glued them down.
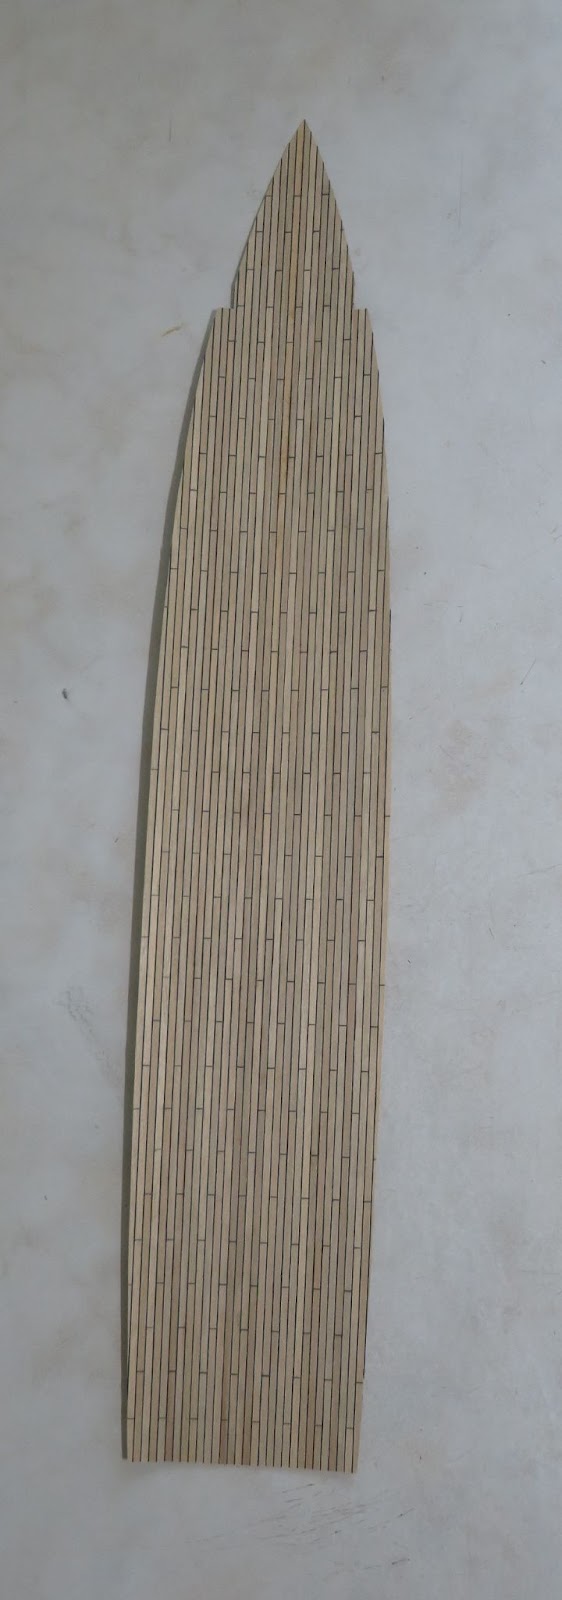
I trimmed the deck covering to size and glued that down to the false deck and then added the margin planks on the model (I will do the forecastle and poop deck coverings the same way). To help support the main rails I fixed some strips along the top inner edge of the bulwarks which will also serve to attach the tops of the bulkhead stanchions to.
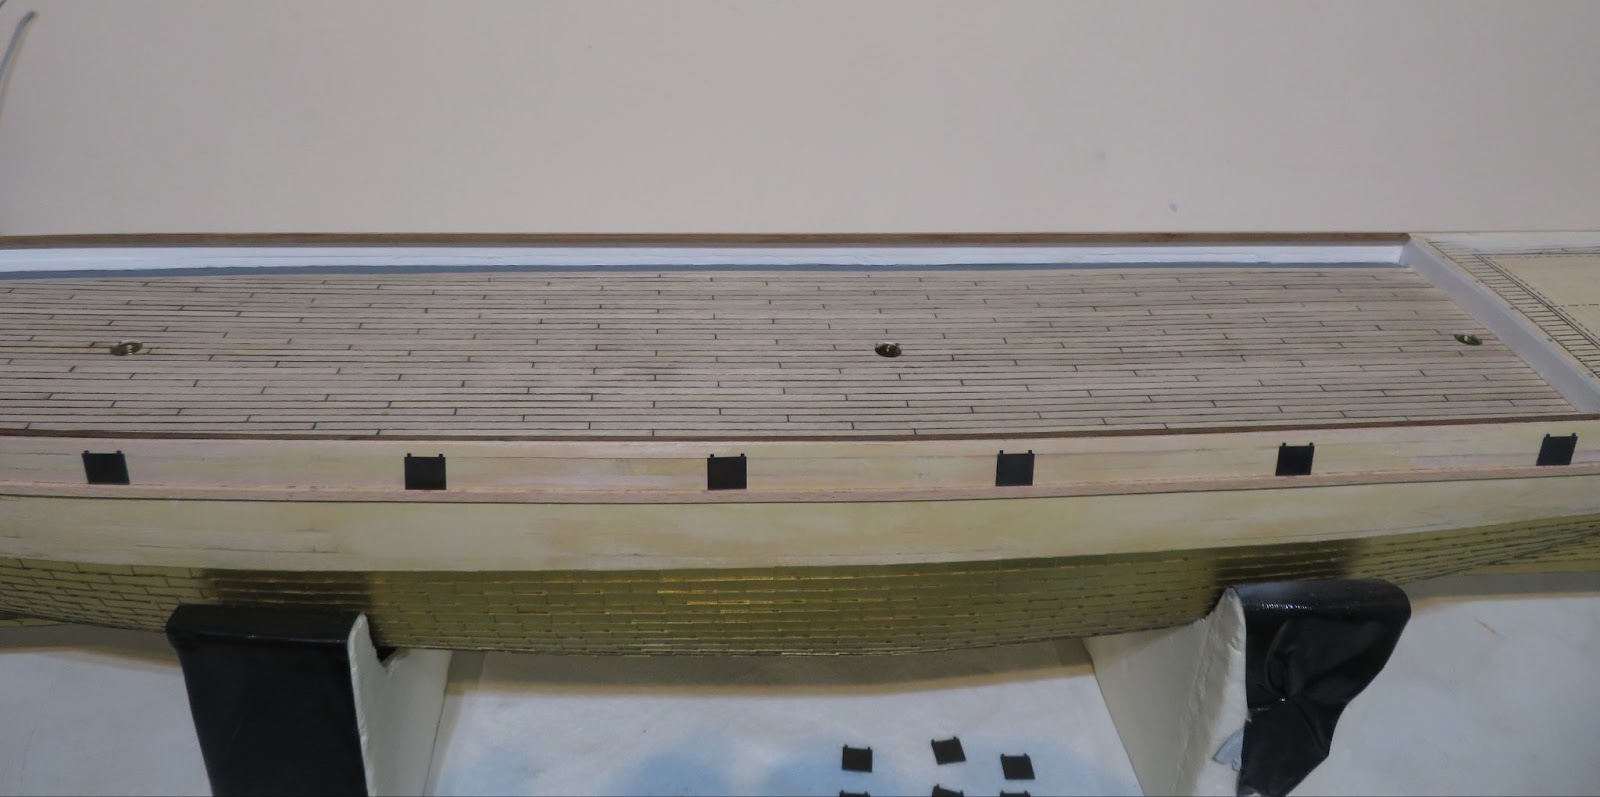
I made up the clearing ports from 0.3mm brass sheet and blackened them with some brass black and then painted them. The brass black helps the paint to stick and also if the paint is scratched it is less likely to show the shiny brass beneath. I decided it would be better to paint the ports separately and attach them later.
Before painting the upper hull I gave it a couple of coats of a high build primer to help fill in a few blemishes and then gave it a light sanding with some fine grit to flatten the surface. I was in two minds about the topcoat. Normally, I use generic car paint from a rattle can, however, I am fully expecting to damage the paint work at some point down the line and I decided that it will be easier to do any touch-up work with my airbrush. I had to buy a new compressor after my old one went up in smoke so I also purchased an airbrush with a 0.5mm needle/nozzle and a high volume reservoir. I tried a few paints to see which finish I preferred and I opted to go with Tamiya semi-gloss black acrylic. I painted the white rubbing strake first and then masked that off before painting the rest of the upper hull. The downside of painting such a large hull using an airbrush is that it takes a lot of passes to build up the paint layer to get an even covering. In the end, I needed about 12 coats of the black. There was a small amount of over-spray at the top of the plates where the masking tape hadn’t quite sealed properly, but it was hardly noticeable. I toned the final finish down a little bit more by going over the whole hull with a very light misting of Tamiya’s semi-gloss clear coat.
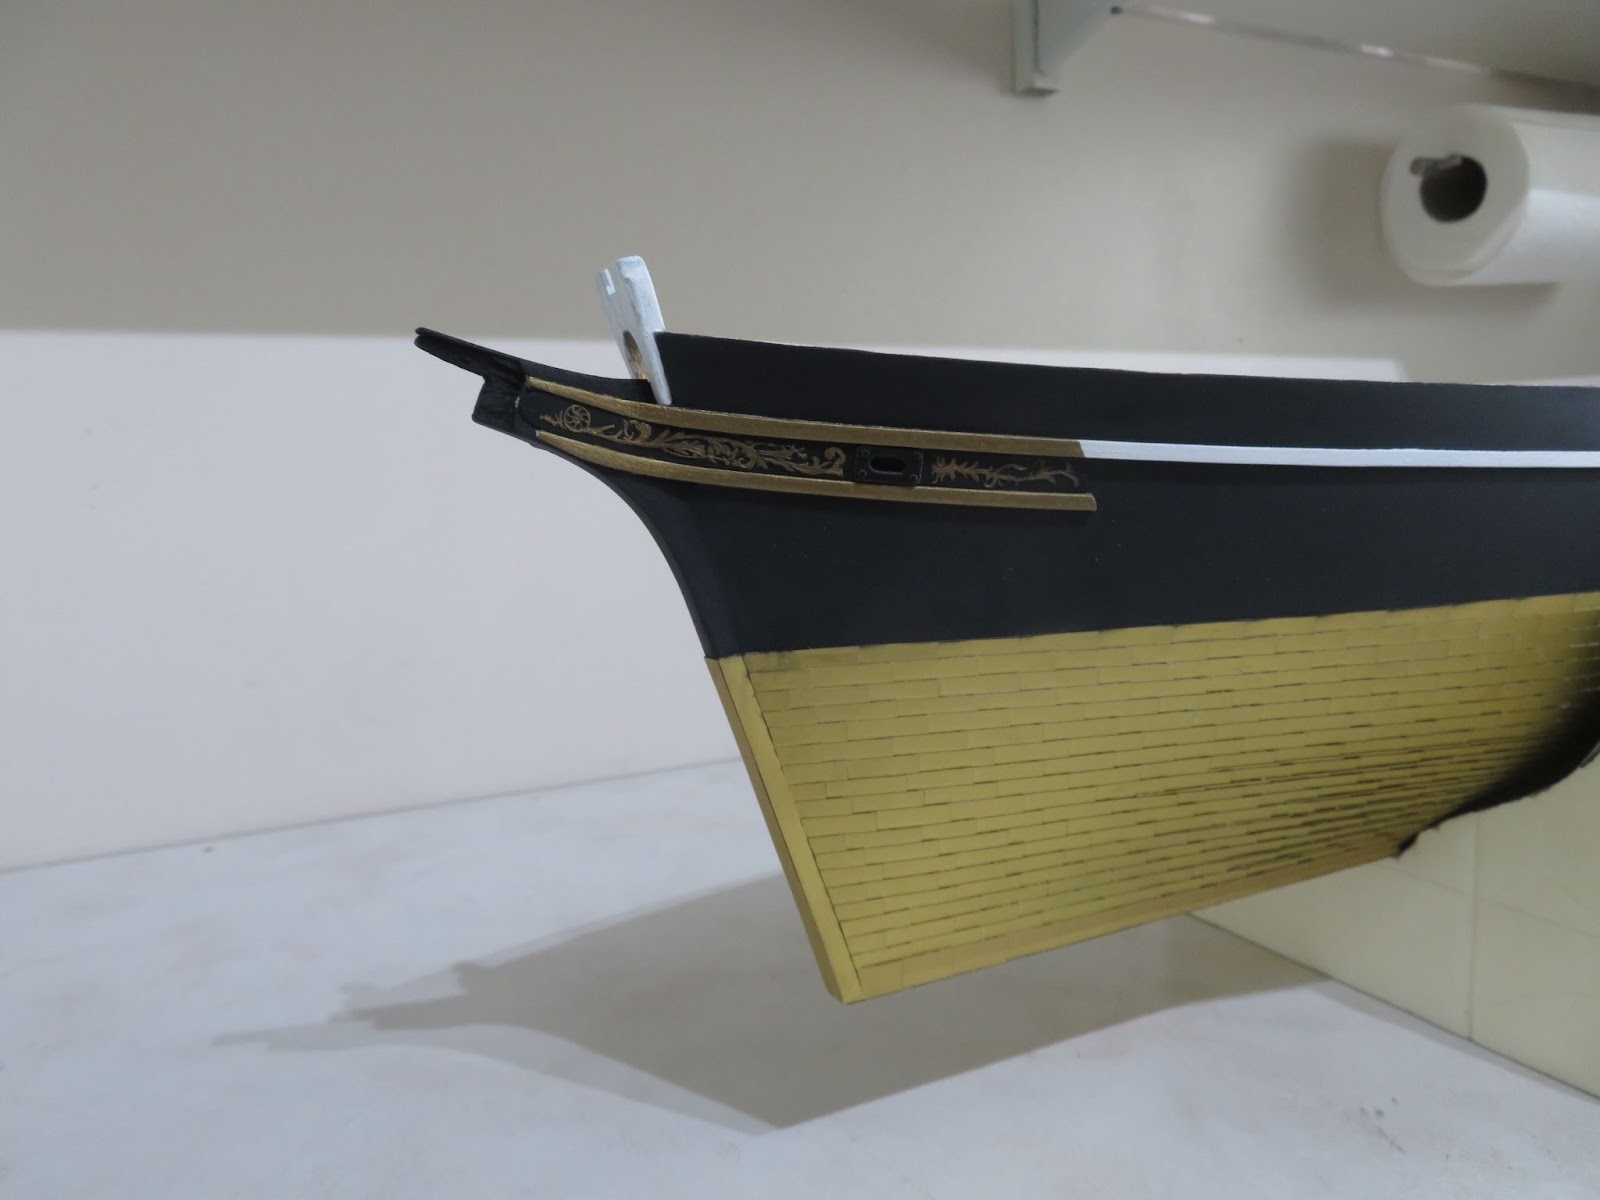
I finished off the decorative bow plates by making the anchor hawses from 0.8 mm brass plate and some brass nails. I attached the etched decor pieces that I purchased from HIsModel to them, flood painted around them and then gold painted the fancy scrolls.

The rear decor piece was extremely fine so I decided to paint it first and then glue it onto the stern. It was very fiddly work and needed a bit of touch-up after gluing but happy enough with the end result.

The final job for this session of work was attaching the clearing ports. I marked off the positions with some masking tape and then fixed them with a dab of CA gel.
Quite a bit of progress but still lots to do. At least the model isn’t languishing on the blocks again.
Next up: Stanchions and fitting the main rails
With the main paint work finished on the hull I can now fit the bulwark stanchions and the main rails. I will also make the two margin pieces for the forecastle deck so that I can complete the fore and poop deck coverings.
As I expected, my spring/summer projects took priority over model building and I have not had much time to work on the model since finishing the brass work. I wasn’t able to do much outside recently because of bad weather so I was able to find some spare time to do a bit of “intensive” building in order to catch up.
First up was to give the plates a degrease and a light polish before applying a couple of coats of clear satin lacquer to give them some protection and to take the shine down a tone. I then painted the inner bulwarks (white) and the water channels (grey) which needed to be done before working on the decking.
For the decking I decided right at the start of this build that I would go “sun bleached - weather washed”. I am using 3mm planks which are slightly wider than scale and I decided to use thread for the caulking rather than painting the edges of the planks but, to make life easier, I used pigment ink to mark the butt joints because using thread was too fiddly to do neatly. The main deck is open, so I decided to glue the strips down onto wax free tracing paper and then stick that to the false deck. It is my usual way to do the decking and it works very well and is a lot easier than doing it on the model. I traced out the main deck area onto the paper and used some grey wash to dye the strips before I glued them down.
I trimmed the deck covering to size and glued that down to the false deck and then added the margin planks on the model (I will do the forecastle and poop deck coverings the same way). To help support the main rails I fixed some strips along the top inner edge of the bulwarks which will also serve to attach the tops of the bulkhead stanchions to.
I made up the clearing ports from 0.3mm brass sheet and blackened them with some brass black and then painted them. The brass black helps the paint to stick and also if the paint is scratched it is less likely to show the shiny brass beneath. I decided it would be better to paint the ports separately and attach them later.
Before painting the upper hull I gave it a couple of coats of a high build primer to help fill in a few blemishes and then gave it a light sanding with some fine grit to flatten the surface. I was in two minds about the topcoat. Normally, I use generic car paint from a rattle can, however, I am fully expecting to damage the paint work at some point down the line and I decided that it will be easier to do any touch-up work with my airbrush. I had to buy a new compressor after my old one went up in smoke so I also purchased an airbrush with a 0.5mm needle/nozzle and a high volume reservoir. I tried a few paints to see which finish I preferred and I opted to go with Tamiya semi-gloss black acrylic. I painted the white rubbing strake first and then masked that off before painting the rest of the upper hull. The downside of painting such a large hull using an airbrush is that it takes a lot of passes to build up the paint layer to get an even covering. In the end, I needed about 12 coats of the black. There was a small amount of over-spray at the top of the plates where the masking tape hadn’t quite sealed properly, but it was hardly noticeable. I toned the final finish down a little bit more by going over the whole hull with a very light misting of Tamiya’s semi-gloss clear coat.
I finished off the decorative bow plates by making the anchor hawses from 0.8 mm brass plate and some brass nails. I attached the etched decor pieces that I purchased from HIsModel to them, flood painted around them and then gold painted the fancy scrolls.
The rear decor piece was extremely fine so I decided to paint it first and then glue it onto the stern. It was very fiddly work and needed a bit of touch-up after gluing but happy enough with the end result.
The final job for this session of work was attaching the clearing ports. I marked off the positions with some masking tape and then fixed them with a dab of CA gel.
Quite a bit of progress but still lots to do. At least the model isn’t languishing on the blocks again.
Next up: Stanchions and fitting the main rails
With the main paint work finished on the hull I can now fit the bulwark stanchions and the main rails. I will also make the two margin pieces for the forecastle deck so that I can complete the fore and poop deck coverings.
- Joined
- Sep 23, 2021
- Messages
- 343
- Points
- 238
Part 15: Stanchions, Forecastle and Poop Deck Coverings, Pig Pens & Paint Locker, Heads, Windlass - Wrong Order!!!
I started this part of the build with the bulwark stanchions which I made from 0.8 mm rod, anything less would be far too flimsy and thicker would be too chunky looking.
The bulwark stanchions supporting the main rail.
The stanchions are angled from the deck margin to the underside of the main rails. I decided not to add the cross pieces or the rings because they would be very difficult to make and would be barely visible under the rails at this scale. There are 26 stanchions per side so I spaced them accordingly and drilled holes at an angle through the bulwark top strip into the deck margin and fixed them with a drop of CA.
I then made the decking for the forecastle and poop decks using the same method as for the main deck and was about to start attaching the main rails when I realised I would get into trouble!
Because the main rails slightly overlap the front edge of the forecastle deck I needed to fix that into position before fixing the rails into position. However, before I could do that, I needed to make the two margin pieces for the deck, make the heads (which butt up to the deck and overlap the main rails) and also the pig pen and paint lockers that go under the deck. The lower bowsprit also needs to be fixed into position.
OK - plan in place? Nope!
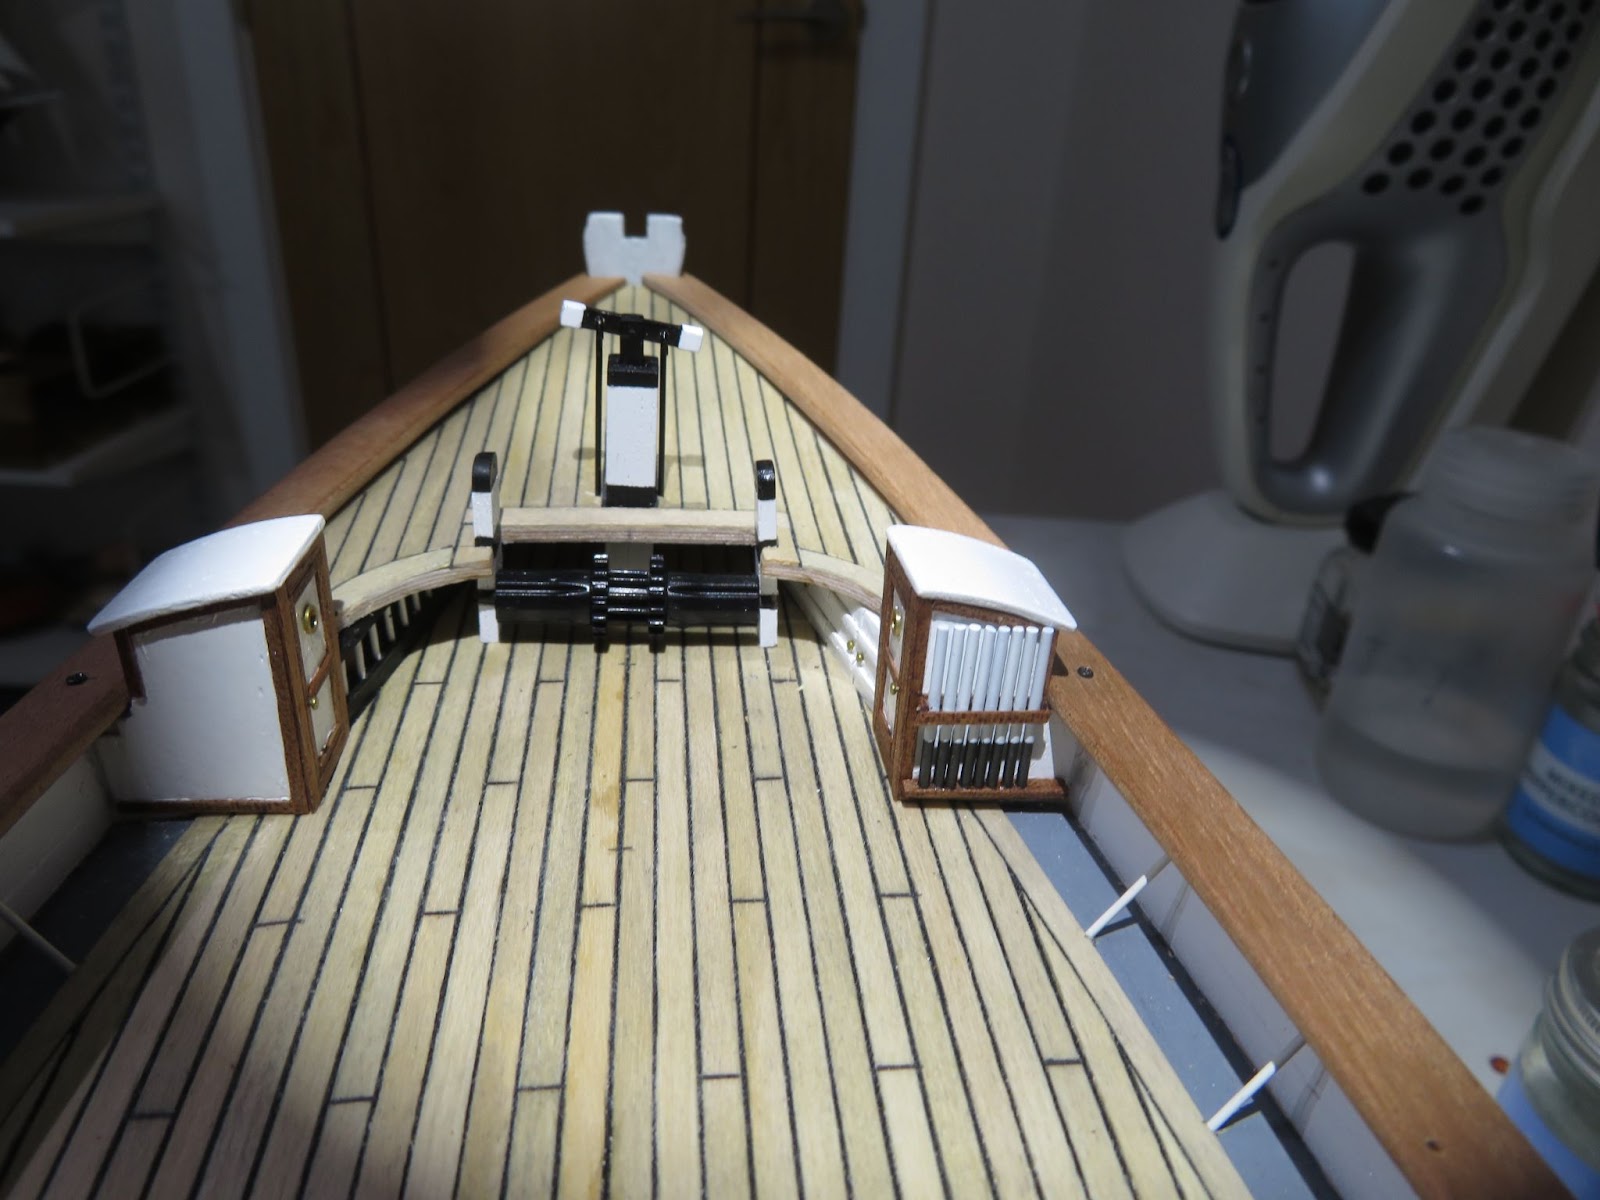
Having narrowly avoided a messy mistake I went back to my photographs of the CS to make sure that I hadn’t missed anything else and, sure enough, I forgot about the large windlass that sits just in front of the forecastle deck - doh!
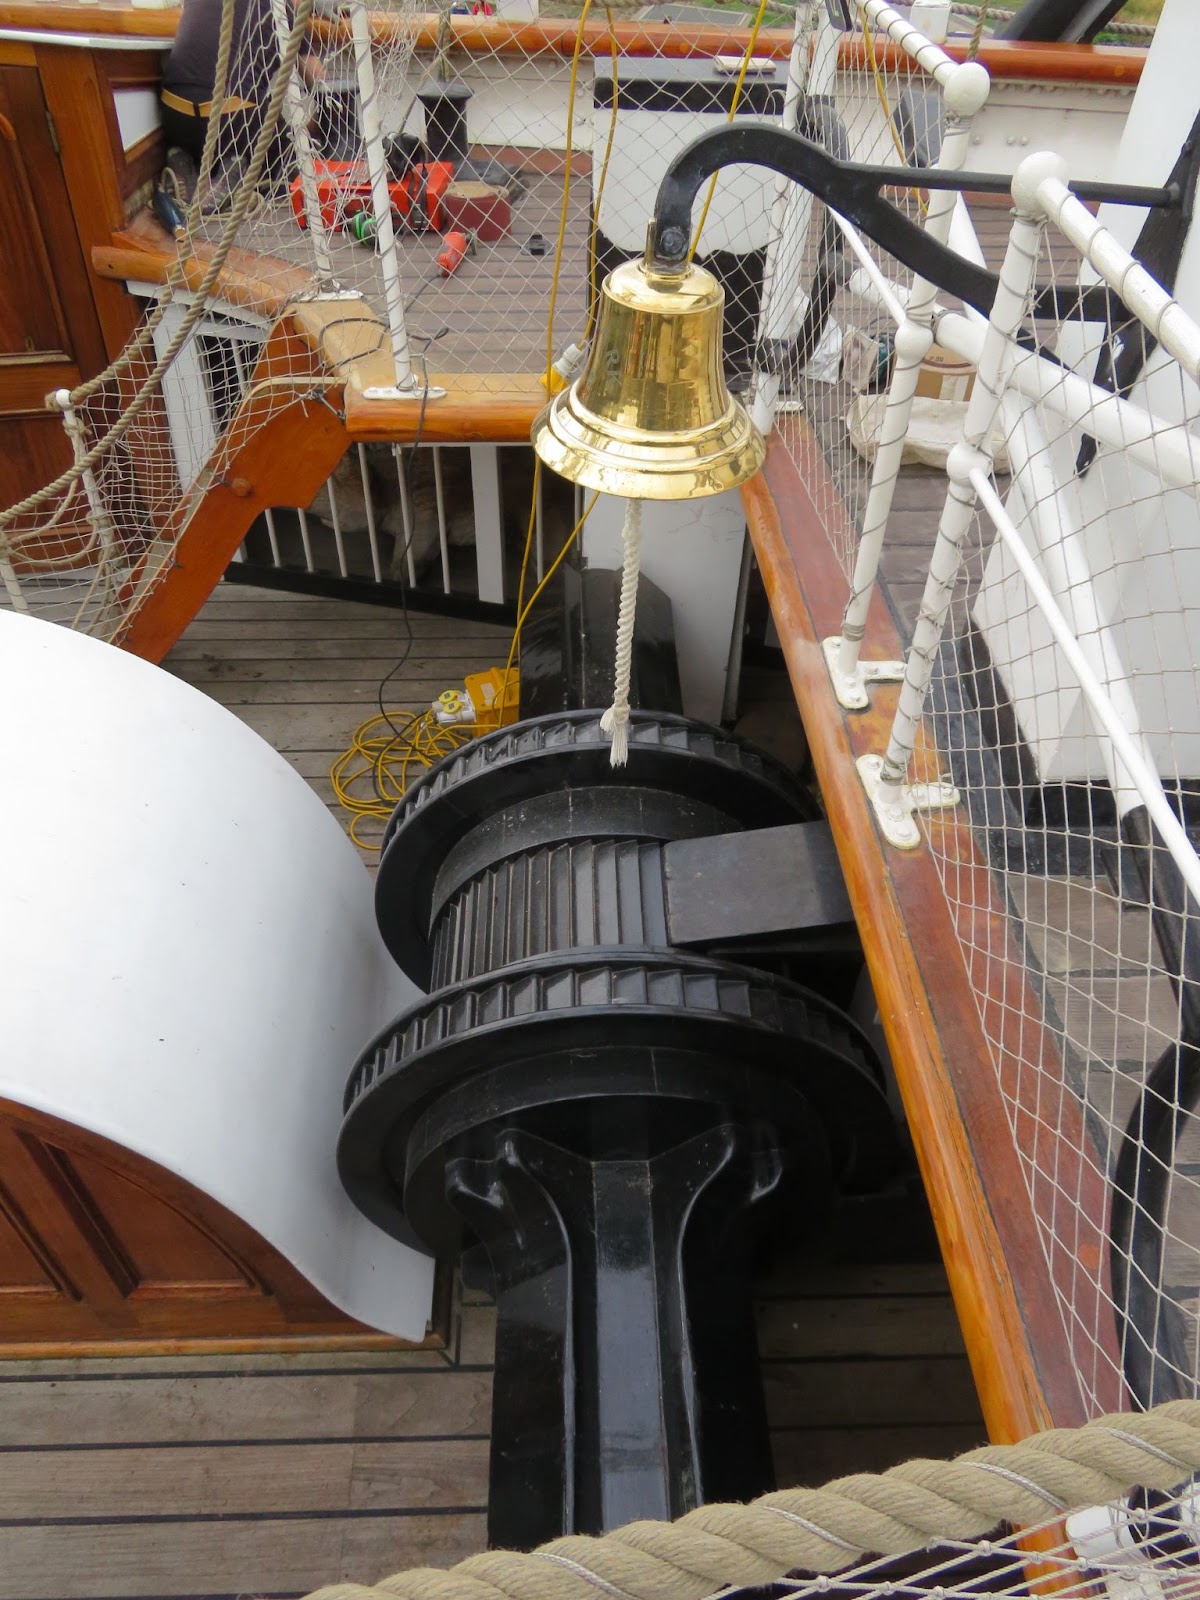
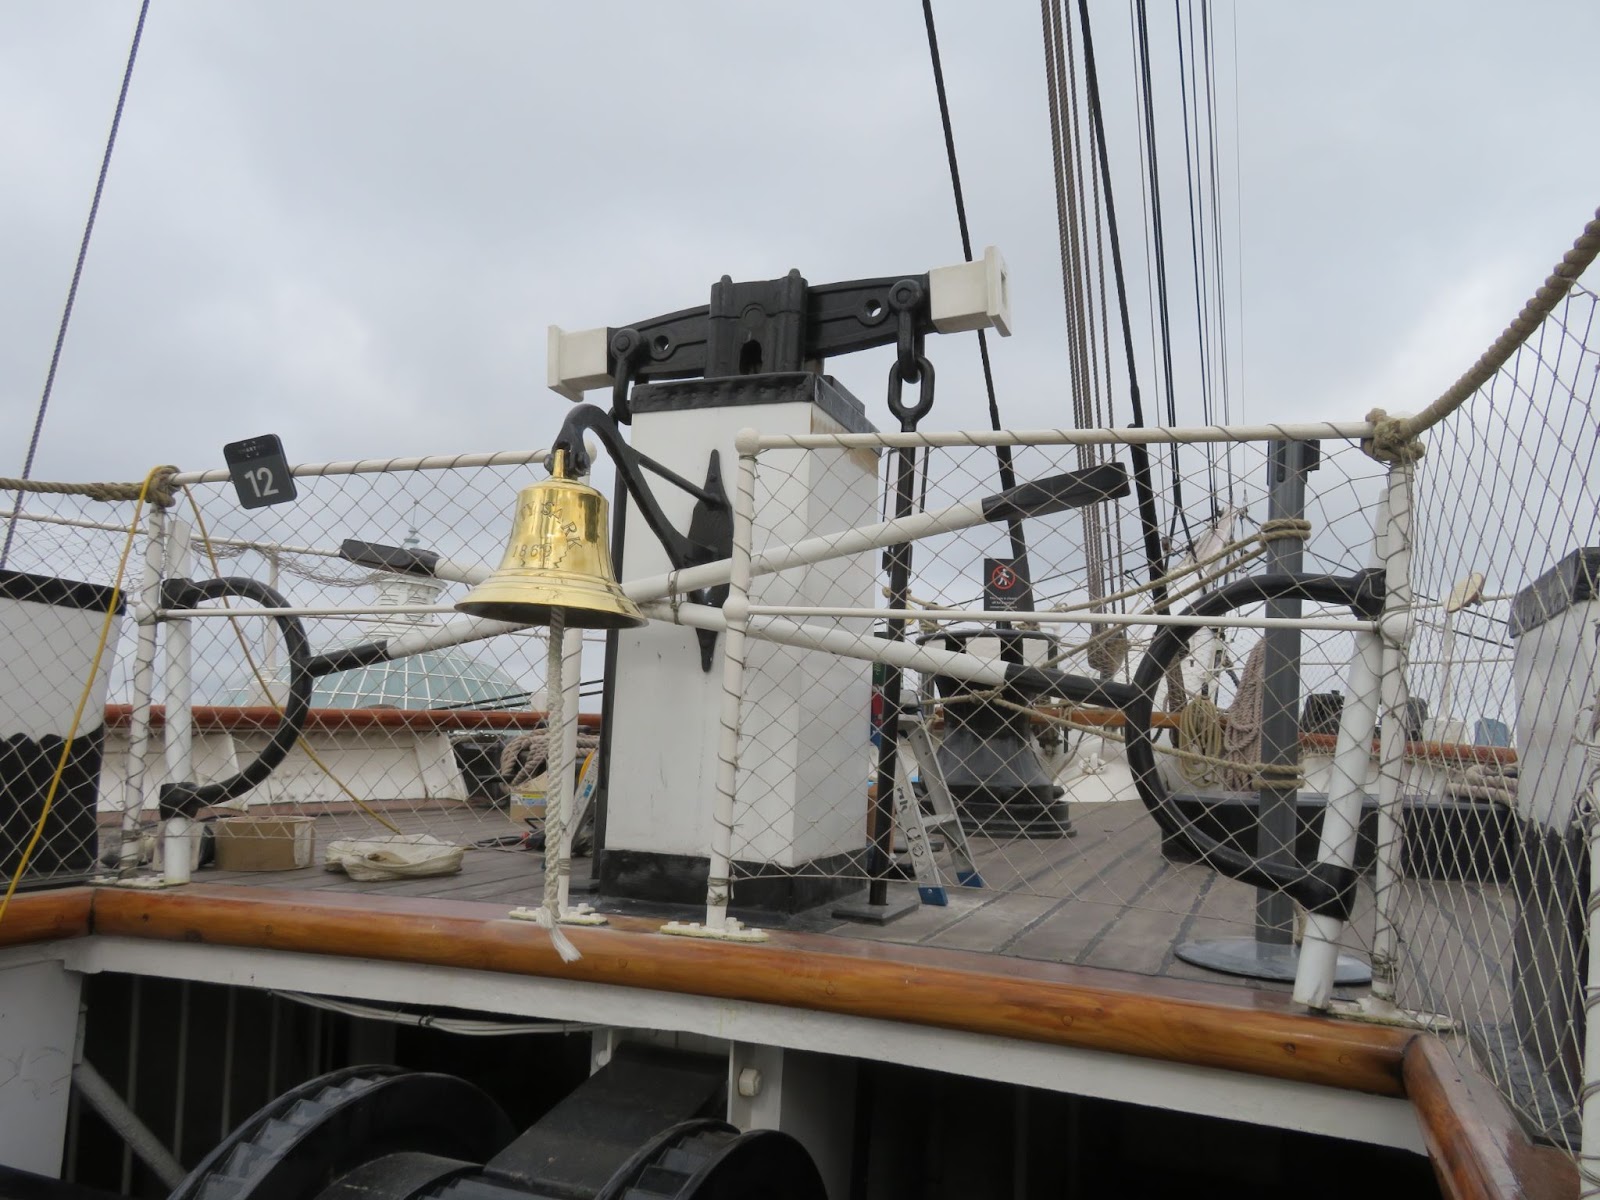
The windlass - pretty hard to miss! The pig pen can also be seen under the deck.
The anchor chains are also a problem because I do not want to fit them until much later in the build ( they would be in the way and too easy to snag). They run through the hawses and down into the chain locker under the foredeck so I will need to figure out a way to fix the end of the chains under the forecastle deck after it is fitted.
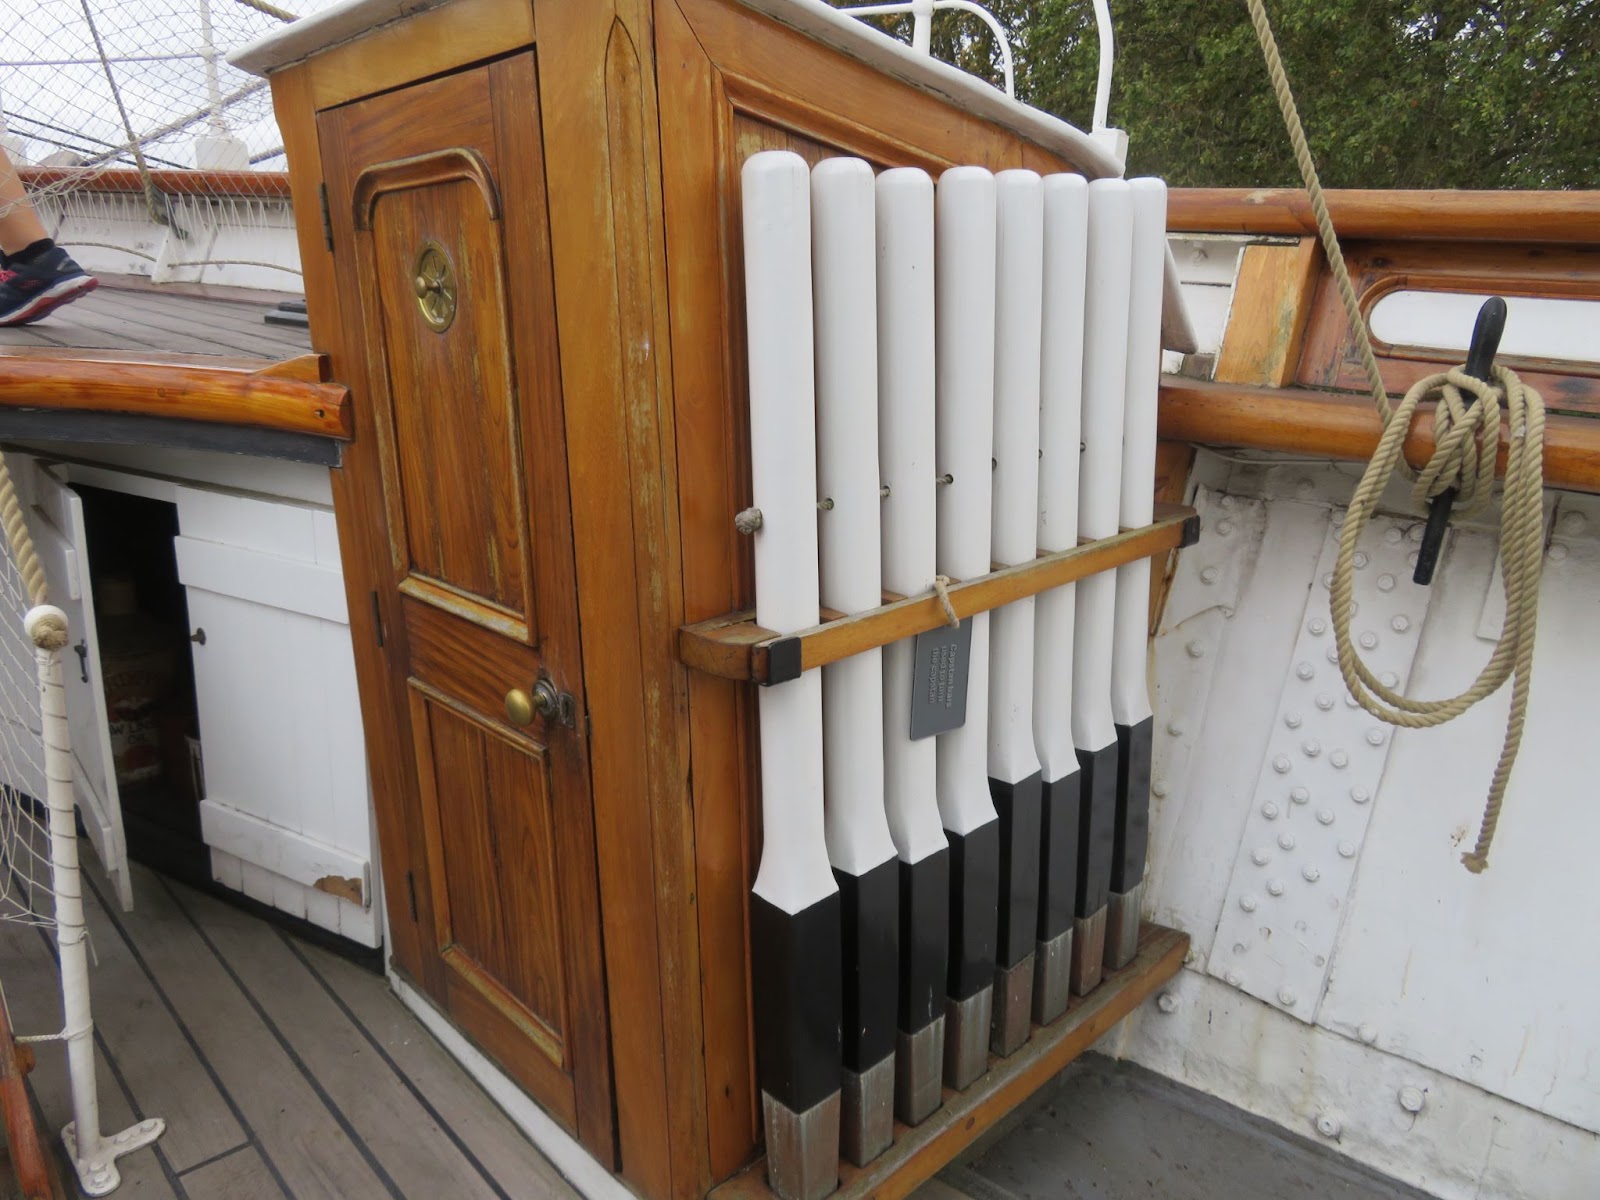
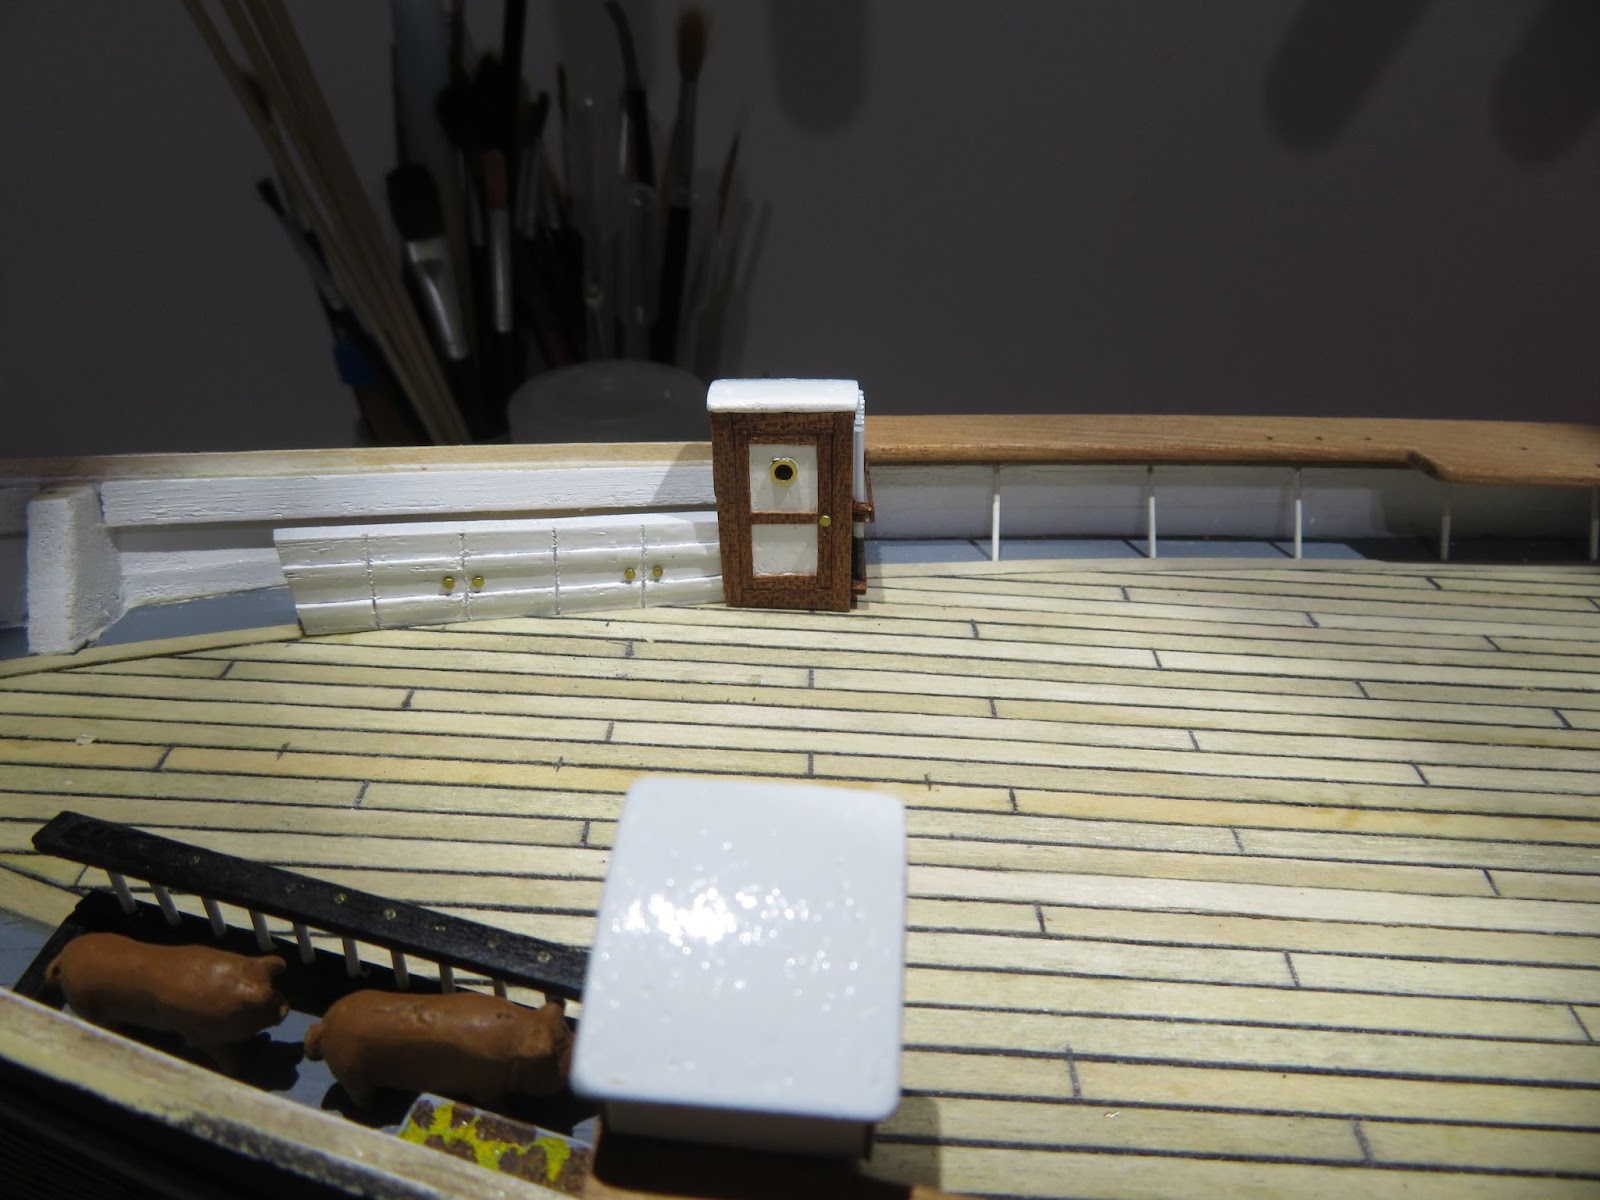
With a more orderly plan in mind, first up was to make the heads, paint lockers and pig pen. The heads were very fiddly to get all the angles and cut-outs correct. I was going to paint them all white but I decided to frame the doorways and sides in dark wood to match the deck houses. You can also see on the starboard head there is a rack to store the capstan bars so I added a couple of strips and painted some brass rod. The paint lockers were nothing special and in the end I just shaped a piece of wood to fit neatly under the deck and used some narrow strip to emulate the doors.
Starboard head and paint lockers.
For the pig pen, I used some white painted brass for the bars and I was going to leave it like that but then my wife said, “where are the pigs and what breed did they have?”. So, I had to find some scale pigs to put in the pen! I could not find any information about what breeds would have been taken on-board ships during the latter half of the 19th century but a little more research turned up a few references of breeds common at the time of the CS. They were Tamworths, Gloucester Old Spot and Yorkshire Whites (large and small). I went with Tamworths, mainly because I was born less than 20 miles from Tamworth where the breed first originated!

A Tamworth Pig!
This kit does not include a windlass because it would have been well hidden under the original square deck (see Part 9). However, because I went with the cut-out deck I needed to make one. The deck also needed some alterations in order to fit it. The windlass is a jig-y-jig type which is operated by a pair of handles above the deck level mounted on a sturdy post that passes through the deck. A ratcheting mechanism then turns the warping drums. The handles are normally stowed as can be seen in the image and I will also do that on the model. The windlass itself is mounted at its ends into the two towing posts that also pass through the deck at the sides of the cut out.
The winding jig "pump"
The windlass mounting on the towing post and the paint lockers under the deck
To make the windlass I rummaged through my bits and bobs draw and found some small brass motor gears that I had salvaged. I split a larger diameter one in half to make the two ratcheting drums and used a smaller one for the clapper wheel. The two warping drums at either side are quartered and I found two pinion gears with 12 teeth which were the perfect size. I filled some of the teeth with JB-Weld leaving one tooth for every two filled so giving me the 4 flats. I sanded the excess JB-weld down and stuck everything on a brass spindle and painted it black.

I made the beam and bracket that is on top of the post from some blackened brass stock and used some 0.8mm brass for the connecting rods that go through the deck. I finished off this section by making the forecastle deck margin pieces, gluing down the forecastle deck covering and making the lower bowsprit ready to fit. Everything else is just loosely fitted because there is some rounded moulded edging on the front of the deck and also on the poop deck that needs to be added and I have to paint the bowsprit and finish off a few other things before fixing everything down properly.
My wife and I are heading off to do some climbing in the Austrian Tyrolean Mountains for our summer holidays in a couple of days so I have posted this as “work-in-progress” and will finish off after we get back.
Next up: Fitting the Forecastle Deck, Bowsprit and the Main Rails
I started this part of the build with the bulwark stanchions which I made from 0.8 mm rod, anything less would be far too flimsy and thicker would be too chunky looking.
The bulwark stanchions supporting the main rail.
The stanchions are angled from the deck margin to the underside of the main rails. I decided not to add the cross pieces or the rings because they would be very difficult to make and would be barely visible under the rails at this scale. There are 26 stanchions per side so I spaced them accordingly and drilled holes at an angle through the bulwark top strip into the deck margin and fixed them with a drop of CA.
I then made the decking for the forecastle and poop decks using the same method as for the main deck and was about to start attaching the main rails when I realised I would get into trouble!
Because the main rails slightly overlap the front edge of the forecastle deck I needed to fix that into position before fixing the rails into position. However, before I could do that, I needed to make the two margin pieces for the deck, make the heads (which butt up to the deck and overlap the main rails) and also the pig pen and paint lockers that go under the deck. The lower bowsprit also needs to be fixed into position.
OK - plan in place? Nope!
Having narrowly avoided a messy mistake I went back to my photographs of the CS to make sure that I hadn’t missed anything else and, sure enough, I forgot about the large windlass that sits just in front of the forecastle deck - doh!
The windlass - pretty hard to miss! The pig pen can also be seen under the deck.
The anchor chains are also a problem because I do not want to fit them until much later in the build ( they would be in the way and too easy to snag). They run through the hawses and down into the chain locker under the foredeck so I will need to figure out a way to fix the end of the chains under the forecastle deck after it is fitted.
With a more orderly plan in mind, first up was to make the heads, paint lockers and pig pen. The heads were very fiddly to get all the angles and cut-outs correct. I was going to paint them all white but I decided to frame the doorways and sides in dark wood to match the deck houses. You can also see on the starboard head there is a rack to store the capstan bars so I added a couple of strips and painted some brass rod. The paint lockers were nothing special and in the end I just shaped a piece of wood to fit neatly under the deck and used some narrow strip to emulate the doors.
Starboard head and paint lockers.
For the pig pen, I used some white painted brass for the bars and I was going to leave it like that but then my wife said, “where are the pigs and what breed did they have?”. So, I had to find some scale pigs to put in the pen! I could not find any information about what breeds would have been taken on-board ships during the latter half of the 19th century but a little more research turned up a few references of breeds common at the time of the CS. They were Tamworths, Gloucester Old Spot and Yorkshire Whites (large and small). I went with Tamworths, mainly because I was born less than 20 miles from Tamworth where the breed first originated!
A Tamworth Pig!
This kit does not include a windlass because it would have been well hidden under the original square deck (see Part 9). However, because I went with the cut-out deck I needed to make one. The deck also needed some alterations in order to fit it. The windlass is a jig-y-jig type which is operated by a pair of handles above the deck level mounted on a sturdy post that passes through the deck. A ratcheting mechanism then turns the warping drums. The handles are normally stowed as can be seen in the image and I will also do that on the model. The windlass itself is mounted at its ends into the two towing posts that also pass through the deck at the sides of the cut out.
The winding jig "pump"
The windlass mounting on the towing post and the paint lockers under the deck
To make the windlass I rummaged through my bits and bobs draw and found some small brass motor gears that I had salvaged. I split a larger diameter one in half to make the two ratcheting drums and used a smaller one for the clapper wheel. The two warping drums at either side are quartered and I found two pinion gears with 12 teeth which were the perfect size. I filled some of the teeth with JB-Weld leaving one tooth for every two filled so giving me the 4 flats. I sanded the excess JB-weld down and stuck everything on a brass spindle and painted it black.
I made the beam and bracket that is on top of the post from some blackened brass stock and used some 0.8mm brass for the connecting rods that go through the deck. I finished off this section by making the forecastle deck margin pieces, gluing down the forecastle deck covering and making the lower bowsprit ready to fit. Everything else is just loosely fitted because there is some rounded moulded edging on the front of the deck and also on the poop deck that needs to be added and I have to paint the bowsprit and finish off a few other things before fixing everything down properly.
My wife and I are heading off to do some climbing in the Austrian Tyrolean Mountains for our summer holidays in a couple of days so I have posted this as “work-in-progress” and will finish off after we get back.
Next up: Fitting the Forecastle Deck, Bowsprit and the Main Rails
very good details - you hit it
- Joined
- Sep 23, 2021
- Messages
- 343
- Points
- 238
Part 16 Fixing the Forecastle Deck, Main Rails and Margins
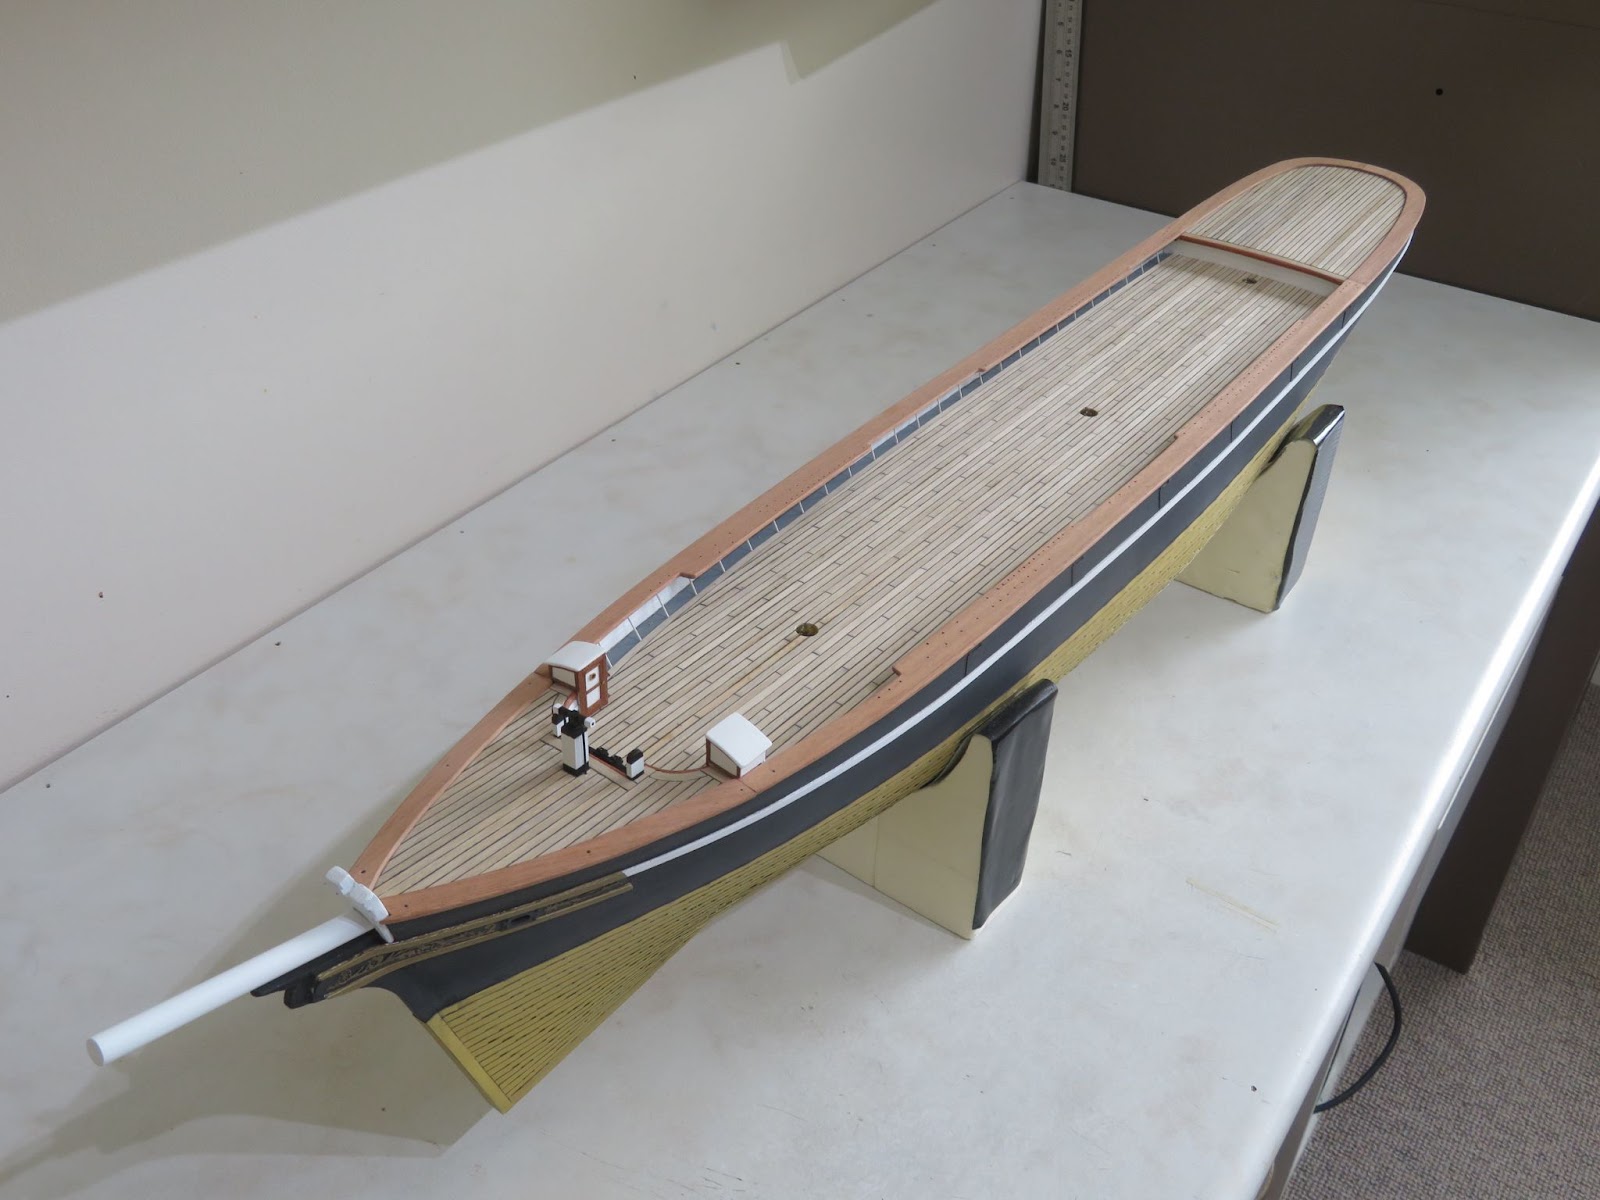
Back from a much needed holiday mountain hiking in Austria - very nice!

“I see no ships!”
Getting back to the model, the first job was to glue down the poop deck covering and the margin pieces for the stern and front edge trim.
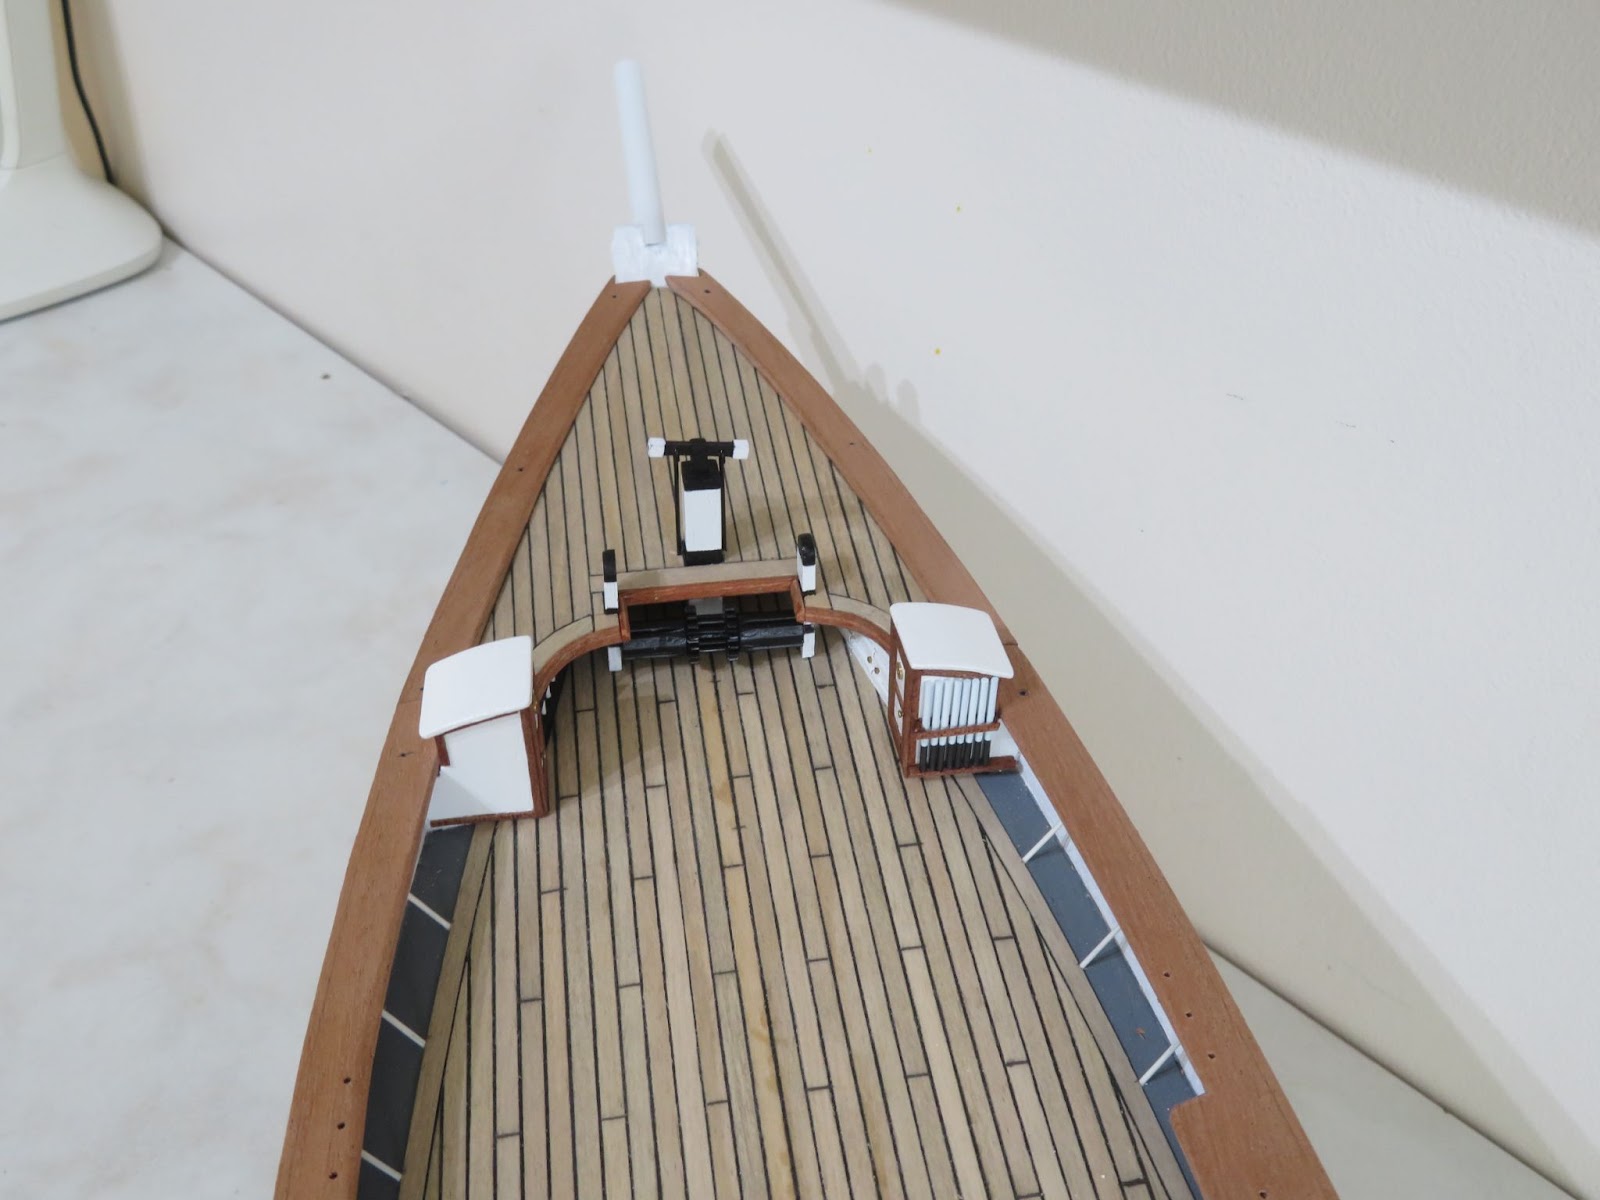
The next job was fitting the bowsprit. There is an error that I noticed right at the start of the hull build (Billing = no surprise). The foredeck height is too low and the forecastle deck is too high by 2mm each but, the two errors combine so that bowsprit comes out of the Knights Head just below the forecastle deck level. On the ship there is a small section of the lower bowsprit that comes through the very front of the forecastle deck (see Part 7). Everything measured correctly to the plans so it is definitely a mistake by Billings. It is not really possible to correct for the error because raising the height of the bowsprit would create a large gap between it and the beak and changing the angle would make it uneven. It's not a big thing because the very front of the forecastle deck will eventually be buried under a lot of rigging hanks! With the bowsprit fitted I glued the forecastle deck and the margin planks in place and added the half-round trim to the front of the deck.
Finally, I fixed the main rails in place. I allowed a 2mm overhang on the outside of the hull for the main rails and the fore and aft margin planks. They form the continuous upper strake that goes around the ship (the upper bulwark and top rail are fitted onto the main rail as can be seen in the image).

I pinned the rails in places using some 0.5mm brass wire to make sure they stayed in the correct position while the glue set and clamped a straight edge across the beam in order to keep the two rails flat.

Next: I will finish off the rudder, make some new rudder irons and fit them to the model. There are some hatchways to build so that I can check the positions of everything on the deck and I will make up the upper bulwarks, top rails and cats. There is no particular order needed for these so I will post an update when I have done a bit more.
Back from a much needed holiday mountain hiking in Austria - very nice!
“I see no ships!”
Getting back to the model, the first job was to glue down the poop deck covering and the margin pieces for the stern and front edge trim.
The next job was fitting the bowsprit. There is an error that I noticed right at the start of the hull build (Billing = no surprise). The foredeck height is too low and the forecastle deck is too high by 2mm each but, the two errors combine so that bowsprit comes out of the Knights Head just below the forecastle deck level. On the ship there is a small section of the lower bowsprit that comes through the very front of the forecastle deck (see Part 7). Everything measured correctly to the plans so it is definitely a mistake by Billings. It is not really possible to correct for the error because raising the height of the bowsprit would create a large gap between it and the beak and changing the angle would make it uneven. It's not a big thing because the very front of the forecastle deck will eventually be buried under a lot of rigging hanks! With the bowsprit fitted I glued the forecastle deck and the margin planks in place and added the half-round trim to the front of the deck.
Finally, I fixed the main rails in place. I allowed a 2mm overhang on the outside of the hull for the main rails and the fore and aft margin planks. They form the continuous upper strake that goes around the ship (the upper bulwark and top rail are fitted onto the main rail as can be seen in the image).
I pinned the rails in places using some 0.5mm brass wire to make sure they stayed in the correct position while the glue set and clamped a straight edge across the beam in order to keep the two rails flat.
Next: I will finish off the rudder, make some new rudder irons and fit them to the model. There are some hatchways to build so that I can check the positions of everything on the deck and I will make up the upper bulwarks, top rails and cats. There is no particular order needed for these so I will post an update when I have done a bit more.
Kurt Konrath
Kurt Konrath
Nice to see what look like Capstan arms stowed on side of the Head house.....
Rarely ever see where these are stowed as they are mostly out of sight until needed.
Rarely ever see where these are stowed as they are mostly out of sight until needed.
You are back of your holiday and I am back on your build-log, Dom. I visited before but now went through it from te beginning. Besides the Amerigo Vespucci, the Cutty Sark is on my list. And yes I do love impressive riggings. But whether either of those two will ever come to my work table…….. Therefore I will follow it for now with great interest.Part 16 Fixing the Forecastle Deck, Main Rails and Margins
Back from a much needed holiday mountain hiking in Austria - very nice!
“I see no ships!”
Getting back to the model, the first job was to glue down the poop deck covering and the margin pieces for the stern and front edge trim.
The next job was fitting the bowsprit. There is an error that I noticed right at the start of the hull build (Billing = no surprise). The foredeck height is too low and the forecastle deck is too high by 2mm each but, the two errors combine so that bowsprit comes out of the Knights Head just below the forecastle deck level. On the ship there is a small section of the lower bowsprit that comes through the very front of the forecastle deck (see Part 7). Everything measured correctly to the plans so it is definitely a mistake by Billings. It is not really possible to correct for the error because raising the height of the bowsprit would create a large gap between it and the beak and changing the angle would make it uneven. It's not a big thing because the very front of the forecastle deck will eventually be buried under a lot of rigging hanks! With the bowsprit fitted I glued the forecastle deck and the margin planks in place and added the half-round trim to the front of the deck.
Finally, I fixed the main rails in place. I allowed a 2mm overhang on the outside of the hull for the main rails and the fore and aft margin planks. They form the continuous upper strake that goes around the ship (the upper bulwark and top rail are fitted onto the main rail as can be seen in the image).
View attachment 472115
I pinned the rails in places using some 0.5mm brass wire to make sure they stayed in the correct position while the glue set and clamped a straight edge across the beam in order to keep the two rails flat.
Next: I will finish off the rudder, make some new rudder irons and fit them to the model. There are some hatchways to build so that I can check the positions of everything on the deck and I will make up the upper bulwarks, top rails and cats. There is no particular order needed for these so I will post an update when I have done a bit more.
Regards, Peter
- Joined
- Sep 23, 2021
- Messages
- 343
- Points
- 238
Hi Peter,You are back of your holiday and I am back on your build-log, Dom. I visited before but now went through it from te beginning. Besides the Amerigo Vespucci, the Cutty Sark is on my list. And yes I do love impressive riggings. But whether either of those two will ever come to my work table…….. Therefore I will follow it for now with great interest.
Regards, Peter
Thanks for checking out the build. I am working my way very slowly through this one, it is a very challenging build for me. I am trying to work on the build a bit more regularly now rather than the stop/start I have managed so far. My goal is to get most of the hull work finished by the end of the winter season (big hope!). Using the vintage Billing kit as a base kit was probably not the best choice as I am having to remake all the parts as I go along using Campbell's plans and Longridge's book for reference, together with the pictures I took down in Greenwich so, it is very time consuming. If you do decide to build the Cutty Sark from a kit, I would not recommend the current Billing version, it is very poor value for money compared to more modern kits (the Sergal/Mantua kit is probably a much better one to work with). In fact the current Billing retail kit is nearly identical to mine (the original kit was introduced in 1972 and it has not changed except that the wood parts are now laser cut). I bought my kit very cheaply, so all the up-grades I have purchased and brassing the hull is still costing me much less than the current retail version is selling for and hopefully I will have a much better model at the end. If I had purchased a modern kit and then still had to do all the up-grades I would not have been very happy!
Dom
- Joined
- Sep 23, 2021
- Messages
- 343
- Points
- 238
Part 17: Rudder and Irons
(See Part 11 for making a new Rudder and the images of the actual rudder on the CS) -
The rudder is held in place by four sets of hinges with narrow straps but the hinges that came in the kit looked much wider than scale so I decided not to use them. To make some new ones I cut 2mm strips from a 0.3mm brass sheet and folded each set to fit neatly around the rudder and the stern post. To sheath the rudder I used some 0.05mm brass sheet rather than tile it.
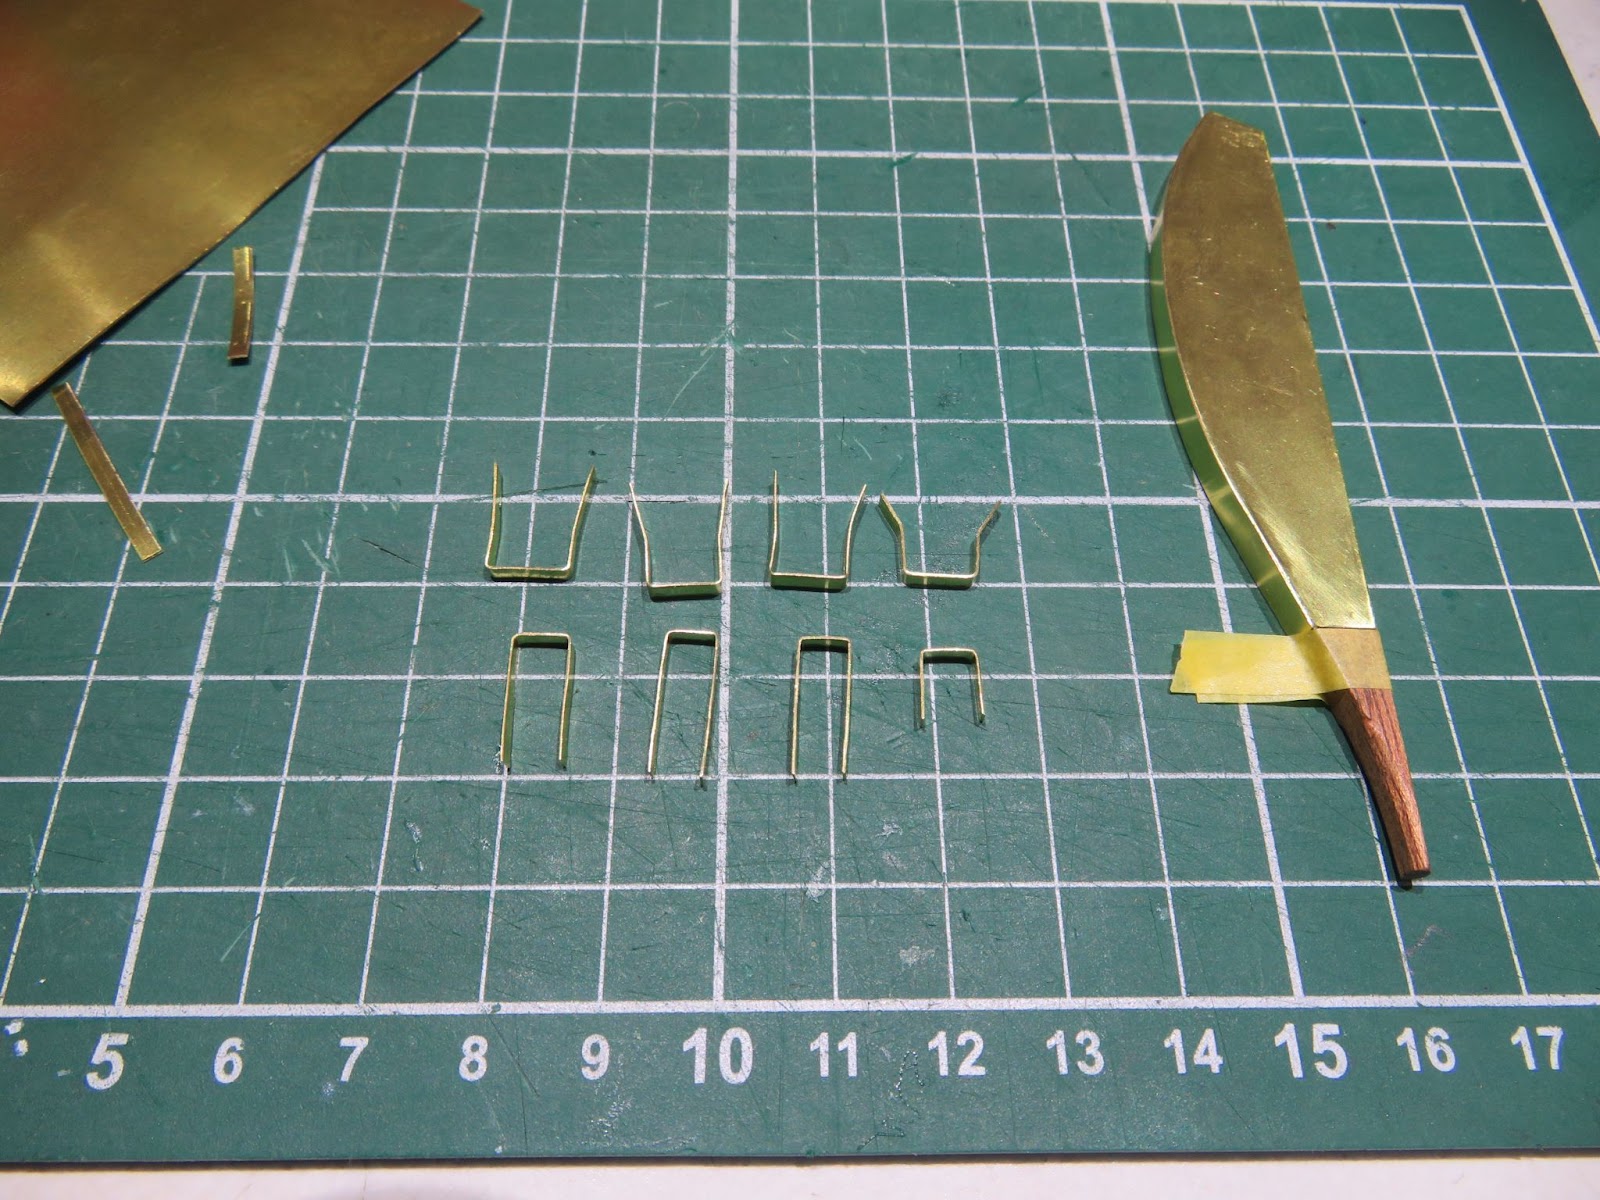
I soldered a section of brass tube onto each hinge section and I joined the pairs together with some cut down brass nails. I used some brass black to blacken them but I then decided to paint them in order to match the hull black and also painted the top of the rudder to match the hull.
I drilled some holes in the straps and used some blackened brass nail heads for the rudder straps but I ended up using some micro-screws to fix the straps to the hull because it was very fiddly to get everything lined up and properly secured. Once the rudder was in place I finished off with a misting of Tamiya semi-gloss lacquer to match the hull brass.
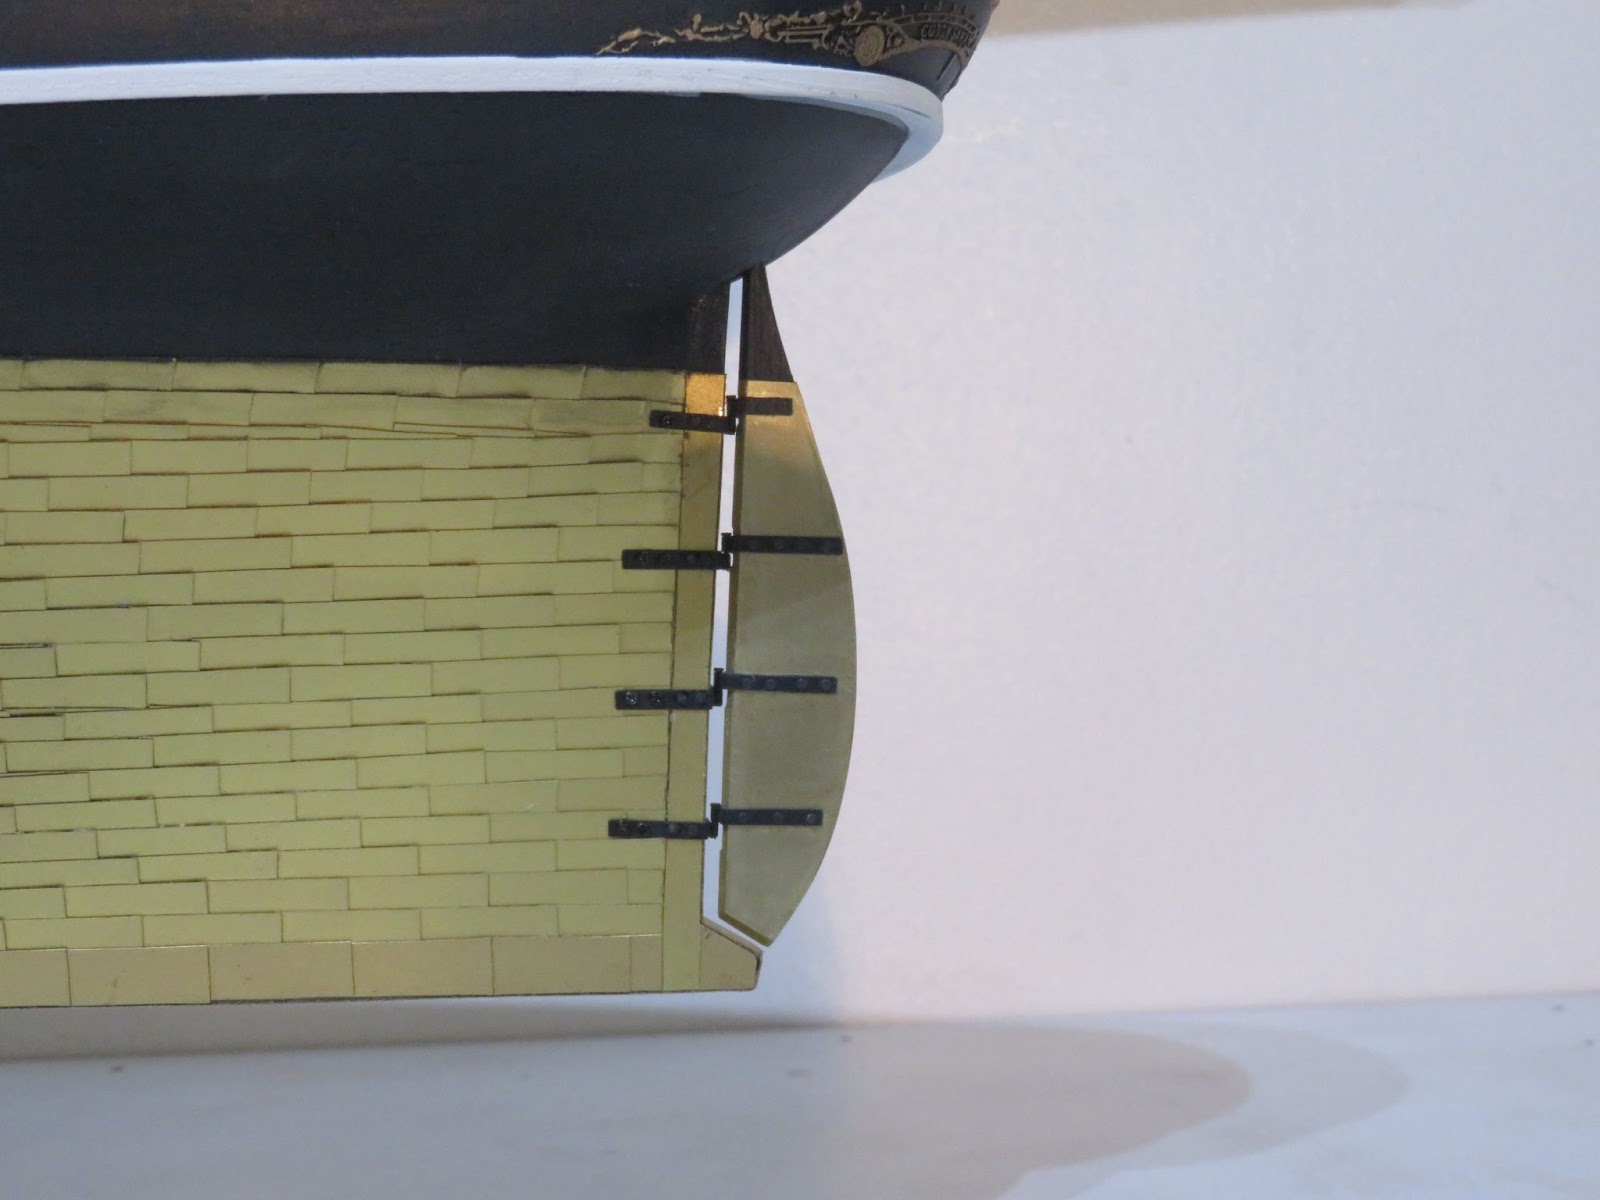
Next: I will make up the remaining hatchways and open up the forward cargo hold. The other holds I have decided to leave closed mainly because they will be difficult to see into and I only wanted to have the one hold that could open so that I can put some tea chests into it.
(See Part 11 for making a new Rudder and the images of the actual rudder on the CS) -
The rudder is held in place by four sets of hinges with narrow straps but the hinges that came in the kit looked much wider than scale so I decided not to use them. To make some new ones I cut 2mm strips from a 0.3mm brass sheet and folded each set to fit neatly around the rudder and the stern post. To sheath the rudder I used some 0.05mm brass sheet rather than tile it.
I soldered a section of brass tube onto each hinge section and I joined the pairs together with some cut down brass nails. I used some brass black to blacken them but I then decided to paint them in order to match the hull black and also painted the top of the rudder to match the hull.
I drilled some holes in the straps and used some blackened brass nail heads for the rudder straps but I ended up using some micro-screws to fix the straps to the hull because it was very fiddly to get everything lined up and properly secured. Once the rudder was in place I finished off with a misting of Tamiya semi-gloss lacquer to match the hull brass.
Next: I will make up the remaining hatchways and open up the forward cargo hold. The other holds I have decided to leave closed mainly because they will be difficult to see into and I only wanted to have the one hold that could open so that I can put some tea chests into it.