I envy your proximity to Austria Dom. Isn't it just the best possible place for hiking? Great picture!Back from a much needed holiday mountain hiking in Austria - very nice!
-

Win a Free Custom Engraved Brass Coin!!!
As a way to introduce our brass coins to the community, we will raffle off a free coin during the month of August. Follow link ABOVE for instructions for entering.
-

PRE-ORDER SHIPS IN SCALE TODAY!
The beloved Ships in Scale Magazine is back and charting a new course for 2026!
Discover new skills, new techniques, and new inspirations in every issue.
NOTE THAT OUR FIRST ISSUE WILL BE JAN/FEB 2026
You are using an out of date browser. It may not display this or other websites correctly.
You should upgrade or use an alternative browser.
You should upgrade or use an alternative browser.
Cutty Sark, Vintage Billing Boats BB564, 1:75.
- Thread starter DomCee
- Start date
- Watchers 26
-
- Tags
- billing boats cutty sark
- Joined
- Sep 23, 2021
- Messages
- 262
- Points
- 168

Part 18: Deck Hatchways and some Furnishings
The Hatchways: There are two hatchways on the main deck. The small forward one is located just behind the large windlass in front of the forecastle deck and the aft hatchway is located between the aft deck house and the Mizzen mast. The aft hatchway had a booby hatch with a sliding cover as it was also used as a companion-way but it has now been removed and an access lift installed for visitors. The hatchway in the kit did not match the one shown in Longridge’s book or Cambell’s plans and I could not find any images so I followed Longridges drawing to make a new one. To match the deck houses I am keeping to the white roofs and panels with dark wood frames.
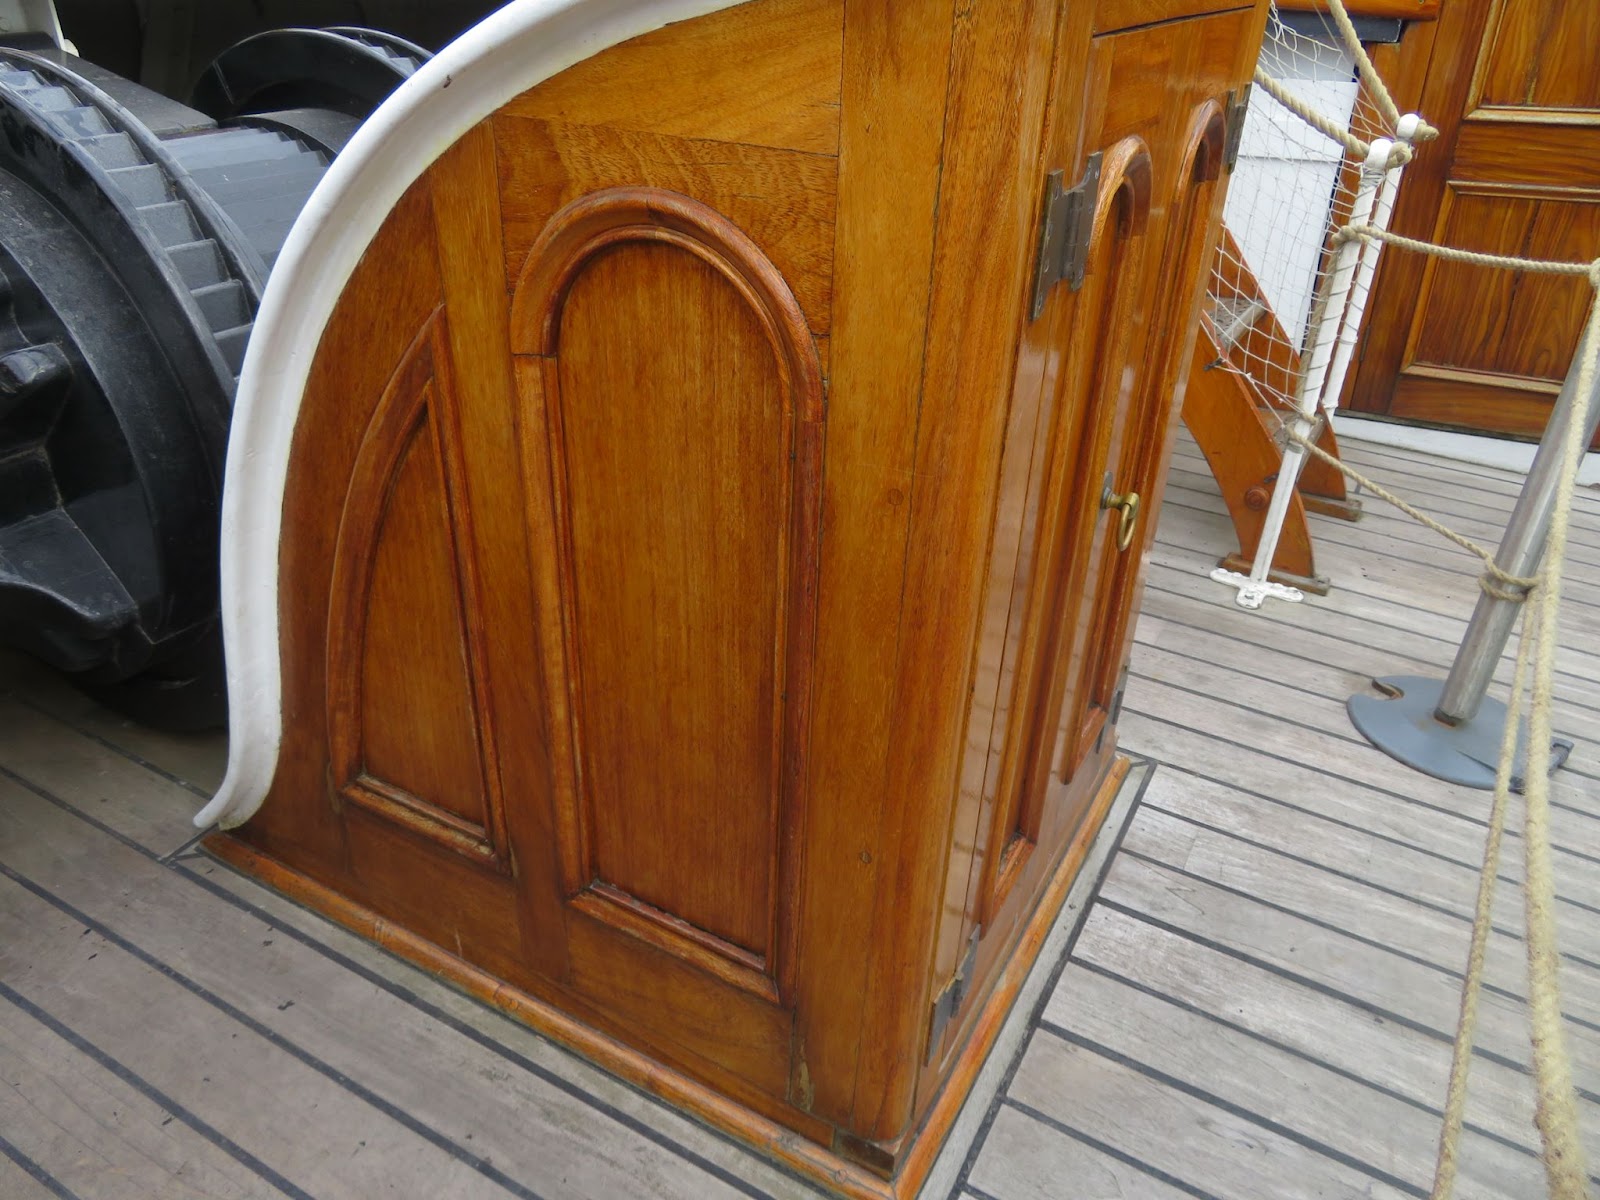
The Forward Hatchway
The Steering Gear: This is housed in a large box that essentially sits on top of a table that is raised up from the poop deck on legs with the steering shaft passing through a pedestal. The box is sloped to the back by a few degrees.
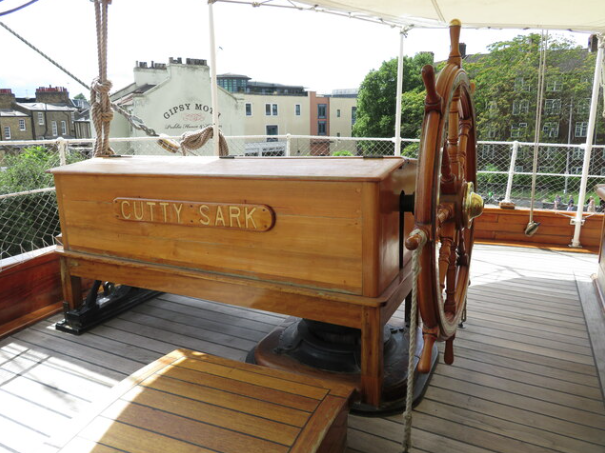
The Steering Gear Housing
The top lids are hinged and there are name plates on the sides. There is also a small hatchway on the Starboard side of the poop which I assume is to access the steering compartment. There should also be a square grating that could be placed either side of the wheel.
There is a nice image of the retired Captain Woodget taking the wheel after the first restoration of the Cutty Sark in 1924, two years after being purchased from the Portuguese by Captain Dowman. The 1924 image shows the top box painted white (a fancy crocheted cover can also be seen draped over the top - a touch from Mrs Dowman no doubt) and the table in dark wood.
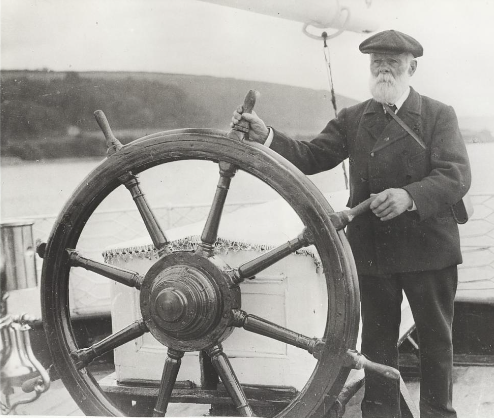
Captain Woodget at the wheel in 1924.
The construction was simple but I decided not to add the pedestal because it cannot be seen at this scale. I used some wooden pins for the legs and made the name plates using the etched parts from HisModel. The kit wheel is brass which I painted red-brown. Interestingly, the wheel in the 1924 image is not the same one that is fitted to the ship now. The small hatchway on the poop was nothing special so I just used a piece of sapele and some thin strips for the lid.
While I was about it, I made up the two chicken coops that are located at the rear of the main deck. They are essentially rectangular boxes with slats in the front and, of course, I had to put some chickens in them! I wanted to make the slats thin enough to see the chickens inside the coops but they just kept breaking and, after a few attempts, I relented out of frustration and used some 0.5mm brass wire. They ended up a little taller than scale, but that’s OK so long as they are happy little chickens.
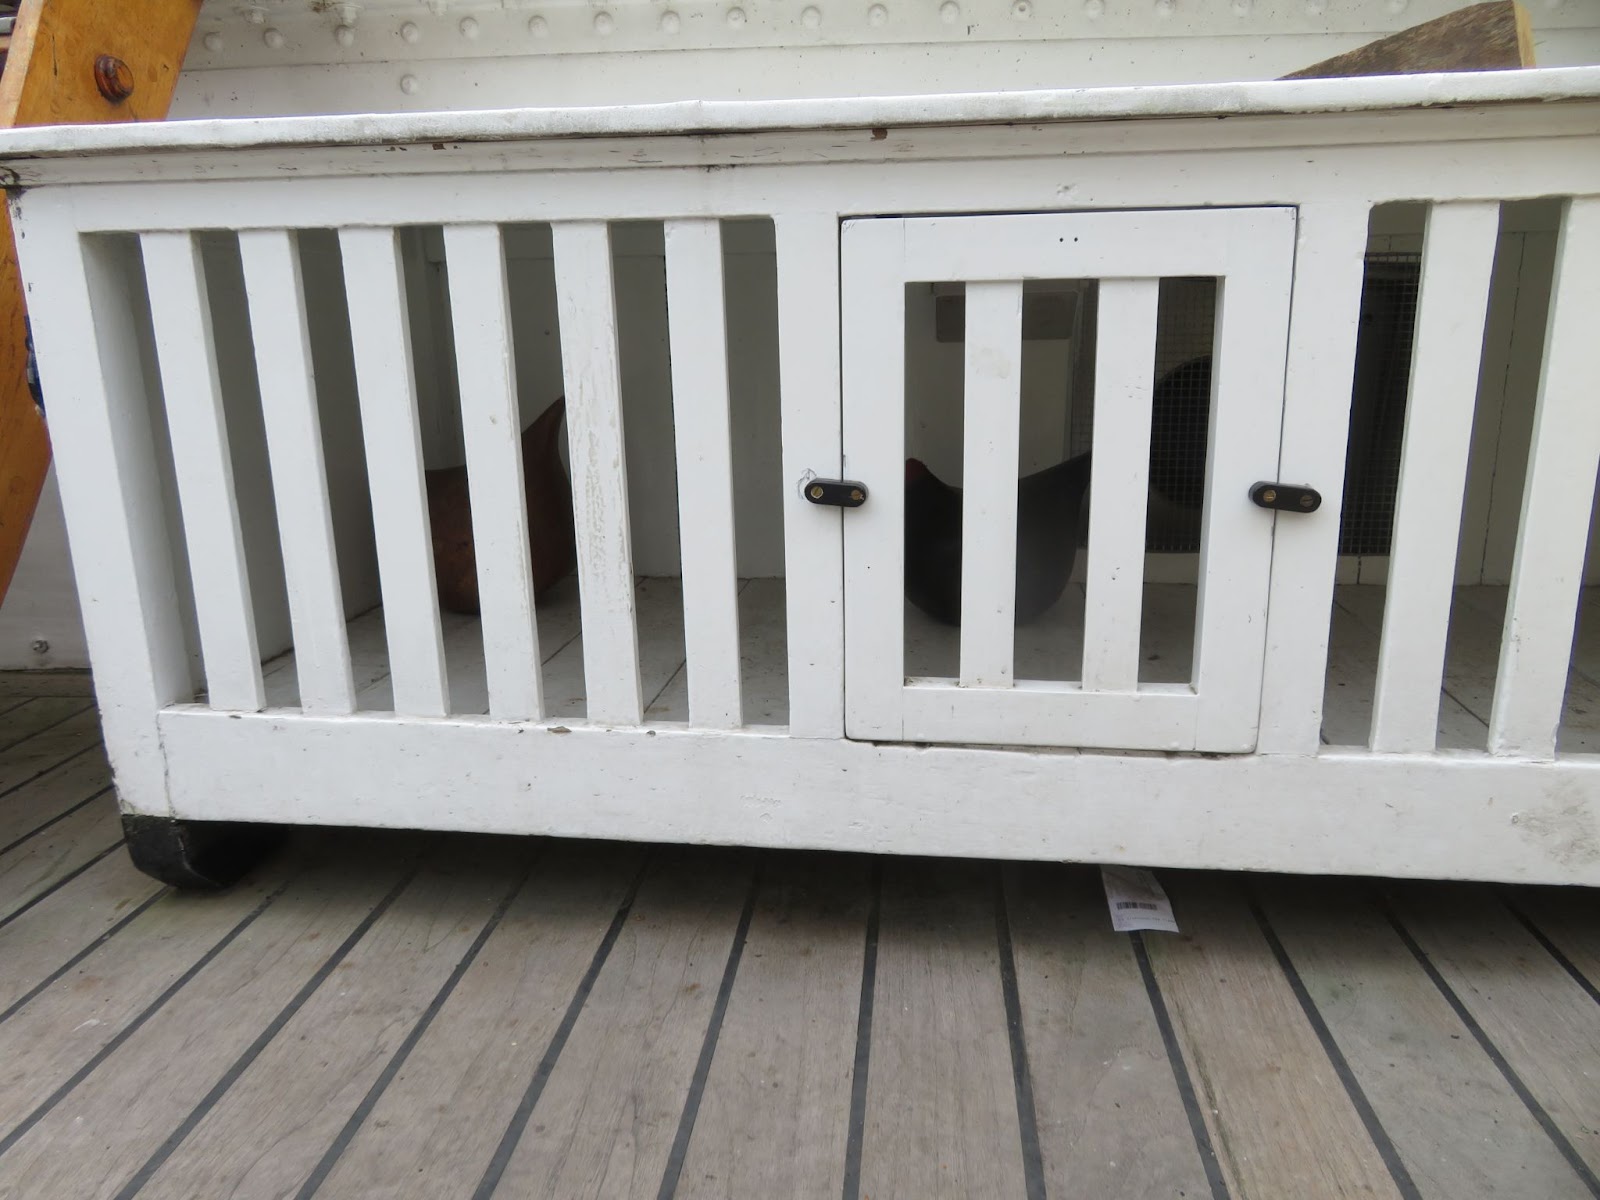
One of the chicken coops (with chickens!)

Next: The last major construction work on the hull is to make the upper bulwarks and rails. I will also need to make the catheads as they extend through the upper bulwarks on the forecastle deck. I didn’t get around to the forward cargo hold so I will open that up and make the frame later.
The Hatchways: There are two hatchways on the main deck. The small forward one is located just behind the large windlass in front of the forecastle deck and the aft hatchway is located between the aft deck house and the Mizzen mast. The aft hatchway had a booby hatch with a sliding cover as it was also used as a companion-way but it has now been removed and an access lift installed for visitors. The hatchway in the kit did not match the one shown in Longridge’s book or Cambell’s plans and I could not find any images so I followed Longridges drawing to make a new one. To match the deck houses I am keeping to the white roofs and panels with dark wood frames.
The Forward Hatchway
The Steering Gear: This is housed in a large box that essentially sits on top of a table that is raised up from the poop deck on legs with the steering shaft passing through a pedestal. The box is sloped to the back by a few degrees.
The Steering Gear Housing
The top lids are hinged and there are name plates on the sides. There is also a small hatchway on the Starboard side of the poop which I assume is to access the steering compartment. There should also be a square grating that could be placed either side of the wheel.
There is a nice image of the retired Captain Woodget taking the wheel after the first restoration of the Cutty Sark in 1924, two years after being purchased from the Portuguese by Captain Dowman. The 1924 image shows the top box painted white (a fancy crocheted cover can also be seen draped over the top - a touch from Mrs Dowman no doubt) and the table in dark wood.
Captain Woodget at the wheel in 1924.
The construction was simple but I decided not to add the pedestal because it cannot be seen at this scale. I used some wooden pins for the legs and made the name plates using the etched parts from HisModel. The kit wheel is brass which I painted red-brown. Interestingly, the wheel in the 1924 image is not the same one that is fitted to the ship now. The small hatchway on the poop was nothing special so I just used a piece of sapele and some thin strips for the lid.
While I was about it, I made up the two chicken coops that are located at the rear of the main deck. They are essentially rectangular boxes with slats in the front and, of course, I had to put some chickens in them! I wanted to make the slats thin enough to see the chickens inside the coops but they just kept breaking and, after a few attempts, I relented out of frustration and used some 0.5mm brass wire. They ended up a little taller than scale, but that’s OK so long as they are happy little chickens.
One of the chicken coops (with chickens!)
Next: The last major construction work on the hull is to make the upper bulwarks and rails. I will also need to make the catheads as they extend through the upper bulwarks on the forecastle deck. I didn’t get around to the forward cargo hold so I will open that up and make the frame later.
It looks like your experience in train displays is paying off! These are nice furnishings and the "chickens" in the coops will be a real "pleaser" for those who examine your model over the years. Did you ultimately end up using the block and deadeye sets for the CS from HIS?
Doug
Doug
- Joined
- Sep 23, 2021
- Messages
- 262
- Points
- 168

Hi Doug,It looks like your experience in train displays is paying off! These are nice furnishings and the "chickens" in the coops will be a real "pleaser" for those who examine your model over the years. Did you ultimately end up using the block and deadeye sets for the CS from HIS?
Doug
It's been heavy weather building this one and still lots more to do. The kit is not very good so it is taking me a long time to make new parts to try to bash it into something a bit better but unfortunately "other-stuff-that-has-to-be-done" has been taking priority over model building. I haven't done anything with the HiS sets yet but as soon as I've finished the upper rails that I'm working on this week I will start stropping the lower deadeyes to the main rails.
Dom
Good morning Dom, This is so good. Fantastic details. Cheers GrantPart 16 Fixing the Forecastle Deck, Main Rails and Margins
Back from a much needed holiday mountain hiking in Austria - very nice!
“I see no ships!”
Getting back to the model, the first job was to glue down the poop deck covering and the margin pieces for the stern and front edge trim.
The next job was fitting the bowsprit. There is an error that I noticed right at the start of the hull build (Billing = no surprise). The foredeck height is too low and the forecastle deck is too high by 2mm each but, the two errors combine so that bowsprit comes out of the Knights Head just below the forecastle deck level. On the ship there is a small section of the lower bowsprit that comes through the very front of the forecastle deck (see Part 7). Everything measured correctly to the plans so it is definitely a mistake by Billings. It is not really possible to correct for the error because raising the height of the bowsprit would create a large gap between it and the beak and changing the angle would make it uneven. It's not a big thing because the very front of the forecastle deck will eventually be buried under a lot of rigging hanks! With the bowsprit fitted I glued the forecastle deck and the margin planks in place and added the half-round trim to the front of the deck.
Finally, I fixed the main rails in place. I allowed a 2mm overhang on the outside of the hull for the main rails and the fore and aft margin planks. They form the continuous upper strake that goes around the ship (the upper bulwark and top rail are fitted onto the main rail as can be seen in the image).
View attachment 472115
I pinned the rails in places using some 0.5mm brass wire to make sure they stayed in the correct position while the glue set and clamped a straight edge across the beam in order to keep the two rails flat.

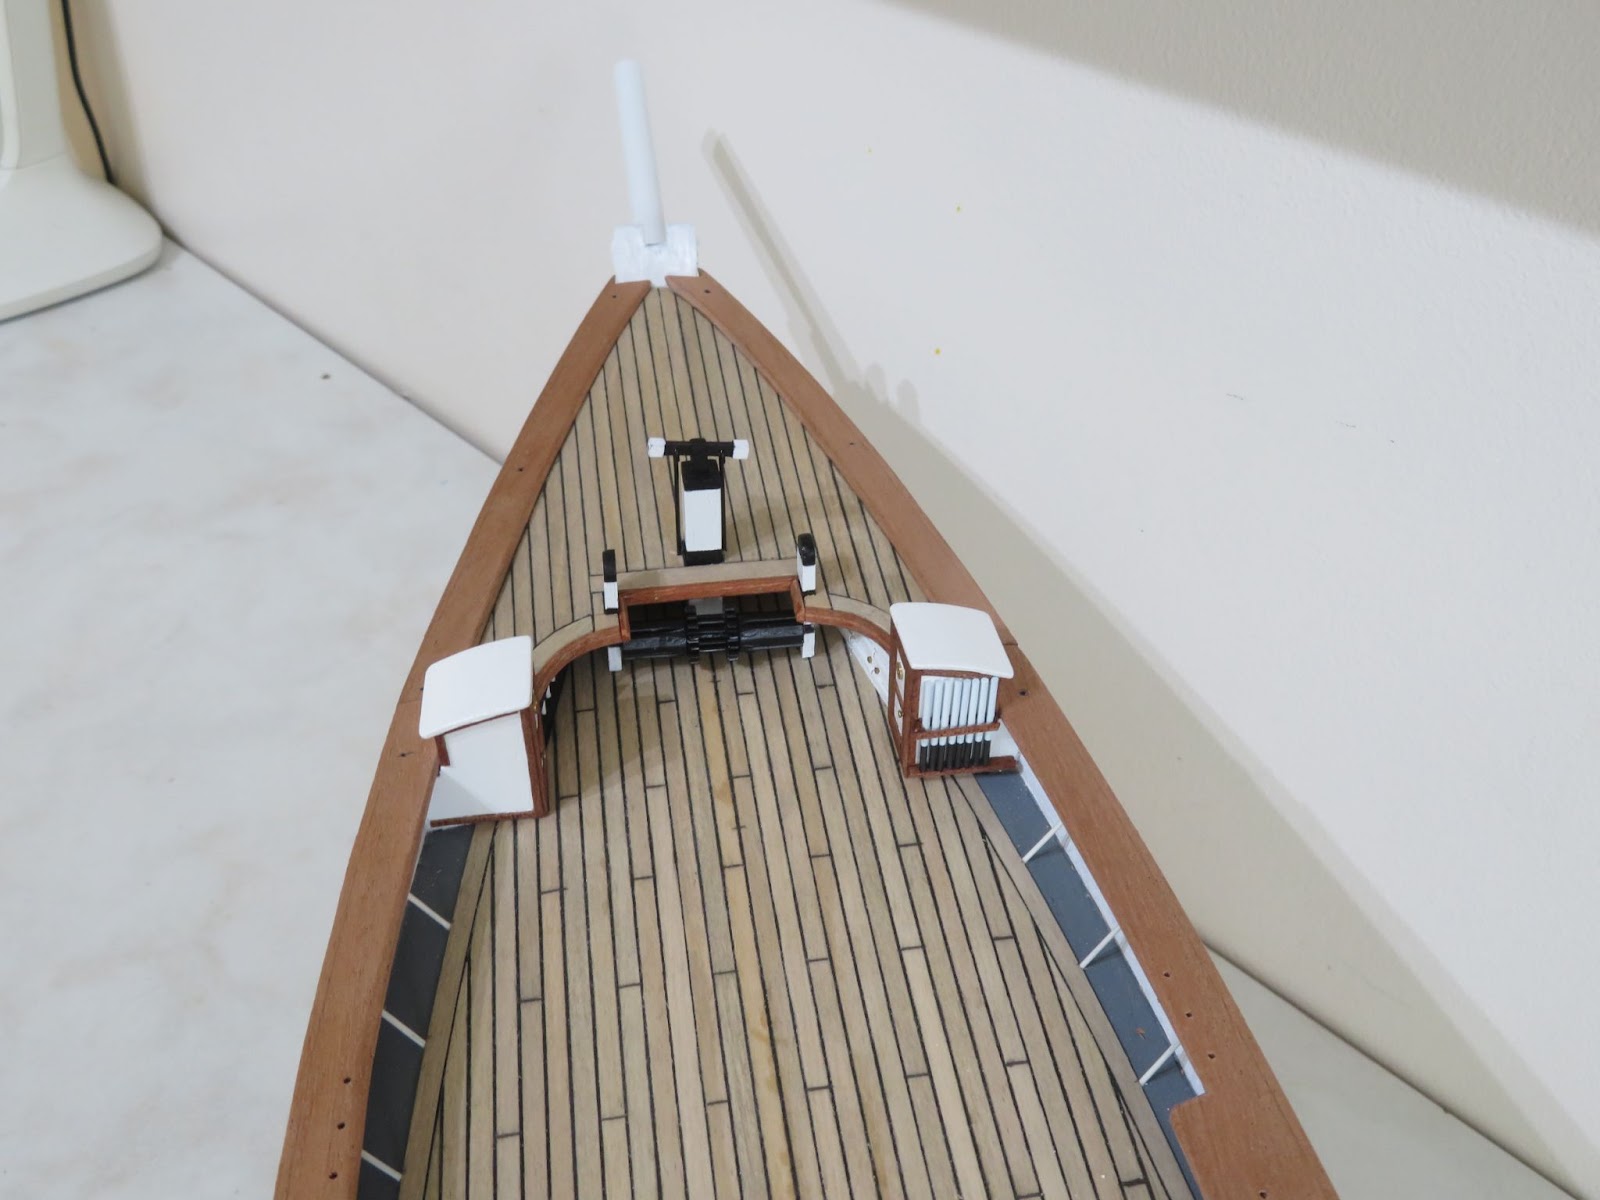
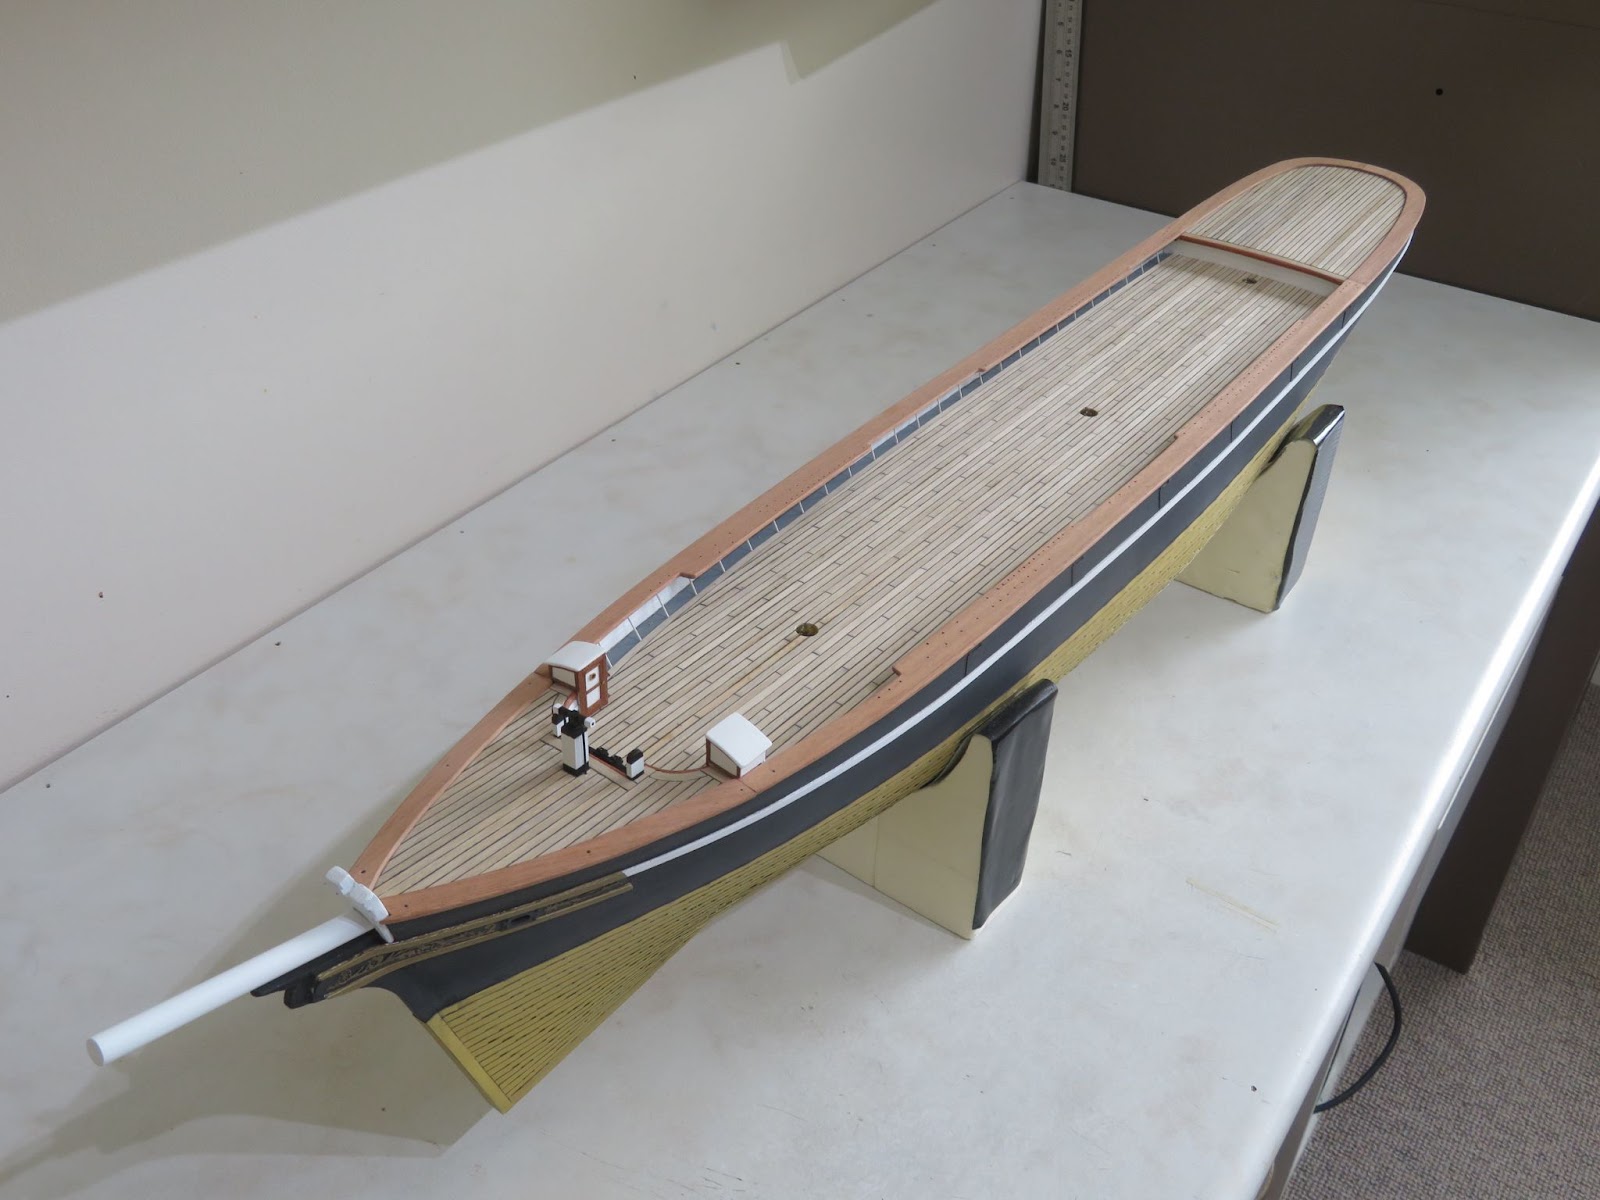
Next: I will finish off the rudder, make some new rudder irons and fit them to the model. There are some hatchways to build so that I can check the positions of everything on the deck and I will make up the upper bulwarks, top rails and cats. There is no particular order needed for these so I will post an update when I have done a bit more.
- Joined
- Sep 23, 2021
- Messages
- 262
- Points
- 168

Part 19: Catheads + New Toys!
I had hoped to work on the upper bulwarks and rails since my last post and I was about to start making them but the wood strips that I had were poor in quality and after I tried sanding them down to get the edges and surfaces smooth they were still not good enough to use. I ordered some more strips but they went AWOL in the post so while I have been waiting and to keep the build going forward, I decided to make the catheads using one of my new “toys”.
The Catheads: are timber stocks angled forward and slightly upwards from the forecastle deck with a triple sheave at the outboard end for the anchor lift. They are square on the outboard side and tapered inboard where they are bolted to the deck. There is an anchor release mechanism and a large cleat and rod on the top and also a whisker which serves to separate the jib boom guys. The outboard end is iron banded with a sturdy ring for the main brace and there is a carved cat face.
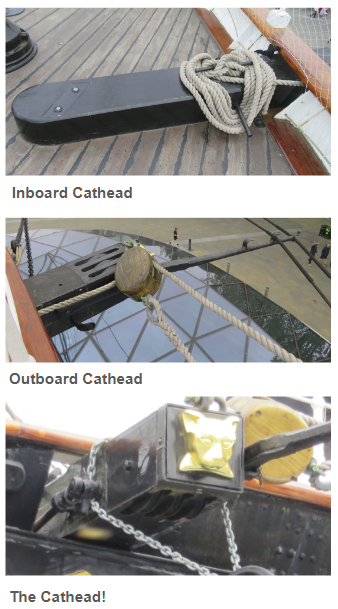
Details of the Catheads
Longridge gives a good description of the size and construction which sets the scale size as 4.75mm square at the end and a length of 36.6mm with ⅓ of the length outboard. The lower inboard section is tapered to compensate for the deck camber.
New Toy(s): I had been thinking about buying some more advanced bench tools for a while but I was reluctant to purchase (new) on the basis of cost vs. utilisation. I am however signed up for alerts on some general auctioneers sites just in case anything turns up of interest (that’s how I got this kit and my next project kit). A few months ago I was alerted to a complete set of Proxxon tools from a house clearance going up for auction which included an MF70 milling machine and a PD-230E mini lathe with the PF230 mill drill head. There were a few other items but I decided to live bid on those two lots and I picked up both for just £300! When I received them the machines were in virtually unused condition and, as an unexpected bonus, there was over £800 worth of brand new tooling and accessories that also turned up with them(at current Proxxon prices). Although I have had them for a while I haven’t had the time to play with them so I thought it was about time to make a start. So, first out of the boxes was the MF70 milling machine which I thought I could try out to make the catheads.
I had some1/4x1/4” hardwood lengths so first I had to mill that down to the correct overall dimensions. Because the forecastle deck is cambered and there is a step over the margin pieces, I needed to cut two different bevells inboard and outboard so that the catheads fitted neatly on the deck and over the margin board (I could have cut out the margin boards but where’s the challenge in that?). Finally I had to drill the three slots for the sheaves and put a blackened brass band around the end.
Straight forward enough? NOPE! - whilst I know some basics of machining, the whole experience was a big learning curve for me!
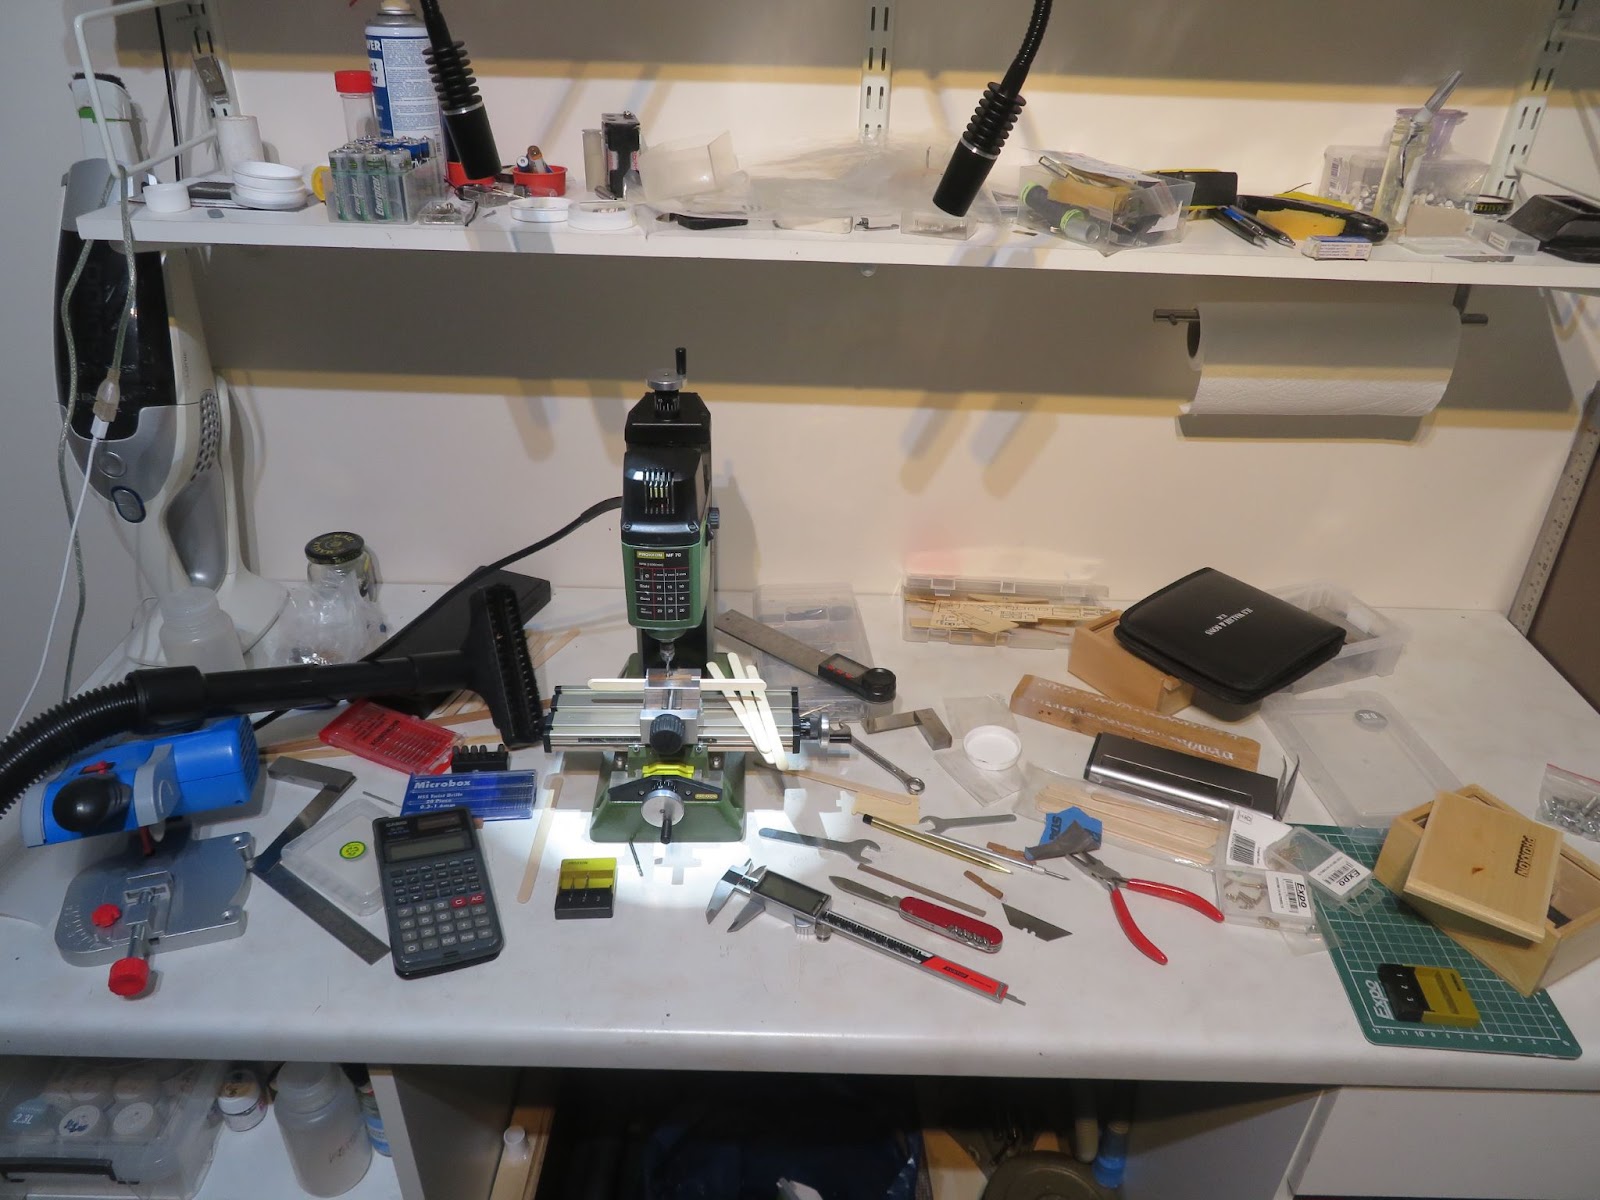
I started with a clean desk and after 30 minutes it looked like this - and it only got worse! :-
Making the basic shape of the stocks was OK but the biggest problem was drilling the slots for the sheaves. Drilling out small slots with a micro bit is very difficult because the end of the drill just wanders about all over the place following the wood grain. I'm sure with experience it is possible but I trashed a number of pieces (and bits!) so I eventually gave up and went for plan B which was to mill one larger slot and use filed down brass washers as pulleys and drill a pin through the side. I probably could have done the job in 30 minutes using some hand tools but the object was to learn to use the machine. For small pieces the precision of the mill is excellent and with practice I will be able to use it to make some complex pieces in the future. However, setting up and using the machine is quite a slow process (for me) and unless the pieces need that level of detail I think my normal set of regular tools will do the job perfectly well.
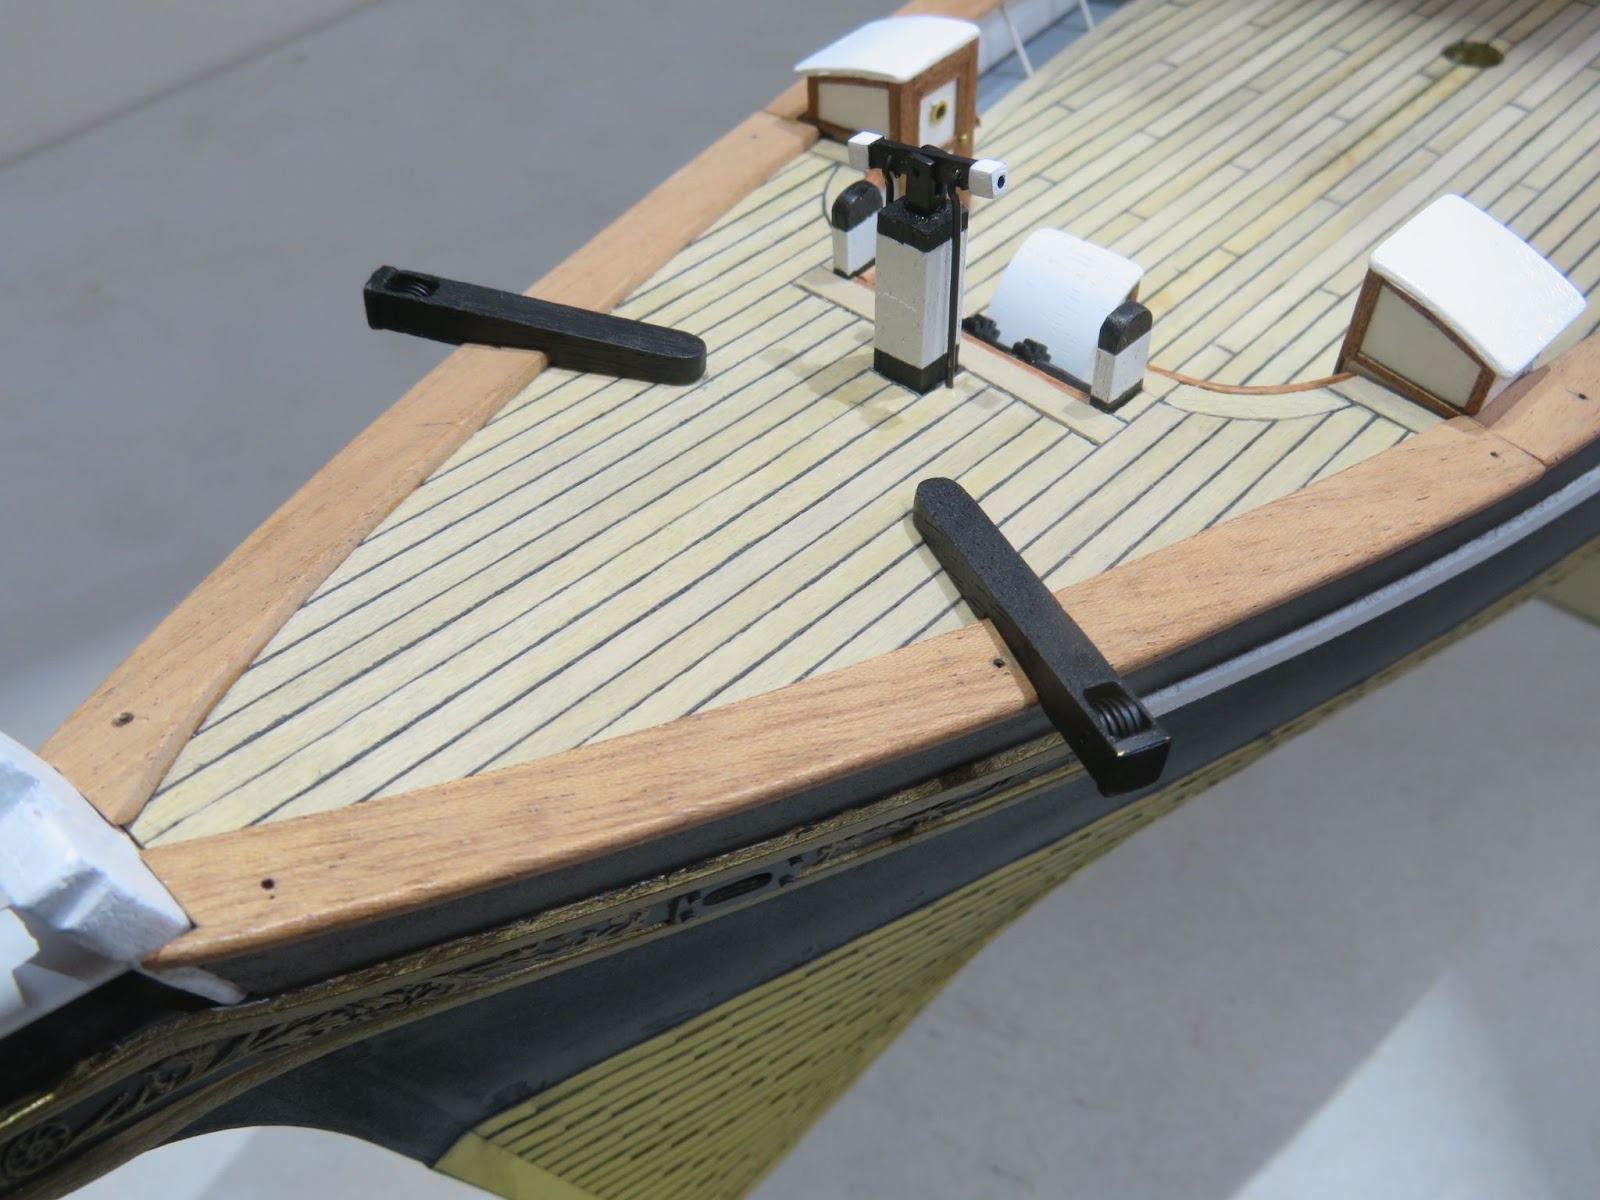
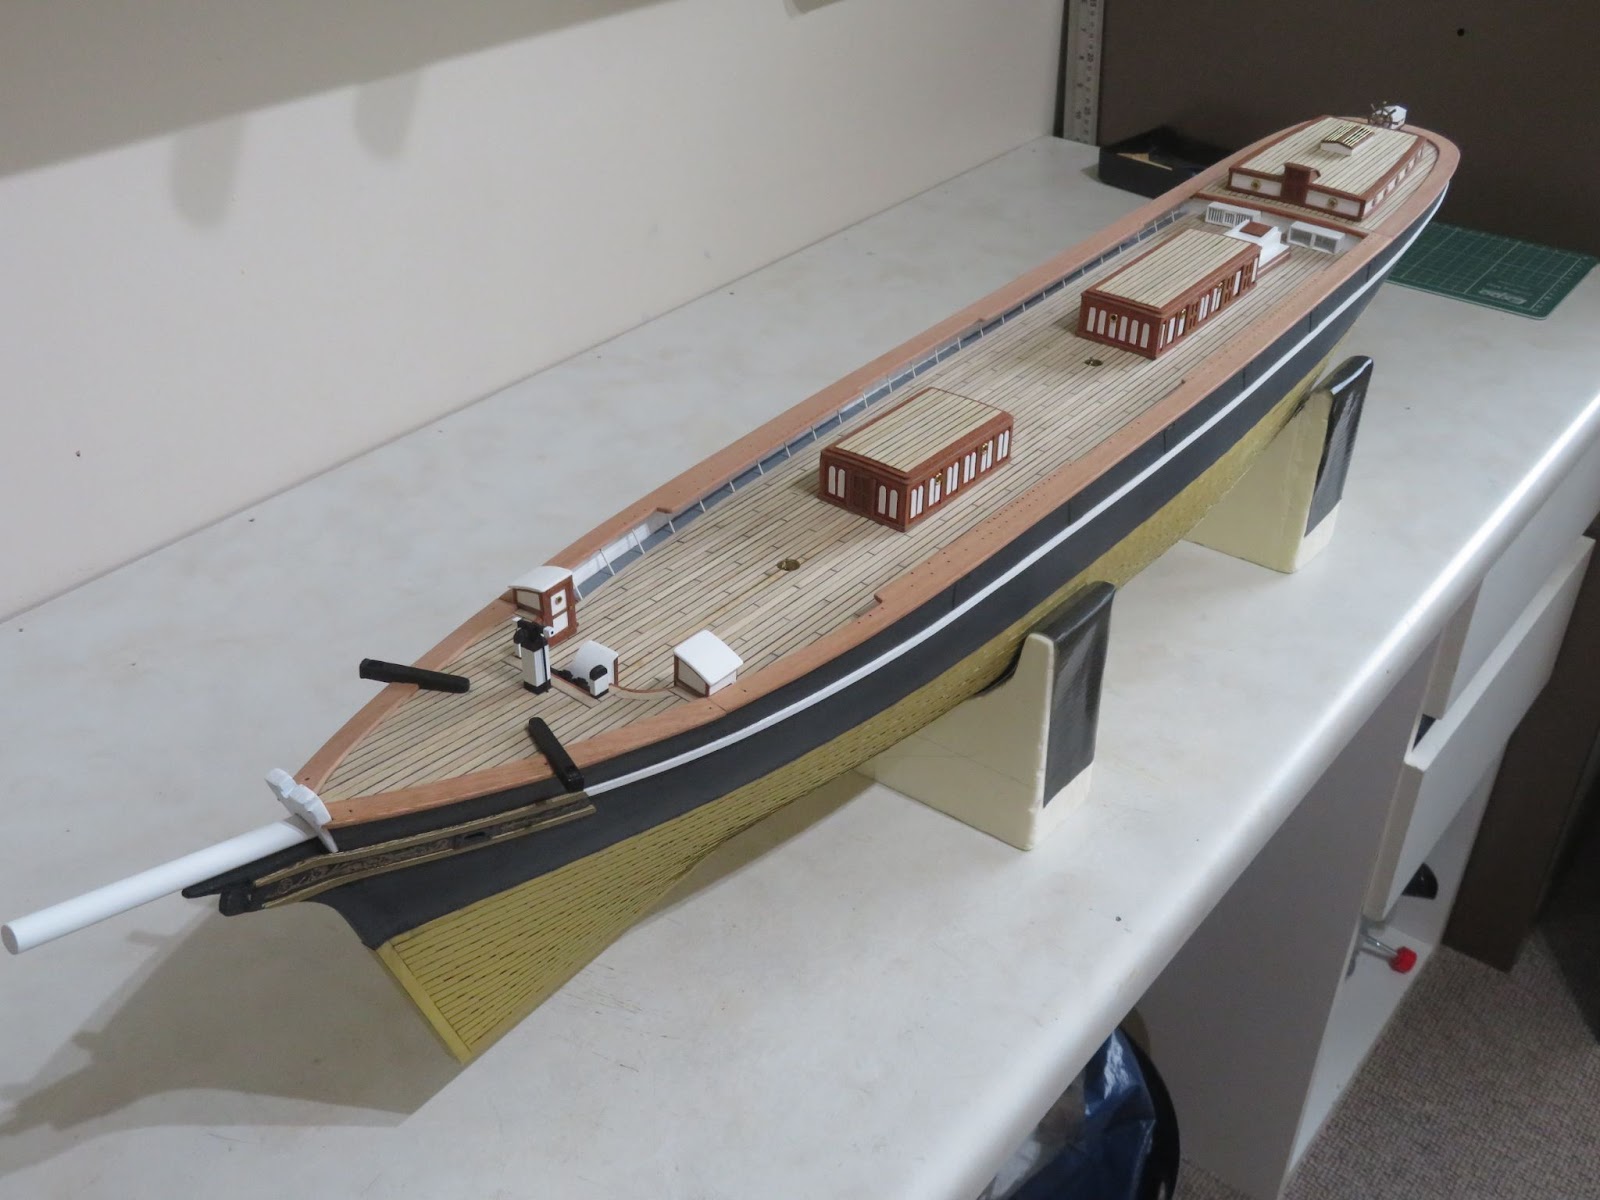
The catheads did come out OK in the end and I will add the other fittings later. I might even have a go at carving the cat heads! I laid out the deck temporarily just to check everything is sailing in the right direction before I start working on the uppers.
At some point I will try out the lathe but I think that it will not be that useful for making model ships other than turning a few brass fittings and perhaps the spars, but even then I really don’t think the time needed to set the machine up to make a few parts will be worth it compared with just ordering them. However, I have a few other projects that will benefit from having a small lathe so, I’ll save that for another day.
Next: As soon as the new strips arrive I'll bash on and finish the upper bulwarks and top rails
I had hoped to work on the upper bulwarks and rails since my last post and I was about to start making them but the wood strips that I had were poor in quality and after I tried sanding them down to get the edges and surfaces smooth they were still not good enough to use. I ordered some more strips but they went AWOL in the post so while I have been waiting and to keep the build going forward, I decided to make the catheads using one of my new “toys”.
The Catheads: are timber stocks angled forward and slightly upwards from the forecastle deck with a triple sheave at the outboard end for the anchor lift. They are square on the outboard side and tapered inboard where they are bolted to the deck. There is an anchor release mechanism and a large cleat and rod on the top and also a whisker which serves to separate the jib boom guys. The outboard end is iron banded with a sturdy ring for the main brace and there is a carved cat face.
Details of the Catheads
Longridge gives a good description of the size and construction which sets the scale size as 4.75mm square at the end and a length of 36.6mm with ⅓ of the length outboard. The lower inboard section is tapered to compensate for the deck camber.
New Toy(s): I had been thinking about buying some more advanced bench tools for a while but I was reluctant to purchase (new) on the basis of cost vs. utilisation. I am however signed up for alerts on some general auctioneers sites just in case anything turns up of interest (that’s how I got this kit and my next project kit). A few months ago I was alerted to a complete set of Proxxon tools from a house clearance going up for auction which included an MF70 milling machine and a PD-230E mini lathe with the PF230 mill drill head. There were a few other items but I decided to live bid on those two lots and I picked up both for just £300! When I received them the machines were in virtually unused condition and, as an unexpected bonus, there was over £800 worth of brand new tooling and accessories that also turned up with them(at current Proxxon prices). Although I have had them for a while I haven’t had the time to play with them so I thought it was about time to make a start. So, first out of the boxes was the MF70 milling machine which I thought I could try out to make the catheads.
I had some1/4x1/4” hardwood lengths so first I had to mill that down to the correct overall dimensions. Because the forecastle deck is cambered and there is a step over the margin pieces, I needed to cut two different bevells inboard and outboard so that the catheads fitted neatly on the deck and over the margin board (I could have cut out the margin boards but where’s the challenge in that?). Finally I had to drill the three slots for the sheaves and put a blackened brass band around the end.
Straight forward enough? NOPE! - whilst I know some basics of machining, the whole experience was a big learning curve for me!
I started with a clean desk and after 30 minutes it looked like this - and it only got worse! :-
Making the basic shape of the stocks was OK but the biggest problem was drilling the slots for the sheaves. Drilling out small slots with a micro bit is very difficult because the end of the drill just wanders about all over the place following the wood grain. I'm sure with experience it is possible but I trashed a number of pieces (and bits!) so I eventually gave up and went for plan B which was to mill one larger slot and use filed down brass washers as pulleys and drill a pin through the side. I probably could have done the job in 30 minutes using some hand tools but the object was to learn to use the machine. For small pieces the precision of the mill is excellent and with practice I will be able to use it to make some complex pieces in the future. However, setting up and using the machine is quite a slow process (for me) and unless the pieces need that level of detail I think my normal set of regular tools will do the job perfectly well.
The catheads did come out OK in the end and I will add the other fittings later. I might even have a go at carving the cat heads! I laid out the deck temporarily just to check everything is sailing in the right direction before I start working on the uppers.
At some point I will try out the lathe but I think that it will not be that useful for making model ships other than turning a few brass fittings and perhaps the spars, but even then I really don’t think the time needed to set the machine up to make a few parts will be worth it compared with just ordering them. However, I have a few other projects that will benefit from having a small lathe so, I’ll save that for another day.
Next: As soon as the new strips arrive I'll bash on and finish the upper bulwarks and top rails
- Joined
- Sep 23, 2021
- Messages
- 262
- Points
- 168

Part 20: Upper Bulwarks and Top Rails
The new wood strips arrived after a long wait (badly damaged package but fortunately the strips were OK - UPS!) so I could get to work on the uppers.
The upper bulwarks and top rails: These form a band around the ship and sit on top of the main rails ( See Image Part 10 ). Their construction is straightforward but a lot of measuring is needed to get everything correct.
On the ship, the upper bulwarks are fabricated from wooden boards that are attached to risers fixed between the main rails and the top rail. Around the stern they are made from shaped wood blocks and along the forecastle they are iron panels. The sections at the forecastle deck are split to allow the catheads to fit through and the toprails run over them to meet the Knights head.
A feature of the upper structure is the decorative panelling on the inboard side.
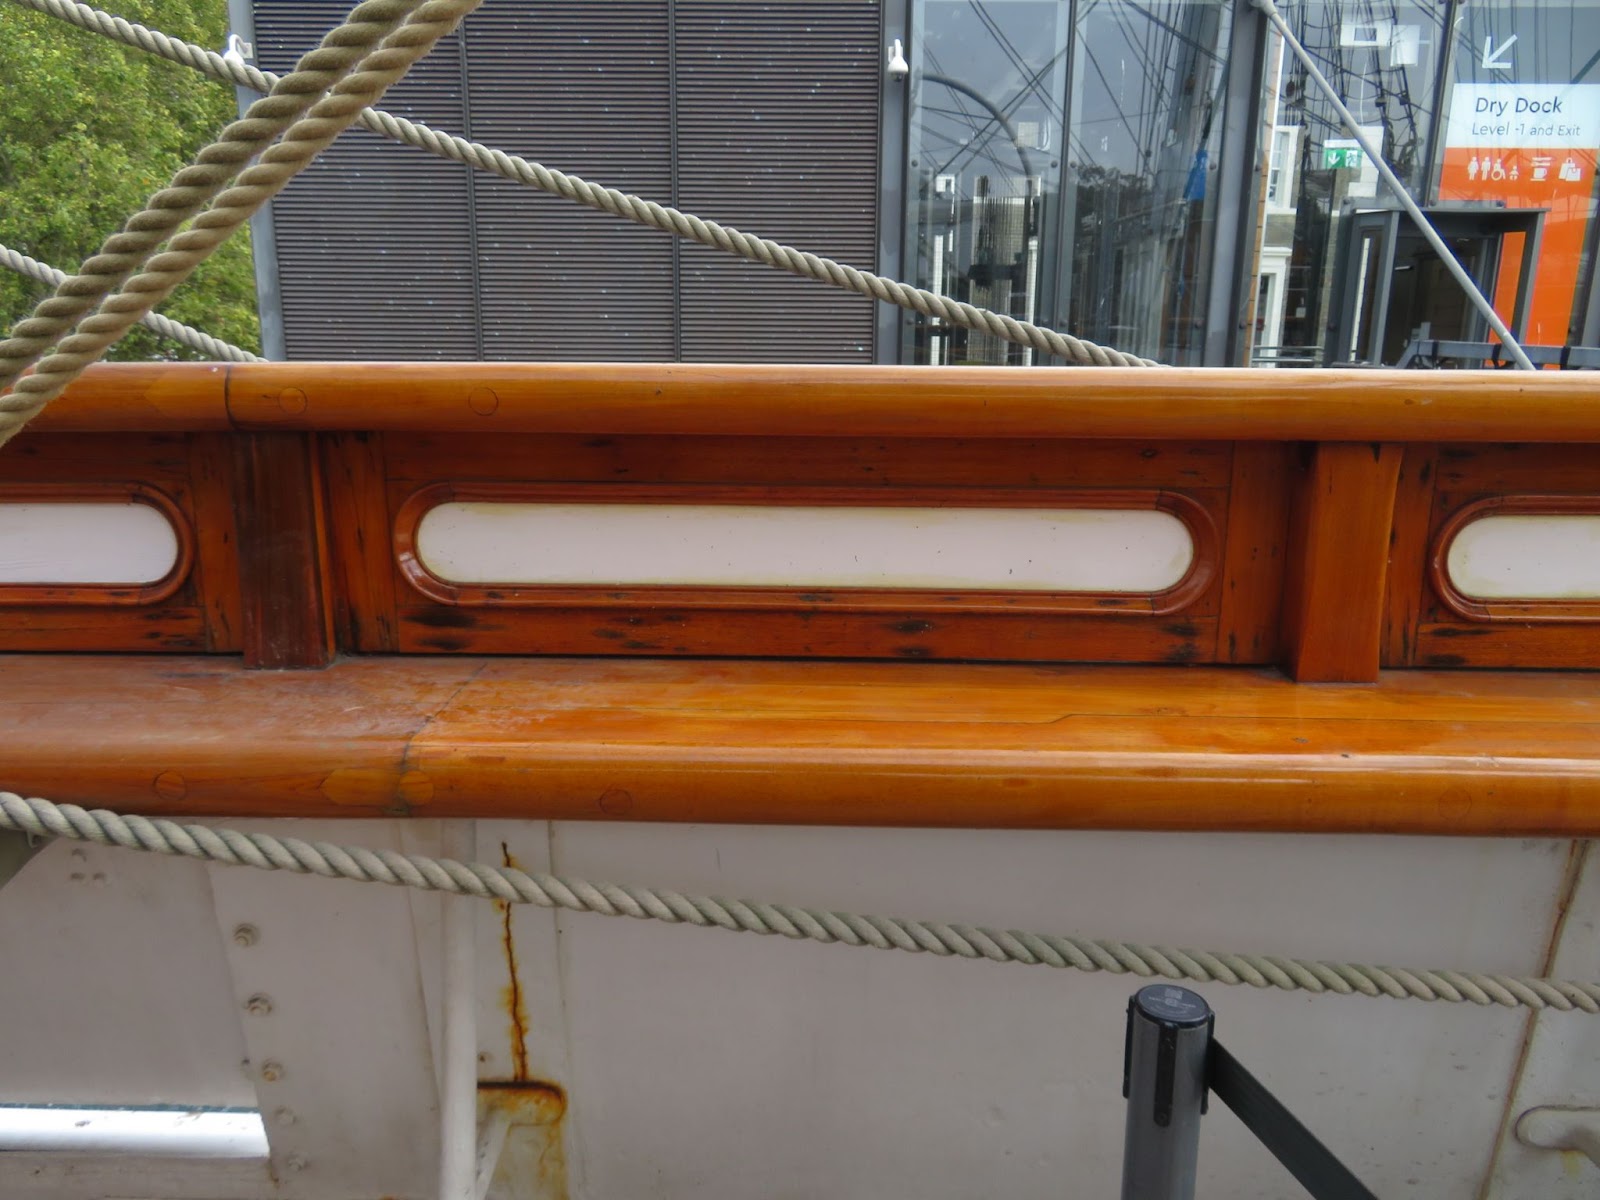
The Inner Decoration on the Upper Bulwarks.
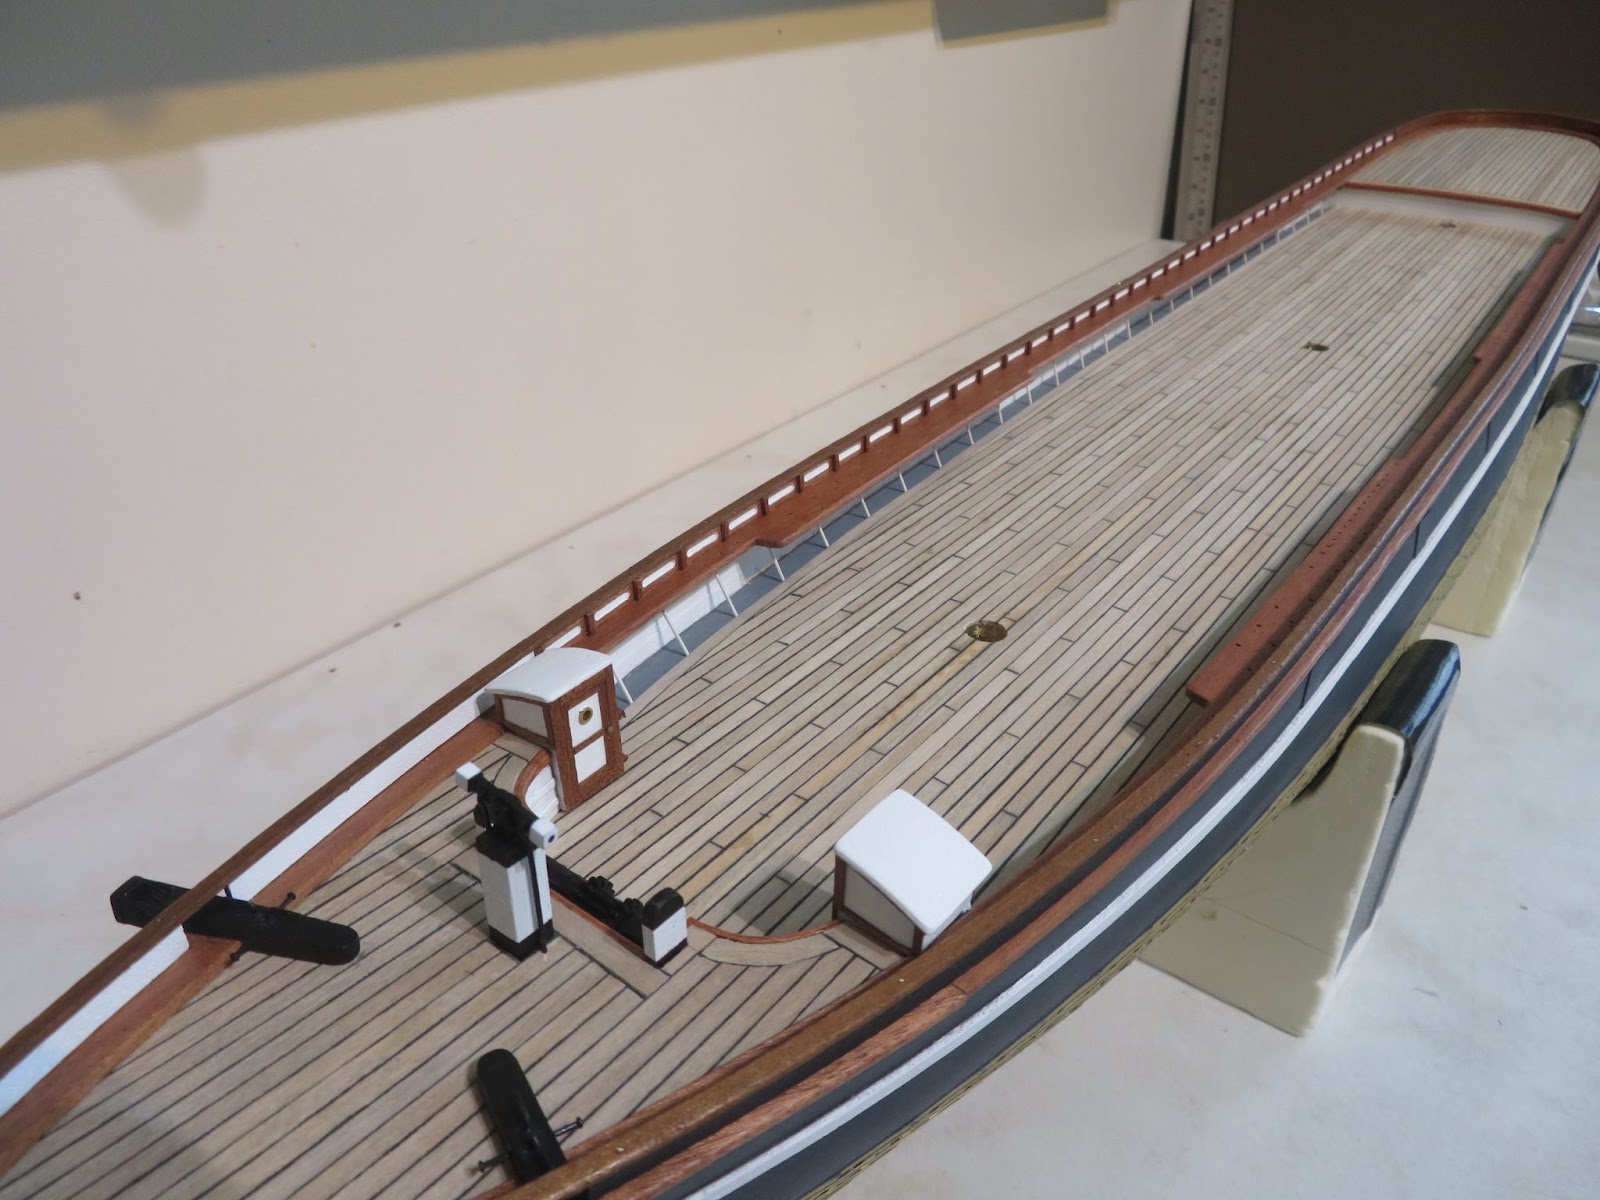
The inner white panel is the painted wood and the decorative moulding is set between the risers. The decorated panelling starts at the heads and runs the length of the main deck and along the straight section of the poop deck but is not continued around the stern. The inner bulwarks are painted white on the forecastle deck and are varnished wood around the stern. There are 40 panelled sections per side. The top rail is positioned so that it rests on the risers on the inboard side with only a small overhang outboard.
The top bulwarks are about ⅓ the height of the lower which works out at 4.8mm high on my model. The Billings instructions suggest using a 7x1.7mm hull strip for the top rail which is way too wide for the scale so I went for 5x1.7mm sapele strips for the upper bulwarks, 3 x1.5mm strips for the top rails and pieces of 1.5 x 1.5mm strip for the risers. To give me the 40 panels the spacing worked out at 15mm with (approx.)12 x 2mm for the white panel decor.
Because the white panels are a feature that will be very visible on the model I tried to make them as best that I could. After a few trial attempts to paint them onto some scrap strip I was not very happy with how they came out. Masking and hand painting was a waste of time because the paint tended to creep along the grain and under the masking and it was difficult to paint all the panels identically. Using an airbrush wasn’t much better so I tried painting some 2mm strip sections (rather like I did the decoration on the deckhouses) and gluing them on but it was a bit messy and I didn’t like the result so I abandoned that method as well. I had some 2mm BECC white gloss lining so I next tried that, the lining gives nice crisp edges and can be precisely cut and positioned however, I could not cut the semi-circular ends (a straight cut looked perfectly fine) and I was going to go with the lining but since I had just been playing with the MF70 to make the catheads I tried using it to mill out the panels. I used a 5mm wide C channel piece to act as a jig so that I could centre the strip and then cut out the panel to a depth of 0.5mm using a 2mm end mill, lift the cutter and then move on to the next cut (Note: the strip is only held in the channel lightly so remember to clip the end with some scrap to stop it moving - lesson learnt!). When I reached the end of the bed travel it was then very easy to wind it back and slide the strip along the channel and repeat.
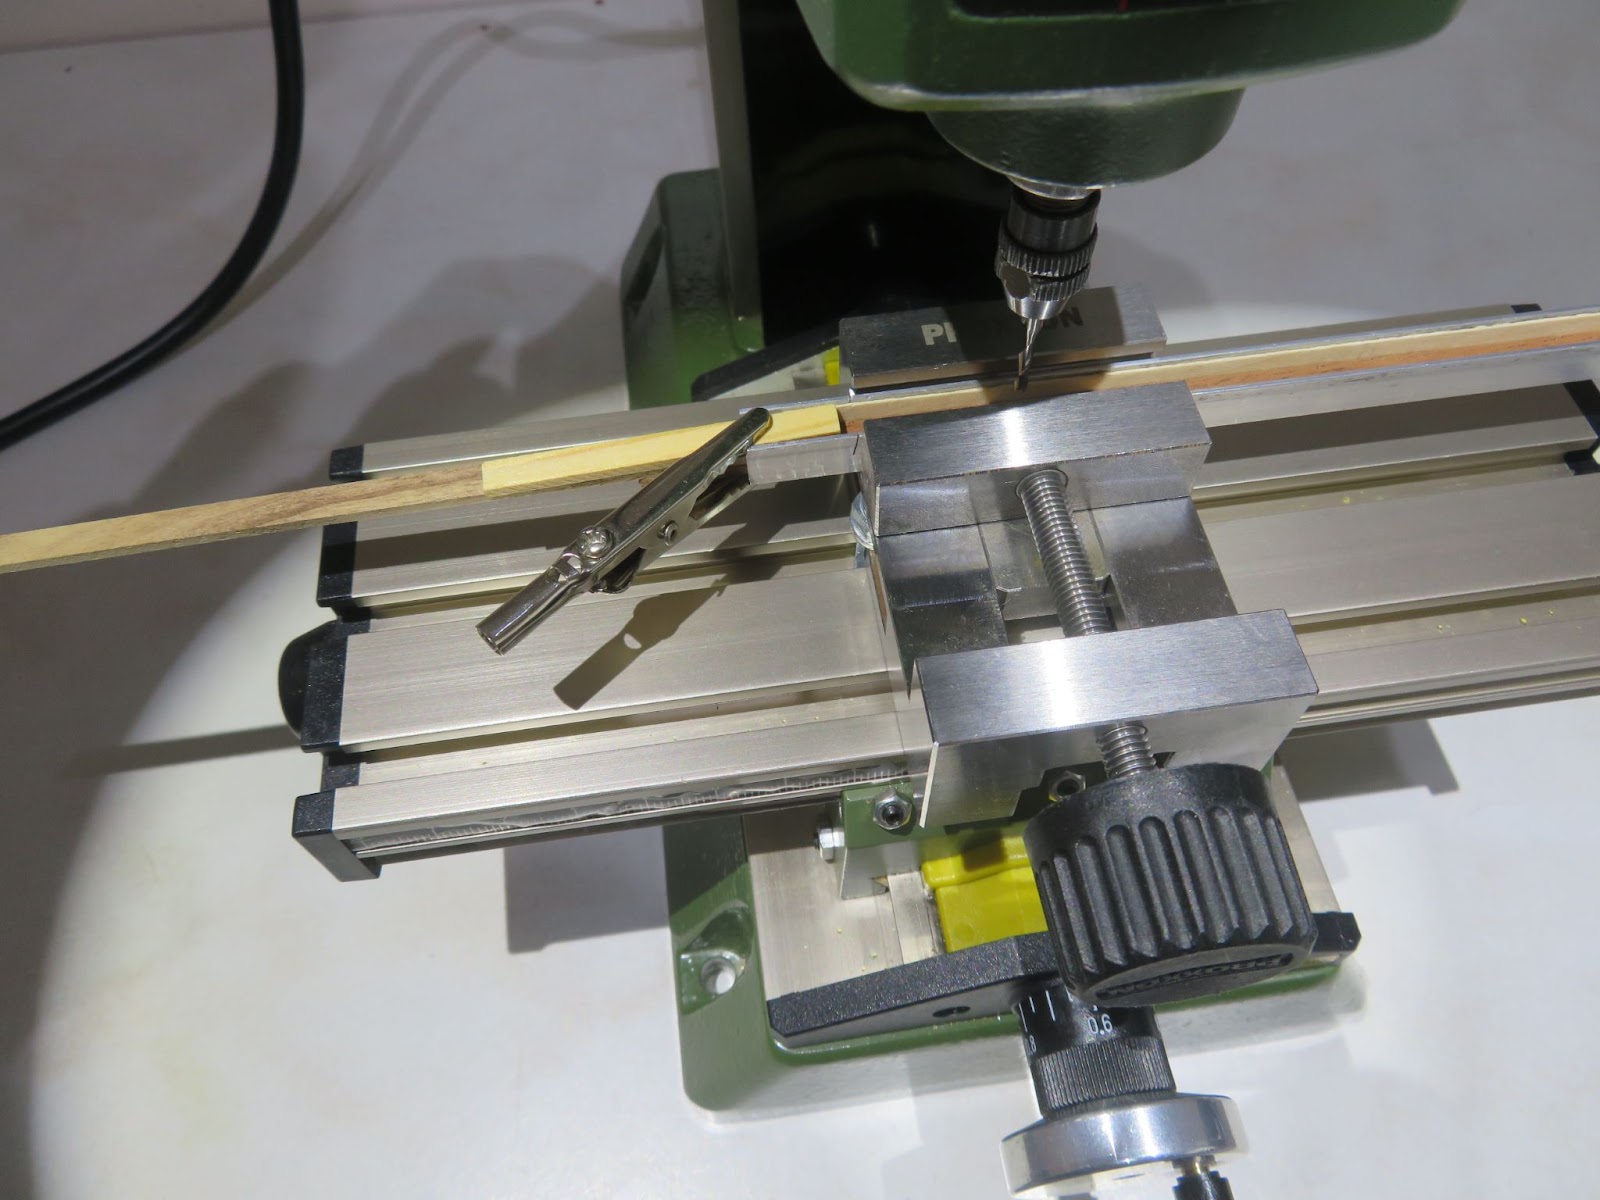
It didn’t take too long to cut out all 80 panels and I was able to make them all identical in size and spacing. It was then very easy to flood the trench with gloss white using a paint pen. I was very pleased with how the panelling came out and it was definitely worth the extra time to try out a few methods.
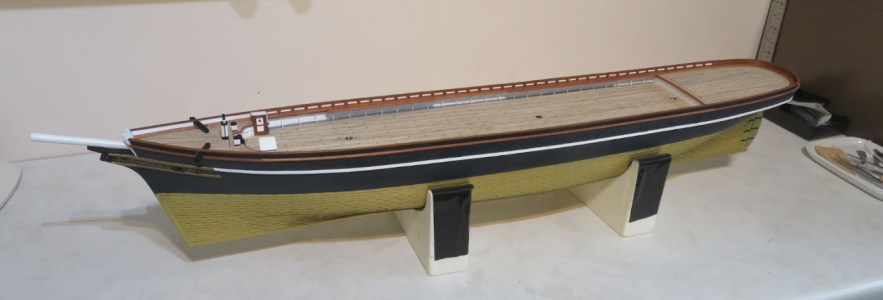
I steamed a separate piece of strip to go neatly around the stern so that the ends joined the two side strips along the poop deck and then painted the outer in semi-gloss black and glued the riser pieces on. I trimmed in the two short pieces for the forecastle deck allowing for the camber of the deck and painted the outer black and inner gloss white. I attached the bulwarks using some white glue and brass wire to pin them into position
The top rails were not as straightforward as I had hoped. I started with some 3mm sapele strips but they had a tendency to split along the grain as I was bending them and I certainly could not steam a piece of the sapele around the stern without splitting the wood. Fortunately I ordered more than one type of wood in anticipation that I was going to have problems and decided to go with some walnut for the long lengths and some flexible beech strip to go around the stern. The only issue was matching the colour to the main rails so I mixed some different wood stains and found cherry wood/mahogany stain at 4:1 was close enough. Scale is always a problem and even 3mm width is too wide for the top rails so I reduced them slightly by rounding the edges with a shaper to 2.5mm stained them and then pinned and glued them onto the bulwarks. Once all the glue had cured I gave the main rails and the top rails a coat of semi-clear.
Next: I should probably have fitted the portholes earlier so they are next on the list. I also need to do the gammoning of the bowsprit and attach any details to the beak because I will need to make and fit the upper decor and name plates and they will be in the way if I do them first.
The new wood strips arrived after a long wait (badly damaged package but fortunately the strips were OK -
 UPS!) so I could get to work on the uppers.
The upper bulwarks and top rails: These form a band around the ship and sit on top of the main rails ( See Image Part 10 ). Their construction is straightforward but a lot of measuring is needed to get everything correct.
On the ship, the upper bulwarks are fabricated from wooden boards that are attached to risers fixed between the main rails and the top rail. Around the stern they are made from shaped wood blocks and along the forecastle they are iron panels. The sections at the forecastle deck are split to allow the catheads to fit through and the toprails run over them to meet the Knights head.
A feature of the upper structure is the decorative panelling on the inboard side.
The Inner Decoration on the Upper Bulwarks.
The inner white panel is the painted wood and the decorative moulding is set between the risers. The decorated panelling starts at the heads and runs the length of the main deck and along the straight section of the poop deck but is not continued around the stern. The inner bulwarks are painted white on the forecastle deck and are varnished wood around the stern. There are 40 panelled sections per side. The top rail is positioned so that it rests on the risers on the inboard side with only a small overhang outboard.
The top bulwarks are about ⅓ the height of the lower which works out at 4.8mm high on my model. The Billings instructions suggest using a 7x1.7mm hull strip for the top rail which is way too wide for the scale so I went for 5x1.7mm sapele strips for the upper bulwarks, 3 x1.5mm strips for the top rails and pieces of 1.5 x 1.5mm strip for the risers. To give me the 40 panels the spacing worked out at 15mm with (approx.)12 x 2mm for the white panel decor.
Because the white panels are a feature that will be very visible on the model I tried to make them as best that I could. After a few trial attempts to paint them onto some scrap strip I was not very happy with how they came out. Masking and hand painting was a waste of time because the paint tended to creep along the grain and under the masking and it was difficult to paint all the panels identically. Using an airbrush wasn’t much better so I tried painting some 2mm strip sections (rather like I did the decoration on the deckhouses) and gluing them on but it was a bit messy and I didn’t like the result so I abandoned that method as well. I had some 2mm BECC white gloss lining so I next tried that, the lining gives nice crisp edges and can be precisely cut and positioned however, I could not cut the semi-circular ends (a straight cut looked perfectly fine) and I was going to go with the lining but since I had just been playing with the MF70 to make the catheads I tried using it to mill out the panels. I used a 5mm wide C channel piece to act as a jig so that I could centre the strip and then cut out the panel to a depth of 0.5mm using a 2mm end mill, lift the cutter and then move on to the next cut (Note: the strip is only held in the channel lightly so remember to clip the end with some scrap to stop it moving - lesson learnt!). When I reached the end of the bed travel it was then very easy to wind it back and slide the strip along the channel and repeat.
It didn’t take too long to cut out all 80 panels and I was able to make them all identical in size and spacing. It was then very easy to flood the trench with gloss white using a paint pen. I was very pleased with how the panelling came out and it was definitely worth the extra time to try out a few methods.
I steamed a separate piece of strip to go neatly around the stern so that the ends joined the two side strips along the poop deck and then painted the outer in semi-gloss black and glued the riser pieces on. I trimmed in the two short pieces for the forecastle deck allowing for the camber of the deck and painted the outer black and inner gloss white. I attached the bulwarks using some white glue and brass wire to pin them into position
The top rails were not as straightforward as I had hoped. I started with some 3mm sapele strips but they had a tendency to split along the grain as I was bending them and I certainly could not steam a piece of the sapele around the stern without splitting the wood. Fortunately I ordered more than one type of wood in anticipation that I was going to have problems and decided to go with some walnut for the long lengths and some flexible beech strip to go around the stern. The only issue was matching the colour to the main rails so I mixed some different wood stains and found cherry wood/mahogany stain at 4:1 was close enough. Scale is always a problem and even 3mm width is too wide for the top rails so I reduced them slightly by rounding the edges with a shaper to 2.5mm stained them and then pinned and glued them onto the bulwarks. Once all the glue had cured I gave the main rails and the top rails a coat of semi-clear.

Next: I should probably have fitted the portholes earlier so they are next on the list. I also need to do the gammoning of the bowsprit and attach any details to the beak because I will need to make and fit the upper decor and name plates and they will be in the way if I do them first.
- Joined
- Sep 23, 2021
- Messages
- 262
- Points
- 168

Part 21. Some Head Work - Portholes, Gammoning and Making the Name Plates
This section of work needed quite a bit of care! I am very glad that I took all the pictures when I visited the Cutty Sark because when I compared Longridge’s, Campbell’s and Billing’s plans, none of them agreed on the details around the bow or positions of the portholes (mainly because it depends on when the plans were made during the ship’s service). Everything was a little bit of a compromise and I had to make the best judgement based on the plans I have, my photographs and old photographs.
Portholes: Originally, there were 4 small portholes equally spaced on each side of the bow which were for lighting the crew's quarters. Additional portholes were added by the Portuguese amidships and a later set of portholes were fitted along the full length of the lower deck when she was a sail sail training ship from 1938 to allow the accommodation deck to be lit. All of the later portholes were removed when the ship was restored to its more original state. The first porthole is positioned just below the rear of the lower decoration panel and the last one is level with the back of the forecastle deck. A mistake I have seen on the plans and some models is that the portholes are positioned parallel to the keel line (looking at the photograph that appears to be the case), however, the deck rises to the bow so they actually follow the strake line which is more obvious when viewed from a different angle. Once I had the spacing and positions it was just a case of drilling the holes and gluing in the portholes
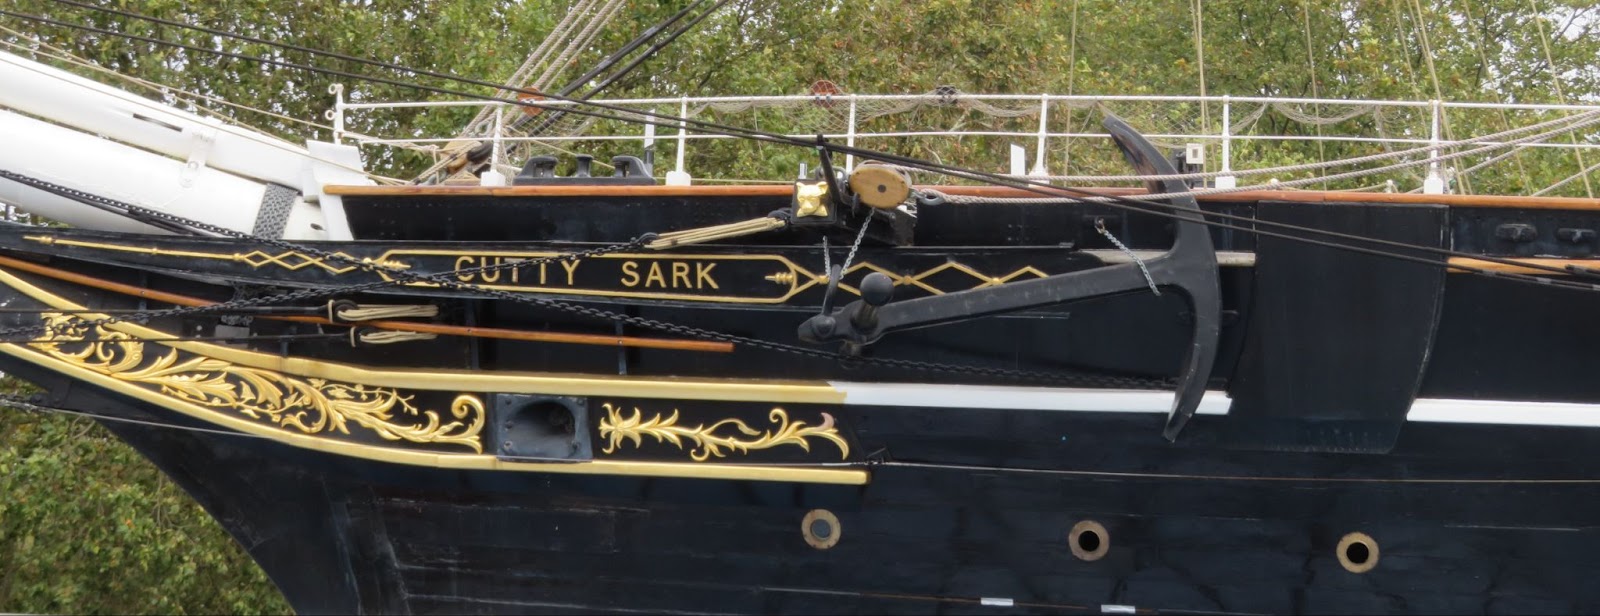
Positions of the portholes (4th out of shot), name board and anchor plates.

The Cutty Sark being restored at Greenwich in 1957 showing the portholes added during her sail training years (you can also see the portholes in the bow following the strake line).
Gammoning the Bowsprit: The bowsprit is gammoned (great name!) with chains however, when I was looking at my pictures, I spotted that there should also be a support block - none of the other plans show this. I don’t think it is a detail worth adding at this point in the build but it can be seen in the image together with the knees for the upper nameplate. It was straight forward to drill a slot and wrap some blackened fine chain around the bowsprit (about 6-7x wraps) and fix it with a drop of CA.
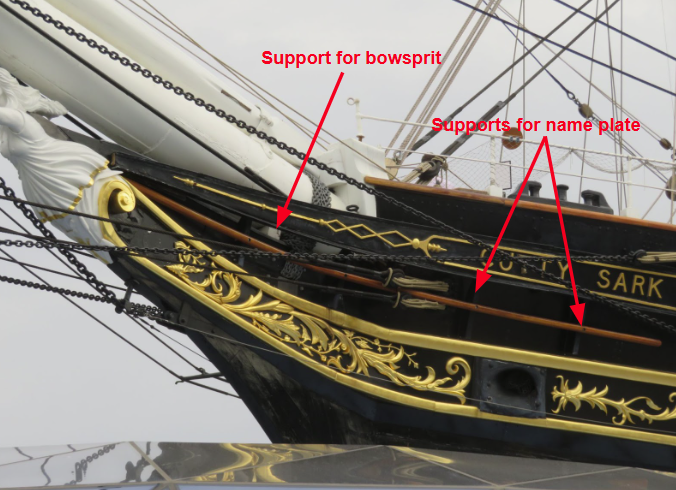
Nameplates: The name plates are placed just above the figurehead and run below the catheads. They are wedge shaped and set away from the hull on vertically aligned knees so that the plate faces are square-on. A decorative moulding is attached to the knees between the nameplate and the lower decoration (note: the knees are not evenly spaced). Campbell’s plans show a shorter nameplate only extending as far back as the catheads (which is the same design as Billings use) - they are decorated and the moulding is present. There was a period when the nameplate was simple with no decoration or moulding - which may have been from when the Portuguese owned her as the Ferreira. The decoration and name plates are probably correct as she is now as seen in the first image.
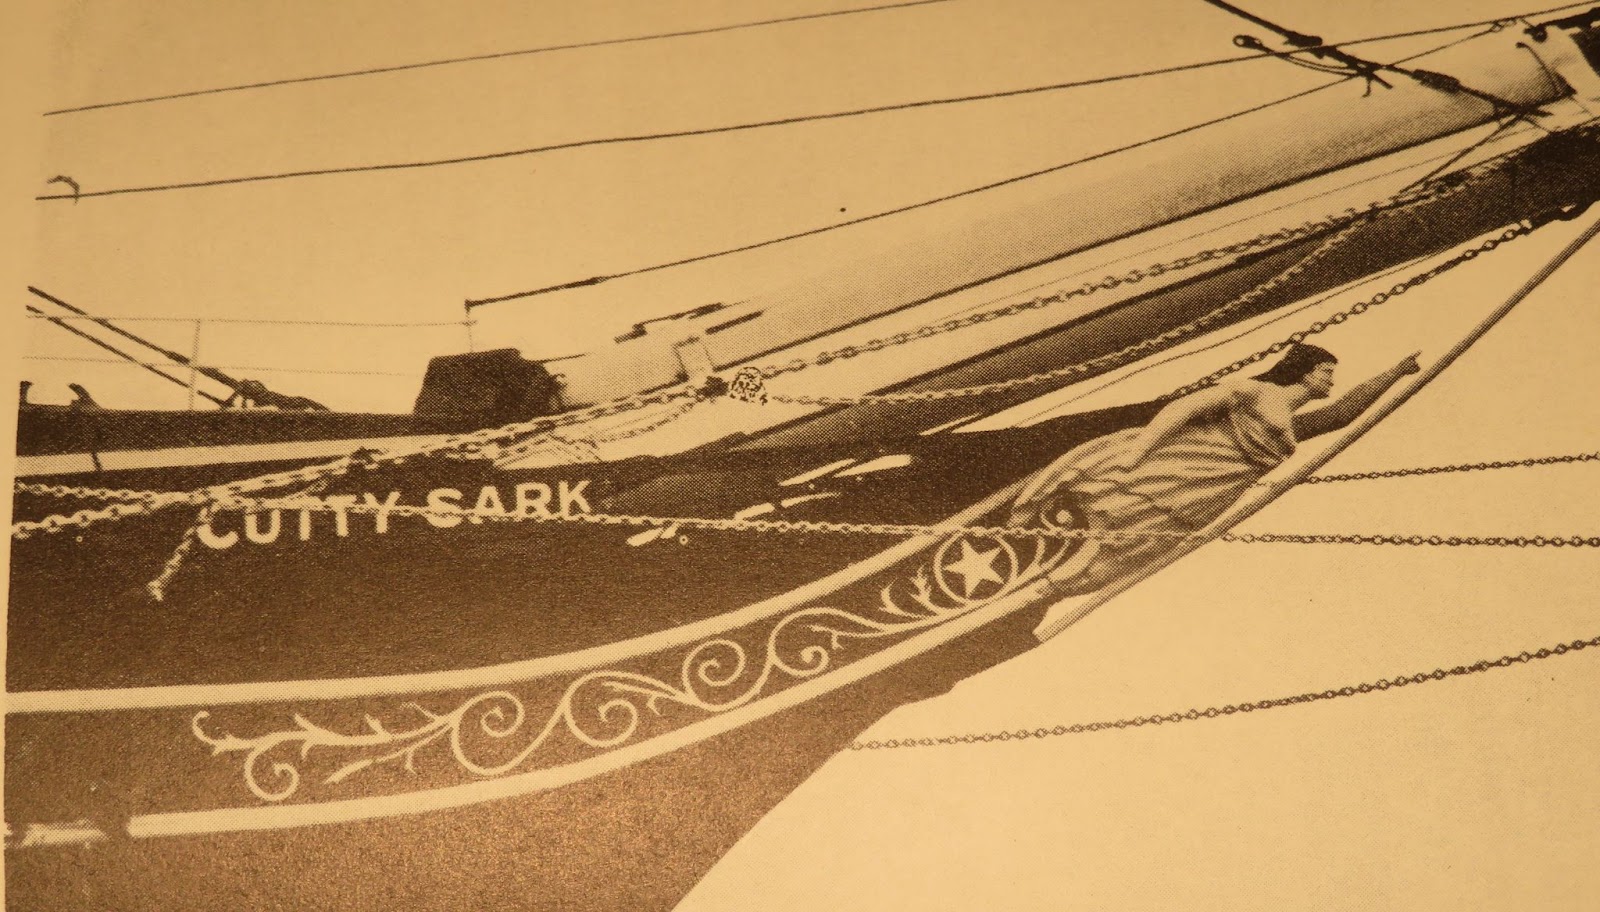
An early image (possibly 1922-36?) of the bow showing simpler scroll work on the lower decoration plate, the nameplate is further forward and there is no decoration or moulding fitted.
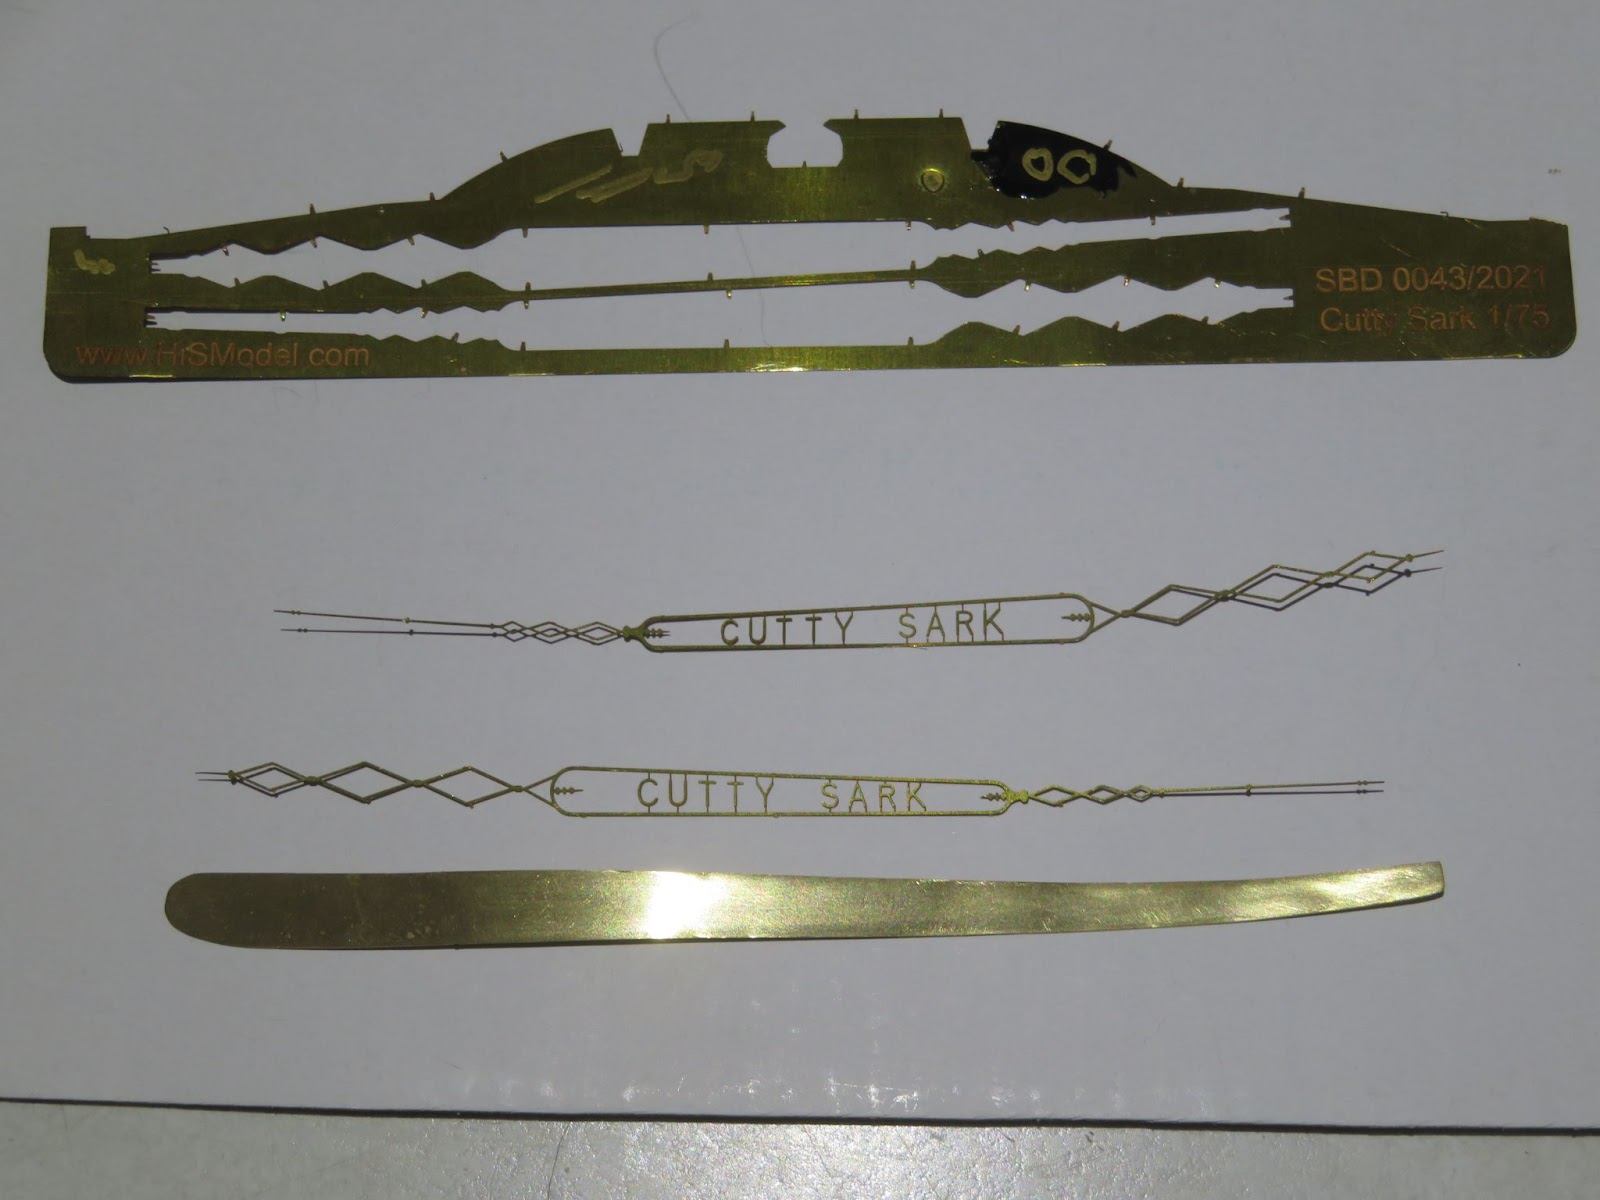
I made some cardboard templates using the outline of the etched pieces to get the length and width correct and then cut some 0.3mm brass sheet to the same size. The etched pieces are superfine and I am glad that I purchased them. They are very good quality and they are very accurately reproduced - HisModel - the only caveat is that they are very easily damaged so great care is needed when handling them.
The front of the forecastle on the model rises more than it should (see Part 16) so I had to compromise a little bit on the positioning but they are more-or-less in the right place. I was not sure how I would attach the plates securely because I could not make the different sized knees in order to have the correct stand-off from the hull. After some thought, I decided it would be easier to solder on some locating pins to the back of the plates to fix them to the hull.
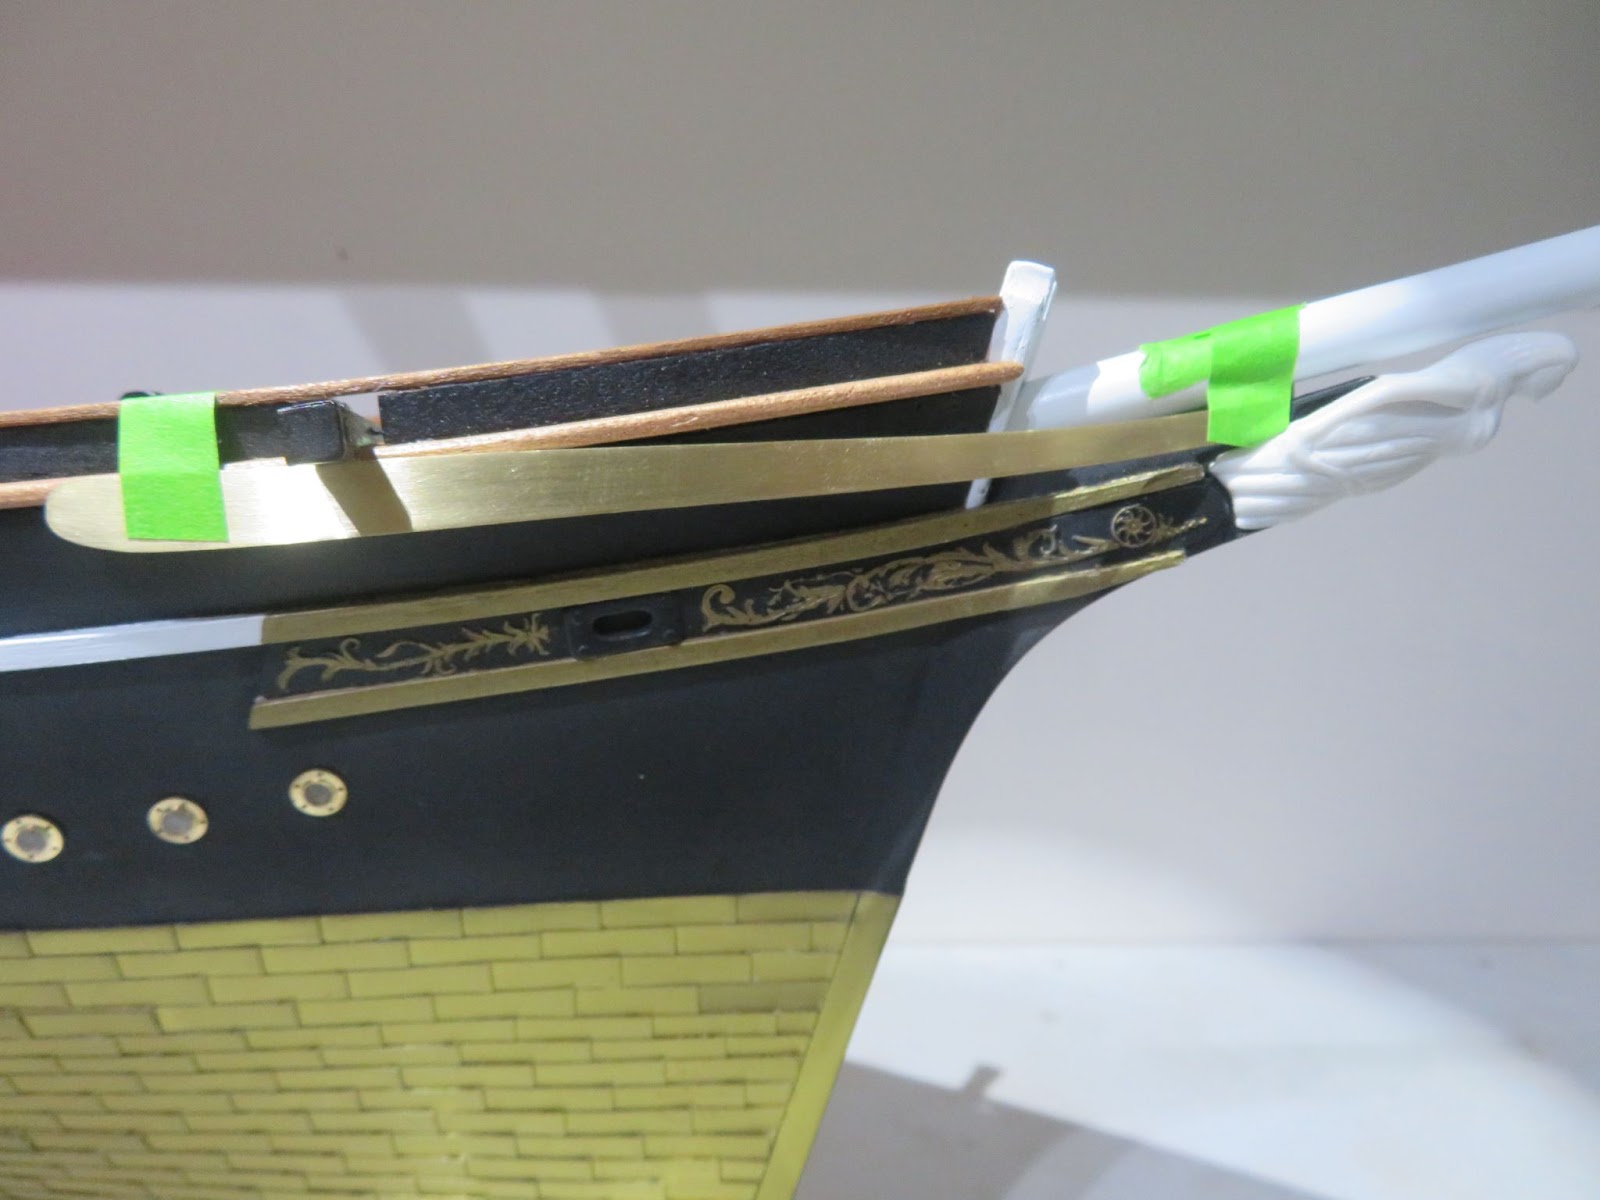
I attached the photo-etched pieces with some CA (an absolute pain to glue on!), painted them black and then carefully painted the raised decoration with gold paint and gave them a final coat of semi-clear. So that I could glue on the moulding between the decor pieces, I “guesstimated” the positions of the knees from the photographs and used some 1 mm brass to make some "faux" brackets that I could glue to the back of nameplates and the hull. Because the scale size was <1mm, wood was just too fragile to use for the moulding and making it thicker didn't look right so, I opted to use some brass rod and painted it.
The anchor “bash” plates: (I don’t know the proper name) are steel plates that are hung just below the top rail of the forecastle deck and rest on the rubbing strake. They are slightly curved in shape and their positions are just aft of the name plates with the rear of the plates roughly in line with the back edge of the third porthole. I made some cardboard templates and then used the 0.3mm brass sheet to make the plates. I bent the bottom edge so that the plate could be attached to the bottom of the rubbing strake. I painted them to match the hull and attached them.
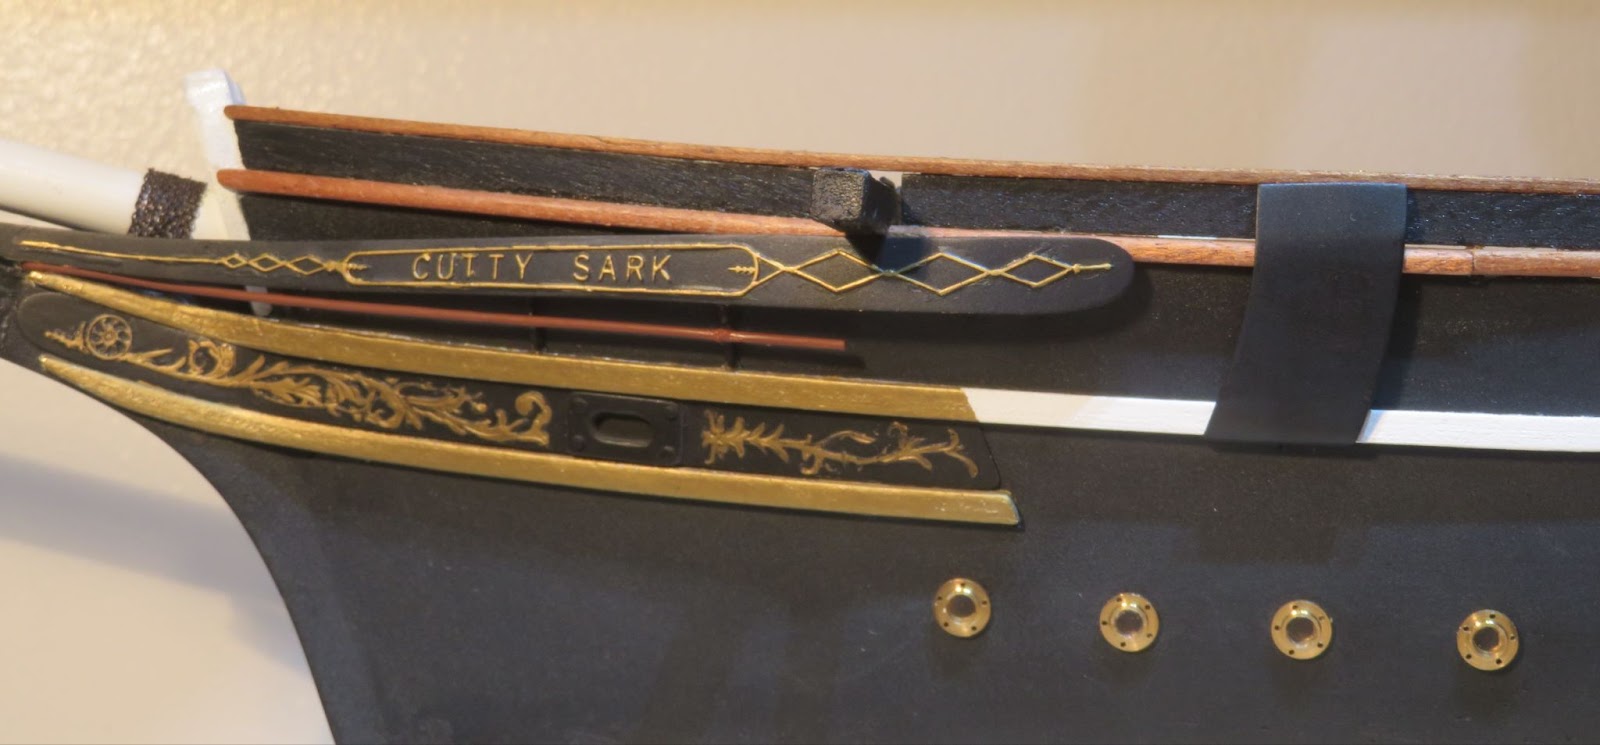
The final result - not a million miles away from the original when compared to the first image.
Next up: I will check through the plans and start preparing the rest of the deck fittings - warping drums, capstan, cargo hold covers etc. There is no specific order for these to be done so it’s just a case of being as methodical as I can and checking that I haven’t missed anything obvious.
This section of work needed quite a bit of care! I am very glad that I took all the pictures when I visited the Cutty Sark because when I compared Longridge’s, Campbell’s and Billing’s plans, none of them agreed on the details around the bow or positions of the portholes (mainly because it depends on when the plans were made during the ship’s service). Everything was a little bit of a compromise and I had to make the best judgement based on the plans I have, my photographs and old photographs.
Portholes: Originally, there were 4 small portholes equally spaced on each side of the bow which were for lighting the crew's quarters. Additional portholes were added by the Portuguese amidships and a later set of portholes were fitted along the full length of the lower deck when she was a sail sail training ship from 1938 to allow the accommodation deck to be lit. All of the later portholes were removed when the ship was restored to its more original state. The first porthole is positioned just below the rear of the lower decoration panel and the last one is level with the back of the forecastle deck. A mistake I have seen on the plans and some models is that the portholes are positioned parallel to the keel line (looking at the photograph that appears to be the case), however, the deck rises to the bow so they actually follow the strake line which is more obvious when viewed from a different angle. Once I had the spacing and positions it was just a case of drilling the holes and gluing in the portholes
Positions of the portholes (4th out of shot), name board and anchor plates.
The Cutty Sark being restored at Greenwich in 1957 showing the portholes added during her sail training years (you can also see the portholes in the bow following the strake line).
Gammoning the Bowsprit: The bowsprit is gammoned (great name!) with chains however, when I was looking at my pictures, I spotted that there should also be a support block - none of the other plans show this. I don’t think it is a detail worth adding at this point in the build but it can be seen in the image together with the knees for the upper nameplate. It was straight forward to drill a slot and wrap some blackened fine chain around the bowsprit (about 6-7x wraps) and fix it with a drop of CA.
Nameplates: The name plates are placed just above the figurehead and run below the catheads. They are wedge shaped and set away from the hull on vertically aligned knees so that the plate faces are square-on. A decorative moulding is attached to the knees between the nameplate and the lower decoration (note: the knees are not evenly spaced). Campbell’s plans show a shorter nameplate only extending as far back as the catheads (which is the same design as Billings use) - they are decorated and the moulding is present. There was a period when the nameplate was simple with no decoration or moulding - which may have been from when the Portuguese owned her as the Ferreira. The decoration and name plates are probably correct as she is now as seen in the first image.
An early image (possibly 1922-36?) of the bow showing simpler scroll work on the lower decoration plate, the nameplate is further forward and there is no decoration or moulding fitted.
I made some cardboard templates using the outline of the etched pieces to get the length and width correct and then cut some 0.3mm brass sheet to the same size. The etched pieces are superfine and I am glad that I purchased them. They are very good quality and they are very accurately reproduced -
 HisModel - the only caveat is that they are very easily damaged so great care is needed when handling them.
The front of the forecastle on the model rises more than it should (see Part 16) so I had to compromise a little bit on the positioning but they are more-or-less in the right place. I was not sure how I would attach the plates securely because I could not make the different sized knees in order to have the correct stand-off from the hull. After some thought, I decided it would be easier to solder on some locating pins to the back of the plates to fix them to the hull.
I attached the photo-etched pieces with some CA (an absolute pain to glue on!), painted them black and then carefully painted the raised decoration with gold paint and gave them a final coat of semi-clear. So that I could glue on the moulding between the decor pieces, I “guesstimated” the positions of the knees from the photographs and used some 1 mm brass to make some "faux" brackets that I could glue to the back of nameplates and the hull. Because the scale size was <1mm, wood was just too fragile to use for the moulding and making it thicker didn't look right so, I opted to use some brass rod and painted it.
The anchor “bash” plates: (I don’t know the proper name) are steel plates that are hung just below the top rail of the forecastle deck and rest on the rubbing strake. They are slightly curved in shape and their positions are just aft of the name plates with the rear of the plates roughly in line with the back edge of the third porthole. I made some cardboard templates and then used the 0.3mm brass sheet to make the plates. I bent the bottom edge so that the plate could be attached to the bottom of the rubbing strake. I painted them to match the hull and attached them.
The final result - not a million miles away from the original when compared to the first image.
Next up: I will check through the plans and start preparing the rest of the deck fittings - warping drums, capstan, cargo hold covers etc. There is no specific order for these to be done so it’s just a case of being as methodical as I can and checking that I haven’t missed anything obvious.
Excellent result with this detail, I would say, it is the first time that I see someone acchiving this result!Part 20: Upper Bulwarks and Top Rails
The new wood strips arrived after a long wait (badly damaged package but fortunately the strips were OK -UPS!) so I could get to work on the uppers.
The upper bulwarks and top rails: These form a band around the ship and sit on top of the main rails ( See Image Part 10 ). Their construction is straightforward but a lot of measuring is needed to get everything correct.
On the ship, the upper bulwarks are fabricated from wooden boards that are attached to risers fixed between the main rails and the top rail. Around the stern they are made from shaped wood blocks and along the forecastle they are iron panels. The sections at the forecastle deck are split to allow the catheads to fit through and the toprails run over them to meet the Knights head.
A feature of the upper structure is the decorative panelling on the inboard side.

The Inner Decoration on the Upper Bulwarks.
The inner white panel is the painted wood and the decorative moulding is set between the risers. The decorated panelling starts at the heads and runs the length of the main deck and along the straight section of the poop deck but is not continued around the stern. The inner bulwarks are painted white on the forecastle deck and are varnished wood around the stern. There are 40 panelled sections per side. The top rail is positioned so that it rests on the risers on the inboard side with only a small overhang outboard.
The top bulwarks are about ⅓ the height of the lower which works out at 4.8mm high on my model. The Billings instructions suggest using a 7x1.7mm hull strip for the top rail which is way too wide for the scale so I went for 5x1.7mm sapele strips for the upper bulwarks, 3 x1.5mm strips for the top rails and pieces of 1.5 x 1.5mm strip for the risers. To give me the 40 panels the spacing worked out at 15mm with (approx.)12 x 2mm for the white panel decor.
Because the white panels are a feature that will be very visible on the model I tried to make them as best that I could. After a few trial attempts to paint them onto some scrap strip I was not very happy with how they came out. Masking and hand painting was a waste of time because the paint tended to creep along the grain and under the masking and it was difficult to paint all the panels identically. Using an airbrush wasn’t much better so I tried painting some 2mm strip sections (rather like I did the decoration on the deckhouses) and gluing them on but it was a bit messy and I didn’t like the result so I abandoned that method as well. I had some 2mm BECC white gloss lining so I next tried that, the lining gives nice crisp edges and can be precisely cut and positioned however, I could not cut the semi-circular ends (a straight cut looked perfectly fine) and I was going to go with the lining but since I had just been playing with the MF70 to make the catheads I tried using it to mill out the panels. I used a 5mm wide C channel piece to act as a jig so that I could centre the strip and then cut out the panel to a depth of 0.5mm using a 2mm end mill, lift the cutter and then move on to the next cut (Note: the strip is only held in the channel lightly so remember to clip the end with some scrap to stop it moving - lesson learnt!). When I reached the end of the bed travel it was then very easy to wind it back and slide the strip along the channel and repeat.

It didn’t take too long to cut out all 80 panels and I was able to make them all identical in size and spacing. It was then very easy to flood the trench with gloss white using a paint pen. I was very pleased with how the panelling came out and it was definitely worth the extra time to try out a few methods.
I steamed a separate piece of strip to go neatly around the stern so that the ends joined the two side strips along the poop deck and then painted the outer in semi-gloss black and glued the riser pieces on. I trimmed in the two short pieces for the forecastle deck allowing for the camber of the deck and painted the outer black and inner gloss white. I attached the bulwarks using some white glue and brass wire to pin them into position
The top rails were not as straightforward as I had hoped. I started with some 3mm sapele strips but they had a tendency to split along the grain as I was bending them and I certainly could not steam a piece of the sapele around the stern without splitting the wood. Fortunately I ordered more than one type of wood in anticipation that I was going to have problems and decided to go with some walnut for the long lengths and some flexible beech strip to go around the stern. The only issue was matching the colour to the main rails so I mixed some different wood stains and found cherry wood/mahogany stain at 4:1 was close enough. Scale is always a problem and even 3mm width is too wide for the top rails so I reduced them slightly by rounding the edges with a shaper to 2.5mm stained them and then pinned and glued them onto the bulwarks. Once all the glue had cured I gave the main rails and the top rails a coat of semi-clear.
View attachment 482117

Next: I should probably have fitted the portholes earlier so they are next on the list. I also need to do the gammoning of the bowsprit and attach any details to the beak because I will need to make and fit the upper decor and name plates and they will be in the way if I do them first.
- Joined
- Sep 23, 2021
- Messages
- 262
- Points
- 168

Part 22. Some Deck Fittings
I didn't have much time to work on the model this last week so I decided to prep up some of the bits and pieces over the week-end ready for fitting out the decks. Being a cargo vessel the decks are fairly spartan and functional so there are not too many fixtures and fittings to deal with.
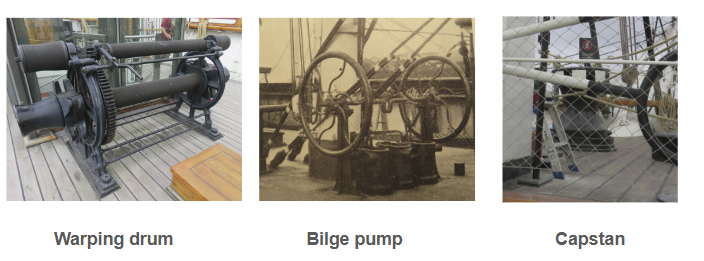
Warping Drums, Bilge Pump and Capstan: The main large deck fixtures are the warping drums (2x), the bilge pump and the main capstan. These are included in the kit and are fully brass so it was just a case of cleaning them up and painting them (my brass black didn’t look right for some reason?). The capstan came with the capstan bars glued in but normally they would be stored and since I installed a set on the rack attached to the starboard head I decided to remove them (the white paint around the capstan crown is not a feature that should be on it). I didn’t get a picture of the pump because it was covered due to restoration work but I found an old picture.
Stanchions, Bollards and Poop Deck Bucket Rail:
While I was about it I cleaned up and painted the stanchions and bollards. The bollards did not have any bases in the kit so I made some from some oak strip, attached the bollards and painted them.
Because I went with the cut-out forecastle deck ( See-Part 9 ) there is no heavy rail on columns and the deck is protected with railed two hole stanchions (x21). At the break of the poop deck there is a heavy rail supported on columns with fire buckets set between the column's. They were working on the rails when I was there but I found an image on the RMG website showing the rail, buckets and the columns with acorn finials. Cambell’s and Billing’s plans both show five columns and eight buckets (which was my choice) but the rail now has six columns and was probably a changed at some point in the ships history.
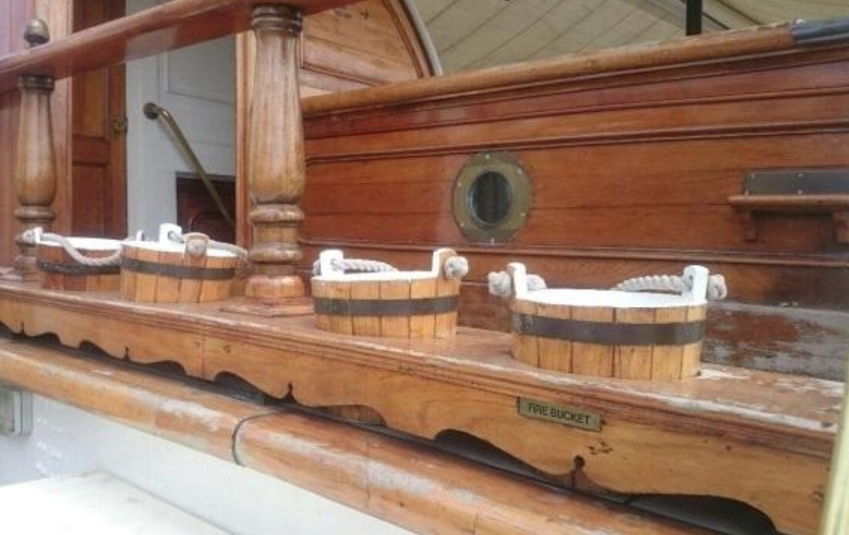
The Poop Deck rail with fire buckets (RMG website photo)
Around the stern there are two hole rail stanchions (x25) and on the sides of the monkey poop (where did they get the names from?) there should be single rail stanchions, x5 per side - (Note: Billing’s plans show two rail stanchions but that is wrong as can be seen in this old image taken by Captain Woodget).
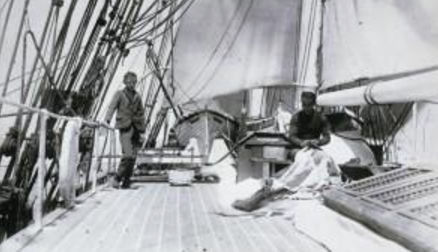
Top of the Monkey Poop (ca. 1885-1895)s - Note: single rail stanchions with the life buoys attached (one for each side).
There is no provision for the bucket rail in the kit so I made one from sapele using the MF70 mill (more practice!) and drilled some holes for the columns and buckets. I was going to make the buckets but because I needed some single hole stanchions for the monkey poop I also ordered some small buckets and stained them light oak and added some rope for the handles. There were some brass columns in the kit but I had some spare wooden ones which looked a closer match in shape so I used those instead and stained them to match. Since I didn’t need the brass columns, I cut a few up and made the finials from them, they are slightly larger than scale, but they’ll do! I soaked the lower part of the rail in some hot water so that I could give it a little bend to follow the deck camber and then fitted it to the poop deck and finished building the rail and gave it a coat of some semi-clear to finish it.
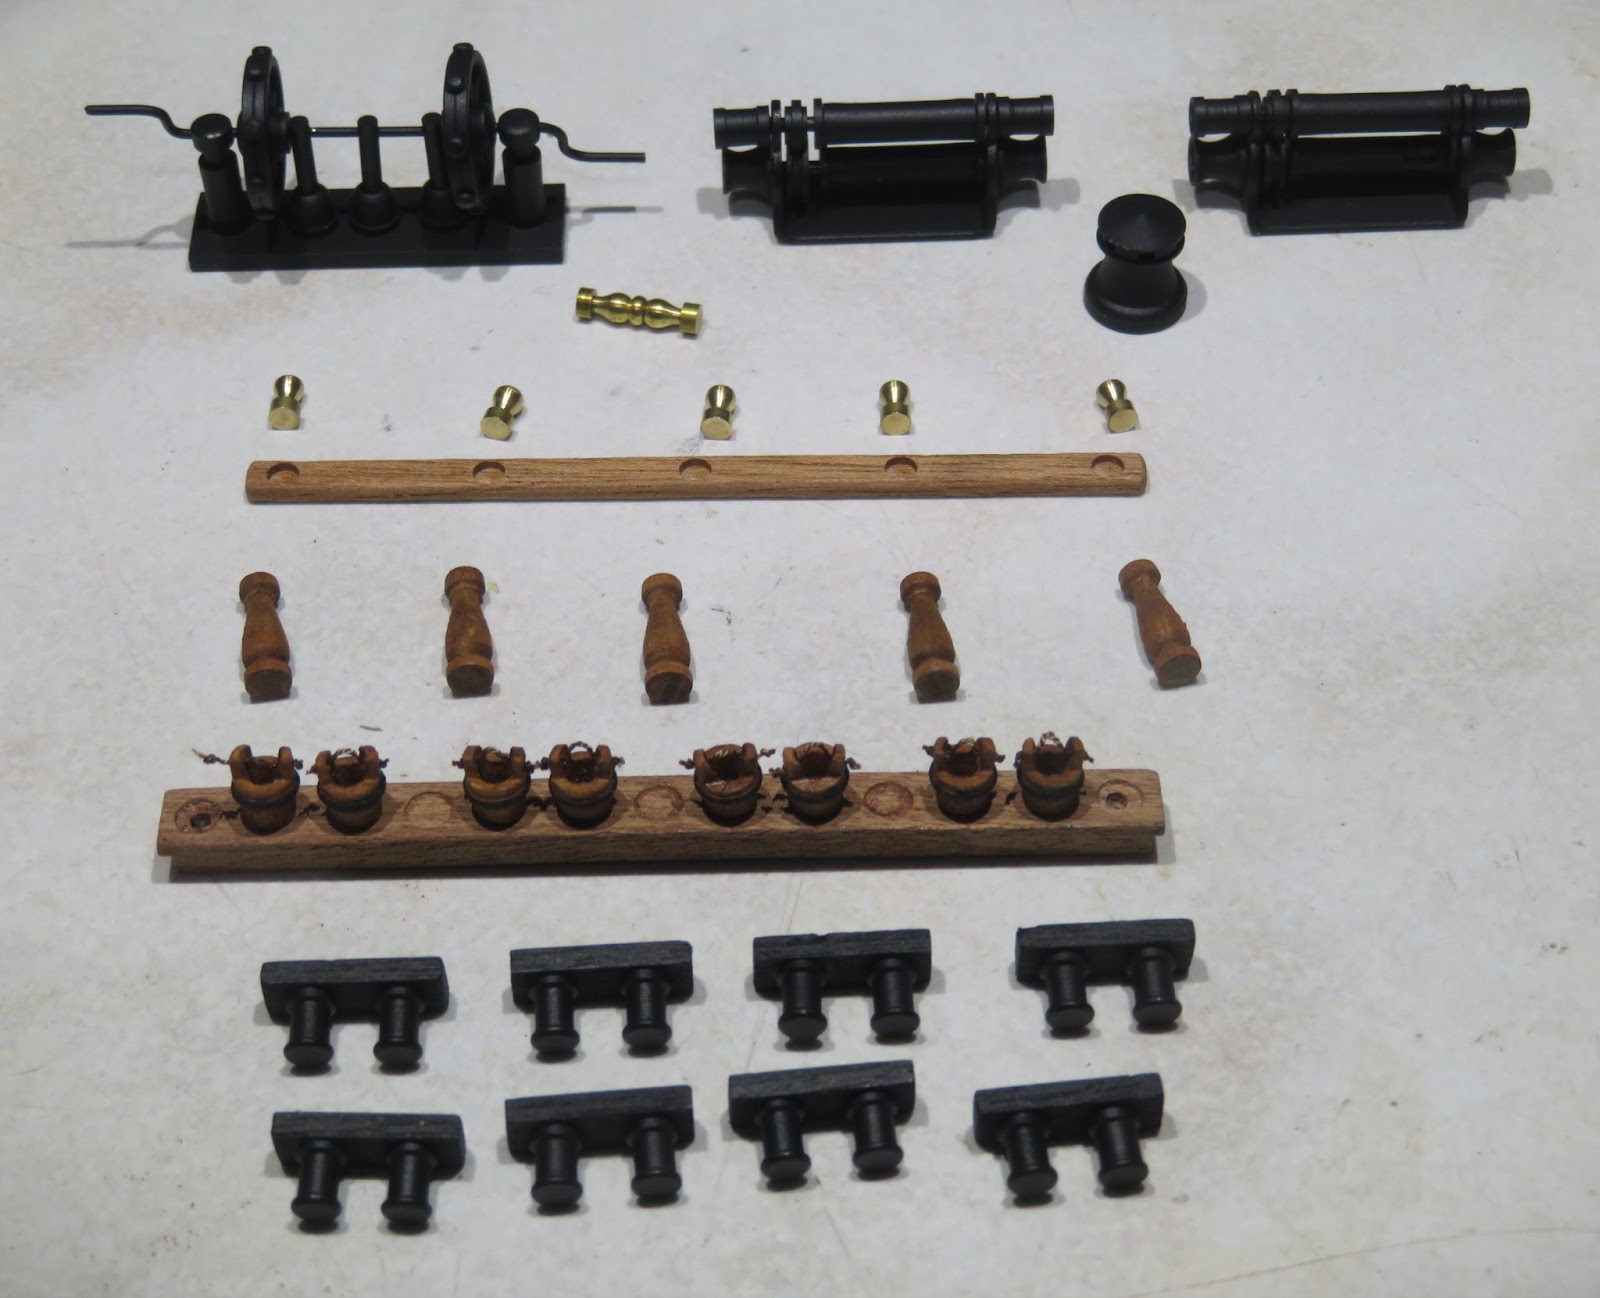
Deck parts ready for fitting out
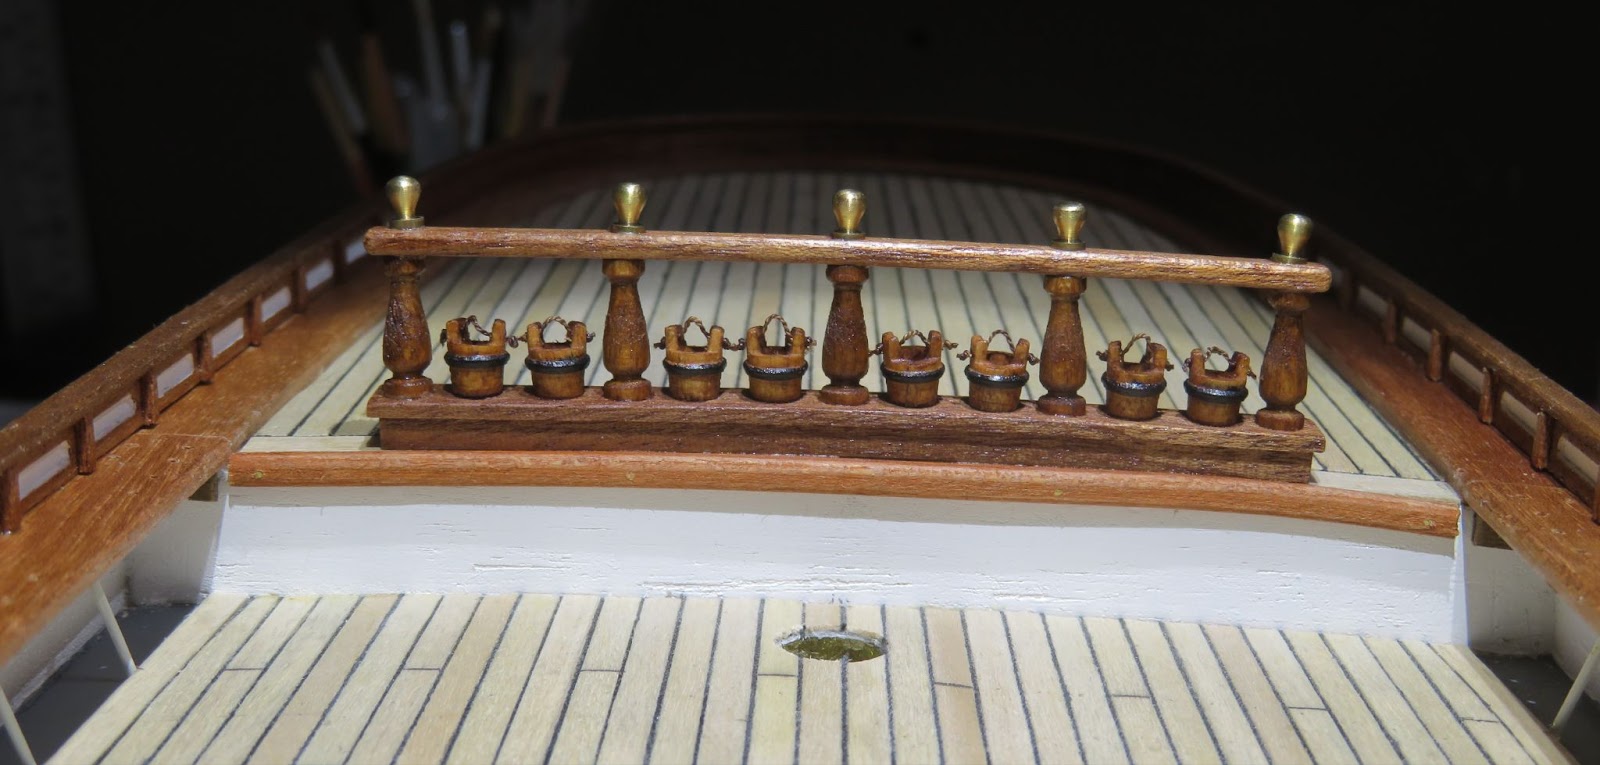
The bucket rail
Next up: I am getting ready to fit out the decks so I will need to sort out the cargo holds and covers.
I didn't have much time to work on the model this last week so I decided to prep up some of the bits and pieces over the week-end ready for fitting out the decks. Being a cargo vessel the decks are fairly spartan and functional so there are not too many fixtures and fittings to deal with.
Warping Drums, Bilge Pump and Capstan: The main large deck fixtures are the warping drums (2x), the bilge pump and the main capstan. These are included in the kit and are fully brass so it was just a case of cleaning them up and painting them (my brass black didn’t look right for some reason?). The capstan came with the capstan bars glued in but normally they would be stored and since I installed a set on the rack attached to the starboard head I decided to remove them (the white paint around the capstan crown is not a feature that should be on it). I didn’t get a picture of the pump because it was covered due to restoration work but I found an old picture.
Stanchions, Bollards and Poop Deck Bucket Rail:
While I was about it I cleaned up and painted the stanchions and bollards. The bollards did not have any bases in the kit so I made some from some oak strip, attached the bollards and painted them.
Because I went with the cut-out forecastle deck ( See-Part 9 ) there is no heavy rail on columns and the deck is protected with railed two hole stanchions (x21). At the break of the poop deck there is a heavy rail supported on columns with fire buckets set between the column's. They were working on the rails when I was there but I found an image on the RMG website showing the rail, buckets and the columns with acorn finials. Cambell’s and Billing’s plans both show five columns and eight buckets (which was my choice) but the rail now has six columns and was probably a changed at some point in the ships history.
The Poop Deck rail with fire buckets (RMG website photo)
Around the stern there are two hole rail stanchions (x25) and on the sides of the monkey poop (where did they get the names from?) there should be single rail stanchions, x5 per side - (Note: Billing’s plans show two rail stanchions but that is wrong as can be seen in this old image taken by Captain Woodget).
Top of the Monkey Poop (ca. 1885-1895)s - Note: single rail stanchions with the life buoys attached (one for each side).
There is no provision for the bucket rail in the kit so I made one from sapele using the MF70 mill (more practice!) and drilled some holes for the columns and buckets. I was going to make the buckets but because I needed some single hole stanchions for the monkey poop I also ordered some small buckets and stained them light oak and added some rope for the handles. There were some brass columns in the kit but I had some spare wooden ones which looked a closer match in shape so I used those instead and stained them to match. Since I didn’t need the brass columns, I cut a few up and made the finials from them, they are slightly larger than scale, but they’ll do! I soaked the lower part of the rail in some hot water so that I could give it a little bend to follow the deck camber and then fitted it to the poop deck and finished building the rail and gave it a coat of some semi-clear to finish it.
Deck parts ready for fitting out
The bucket rail
Next up: I am getting ready to fit out the decks so I will need to sort out the cargo holds and covers.
Nicely detailed parts, Dom. A steady progress.Part 22. Some Deck Fittings
I didn't have much time to work on the model this last week so I decided to prep up some of the bits and pieces over the week-end ready for fitting out the decks. Being a cargo vessel the decks are fairly spartan and functional so there are not too many fixtures and fittings to deal with.
Warping Drums, Bilge Pump and Capstan: The main large deck fixtures are the warping drums (2x), the bilge pump and the main capstan. These are included in the kit and are fully brass so it was just a case of cleaning them up and painting them (my brass black didn’t look right for some reason?). The capstan came with the capstan bars glued in but normally they would be stored and since I installed a set on the rack attached to the starboard head I decided to remove them (the white paint around the capstan crown is not a feature that should be on it). I didn’t get a picture of the pump because it was covered due to restoration work but I found an old picture.

Stanchions, Bollards and Poop Deck Bucket Rail:
While I was about it I cleaned up and painted the stanchions and bollards. The bollards did not have any bases in the kit so I made some from some oak strip, attached the bollards and painted them.
Because I went with the cut-out forecastle deck ( See-Part 9 ) there is no heavy rail on columns and the deck is protected with railed two hole stanchions (x21). At the break of the poop deck there is a heavy rail supported on columns with fire buckets set between the column's. They were working on the rails when I was there but I found an image on the RMG website showing the rail, buckets and the columns with acorn finials. Cambell’s and Billing’s plans both show five columns and eight buckets (which was my choice) but the rail now has six columns and was probably a changed at some point in the ships history.

The Poop Deck rail with fire buckets (RMG website photo)
Around the stern there are two hole rail stanchions (x25) and on the sides of the monkey poop (where did they get the names from?) there should be single rail stanchions, x5 per side - (Note: Billing’s plans show two rail stanchions but that is wrong as can be seen in this old image taken by Captain Woodget).

Top of the Monkey Poop (ca. 1885-1895)s - Note: single rail stanchions with the life buoys attached (one for each side).
There is no provision for the bucket rail in the kit so I made one from sapele using the MF70 mill (more practice!) and drilled some holes for the columns and buckets. I was going to make the buckets but because I needed some single hole stanchions for the monkey poop I also ordered some small buckets and stained them light oak and added some rope for the handles. There were some brass columns in the kit but I had some spare wooden ones which looked a closer match in shape so I used those instead and stained them to match. Since I didn’t need the brass columns, I cut a few up and made the finials from them, they are slightly larger than scale, but they’ll do! I soaked the lower part of the rail in some hot water so that I could give it a little bend to follow the deck camber and then fitted it to the poop deck and finished building the rail and gave it a coat of some semi-clear to finish it.

Deck parts ready for fitting out

The bucket rail
Next up: I am getting ready to fit out the decks so I will need to sort out the cargo holds and covers.
Regards, Peter
- Joined
- Sep 23, 2021
- Messages
- 262
- Points
- 168

Part 23: Cargo Hatchways and Covers, Poop Deck Cabin Detail
Cargo hatchways, coamings and covers: The first job needed to be done was to make the forward and main cargo hatchways. I have made the aft cargo/booby hatch (see Part 18) and only needed to work on the forward and main cargo hatches so this part was fairly straight forward. The hatchways should be slightly cambered (corresponding to the deck camber) but, at the scale of the model, it is not a detail worth worrying about!
I made the forward hold so that I can have the option to open it up for display and put some little tea chests in there. I opened up the hold space by carefully cutting away the deck covering and made the coaming. The scale height for the coaming from the deck is 6mm so it was straightforward to make the four sides from some 10 x 2 mm strip so that the inner part was below the deck level. I used the mill to make all the rebates (it is coming in quite useful after all!). The base of the coaming has a moulding around it so I used some thin strip for that. To keep with my painting scheme I painted the outer white with varnished wood for the moulding and the hatch covers.
For the covers, Campbell’s plans show the forward hatch as having sixteen covers laid in eight pairs across the hatchway with a central divider. At scale each would only be approx. 4 x 13mm so it would not be practical to make individual removable covers.
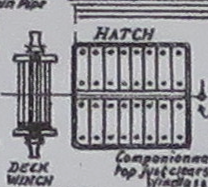
Cambell’s plans showing the 16 covers for the forward hold.
The simplest way to depict the hatch covers was to make a single cover piece from some solid wood and carefully cut grooves with a micro blade to divide it up into the sixteen sections (I did not bother with the central divider). I used a pencil to highlight the sections. Again the hatches are just too small to warrant making individual lifting rings so I opted to use some blackened brass nail heads to represent them (I’ll make some tea chests to put in the hold later!).
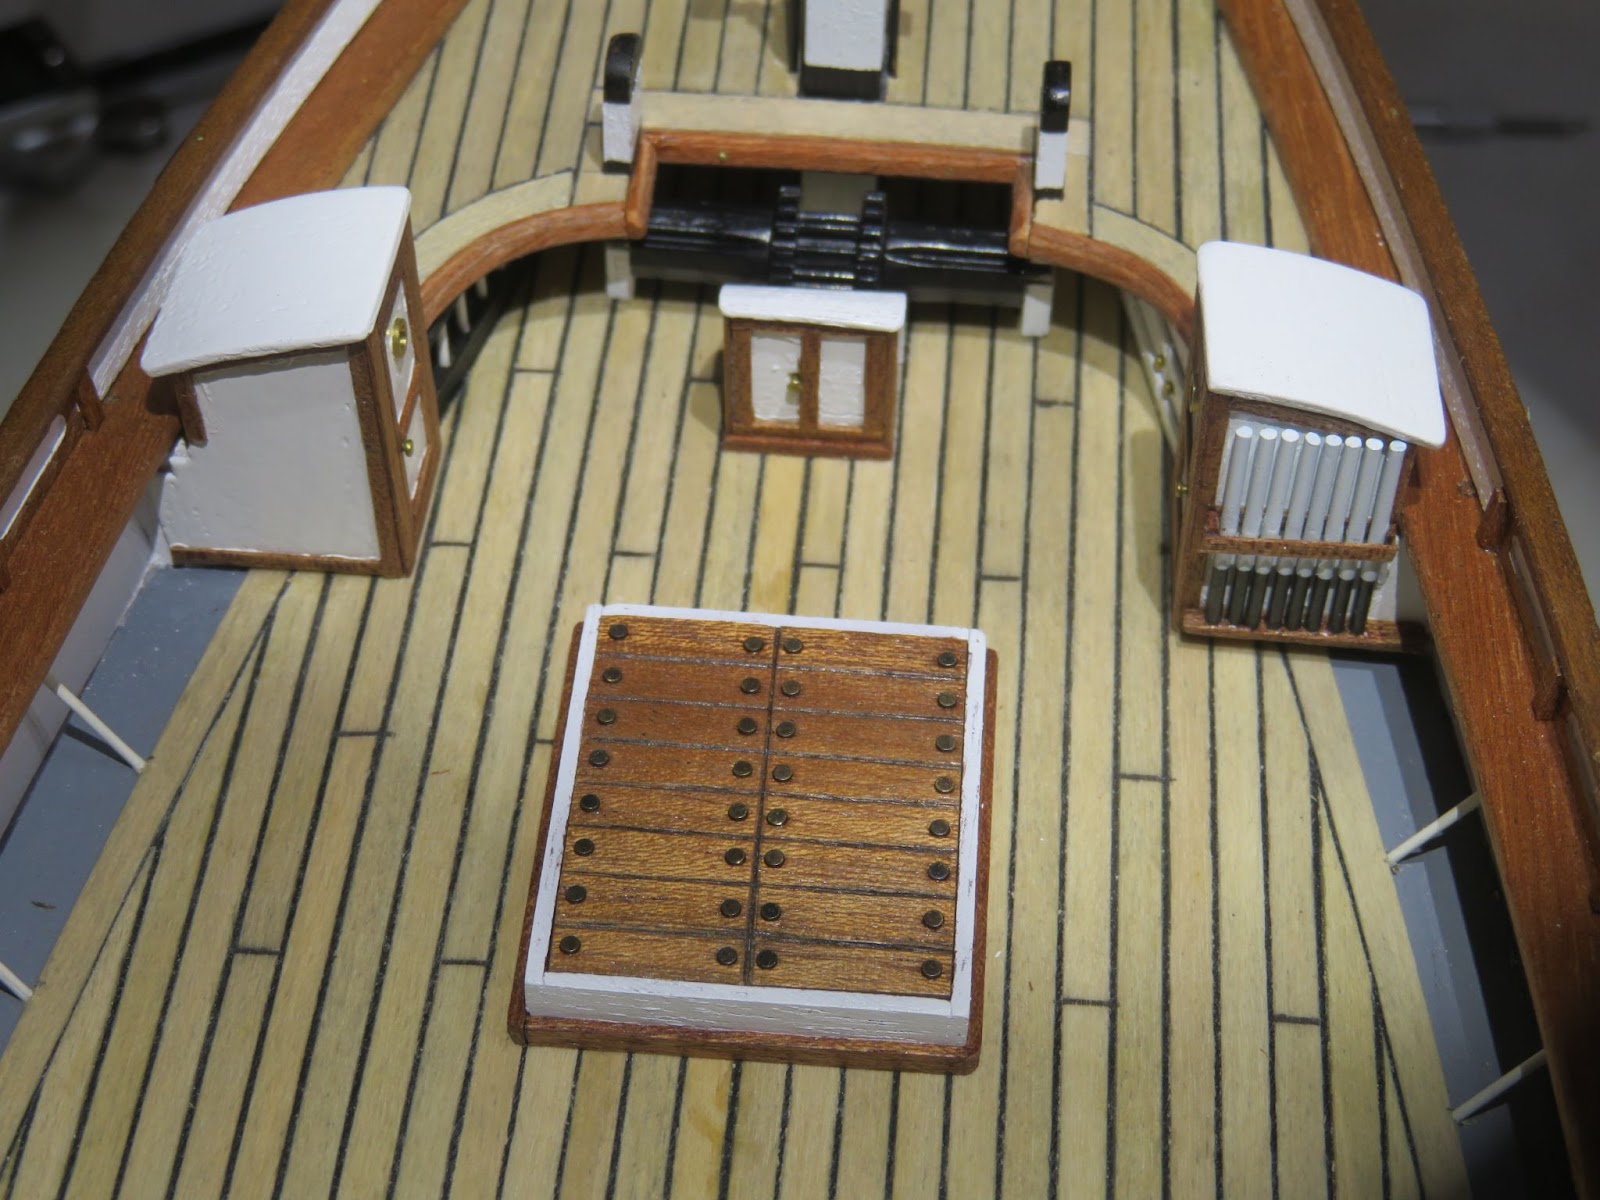
Forward hold hatchway.
I decided to cover the main cargo hold with a tarpaulin to show how it would be on the ship when loaded. This made life easy because it was just a case of making a solid piece to the correct size adding the moulding and painting the upper part white. In the 19th century the tarpaulins would have been tarred flax-canvas which would have been dark grey/black in colour so I used some thin poly-cotton material and stained it “dark grey” with some wood stain and coated it with some matt-lacquer. On the ship, the covers are held in place by iron bars sitting in right-angled cleats spaced around the coaming and then locked using wooden wedges. I used some blackened 0.5mm brass wire for the cleats and some 0.8mm brass rod to represent the bars (no wooden wedges, they would have been ridiculously fragile!).
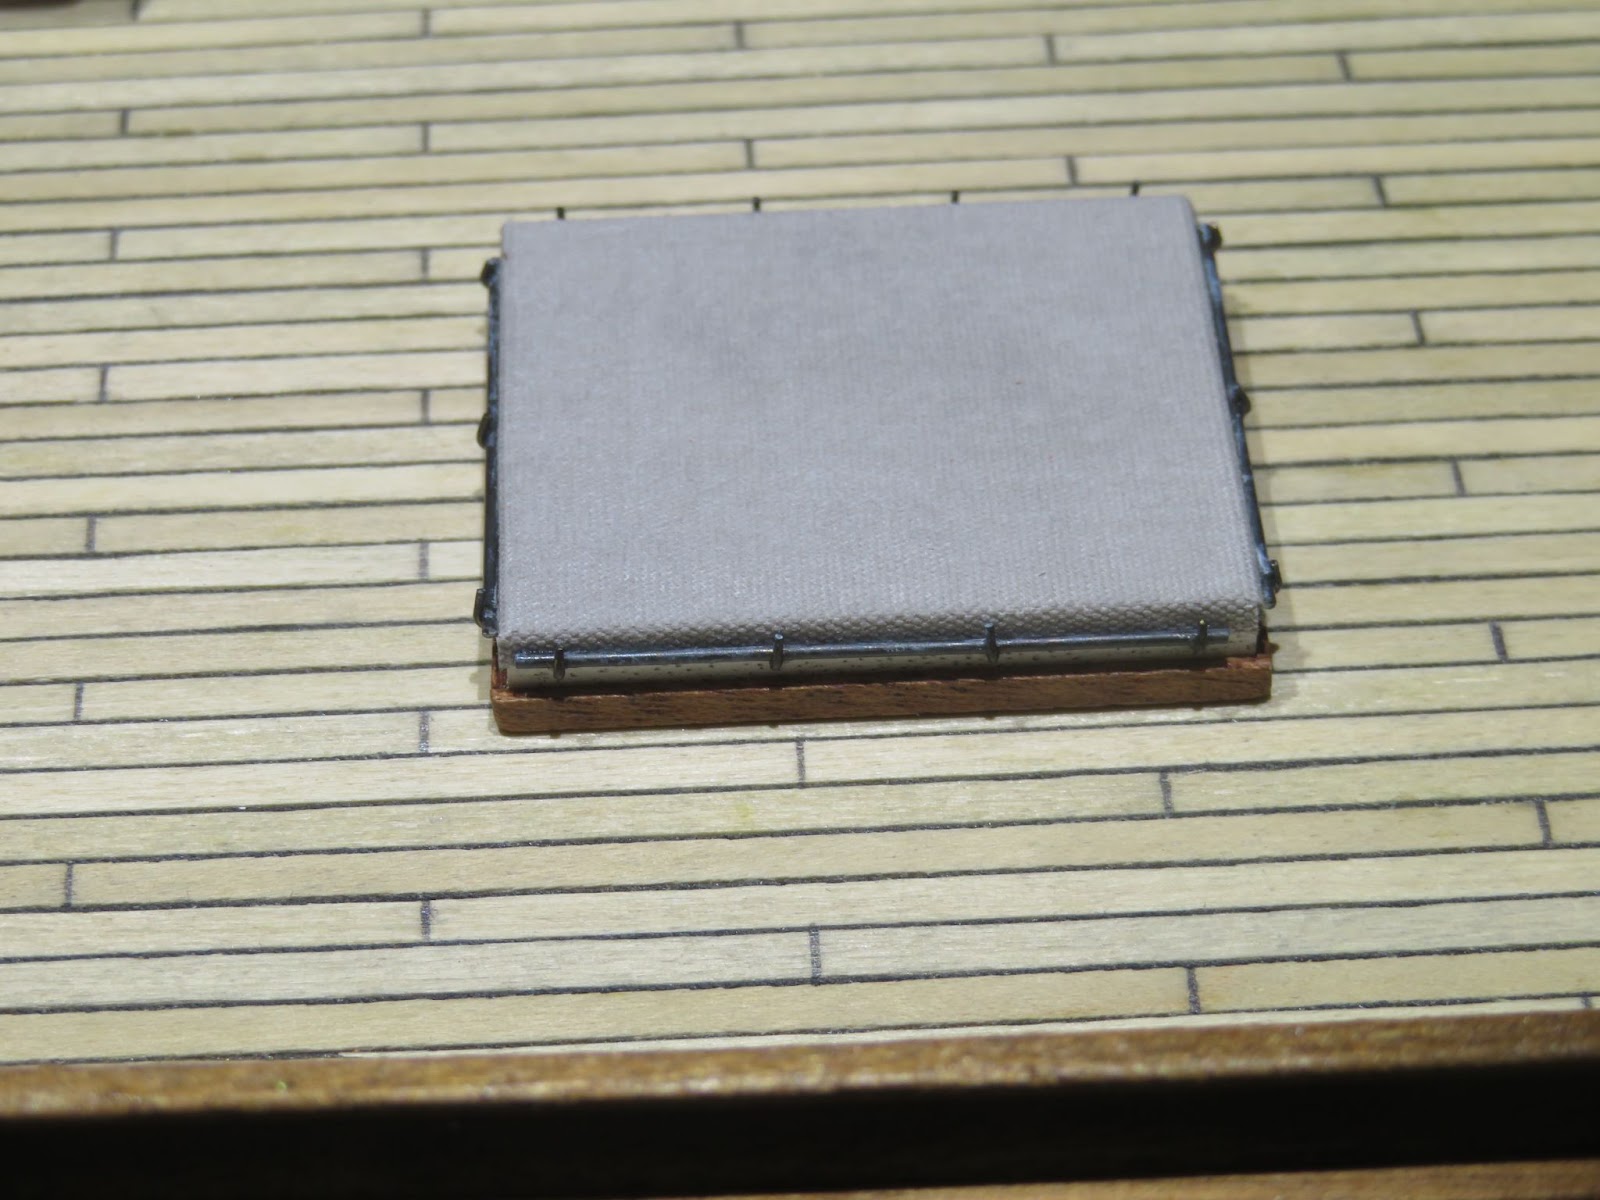
Main cargo hatchway
Poop Deck Cabin: to finish off the cabin I added the rails and stanchions. There are also two small steps at the front and at the back for access to the monkey deck, one at each side. At the rear of the deck there is a compass binnacle and also a small bell. I was not sure about the positions and type of the compass and bell. I found a nice picture on the RMG website showing Captain Woodget standing with them both but this is a later image with the altered cabin having an access door at the rear. Campbell’s plans show that the compass was directly in front of the wheel and the bell was located by the front hatch (but this also changed later and the compass and bell were side by side).
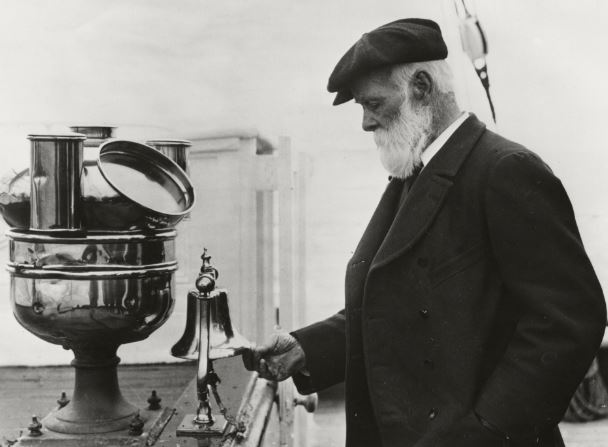
Captain Woodget on the Poop deck.
There was a plastic binnacle in the kit which needed some alteration to make it look a bit like the one in the picture. I drilled it out and used a spare porthole and a bollard to make up the base of the binnacle and stand. Just for fun, I made a little compass dial to fit in the front (yes, I know the dial should be horizontal!). I finished it with some gold leaf paint but I didn’t have any suitable glazing so I just painted over the dial with some clear lacquer. I don't have a small bell so I will look into that (there is also a larger ships bell over the windlass which I will fit later).
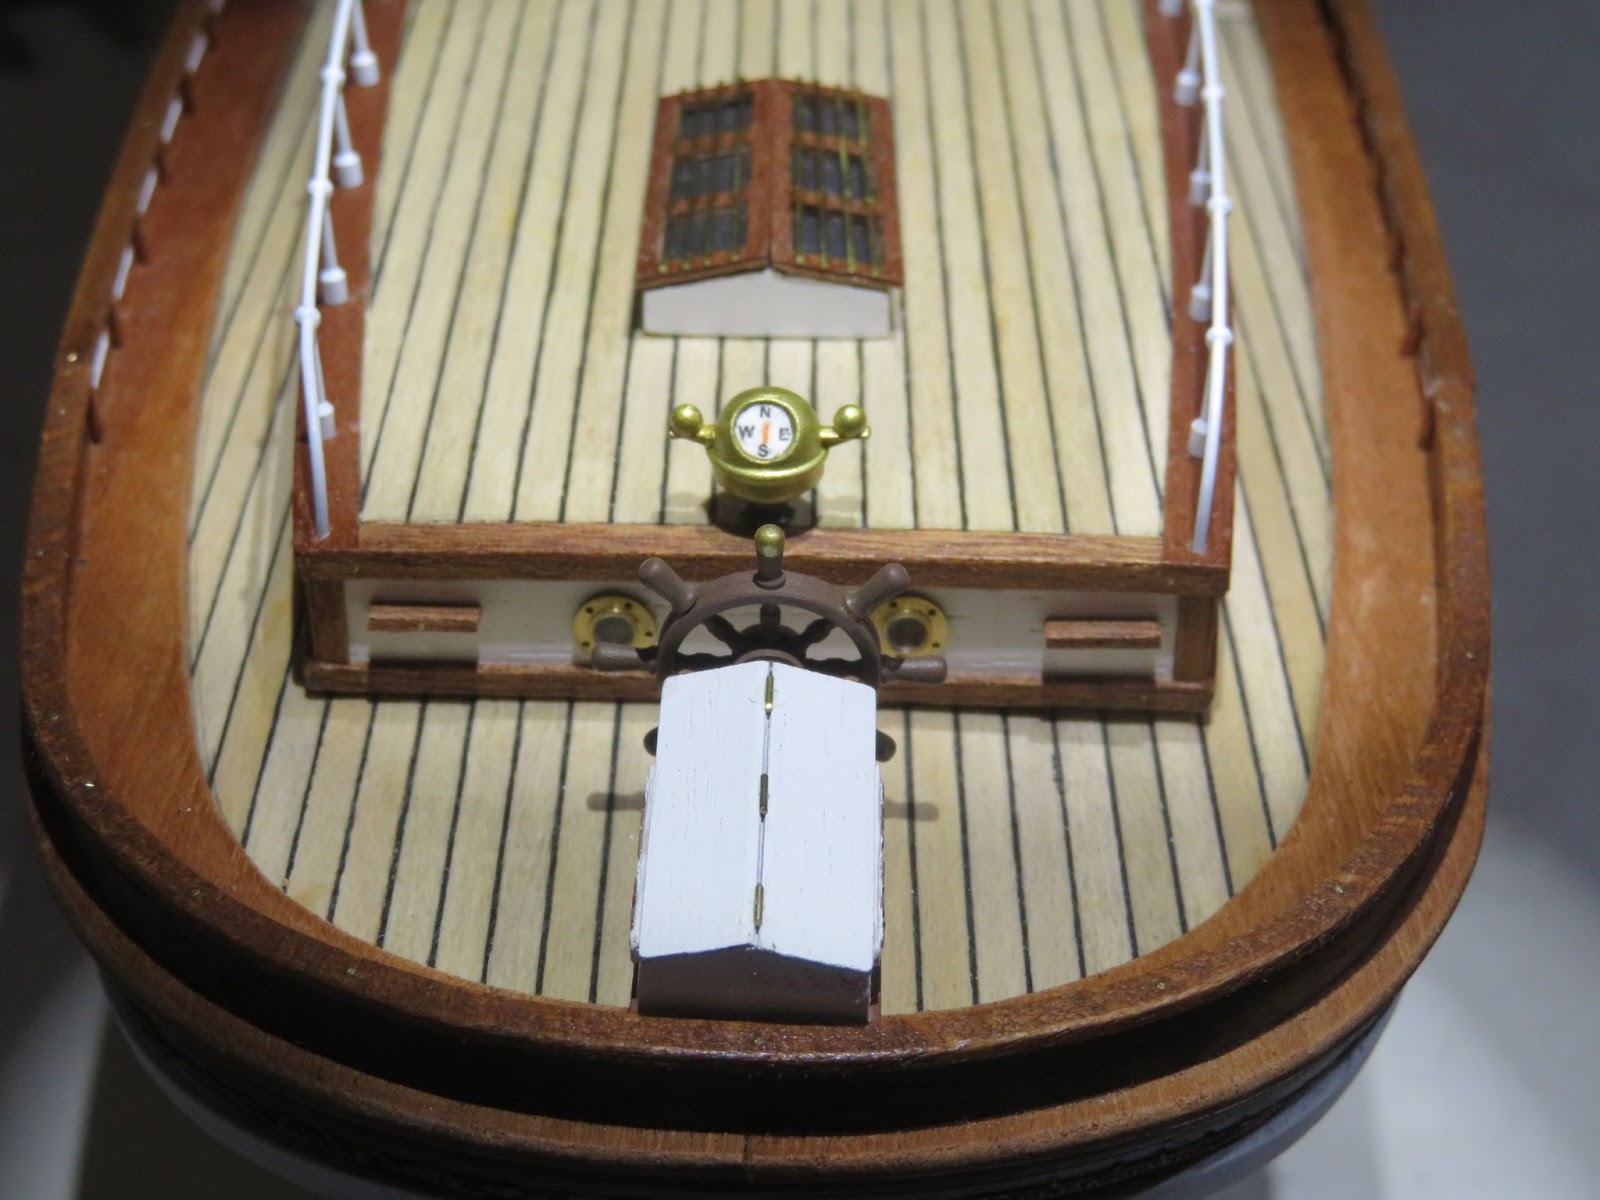
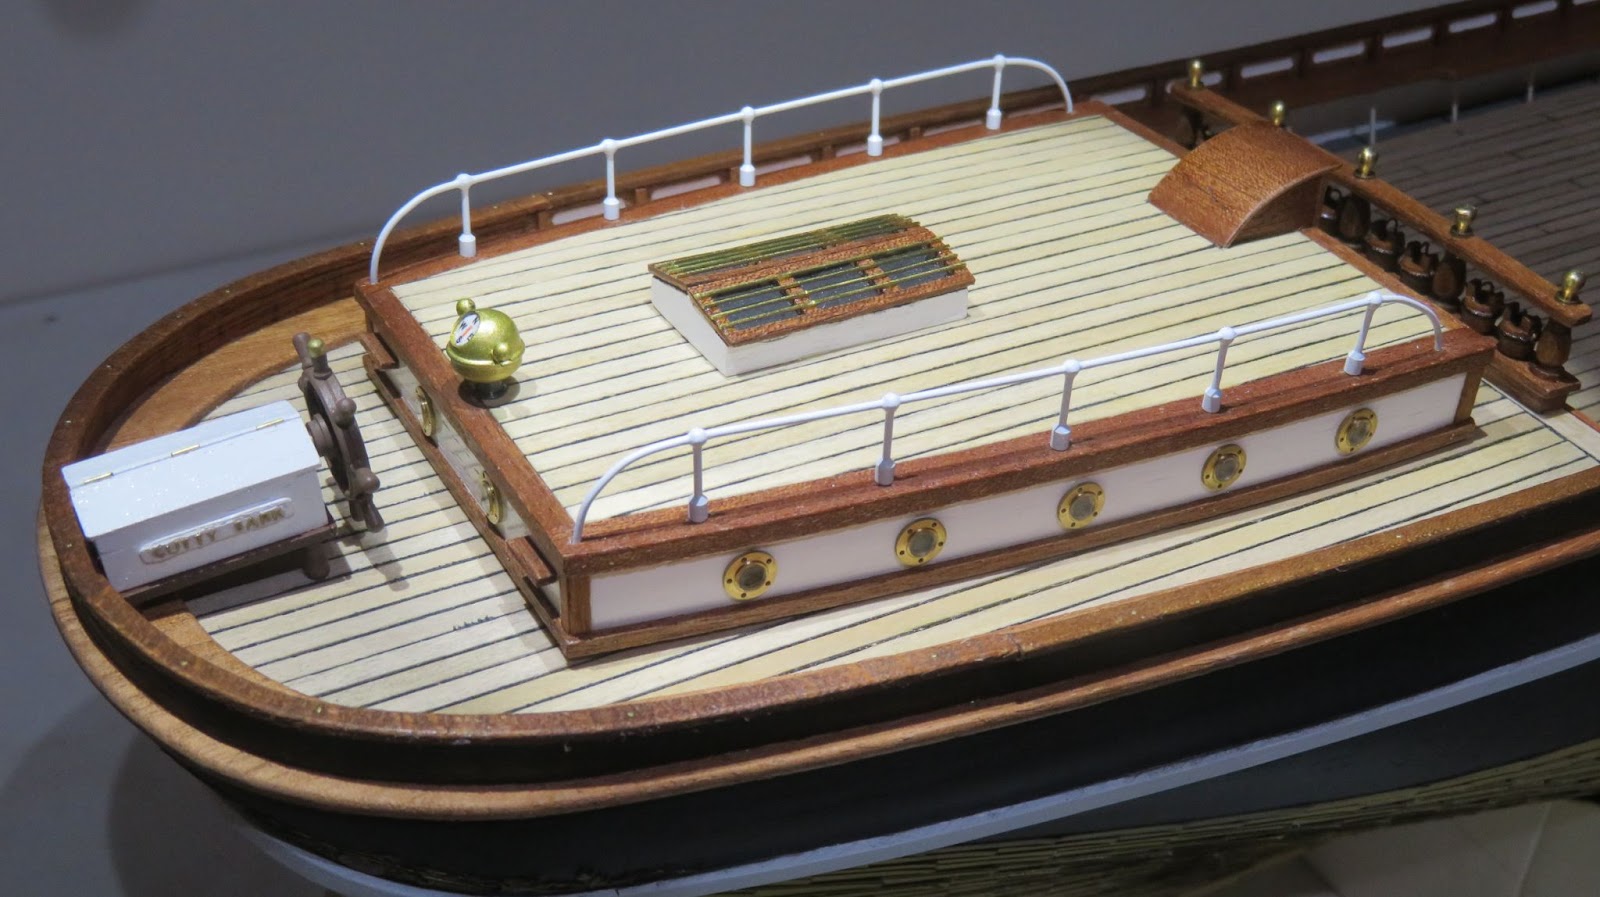
I’m still hoping to get most of the fitting out of the hull done over the Christmas/NewYear period and so far I am managing to make slow but steady progress. Still vast amounts to do but, progress is progress.
Next up: Continuing to fit out the decks - and checking against the plans for things that I have forgotten and need to be fitted to the decks! I'll also make a start on making the Fife Rails.
Cargo hatchways, coamings and covers: The first job needed to be done was to make the forward and main cargo hatchways. I have made the aft cargo/booby hatch (see Part 18) and only needed to work on the forward and main cargo hatches so this part was fairly straight forward. The hatchways should be slightly cambered (corresponding to the deck camber) but, at the scale of the model, it is not a detail worth worrying about!
I made the forward hold so that I can have the option to open it up for display and put some little tea chests in there. I opened up the hold space by carefully cutting away the deck covering and made the coaming. The scale height for the coaming from the deck is 6mm so it was straightforward to make the four sides from some 10 x 2 mm strip so that the inner part was below the deck level. I used the mill to make all the rebates (it is coming in quite useful after all!). The base of the coaming has a moulding around it so I used some thin strip for that. To keep with my painting scheme I painted the outer white with varnished wood for the moulding and the hatch covers.
For the covers, Campbell’s plans show the forward hatch as having sixteen covers laid in eight pairs across the hatchway with a central divider. At scale each would only be approx. 4 x 13mm so it would not be practical to make individual removable covers.
Cambell’s plans showing the 16 covers for the forward hold.
The simplest way to depict the hatch covers was to make a single cover piece from some solid wood and carefully cut grooves with a micro blade to divide it up into the sixteen sections (I did not bother with the central divider). I used a pencil to highlight the sections. Again the hatches are just too small to warrant making individual lifting rings so I opted to use some blackened brass nail heads to represent them (I’ll make some tea chests to put in the hold later!).
Forward hold hatchway.
I decided to cover the main cargo hold with a tarpaulin to show how it would be on the ship when loaded. This made life easy because it was just a case of making a solid piece to the correct size adding the moulding and painting the upper part white. In the 19th century the tarpaulins would have been tarred flax-canvas which would have been dark grey/black in colour so I used some thin poly-cotton material and stained it “dark grey” with some wood stain and coated it with some matt-lacquer. On the ship, the covers are held in place by iron bars sitting in right-angled cleats spaced around the coaming and then locked using wooden wedges. I used some blackened 0.5mm brass wire for the cleats and some 0.8mm brass rod to represent the bars (no wooden wedges, they would have been ridiculously fragile!).
Main cargo hatchway
Poop Deck Cabin: to finish off the cabin I added the rails and stanchions. There are also two small steps at the front and at the back for access to the monkey deck, one at each side. At the rear of the deck there is a compass binnacle and also a small bell. I was not sure about the positions and type of the compass and bell. I found a nice picture on the RMG website showing Captain Woodget standing with them both but this is a later image with the altered cabin having an access door at the rear. Campbell’s plans show that the compass was directly in front of the wheel and the bell was located by the front hatch (but this also changed later and the compass and bell were side by side).
Captain Woodget on the Poop deck.
There was a plastic binnacle in the kit which needed some alteration to make it look a bit like the one in the picture. I drilled it out and used a spare porthole and a bollard to make up the base of the binnacle and stand. Just for fun, I made a little compass dial to fit in the front (yes, I know the dial should be horizontal!). I finished it with some gold leaf paint but I didn’t have any suitable glazing so I just painted over the dial with some clear lacquer. I don't have a small bell so I will look into that (there is also a larger ships bell over the windlass which I will fit later).
I’m still hoping to get most of the fitting out of the hull done over the Christmas/NewYear period and so far I am managing to make slow but steady progress. Still vast amounts to do but, progress is progress.
Next up: Continuing to fit out the decks - and checking against the plans for things that I have forgotten and need to be fitted to the decks! I'll also make a start on making the Fife Rails.
Good morning Dom.Part 23: Cargo Hatchways and Covers, Poop Deck Cabin Detail
Cargo hatchways, coamings and covers: The first job needed to be done was to make the forward and main cargo hatchways. I have made the aft cargo/booby hatch (see Part 18) and only needed to work on the forward and main cargo hatches so this part was fairly straight forward. The hatchways should be slightly cambered (corresponding to the deck camber) but, at the scale of the model, it is not a detail worth worrying about!
I made the forward hold so that I can have the option to open it up for display and put some little tea chests in there. I opened up the hold space by carefully cutting away the deck covering and made the coaming. The scale height for the coaming from the deck is 6mm so it was straightforward to make the four sides from some 10 x 2 mm strip so that the inner part was below the deck level. I used the mill to make all the rebates (it is coming in quite useful after all!). The base of the coaming has a moulding around it so I used some thin strip for that. To keep with my painting scheme I painted the outer white with varnished wood for the moulding and the hatch covers.
For the covers, Campbell’s plans show the forward hatch as having sixteen covers laid in eight pairs across the hatchway with a central divider. At scale each would only be approx. 4 x 13mm so it would not be practical to make individual removable covers.

Cambell’s plans showing the 16 covers for the forward hold.
The simplest way to depict the hatch covers was to make a single cover piece from some solid wood and carefully cut grooves with a micro blade to divide it up into the sixteen sections (I did not bother with the central divider). I used a pencil to highlight the sections. Again the hatches are just too small to warrant making individual lifting rings so I opted to use some blackened brass nail heads to represent them (I’ll make some tea chests to put in the hold later!).

Forward hold hatchway.
I decided to cover the main cargo hold with a tarpaulin to show how it would be on the ship when loaded. This made life easy because it was just a case of making a solid piece to the correct size adding the moulding and painting the upper part white. In the 19th century the tarpaulins would have been tarred flax-canvas which would have been dark grey/black in colour so I used some thin poly-cotton material and stained it “dark grey” with some wood stain and coated it with some matt-lacquer. On the ship, the covers are held in place by iron bars sitting in right-angled cleats spaced around the coaming and then locked using wooden wedges. I used some blackened 0.5mm brass wire for the cleats and some 0.8mm brass rod to represent the bars (no wooden wedges, they would have been ridiculously fragile!).

Main cargo hatchway
Poop Deck Cabin: to finish off the cabin I added the rails and stanchions. There are also two small steps at the front and at the back for access to the monkey deck, one at each side. At the rear of the deck there is a compass binnacle and also a small bell. I was not sure about the positions and type of the compass and bell. I found a nice picture on the RMG website showing Captain Woodget standing with them both but this is a later image with the altered cabin having an access door at the rear. Campbell’s plans show that the compass was directly in front of the wheel and the bell was located by the front hatch (but this also changed later and the compass and bell were side by side).

Captain Woodget on the Poop deck.
There was a plastic binnacle in the kit which needed some alteration to make it look a bit like the one in the picture. I drilled it out and used a spare porthole and a bollard to make up the base of the binnacle and stand. Just for fun, I made a little compass dial to fit in the front (yes, I know the dial should be horizontal!). I finished it with some gold leaf paint but I didn’t have any suitable glazing so I just painted over the dial with some clear lacquer. I don't have a small bell so I will look into that (there is also a larger ships bell over the windlass which I will fit later).


I’m still hoping to get most of the fitting out of the hull done over the Christmas/NewYear period and so far I am managing to make slow but steady progress. Still vast amounts to do but, progress is progress.
Next up: Continuing to fit out the decks - and checking against the plans for things that I have forgotten and need to be fitted to the decks! I'll also make a start on making the Fife Rails.
Wonderful progress. Cheers Grant
- Joined
- Sep 23, 2021
- Messages
- 262
- Points
- 168

Part 24: Making the Fife Rails.
I’m reaching the stage where re-doing anything will be a nightmare so, I am taking my time looking at the plans and going through my books to make sure that I haven’t missed anything major. I have already spotted some things that would have caused me some grief but hopefully, I can now take the correct course.
I decided that I needed to make up the fife rails next so that I can check their positions on the deck and make sure that they have the correct clearances in order to fit the bilge pump and winches. This section actually turned out to be quite interesting because there are some differences in the type and position of the fife rails shown on the plans and images that I have. I spent some time researching the ship's history trying to find out a little bit more about how the ship was fitted out and what changes were made through the years: My research conclusion: Nobody knows!!!
Many changes were made to the rigging during the ship's long service so Jock Willi’s original spec. is probably the only complete record to go by but even that can only be used for guidance.
Jock Willis’ original specification:
“Fife Rails. To be fitted with two square stanchions of Teak, abaft the mainmast and foremast with six sheaves in each and a Teak rail running between them, stout iron hoops with eyes in them round lower part of masts and pin hoops above, all galvanised”.
This specification would imply the ship would be fitted with a single fife rail with square stanchions behind the masts. However, changes were made as she was being built so it is likely that additional rails were added in order to cope with the rigging. After she was cut down the second rail at the foremast may have been replaced with a smaller rail and when she was rigged as a barquentine under Portuguese ownership, the second rail was probably removed because it was not needed for the reduced number of sails.
Campbell’s plans show one fife rail at the foremast and two at the main, while Billing’s and Longridge’s plans show two at the foremast and main. Currently the ship has one fife rail at the front of the foremast (as in Campbell plans). The fife rails consist of substantial pillars each of which having three sheaves with a heavy curved pin rail sitting on top of them. The pillar tops pass through the rail and are shaped to allow ropes to be turned around them. The foremast rails are smaller than the main but the number of pins per rail is ???? Billing’s plans are probably OK in terms of the size and position of the fife rails with eight pins (16 total) per rail on the fore and ten (20) on the main. Campbell’s plans show only five pin positions per rail but the main mast rail is larger so more pins would be the case.
Longridge suggested that more than one rope was belayed per pin and that there were possibly side extensions added around the main mast for extra pin positions (that is doubtful because it would have blocked access to the bilge pump which is positioned between the mast and the after rail).
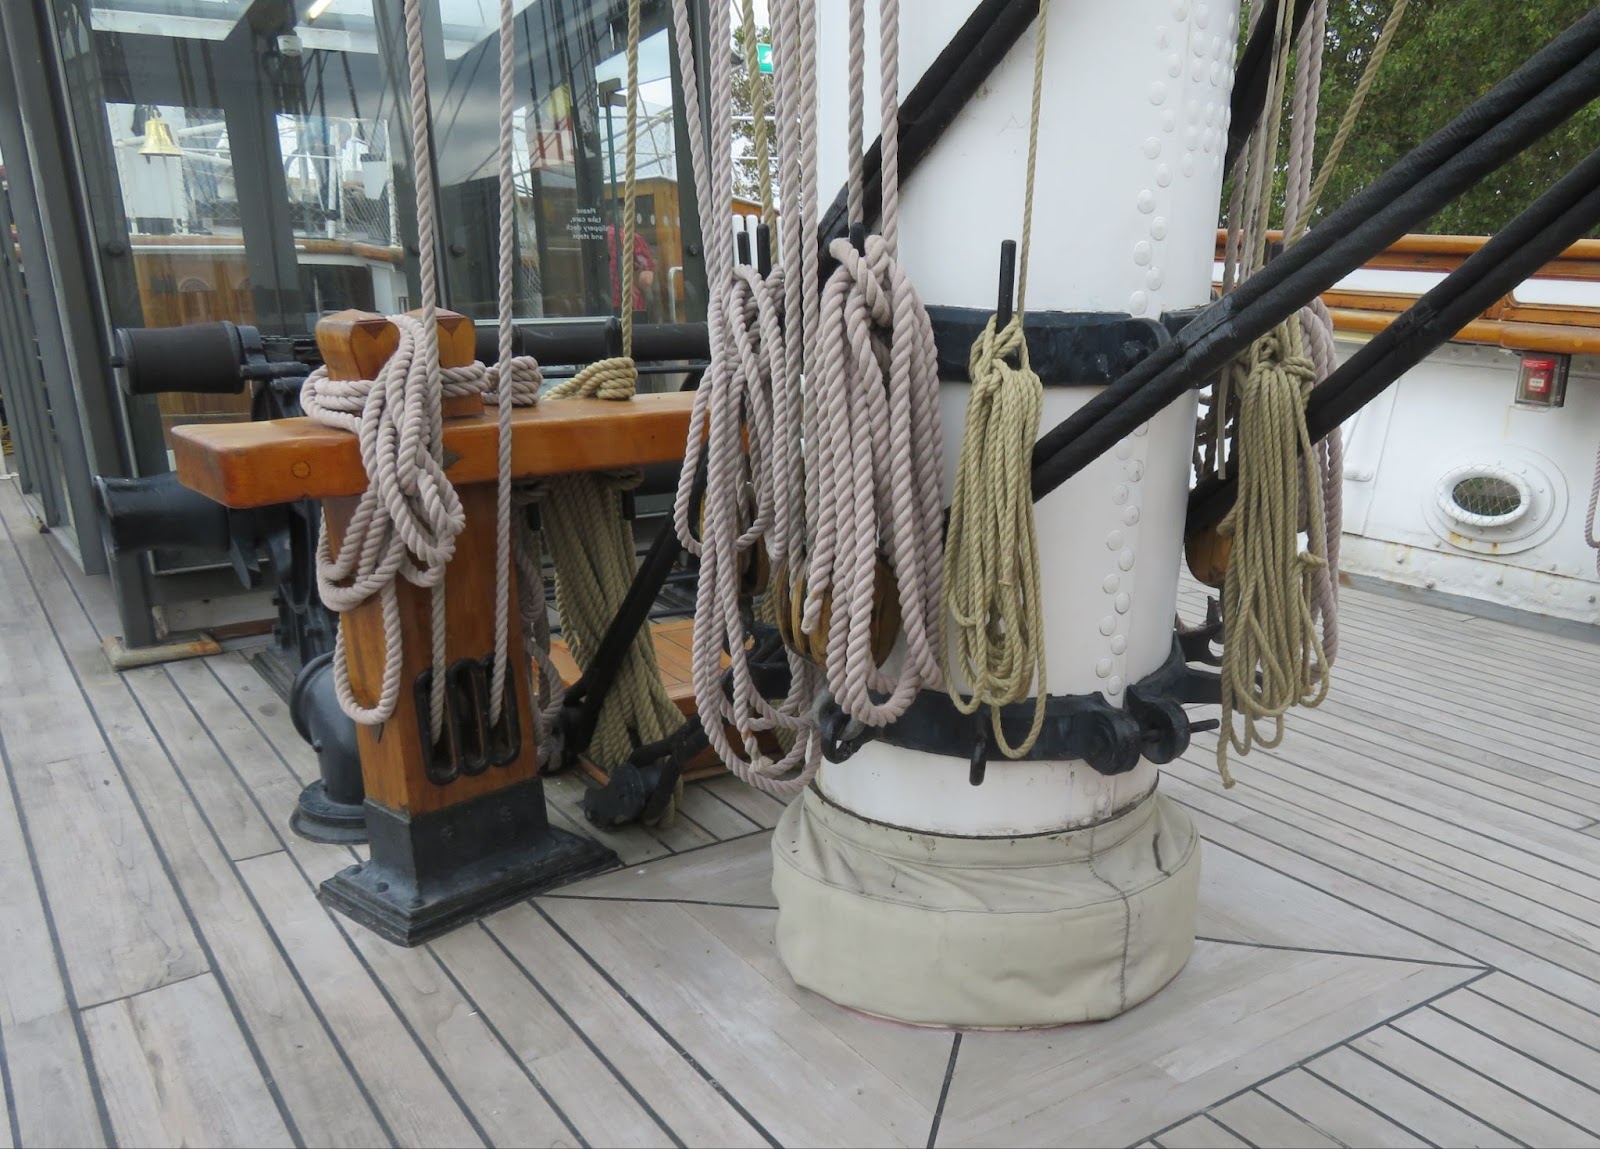
The foremast fife rail (as currently fitted) shows one of the substantial pillars with the sheaves in the base and thick rail.
I found a picture in Longridge’s book showing that the foremast did indeed have two fife rails but the aft rail was smaller and had only one sheave per pillar and the pillars were rounded. Unfortunately, there is no date with the image.
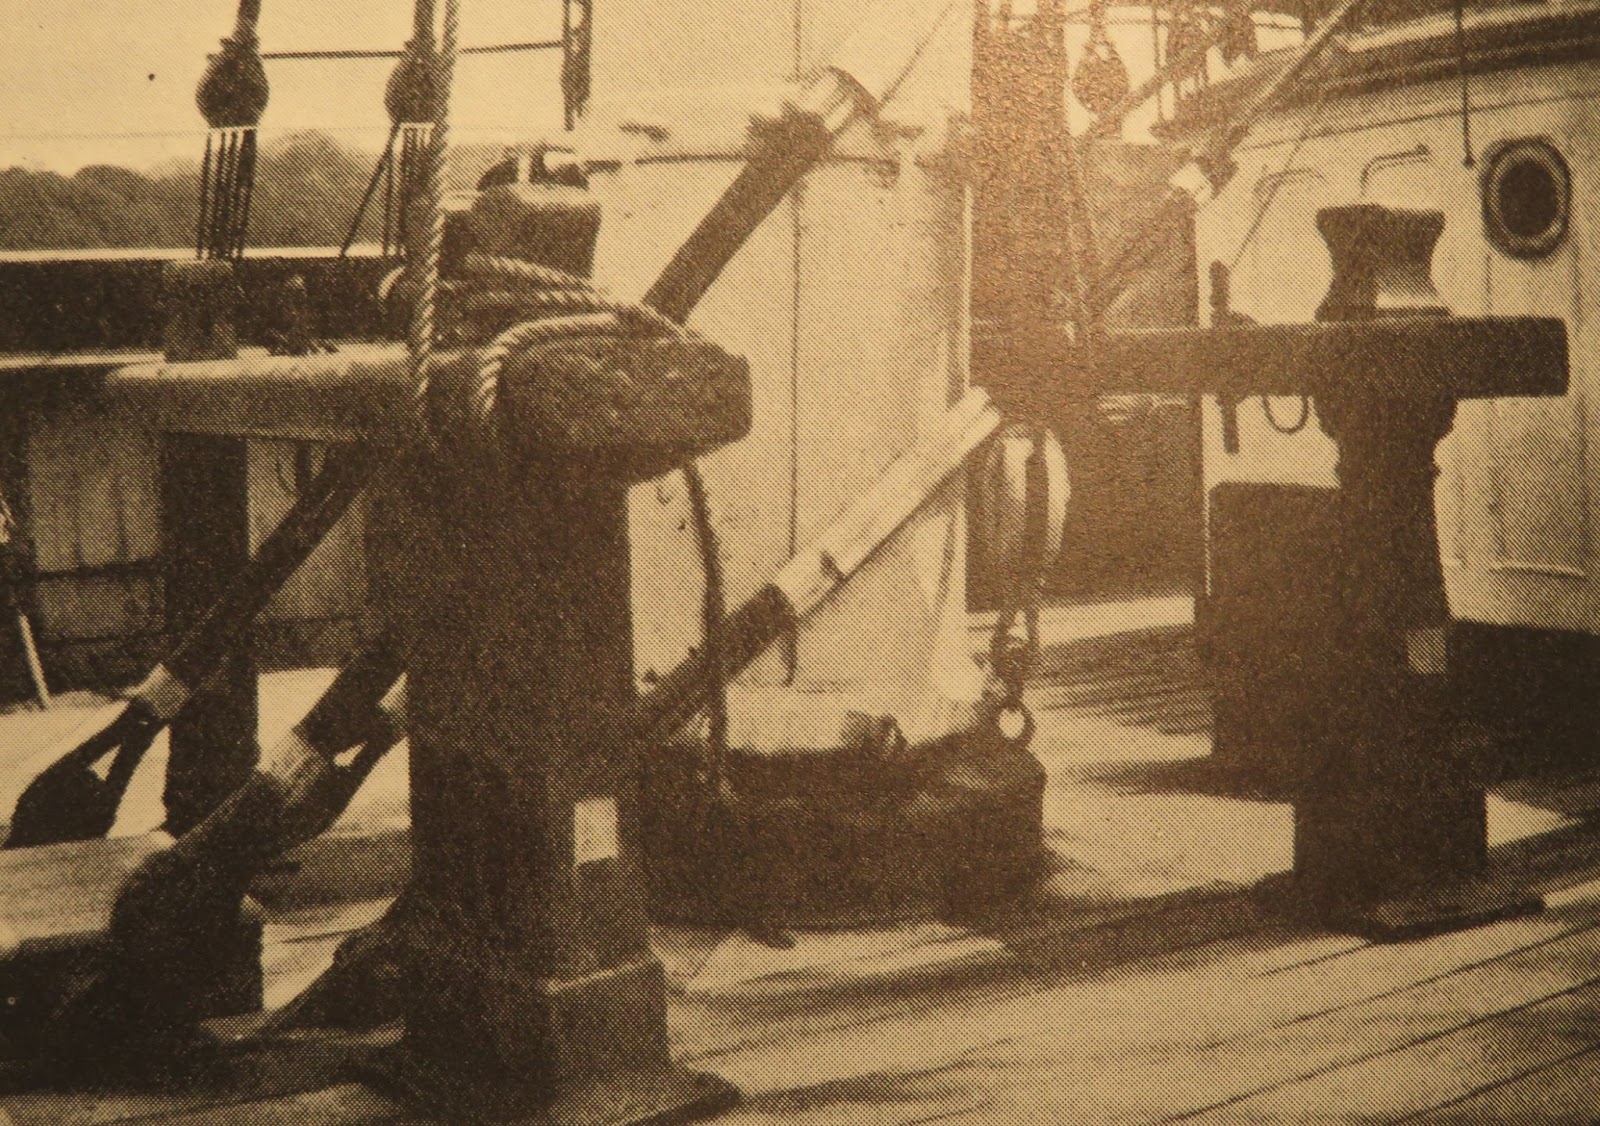
The foremast fife rails (Longridge - date unknown) - note that the stays pass under the rail to the deck anchors
The kit has some brass pillars for the rails but they are the wrong type so I decided to make some - we have just suffered a very bad storm in the UK over the week-end so, while being confined to quarters for the duration, there was not much else to do! Longridge gives all the measurements for the pillars which I used to set the scale dimensions.
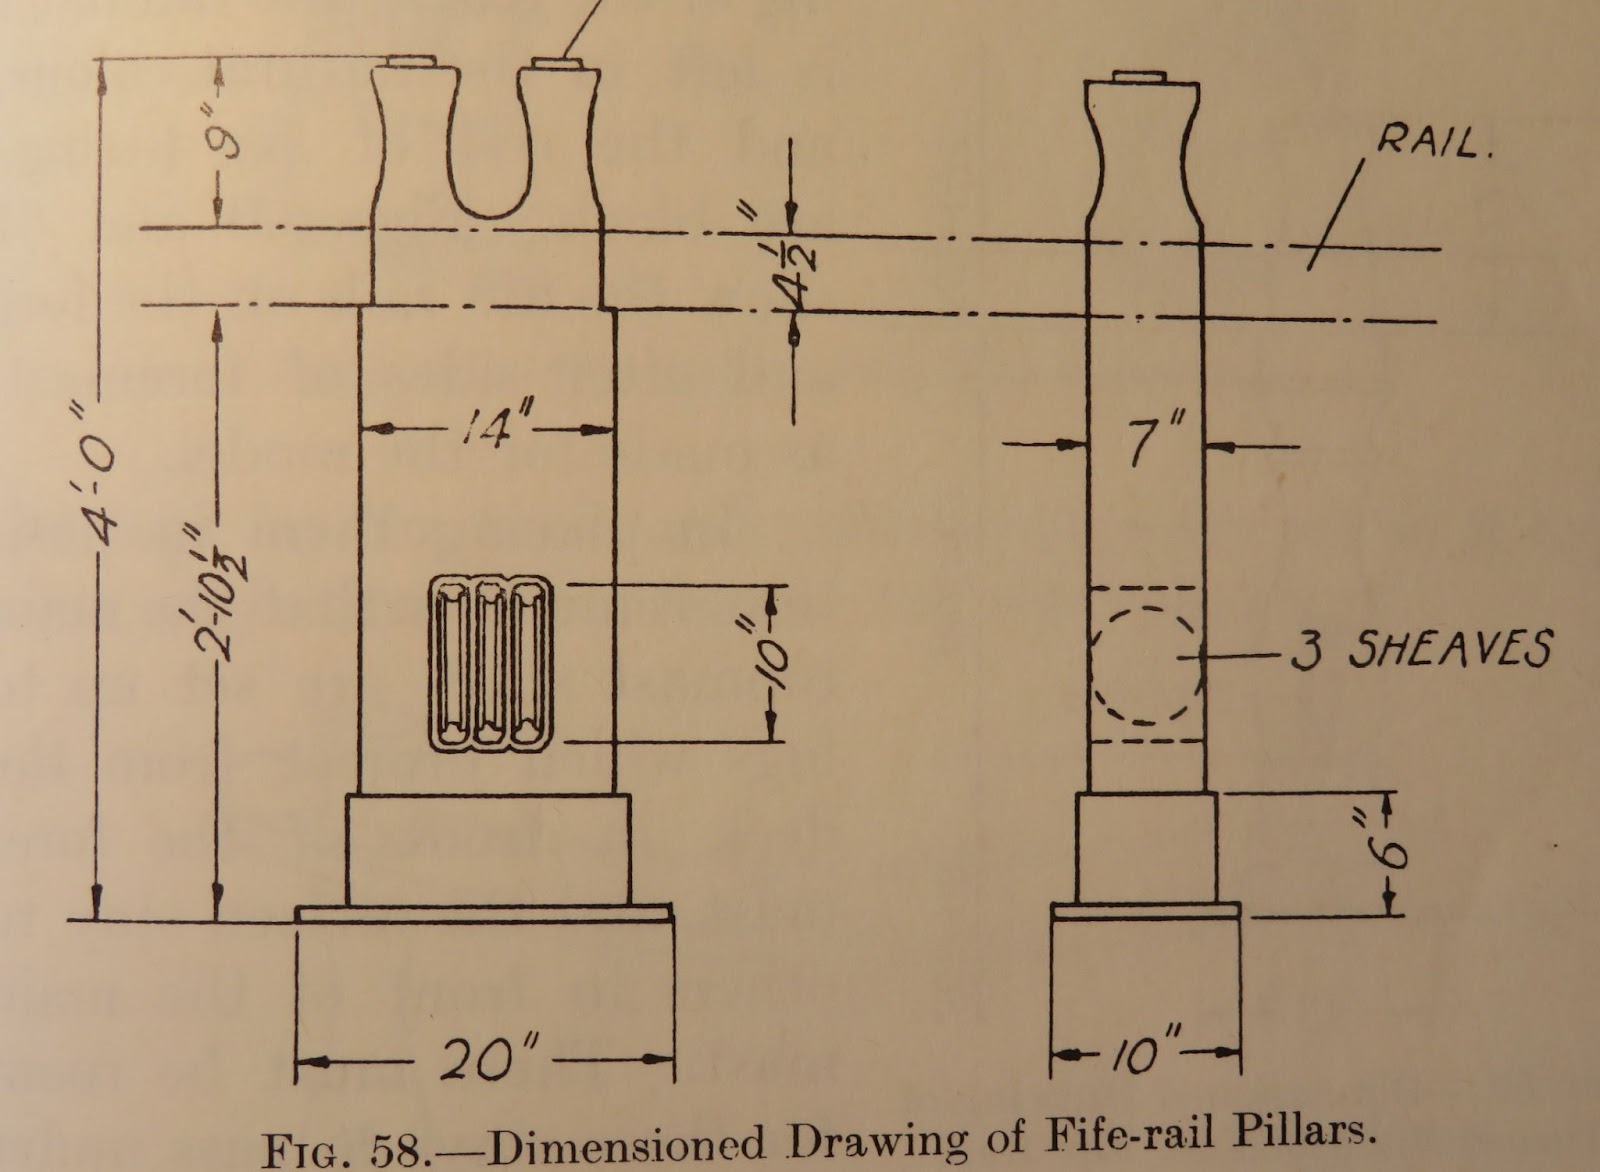
Dimensions and form of the pillars.
I decided to make the pillars slightly larger than scale just to make them a little more robust. I opted for two rails per mast but all of the same type because I think that would have been needed when she had her full height masts (and it was easier to just make 8x pillars!).
Milling the pillars was fairly straightforward once I figured out the correct sequence of operations and set up the machine (I’m getting better!!!). The pillars are basically stepped blocks so once I had the largest dimension set for the base (not the base plate) it was a simple case of winding the mill forward by the correct amount and then increasing the depth of cut for the next section and repeat for the top section so reducing the profile in steps. With one side cut all I had to do was turn the piece 90 degrees and repeat for all four sides. After struggling to make the sheaves for the catheads I decided not to do the same for the pillars but instead milled some shallow trenches and drilled holes top and bottom to represent them and used some pencil black to highlight them. The last thing was to mill slots into the tops and shape them with a small file.
For the curved rails I used 2 mm thick sapele strips which I cut out and then drilled and filed some slots for the pillars to fit through. Because there is no absolute record of the number of pin positions on each rail I decided the more the merrier and went with Billing’s plans simply because it would be almost impossible to rig the model by belaying two ropes per pin - which ropes to which pins??? No records!!! I painted the bases black for the iron work and gave them a coat of lacquer to finish them off.
The mizzen mast does not have a fife rail but there are two rails at either side of the poop deck cabin as well as some on the sheer poles attached to the shrouds which are used for belaying. The two side rails are a simple design mounted on rounded pillars so they were easy to make up.
I will mark out their positions on the deck but I will not fix the fife rails into position until after I have stepped the masts because, as you can see in the picture, the mainstays are anchored to the deck under the rails so I need to make sure that the anchor points are in the correct position.

The fife rails

Main mast rails
It took a bit of time (and I managed to trash a few pieces) but it was quite a good work out for the mill (and my brain).
Next up: Starting to fit out the decks
I’m reaching the stage where re-doing anything will be a nightmare so, I am taking my time looking at the plans and going through my books to make sure that I haven’t missed anything major. I have already spotted some things that would have caused me some grief but hopefully, I can now take the correct course.
I decided that I needed to make up the fife rails next so that I can check their positions on the deck and make sure that they have the correct clearances in order to fit the bilge pump and winches. This section actually turned out to be quite interesting because there are some differences in the type and position of the fife rails shown on the plans and images that I have. I spent some time researching the ship's history trying to find out a little bit more about how the ship was fitted out and what changes were made through the years: My research conclusion: Nobody knows!!!
Many changes were made to the rigging during the ship's long service so Jock Willi’s original spec. is probably the only complete record to go by but even that can only be used for guidance.
Jock Willis’ original specification:
“Fife Rails. To be fitted with two square stanchions of Teak, abaft the mainmast and foremast with six sheaves in each and a Teak rail running between them, stout iron hoops with eyes in them round lower part of masts and pin hoops above, all galvanised”.
This specification would imply the ship would be fitted with a single fife rail with square stanchions behind the masts. However, changes were made as she was being built so it is likely that additional rails were added in order to cope with the rigging. After she was cut down the second rail at the foremast may have been replaced with a smaller rail and when she was rigged as a barquentine under Portuguese ownership, the second rail was probably removed because it was not needed for the reduced number of sails.
Campbell’s plans show one fife rail at the foremast and two at the main, while Billing’s and Longridge’s plans show two at the foremast and main. Currently the ship has one fife rail at the front of the foremast (as in Campbell plans). The fife rails consist of substantial pillars each of which having three sheaves with a heavy curved pin rail sitting on top of them. The pillar tops pass through the rail and are shaped to allow ropes to be turned around them. The foremast rails are smaller than the main but the number of pins per rail is ???? Billing’s plans are probably OK in terms of the size and position of the fife rails with eight pins (16 total) per rail on the fore and ten (20) on the main. Campbell’s plans show only five pin positions per rail but the main mast rail is larger so more pins would be the case.
Longridge suggested that more than one rope was belayed per pin and that there were possibly side extensions added around the main mast for extra pin positions (that is doubtful because it would have blocked access to the bilge pump which is positioned between the mast and the after rail).
The foremast fife rail (as currently fitted) shows one of the substantial pillars with the sheaves in the base and thick rail.
I found a picture in Longridge’s book showing that the foremast did indeed have two fife rails but the aft rail was smaller and had only one sheave per pillar and the pillars were rounded. Unfortunately, there is no date with the image.
The foremast fife rails (Longridge - date unknown) - note that the stays pass under the rail to the deck anchors
The kit has some brass pillars for the rails but they are the wrong type so I decided to make some - we have just suffered a very bad storm in the UK over the week-end so, while being confined to quarters for the duration, there was not much else to do! Longridge gives all the measurements for the pillars which I used to set the scale dimensions.
Dimensions and form of the pillars.
I decided to make the pillars slightly larger than scale just to make them a little more robust. I opted for two rails per mast but all of the same type because I think that would have been needed when she had her full height masts (and it was easier to just make 8x pillars!).
Milling the pillars was fairly straightforward once I figured out the correct sequence of operations and set up the machine (I’m getting better!!!). The pillars are basically stepped blocks so once I had the largest dimension set for the base (not the base plate) it was a simple case of winding the mill forward by the correct amount and then increasing the depth of cut for the next section and repeat for the top section so reducing the profile in steps. With one side cut all I had to do was turn the piece 90 degrees and repeat for all four sides. After struggling to make the sheaves for the catheads I decided not to do the same for the pillars but instead milled some shallow trenches and drilled holes top and bottom to represent them and used some pencil black to highlight them. The last thing was to mill slots into the tops and shape them with a small file.
For the curved rails I used 2 mm thick sapele strips which I cut out and then drilled and filed some slots for the pillars to fit through. Because there is no absolute record of the number of pin positions on each rail I decided the more the merrier and went with Billing’s plans simply because it would be almost impossible to rig the model by belaying two ropes per pin - which ropes to which pins??? No records!!! I painted the bases black for the iron work and gave them a coat of lacquer to finish them off.
The mizzen mast does not have a fife rail but there are two rails at either side of the poop deck cabin as well as some on the sheer poles attached to the shrouds which are used for belaying. The two side rails are a simple design mounted on rounded pillars so they were easy to make up.
I will mark out their positions on the deck but I will not fix the fife rails into position until after I have stepped the masts because, as you can see in the picture, the mainstays are anchored to the deck under the rails so I need to make sure that the anchor points are in the correct position.
The fife rails
Main mast rails
It took a bit of time (and I managed to trash a few pieces) but it was quite a good work out for the mill (and my brain).
Next up: Starting to fit out the decks
- Joined
- Sep 23, 2021
- Messages
- 262
- Points
- 168

Part 25: Fitting out the Decks
I started this build over two years ago and my planned progress last winter went down the pan because of a kidney stone so the model building was pretty much shelved for two months while I sorted myself out - and then other projects kicked in for the spring and summer - c’est la vie! Although I don’t do New Year Resolutions, I have set myself the challenge to finish most of the hull work over the Xmas/New Year so that I can move onto the masts during January/February. After that I will have less time for the model as my other projects will start-up. Hopefully, I will be rigging by then so I will be able to run a few lines when I have some spare time and spread that over the rest of the year (which will probably be better because my sanity, and my eyesight, will probably be tested to the limit!).
Plenty to get through over the next few weeks - so, here goes nothing!
Deck mast base details: There was a little bit of deck work to finish off before starting to fix things into position. I did not quarter the decking around the bases of the masts when I laid out the main deck because it would have been a disaster if I had made a mistake in the positioning. The quarter pieces need to be large enough to accommodate the mast bases when they are fitted as you can see in the image. The quartering is flush to the decking so I cut away a square section of the deck around each mast. I used some 6 x 0.5 mm lime strips to make up the quarters, gave them a quick wash with some dilute grey stain to match with the deck planks and stuck them down with some thread for the caulking. I will give the decks a light coating of clear matt lacquer once I have finished fitting out.
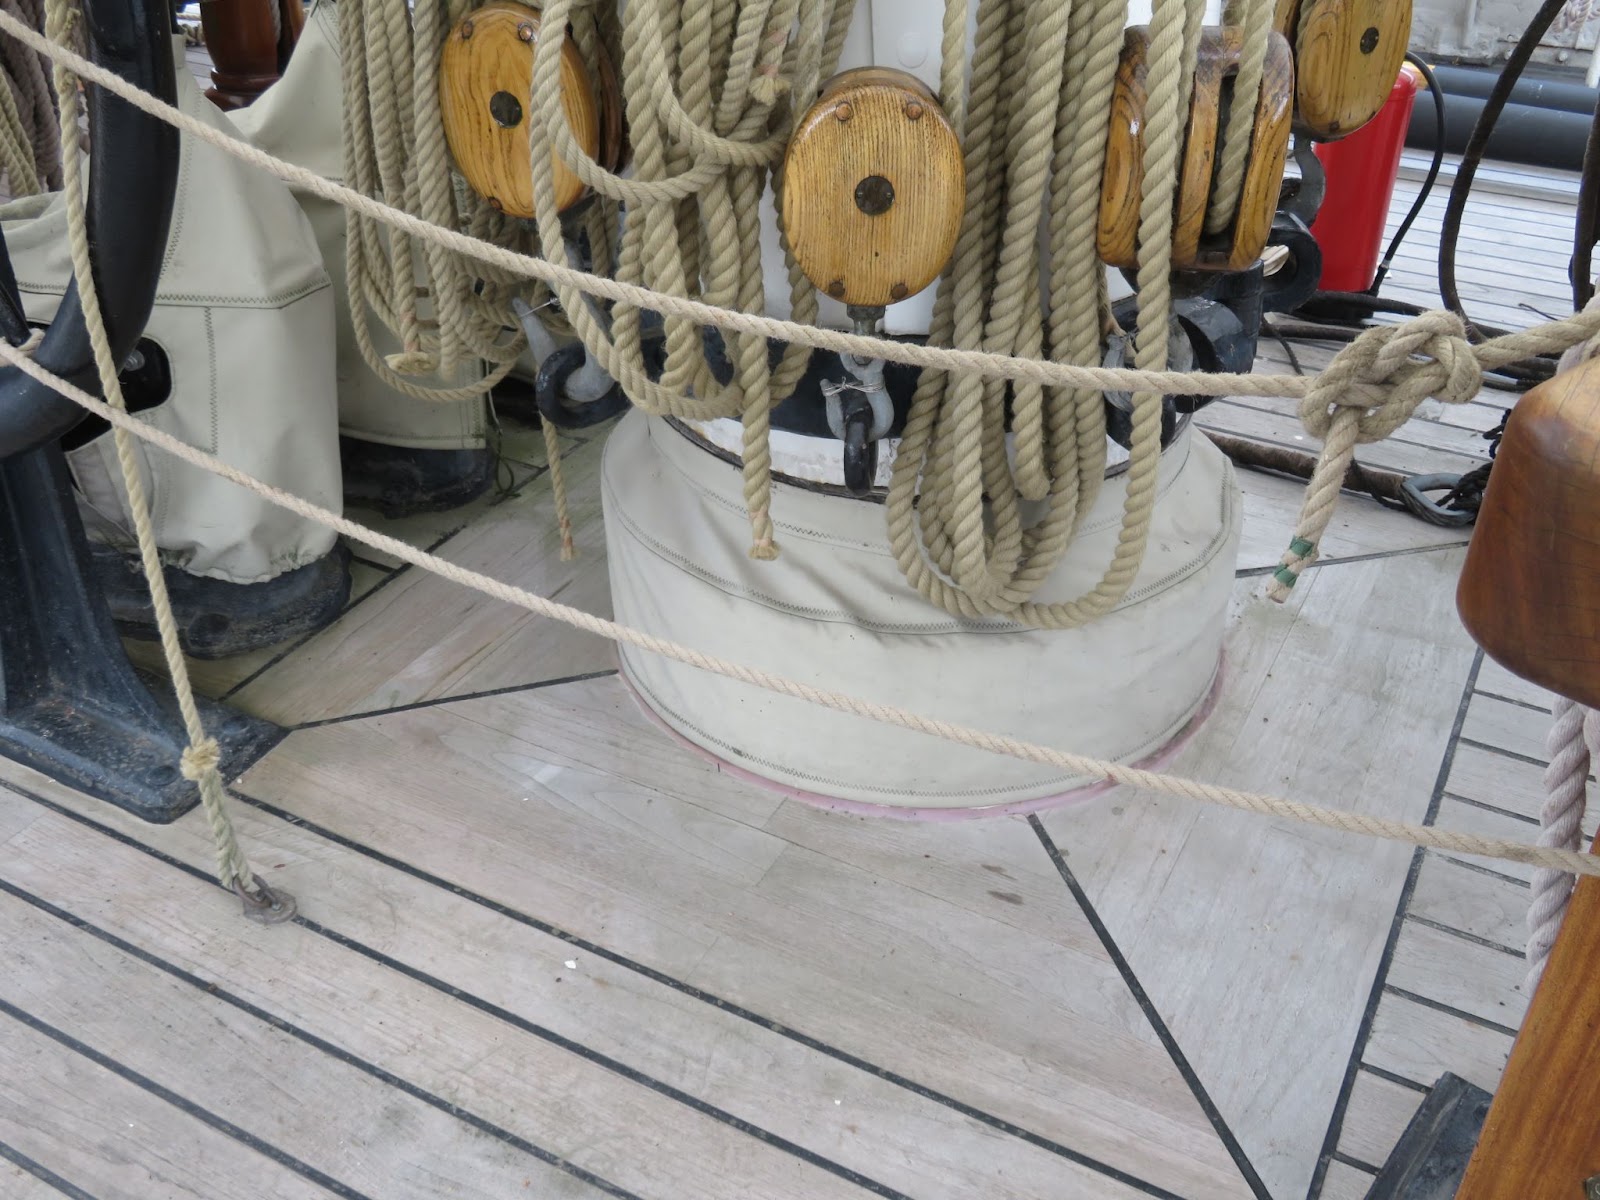
Details around the (main) mast base (same for fore and mizzen). The image also gives some good information on the position of the bilge pump and the eye rings that will need to go around the mast base.
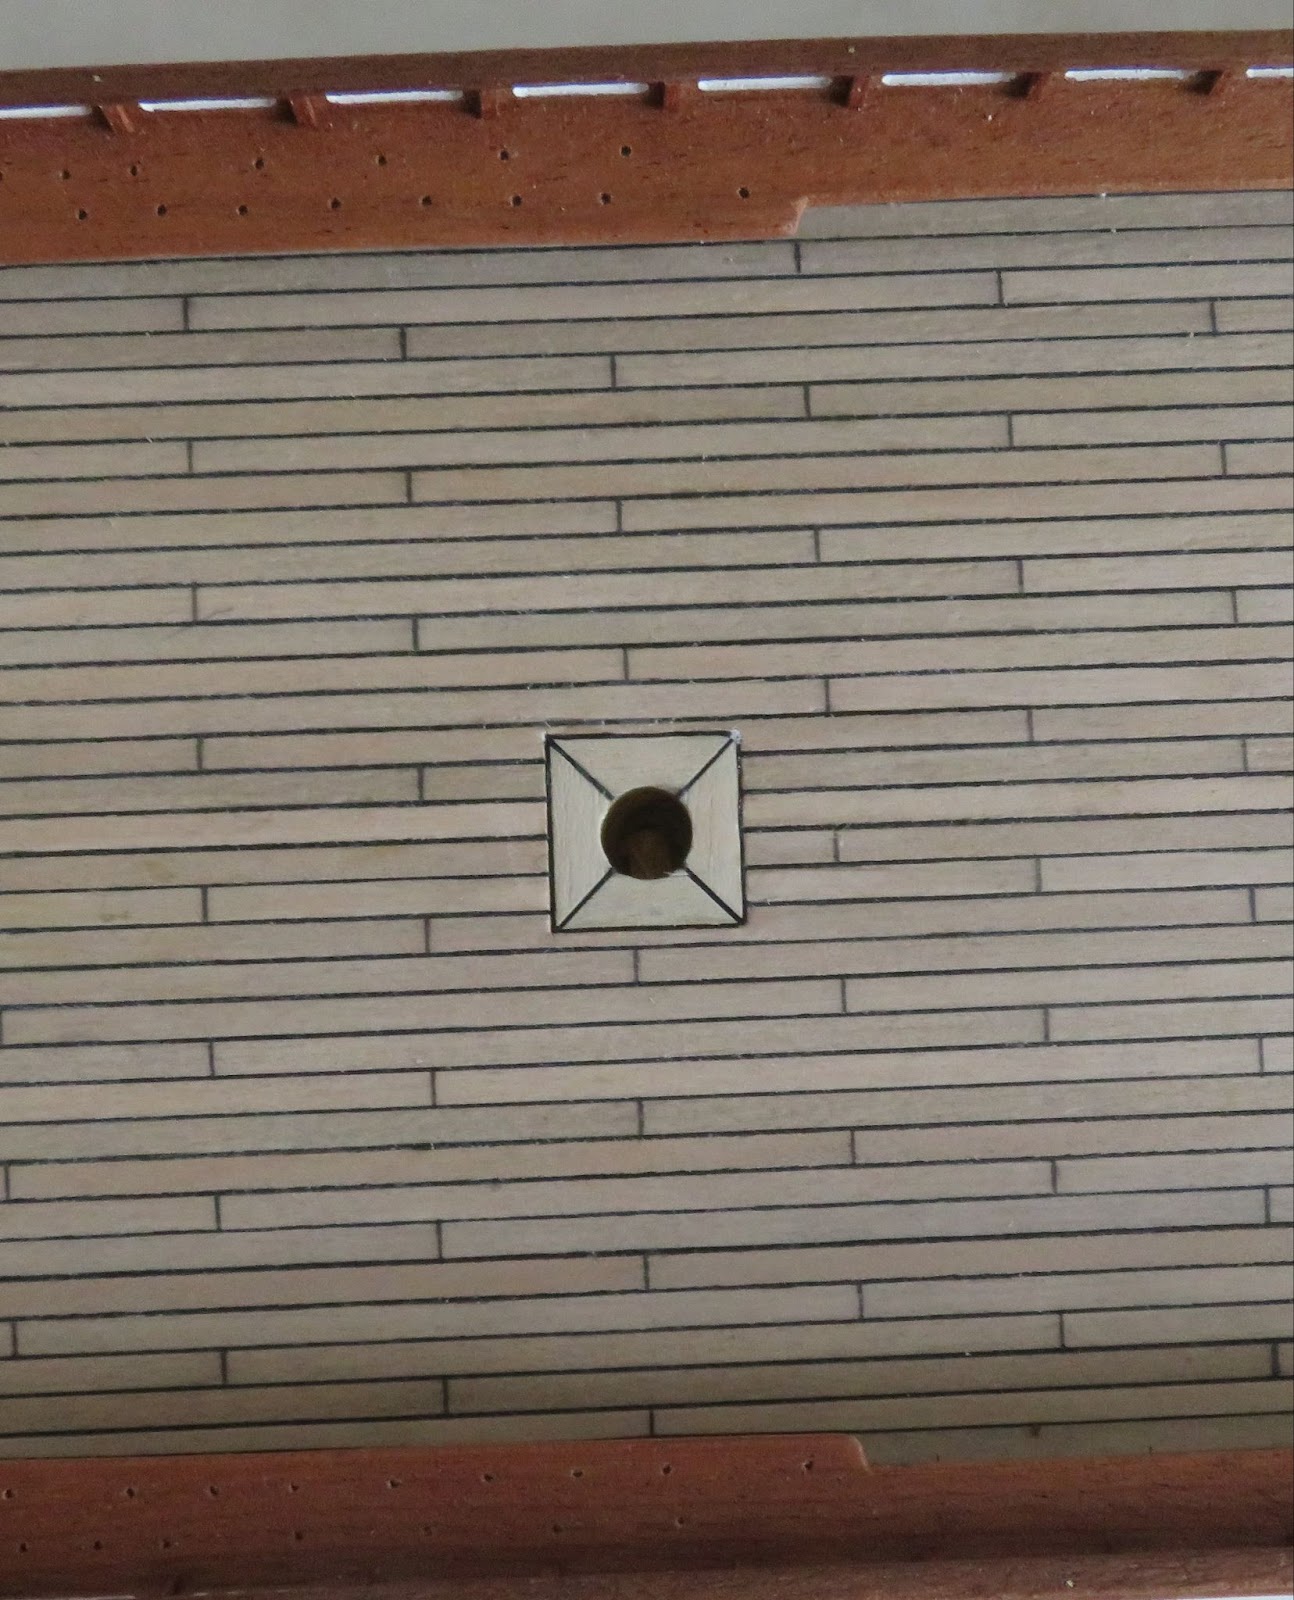
While I was sorting out the deck, I measured out and drilled the positions for the deadeyes on the poop deck for rigging the mizzen mast.
Fitting the deck houses: Before fitting the deck houses I cambered the bases to the deck by laying some medium grit on the top of the deck and then carefully rubbed each deck house along the midline back and forth until they sat nicely on the deck. The only things to add were some door knobs. Once I was happy with the position I glued them down.
Deck fixtures: This was just a case of measuring the positions for the bits that I made up in Part 22 and gluing them down. I also fixed the poop deck pin rails into place but not the main and foremast fife rails. The positions of the poop rails was a bit of a compromise because I went with a slightly wider margin plank. Looking at my photos, they should stand just inboard of the strops but not so close that they would be blocked by the shrouds.
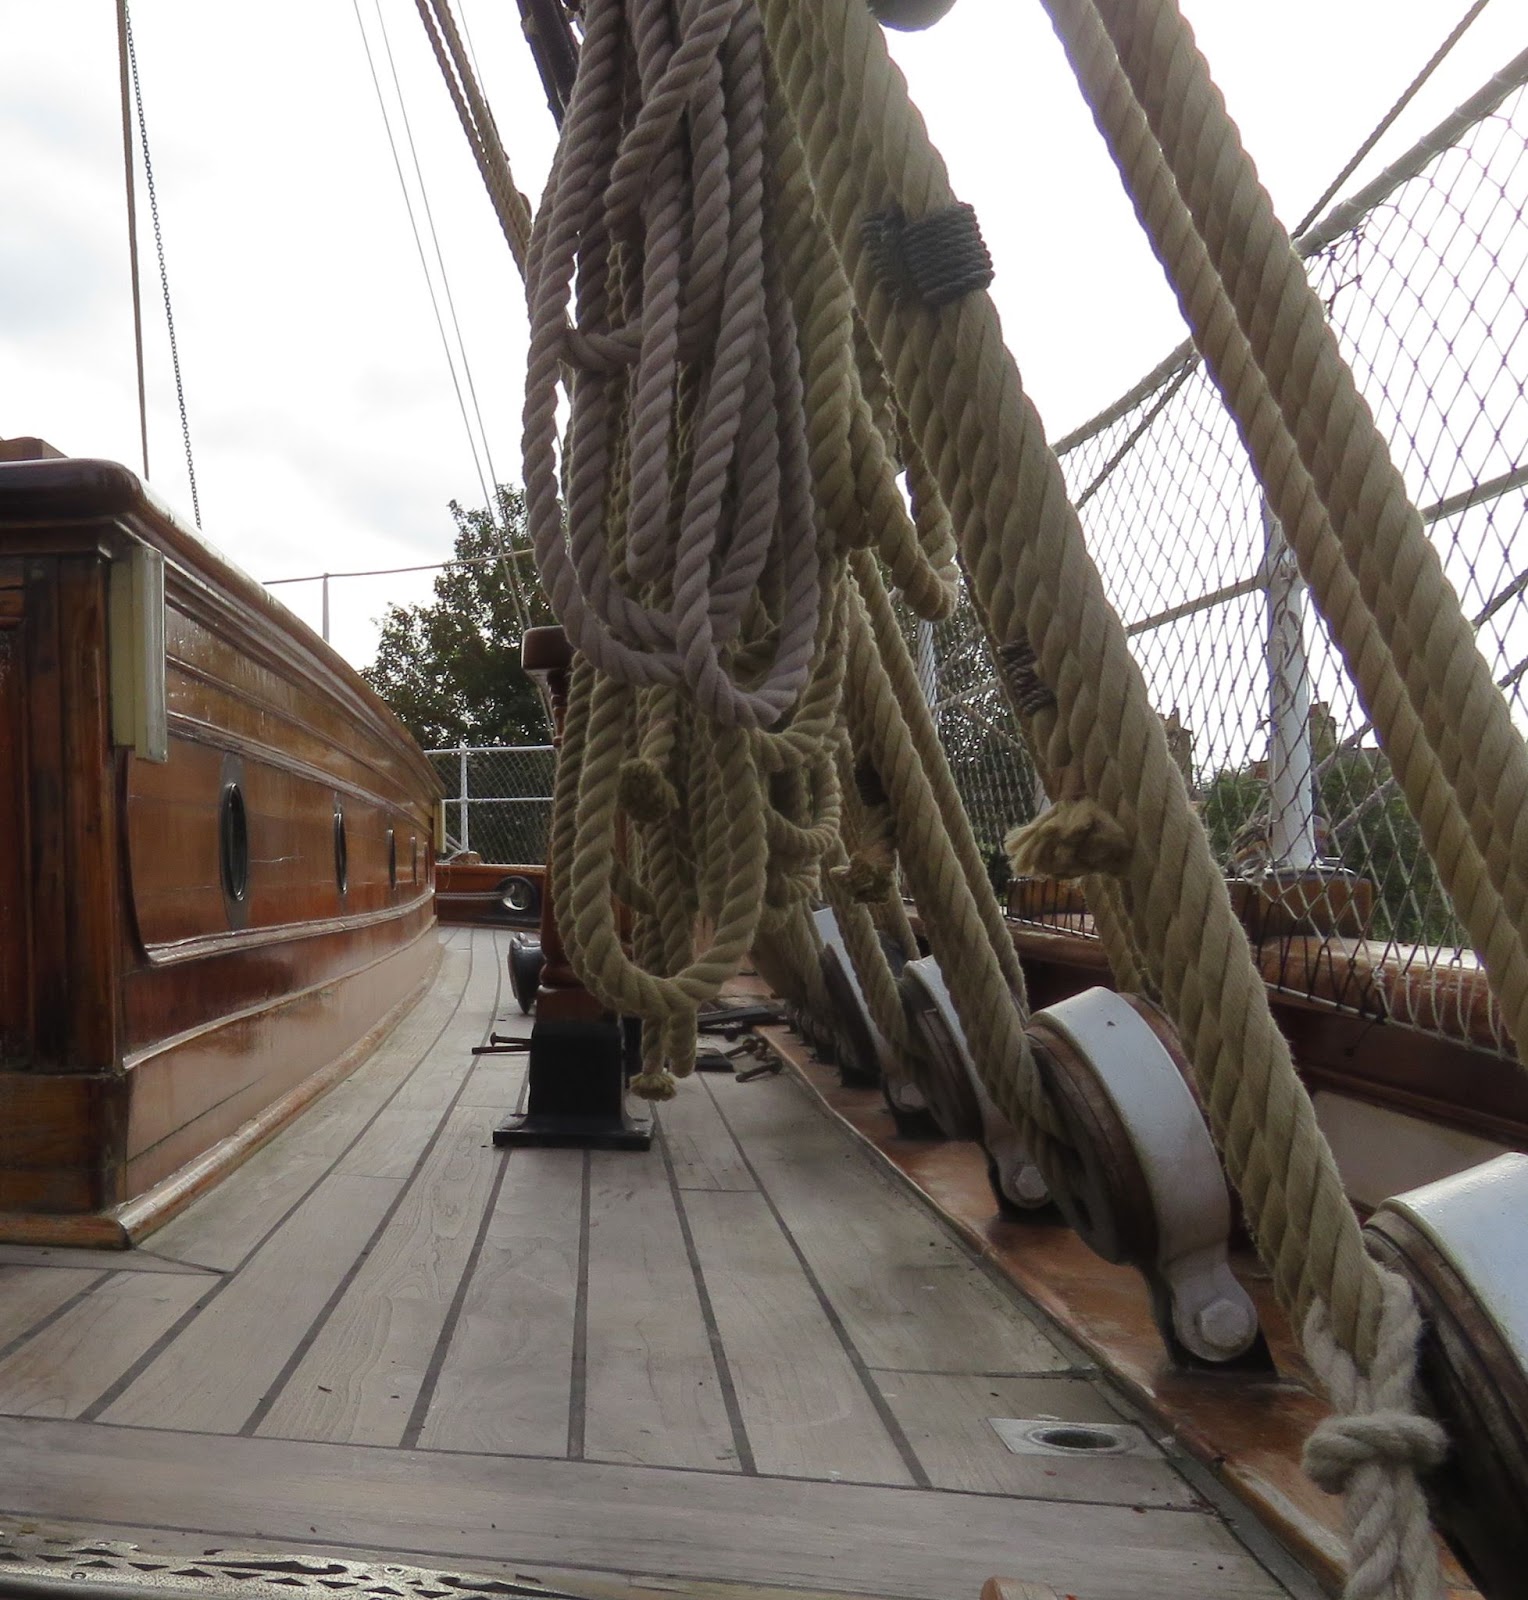
Poop deck pin rail
I marked out the positions of the fife rails for the fore and main masts and put some brass pegs in the bases of the pillars and then drilled corresponding holes in the deck so that I can just pop them in to fix them into place when I have fixed the anchor positions for the stays. There are also a few details to include at the foremast forward rail as shown in the photograph, a small access hatch to the chain locker between the stay anchors and two chain pipes which are positioned just in front of the pillars. There were no fittings in the kit for the pipes but luckily I found some spares from a previous build which just needed a little modification and painting and I will add those later.
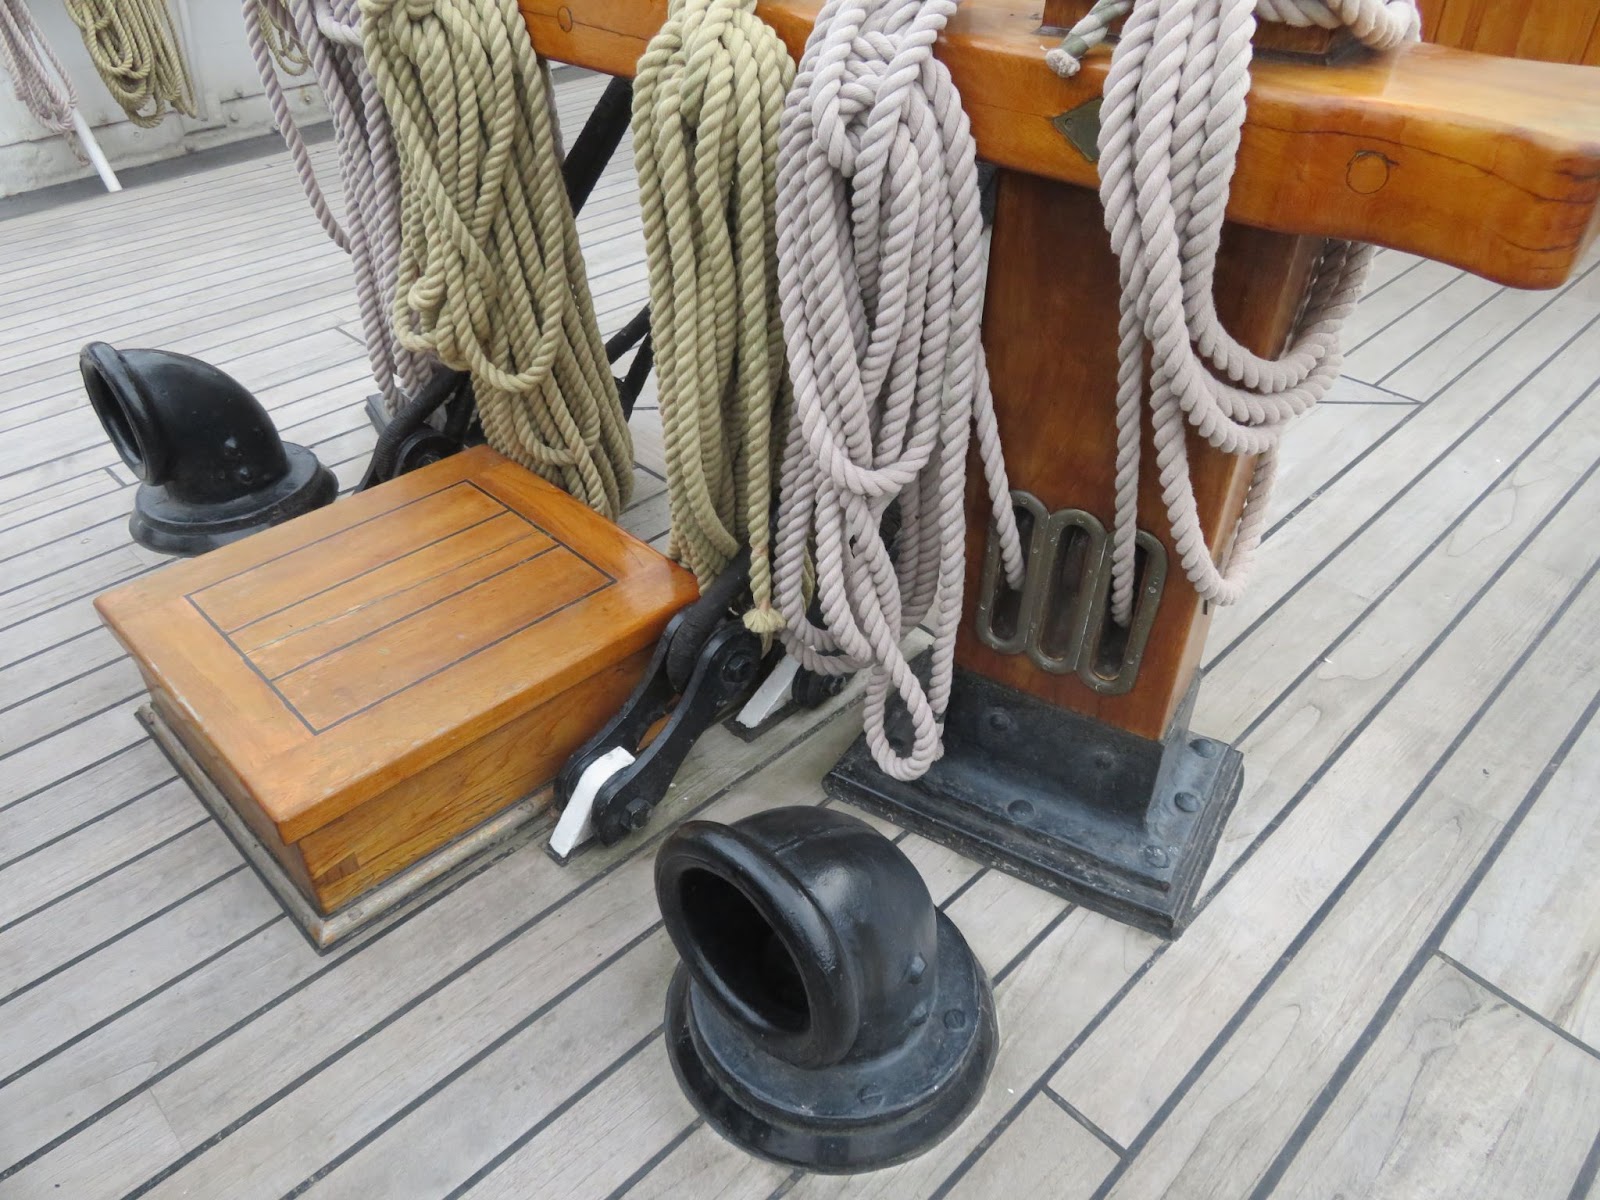
The chain pipes and access hatch to the chain locker (foremast)
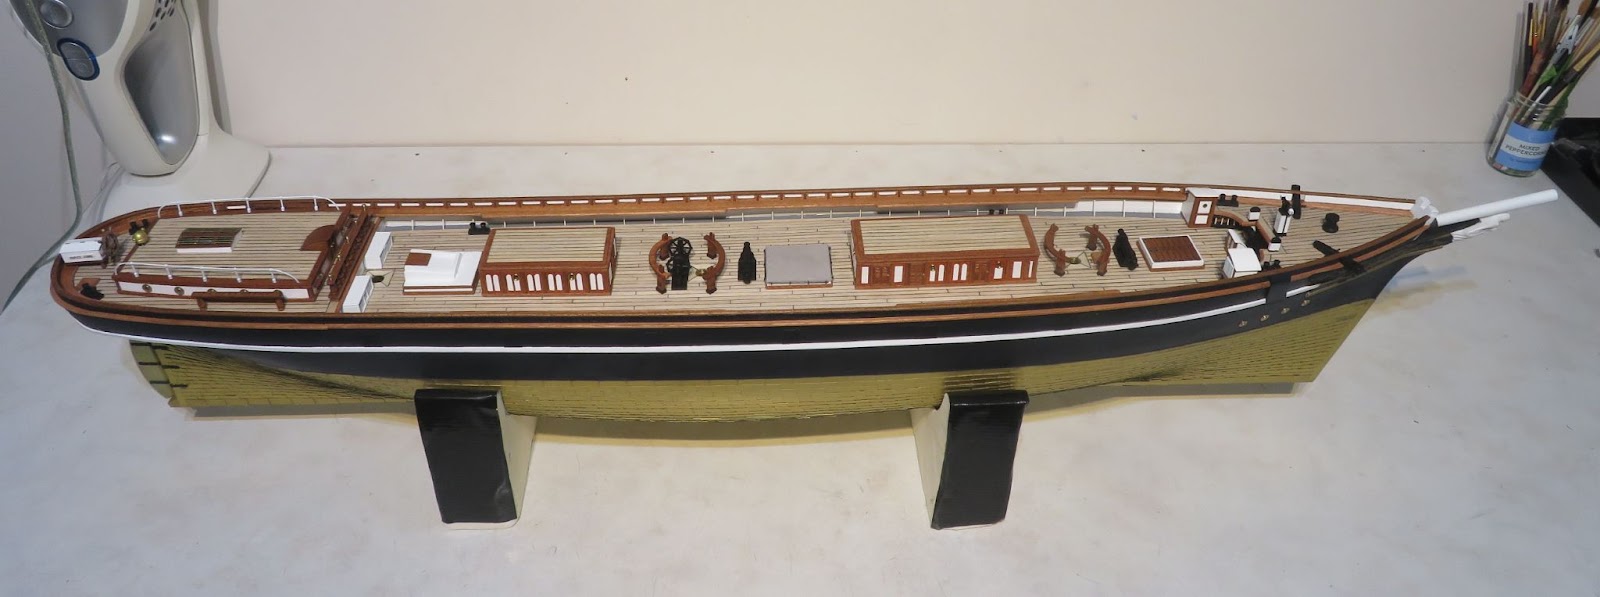
Fitted out decks
The hull is starting to come together nicely.
Next up: I will probably make up the boats and skids that go on the after deck house.
I started this build over two years ago and my planned progress last winter went down the pan because of a kidney stone so the model building was pretty much shelved for two months while I sorted myself out - and then other projects kicked in for the spring and summer - c’est la vie! Although I don’t do New Year Resolutions, I have set myself the challenge to finish most of the hull work over the Xmas/New Year so that I can move onto the masts during January/February. After that I will have less time for the model as my other projects will start-up. Hopefully, I will be rigging by then so I will be able to run a few lines when I have some spare time and spread that over the rest of the year (which will probably be better because my sanity, and my eyesight, will probably be tested to the limit!).
Plenty to get through over the next few weeks - so, here goes nothing!
Deck mast base details: There was a little bit of deck work to finish off before starting to fix things into position. I did not quarter the decking around the bases of the masts when I laid out the main deck because it would have been a disaster if I had made a mistake in the positioning. The quarter pieces need to be large enough to accommodate the mast bases when they are fitted as you can see in the image. The quartering is flush to the decking so I cut away a square section of the deck around each mast. I used some 6 x 0.5 mm lime strips to make up the quarters, gave them a quick wash with some dilute grey stain to match with the deck planks and stuck them down with some thread for the caulking. I will give the decks a light coating of clear matt lacquer once I have finished fitting out.
Details around the (main) mast base (same for fore and mizzen). The image also gives some good information on the position of the bilge pump and the eye rings that will need to go around the mast base.
While I was sorting out the deck, I measured out and drilled the positions for the deadeyes on the poop deck for rigging the mizzen mast.
Fitting the deck houses: Before fitting the deck houses I cambered the bases to the deck by laying some medium grit on the top of the deck and then carefully rubbed each deck house along the midline back and forth until they sat nicely on the deck. The only things to add were some door knobs. Once I was happy with the position I glued them down.
Deck fixtures: This was just a case of measuring the positions for the bits that I made up in Part 22 and gluing them down. I also fixed the poop deck pin rails into place but not the main and foremast fife rails. The positions of the poop rails was a bit of a compromise because I went with a slightly wider margin plank. Looking at my photos, they should stand just inboard of the strops but not so close that they would be blocked by the shrouds.
Poop deck pin rail
I marked out the positions of the fife rails for the fore and main masts and put some brass pegs in the bases of the pillars and then drilled corresponding holes in the deck so that I can just pop them in to fix them into place when I have fixed the anchor positions for the stays. There are also a few details to include at the foremast forward rail as shown in the photograph, a small access hatch to the chain locker between the stay anchors and two chain pipes which are positioned just in front of the pillars. There were no fittings in the kit for the pipes but luckily I found some spares from a previous build which just needed a little modification and painting and I will add those later.
The chain pipes and access hatch to the chain locker (foremast)
Fitted out decks
The hull is starting to come together nicely.
Next up: I will probably make up the boats and skids that go on the after deck house.
That’s looking nice, Dom. And some good ref. pictures to make some nice details.Part 25: Fitting out the Decks
I started this build over two years ago and my planned progress last winter went down the pan because of a kidney stone so the model building was pretty much shelved for two months while I sorted myself out - and then other projects kicked in for the spring and summer - c’est la vie! Although I don’t do New Year Resolutions, I have set myself the challenge to finish most of the hull work over the Xmas/New Year so that I can move onto the masts during January/February. After that I will have less time for the model as my other projects will start-up. Hopefully, I will be rigging by then so I will be able to run a few lines when I have some spare time and spread that over the rest of the year (which will probably be better because my sanity, and my eyesight, will probably be tested to the limit!).
Plenty to get through over the next few weeks - so, here goes nothing!
Deck mast base details: There was a little bit of deck work to finish off before starting to fix things into position. I did not quarter the decking around the bases of the masts when I laid out the main deck because it would have been a disaster if I had made a mistake in the positioning. The quarter pieces need to be large enough to accommodate the mast bases when they are fitted as you can see in the image. The quartering is flush to the decking so I cut away a square section of the deck around each mast. I used some 6 x 0.5 mm lime strips to make up the quarters, gave them a quick wash with some dilute grey stain to match with the deck planks and stuck them down with some thread for the caulking. I will give the decks a light coating of clear matt lacquer once I have finished fitting out.

Details around the (main) mast base (same for fore and mizzen). The image also gives some good information on the position of the bilge pump and the eye rings that will need to go around the mast base.

While I was sorting out the deck, I measured out and drilled the positions for the deadeyes on the poop deck for rigging the mizzen mast.
Fitting the deck houses: Before fitting the deck houses I cambered the bases to the deck by laying some medium grit on the top of the deck and then carefully rubbed each deck house along the midline back and forth until they sat nicely on the deck. The only things to add were some door knobs. Once I was happy with the position I glued them down.
Deck fixtures: This was just a case of measuring the positions for the bits that I made up in Part 22 and gluing them down. I also fixed the poop deck pin rails into place but not the main and foremast fife rails. The positions of the poop rails was a bit of a compromise because I went with a slightly wider margin plank. Looking at my photos, they should stand just inboard of the strops but not so close that they would be blocked by the shrouds.

Poop deck pin rail
I marked out the positions of the fife rails for the fore and main masts and put some brass pegs in the bases of the pillars and then drilled corresponding holes in the deck so that I can just pop them in to fix them into place when I have fixed the anchor positions for the stays. There are also a few details to include at the foremast forward rail as shown in the photograph, a small access hatch to the chain locker between the stay anchors and two chain pipes which are positioned just in front of the pillars. There were no fittings in the kit for the pipes but luckily I found some spares from a previous build which just needed a little modification and painting and I will add those later.

The chain pipes and access hatch to the chain locker (foremast)

Fitted out decks
The hull is starting to come together nicely.
Next up: I will probably make up the boats and skids that go on the after deck house.
Regards, Peter
- Joined
- Sep 23, 2021
- Messages
- 262
- Points
- 168

Part 26: Ladders, Boat Skids, Cats and Making a Start on the Boats.
End of year stuff gobbled up my spare time for the model but I managed to sneak into the shipyard just to get a little bit done in order to post something before the New Year.
First up:- Wishing everyone a Happy New Year! I hope everyone has a good time celebrating in 2025 (please remember not to build under the influence - it won’t end well!)
The Ladders: These were straight forward. There are two pairs, one set for the poop and one for the fore deck access. I made them from some 3mm x 1mm strip and adjusted the step height so that I ended up with four steps per ladder. I used the mill to make the rebates. The foredeck ladders are located just to the inside edge of the cut out and are oriented fore and aft ( See Part 15 Image ) so one side needs to be recessed to fit the moulding along the foredeck edge.
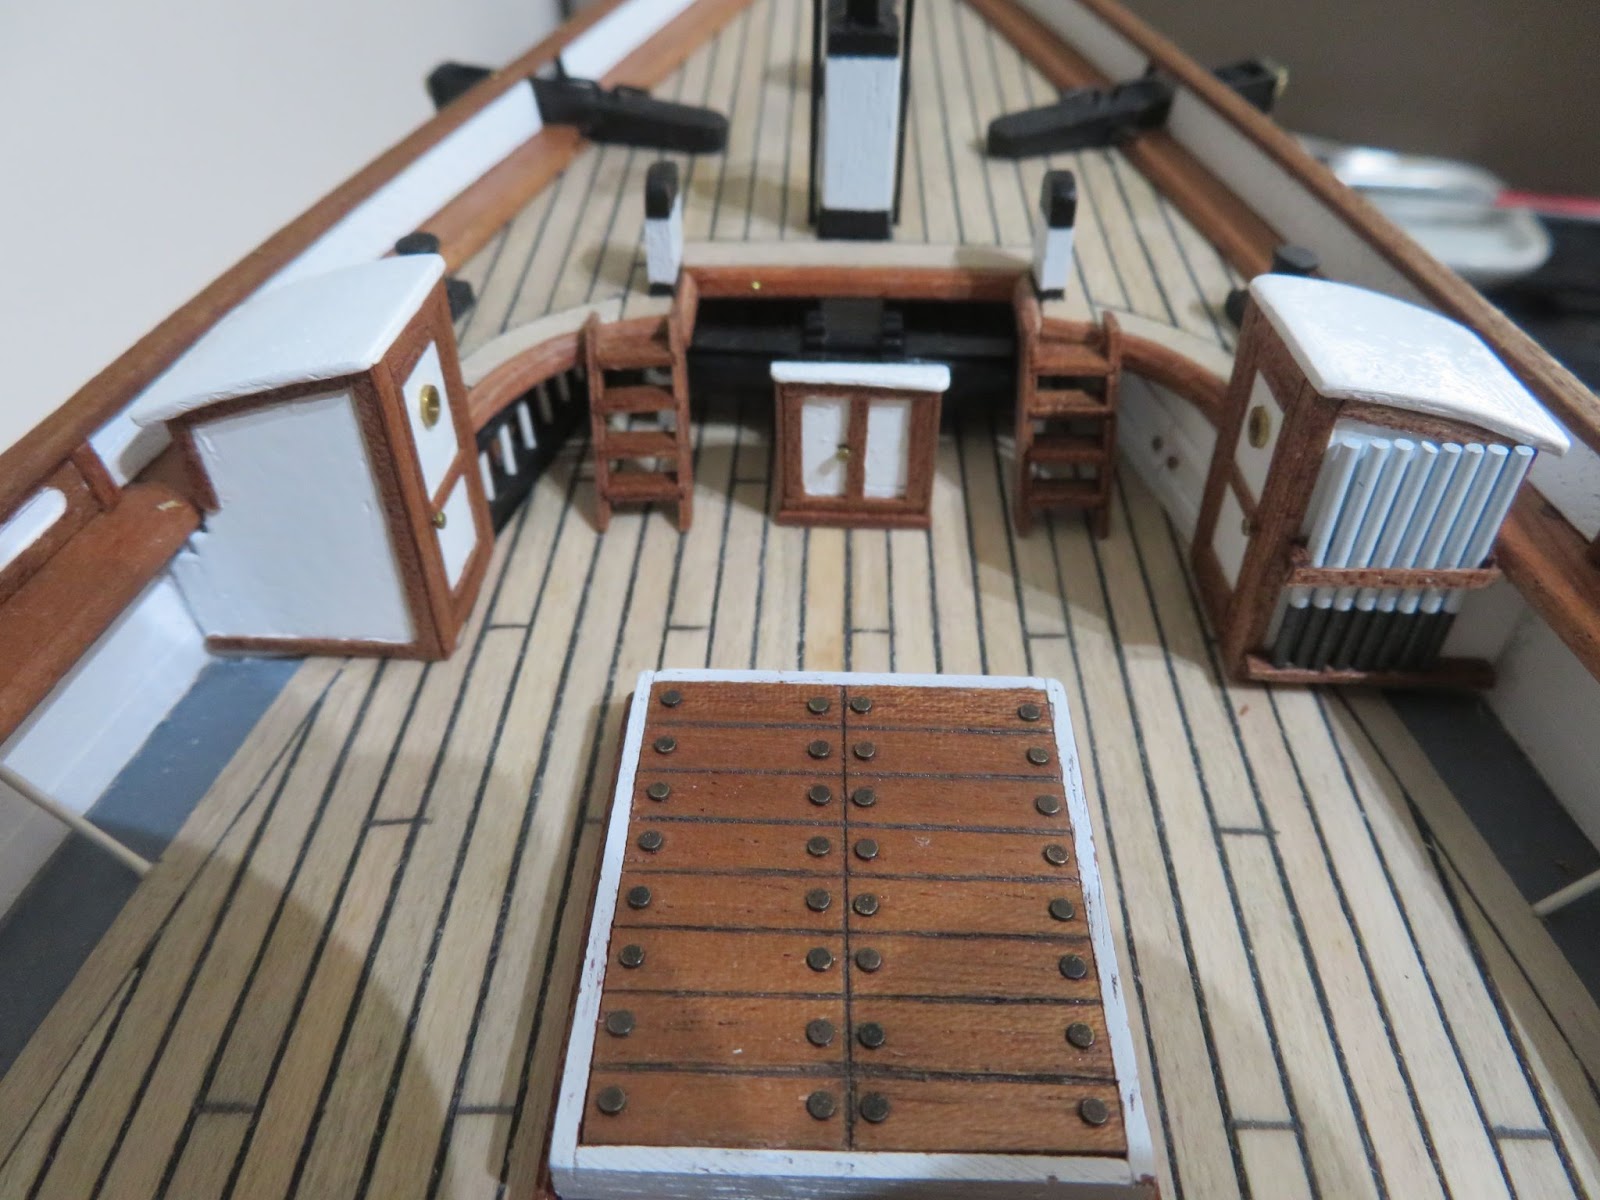
The Boats: On the Cutty Sark there are three types of boats, the Captain's 24’ Gig, a 22’ Jolly and two 25’ Lifeboats. The Billings kit has two types of their “generic” plastic boats which are not the correct size or type, the two lifeboats are just about OK to use but the other two are not really correct if you want to be more accurate. Fortunately, I spotted Kevin’s resin boats from KTL Model Shop on the SOS for the 1/96 Revell Kit Cutty Sark Boats | Ships of Scale and he very nicely re-scaled and printed a set at 1/75 for me. I have just started to make them up so hopefully I will have them finished and painted over the next few days (New Year celebrations permitting). I will try to get the finished boats posted in the next Part.
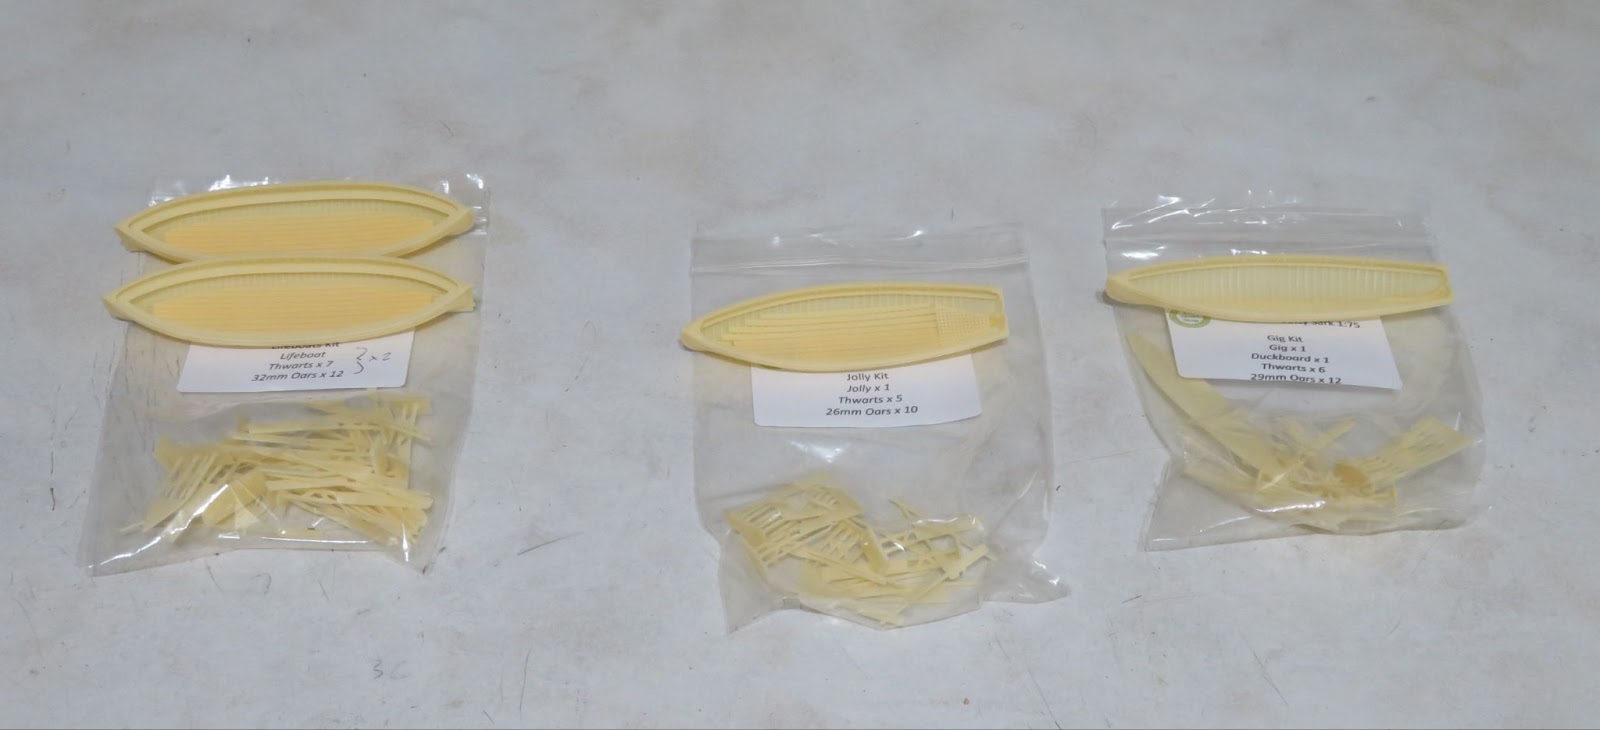
KTL 1/75 Resin Boat Kits
The only “annoying” thing to consider is that after making up the boats the Gig and Jolly are placed upside down on the top of the fore and aft deck houses and the lifeboats are covered with a canvass! It is up to the modeller to decide how the boats will be displayed of course.
The Skids: The skids are located at the aft deck house and are heavy beams that span the full beam of the ship with the outer tips positioned over the top rails. The fore skid is supported just above the roof of the deck house on stepped blocks and the ends of the beam on metal poles that pass through the main rail and are stepped into the water channel. The aft skid is not supported on the deck house but has a set of poles at the middle and ends. The end support poles are shaped with a double bend in order to give more support to the beam. The beams are cambered to match the deck as can be seen in the photograph.
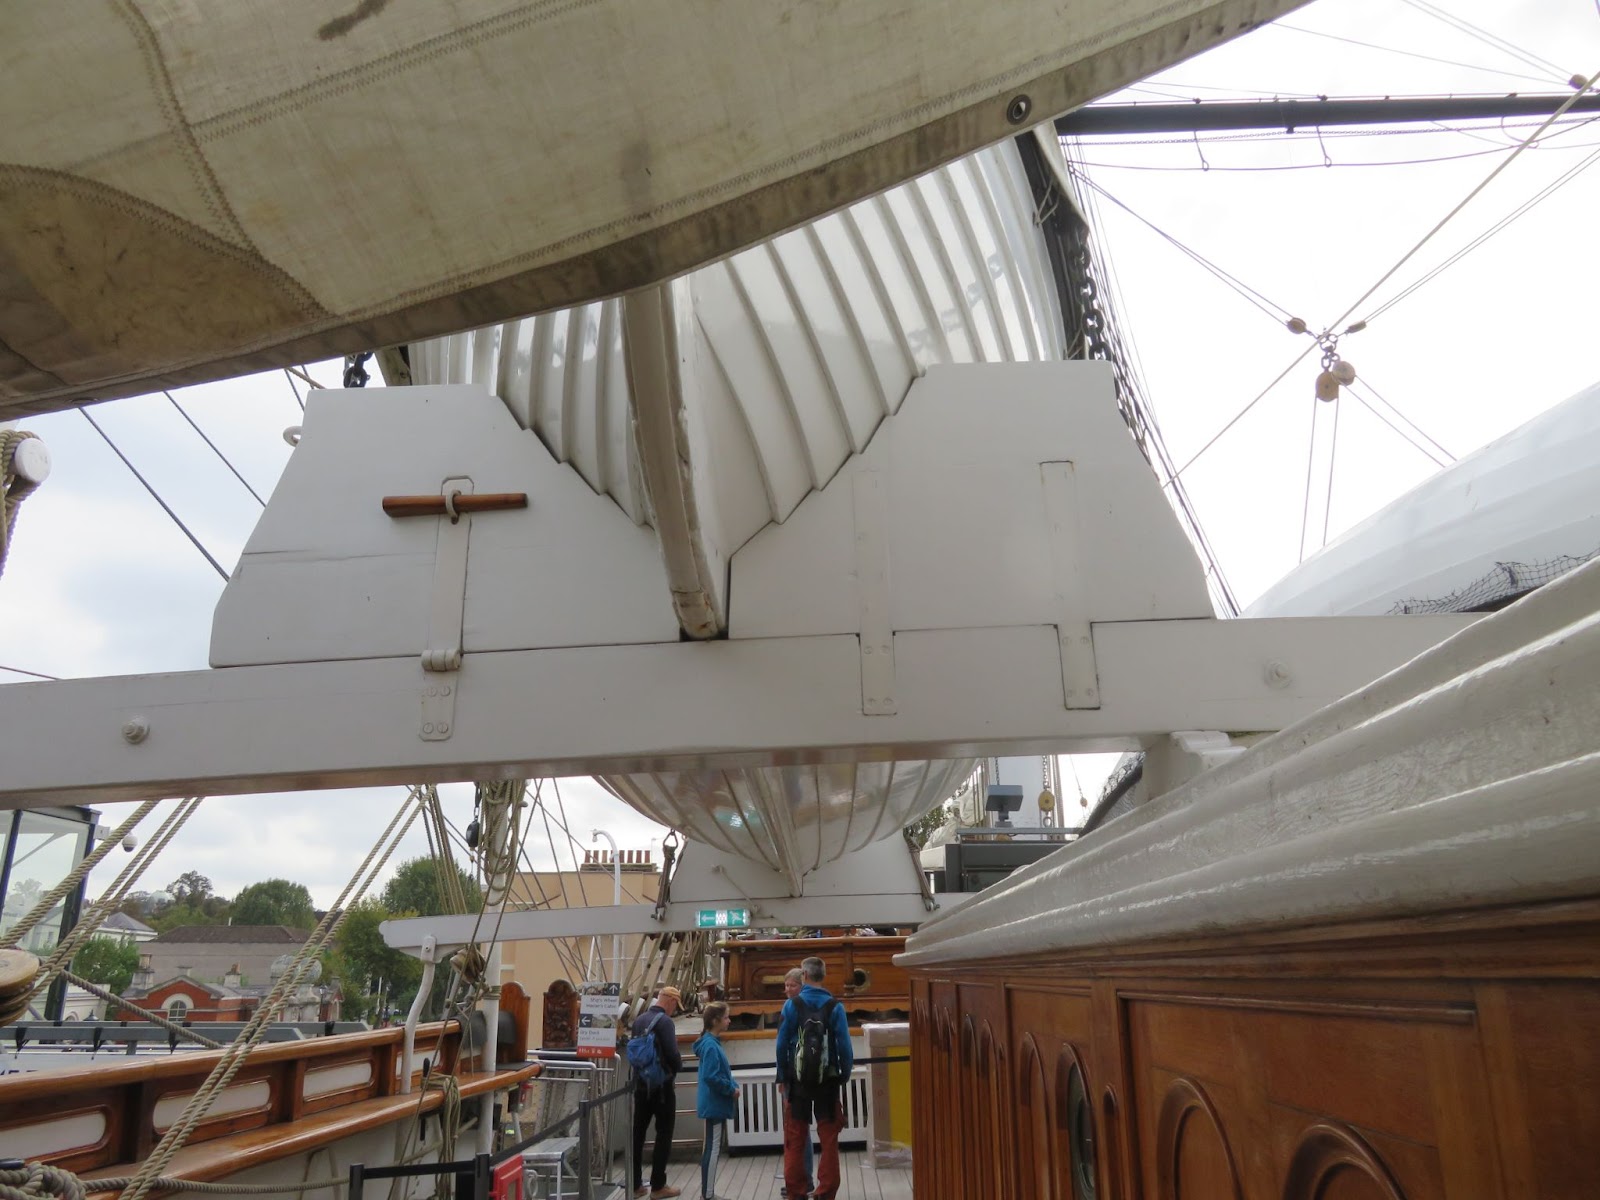
The Skids and one of the Lifeboats Located in the Chocks.
The kit from KTL includes a set of skids and also a spare set of separate boat chocks if you want to make your own skids from wood. I went with the ones supplied in the kit and all that was needed was to trim them down to the correct beam width. After measuring the heights of the skids from the deck I made up the stepped blocks that go on the roof to give me the correct clearance. The hardest part was positioning the fore and aft skids and lining them up so that they had the correct spacing for the boats and then drilling the corresponding holes in the main rail for the end supports. I used some 1.4mm brass rod for the aft centre support poles and 1.2mm rod for the end supports. There are also some eye bolts on the inside face of the skids for tying down the boats.
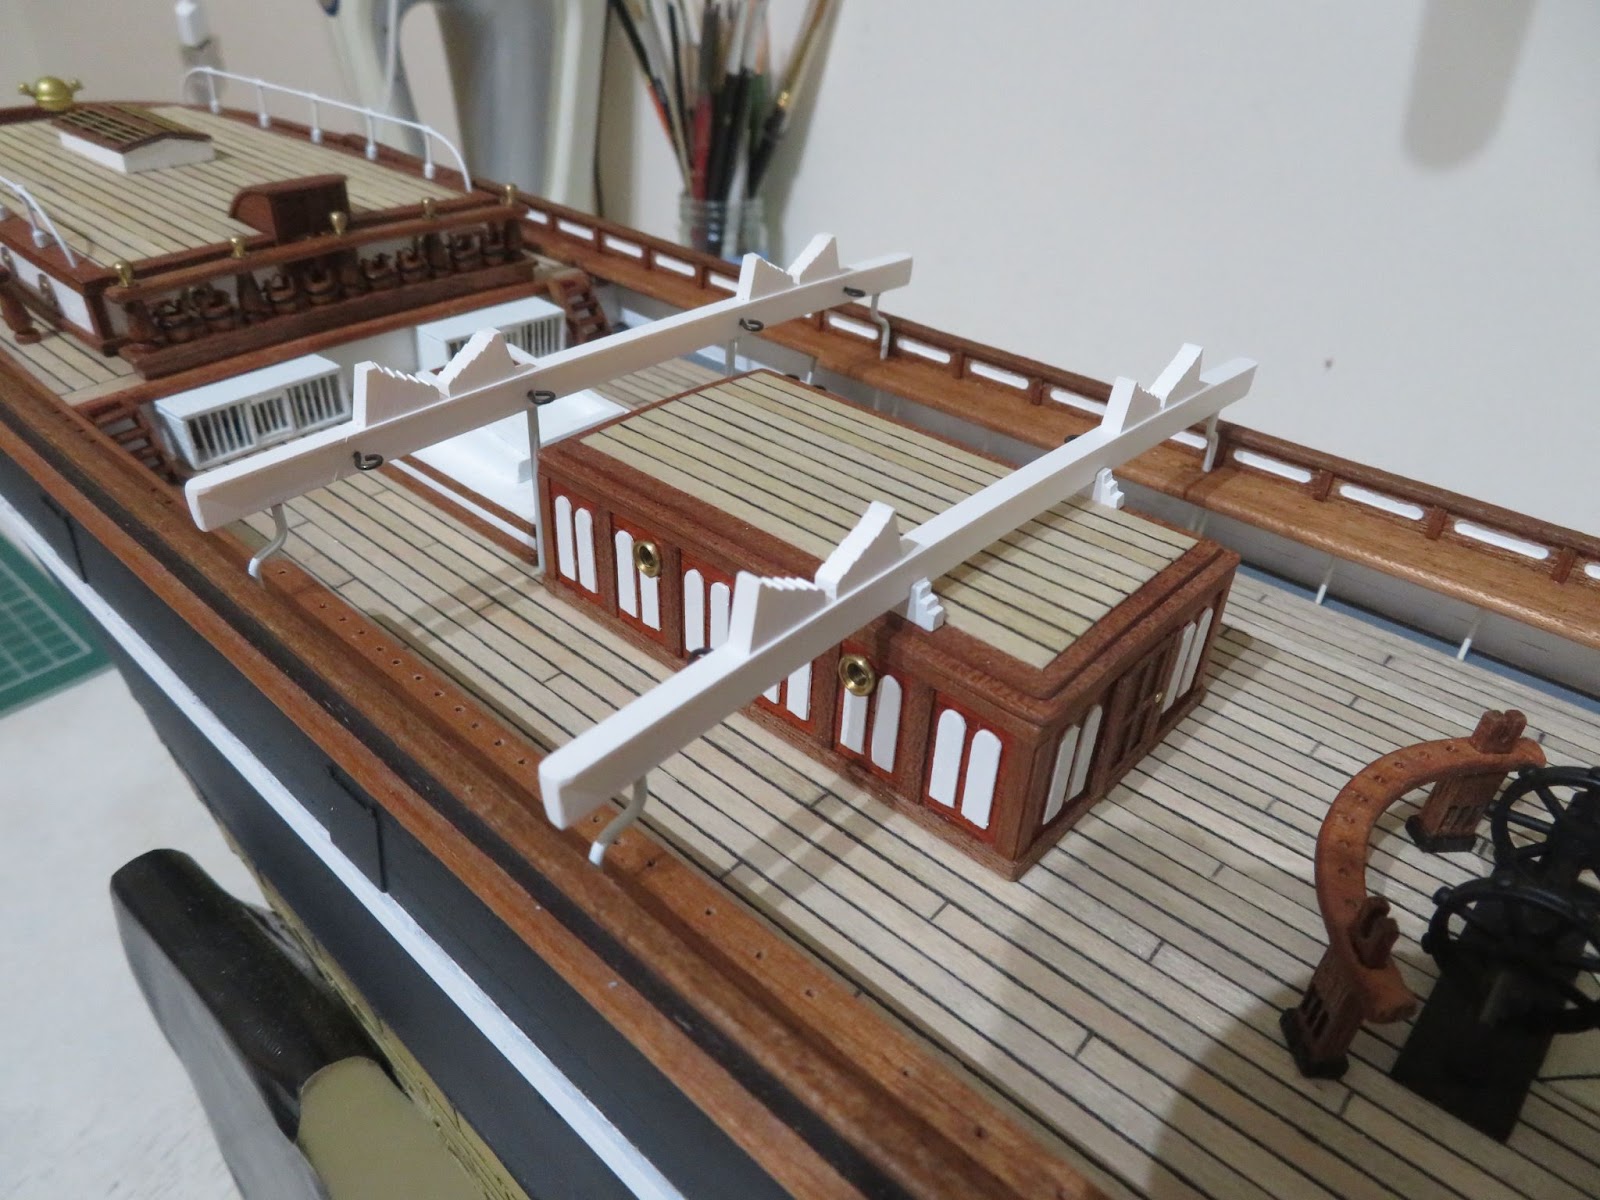
Boat Skids
The Catheads: Kevin from KTL very kindly supplied a few accessories which were very unexpected! The set included the poop deck bell, the hand pump that is found outside the port head, the boomkins, the catheads and the binnacle. The binnacle was very nicely made and of the correct scale and type but since I had already made one up and fitted it, I decided not to use the new one ( it will however find a home on my next build). I will fit the other accessories as soon as I have finished building the boats but I decided that the catheads looked really nice so I painted and fitted them - most excellent result!
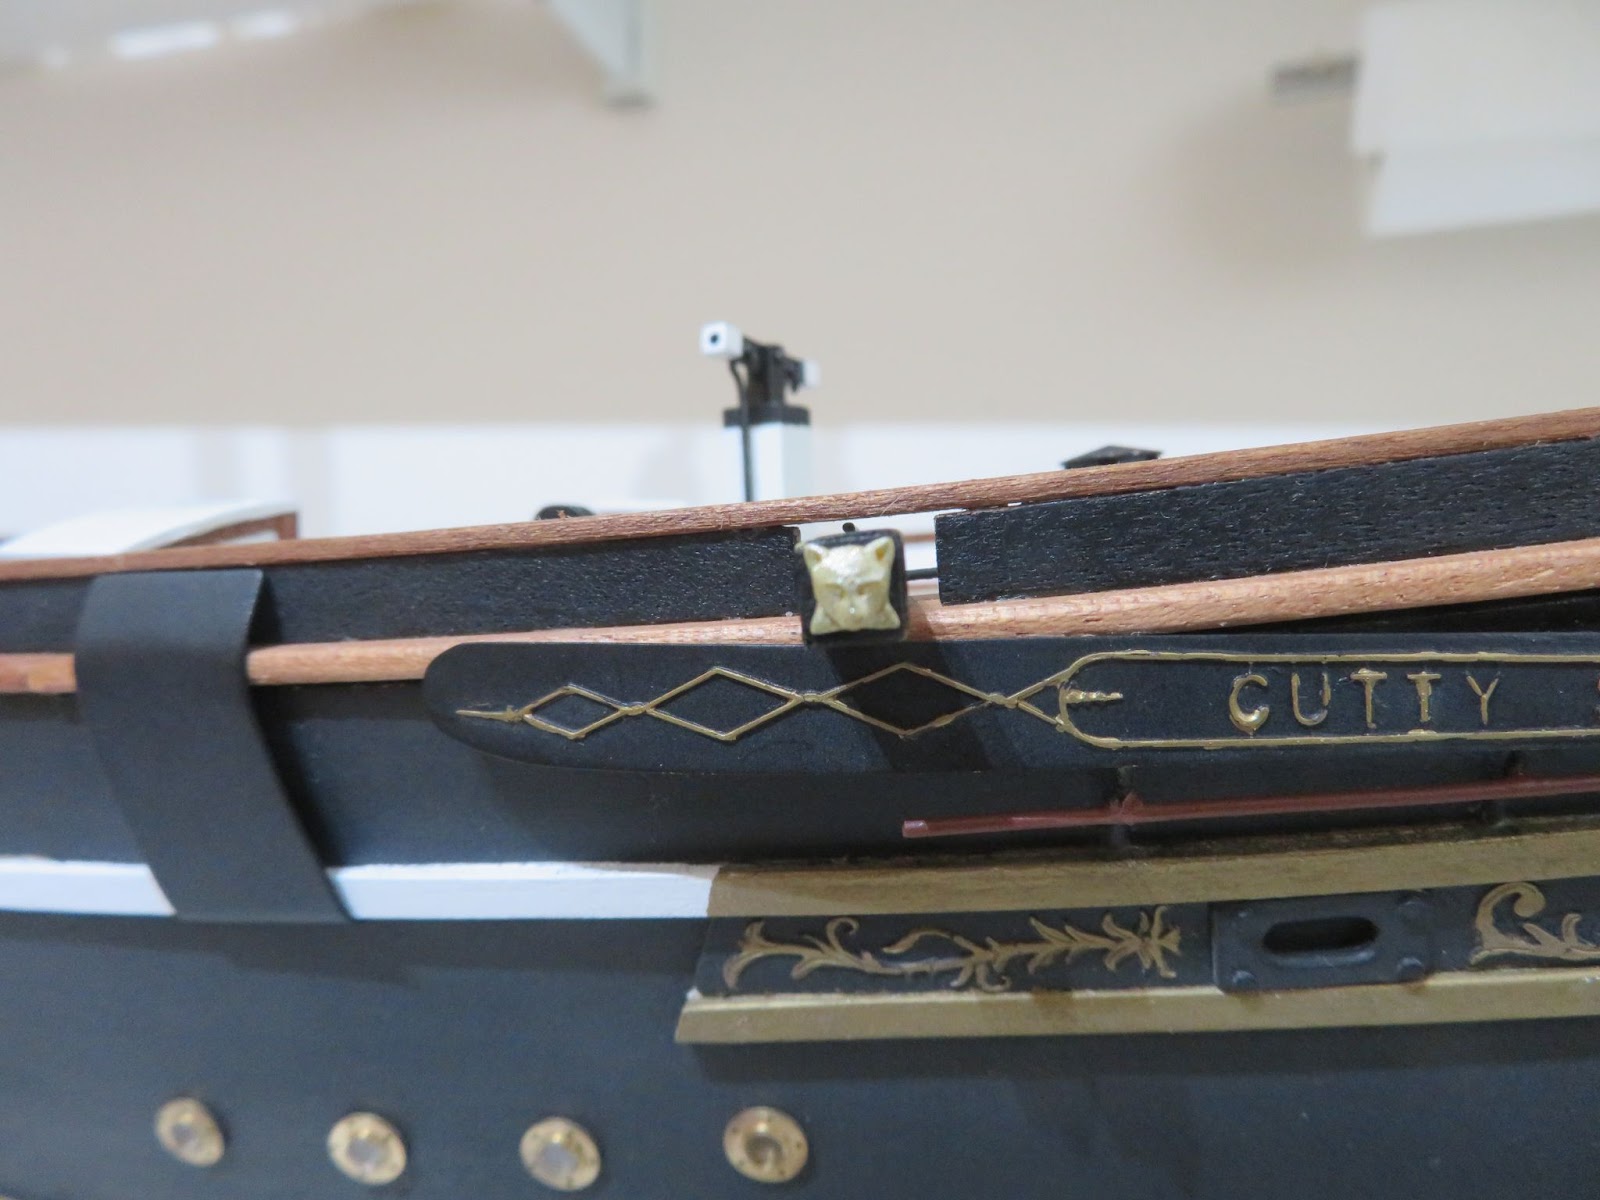
The Cathead!
Very pleased with the boats/skids kit and accessories from KTL , they are accurately made and are the correct type and size for the 1/75 Cutty Sark. They will certainly have saved me a lot of time and hassle and are so much better than the boats in the kit.
Next up: Finishing the boats
End of year stuff gobbled up my spare time for the model but I managed to sneak into the shipyard just to get a little bit done in order to post something before the New Year.
First up:- Wishing everyone a Happy New Year! I hope everyone has a good time celebrating in 2025 (please remember not to build under the influence - it won’t end well!)
The Ladders: These were straight forward. There are two pairs, one set for the poop and one for the fore deck access. I made them from some 3mm x 1mm strip and adjusted the step height so that I ended up with four steps per ladder. I used the mill to make the rebates. The foredeck ladders are located just to the inside edge of the cut out and are oriented fore and aft ( See Part 15 Image ) so one side needs to be recessed to fit the moulding along the foredeck edge.
The Boats: On the Cutty Sark there are three types of boats, the Captain's 24’ Gig, a 22’ Jolly and two 25’ Lifeboats. The Billings kit has two types of their “generic” plastic boats which are not the correct size or type, the two lifeboats are just about OK to use but the other two are not really correct if you want to be more accurate. Fortunately, I spotted Kevin’s resin boats from KTL Model Shop on the SOS for the 1/96 Revell Kit Cutty Sark Boats | Ships of Scale and he very nicely re-scaled and printed a set at 1/75 for me. I have just started to make them up so hopefully I will have them finished and painted over the next few days (New Year celebrations permitting). I will try to get the finished boats posted in the next Part.
KTL 1/75 Resin Boat Kits
The only “annoying” thing to consider is that after making up the boats the Gig and Jolly are placed upside down on the top of the fore and aft deck houses and the lifeboats are covered with a canvass! It is up to the modeller to decide how the boats will be displayed of course.
The Skids: The skids are located at the aft deck house and are heavy beams that span the full beam of the ship with the outer tips positioned over the top rails. The fore skid is supported just above the roof of the deck house on stepped blocks and the ends of the beam on metal poles that pass through the main rail and are stepped into the water channel. The aft skid is not supported on the deck house but has a set of poles at the middle and ends. The end support poles are shaped with a double bend in order to give more support to the beam. The beams are cambered to match the deck as can be seen in the photograph.
The Skids and one of the Lifeboats Located in the Chocks.
The kit from KTL includes a set of skids and also a spare set of separate boat chocks if you want to make your own skids from wood. I went with the ones supplied in the kit and all that was needed was to trim them down to the correct beam width. After measuring the heights of the skids from the deck I made up the stepped blocks that go on the roof to give me the correct clearance. The hardest part was positioning the fore and aft skids and lining them up so that they had the correct spacing for the boats and then drilling the corresponding holes in the main rail for the end supports. I used some 1.4mm brass rod for the aft centre support poles and 1.2mm rod for the end supports. There are also some eye bolts on the inside face of the skids for tying down the boats.
Boat Skids
The Catheads: Kevin from KTL very kindly supplied a few accessories which were very unexpected! The set included the poop deck bell, the hand pump that is found outside the port head, the boomkins, the catheads and the binnacle. The binnacle was very nicely made and of the correct scale and type but since I had already made one up and fitted it, I decided not to use the new one ( it will however find a home on my next build). I will fit the other accessories as soon as I have finished building the boats but I decided that the catheads looked really nice so I painted and fitted them - most excellent result!
The Cathead!
Very pleased with the boats/skids kit and accessories from KTL
 , they are accurately made and are the correct type and size for the 1/75 Cutty Sark. They will certainly have saved me a lot of time and hassle and are so much better than the boats in the kit.
 Next up: Finishing the boats
Good morning Dom. Wonderful progress, she is beautiful. BTW I really appreciate how you layout and present your build log. I always pity the guys looking at my haphazard postsPart 26: Ladders, Boat Skids, Cats and Making a Start on the Boats.
End of year stuff gobbled up my spare time for the model but I managed to sneak into the shipyard just to get a little bit done in order to post something before the New Year.
First up:- Wishing everyone a Happy New Year! I hope everyone has a good time celebrating in 2025 (please remember not to build under the influence - it won’t end well!)
The Ladders: These were straight forward. There are two pairs, one set for the poop and one for the fore deck access. I made them from some 3mm x 1mm strip and adjusted the step height so that I ended up with four steps per ladder. I used the mill to make the rebates. The foredeck ladders are located just to the inside edge of the cut out and are oriented fore and aft ( See Part 15 Image ) so one side needs to be recessed to fit the moulding along the foredeck edge.

The Boats: On the Cutty Sark there are three types of boats, the Captain's 24’ Gig, a 22’ Jolly and two 25’ Lifeboats. The Billings kit has two types of their “generic” plastic boats which are not the correct size or type, the two lifeboats are just about OK to use but the other two are not really correct if you want to be more accurate. Fortunately, I spotted Kevin’s resin boats from KTL Model Shop on the SOS for the 1/96 Revell Kit Cutty Sark Boats | Ships of Scale and he very nicely re-scaled and printed a set at 1/75 for me. I have just started to make them up so hopefully I will have them finished and painted over the next few days (New Year celebrations permitting). I will try to get the finished boats posted in the next Part.

KTL 1/75 Resin Boat Kits
The only “annoying” thing to consider is that after making up the boats the Gig and Jolly are placed upside down on the top of the fore and aft deck houses and the lifeboats are covered with a canvass! It is up to the modeller to decide how the boats will be displayed of course.
The Skids: The skids are located at the aft deck house and are heavy beams that span the full beam of the ship with the outer tips positioned over the top rails. The fore skid is supported just above the roof of the deck house on stepped blocks and the ends of the beam on metal poles that pass through the main rail and are stepped into the water channel. The aft skid is not supported on the deck house but has a set of poles at the middle and ends. The end support poles are shaped with a double bend in order to give more support to the beam. The beams are cambered to match the deck as can be seen in the photograph.

The Skids and one of the Lifeboats Located in the Chocks.
The kit from KTL includes a set of skids and also a spare set of separate boat chocks if you want to make your own skids from wood. I went with the ones supplied in the kit and all that was needed was to trim them down to the correct beam width. After measuring the heights of the skids from the deck I made up the stepped blocks that go on the roof to give me the correct clearance. The hardest part was positioning the fore and aft skids and lining them up so that they had the correct spacing for the boats and then drilling the corresponding holes in the main rail for the end supports. I used some 1.4mm brass rod for the aft centre support poles and 1.2mm rod for the end supports. There are also some eye bolts on the inside face of the skids for tying down the boats.

Boat Skids
The Catheads: Kevin from KTL very kindly supplied a few accessories which were very unexpected! The set included the poop deck bell, the hand pump that is found outside the port head, the boomkins, the catheads and the binnacle. The binnacle was very nicely made and of the correct scale and type but since I had already made one up and fitted it, I decided not to use the new one ( it will however find a home on my next build). I will fit the other accessories as soon as I have finished building the boats but I decided that the catheads looked really nice so I painted and fitted them - most excellent result!

The Cathead!
Very pleased with the boats/skids kit and accessories from KTL, they are accurately made and are the correct type and size for the 1/75 Cutty Sark. They will certainly have saved me a lot of time and hassle and are so much better than the boats in the kit.
Next up: Finishing the boats
- Joined
- Sep 23, 2021
- Messages
- 262
- Points
- 168

Part 27: The Boats
Another year gone, a new one begins!
My plan to try to get the hull mostly done over the Christmas/New Year fell flat on its face - no surprise! We are supposed to make merry after all!
To get things going for 2025 I finished the boats from KTL. They were very precisely printed and went together very easily with very minimal preparation needed to remove any residual resin left from the print supports. I decided to use mahogany red/brown for the interior and the gunwales, gloss white for the hulls and ash yellow for the oars. All that was needed was glue in the thwarts. I gave the boats a light misting of clear lacquer to finish them. I lashed in the oars (all of them!) to the thwarts and used a drop of glue to just keep them from moving. The lifeboats would also have been stowed with a simple mast and lug sail, similarly the jolly and gig would also have a mast and sail so I may make up something and add them later.
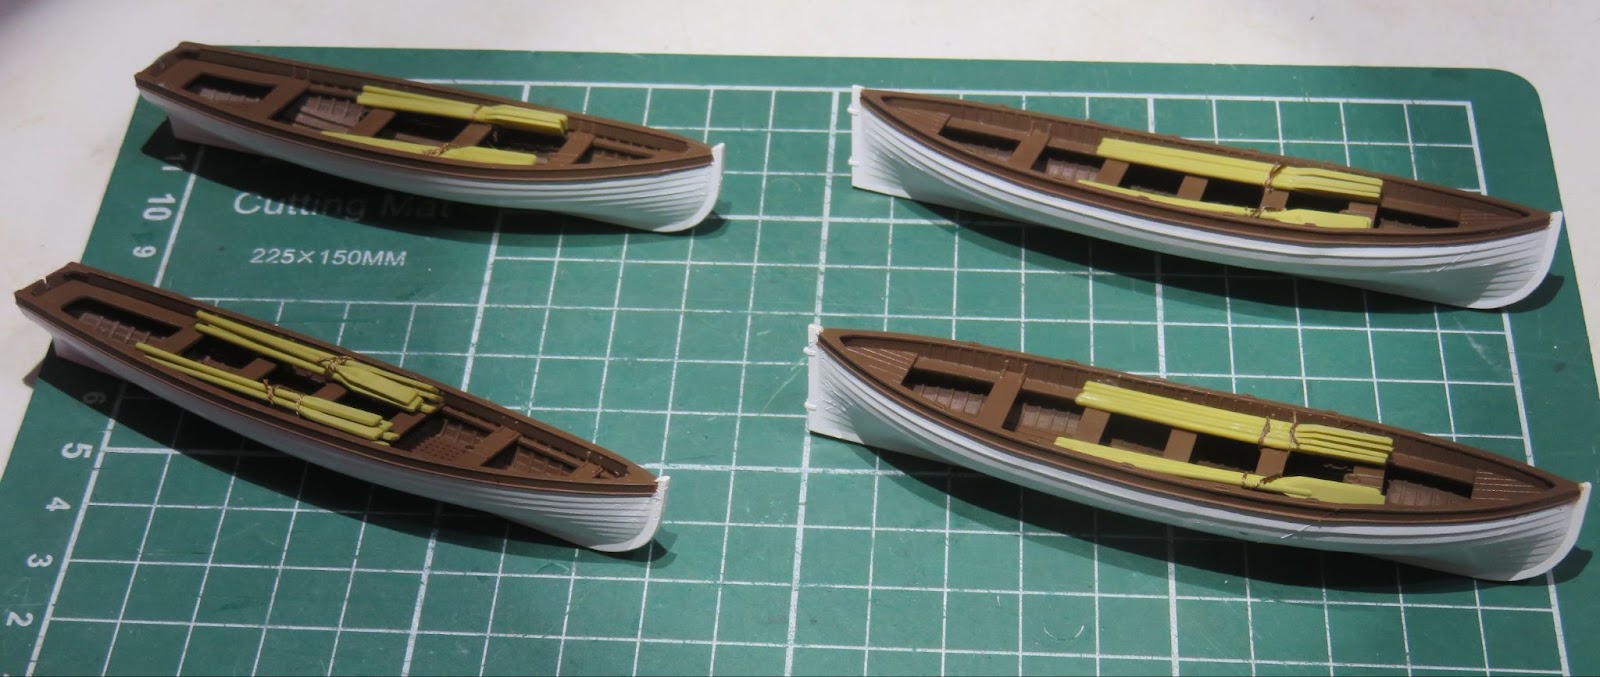
Finished Boats
The boat kits from KTL were well worth buying and the accessories will add some nice extra details. I will leave the boats off the model for the moment while I finish off some of the other deck details so that they do not get in the way or damaged.
Next up: I need to make the railings for the poop and forecastle decks and fit those which will be quite a fiddly job to do. I will also paint and fit the davits for the boats.
Another year gone, a new one begins!
My plan to try to get the hull mostly done over the Christmas/New Year fell flat on its face - no surprise! We are supposed to make merry after all!
To get things going for 2025 I finished the boats from KTL. They were very precisely printed and went together very easily with very minimal preparation needed to remove any residual resin left from the print supports. I decided to use mahogany red/brown for the interior and the gunwales, gloss white for the hulls and ash yellow for the oars. All that was needed was glue in the thwarts. I gave the boats a light misting of clear lacquer to finish them. I lashed in the oars (all of them!) to the thwarts and used a drop of glue to just keep them from moving. The lifeboats would also have been stowed with a simple mast and lug sail, similarly the jolly and gig would also have a mast and sail so I may make up something and add them later.
Finished Boats
The boat kits from KTL were well worth buying and the accessories will add some nice extra details. I will leave the boats off the model for the moment while I finish off some of the other deck details so that they do not get in the way or damaged.
Next up: I need to make the railings for the poop and forecastle decks and fit those which will be quite a fiddly job to do. I will also paint and fit the davits for the boats.
Last edited:


