Yes, understand you very well. Austria is a very beautiful country. I lived in Germany for 10 years and visited Austria attending motorcycle racing at A-1 Ring in Spielberg many times!!!english istn't my first language, but I hope you got my point
-

Win a Free Custom Engraved Brass Coin!!!
As a way to introduce our brass coins to the community, we will raffle off a free coin during the month of August. Follow link ABOVE for instructions for entering.
-

PRE-ORDER SHIPS IN SCALE TODAY!
The beloved Ships in Scale Magazine is back and charting a new course for 2026!
Discover new skills, new techniques, and new inspirations in every issue.
NOTE THAT OUR FIRST ISSUE WILL BE JAN/FEB 2026
You are using an out of date browser. It may not display this or other websites correctly.
You should upgrade or use an alternative browser.
You should upgrade or use an alternative browser.
Don's Battle Station
- Thread starter DonRobinson
- Start date
- Watchers 14
-
- Tags
- deck battle station
Hello Markus, thanks for stopping by and offering your thoughts. You are absolutely right with your observation and now, when I look at the picture I agree with you.
I have never done a train tackle before and could not find a good example of one, all I knew was some had one while others had two.
The purpose of a train tackle is to haul the cannon and carriage back after firing. With my setup the carriage would hit the eyebolts as they are neither wide enough or far enough back for even the the breeching line to fully extend.
Although I will not change this on the model, as it it is covered in at this point, I will keep this in mind and not make the same mistake again.
Again Thank You for sharing your knowledge,. Any further observations are most welcome
Hey all another small update:
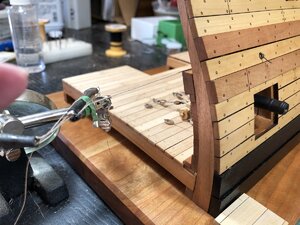
Here I am seizing a loop onto the rope which will attach to the gunport hatch. You can see I already have a eyebolt attached
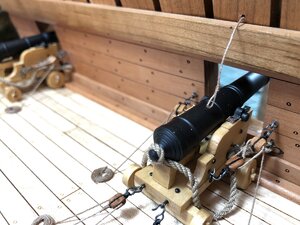
Here it is completed. Seizing is a bit sloppy but that's ok because at this point you take scissors and cut the rope off as it is much to short!!
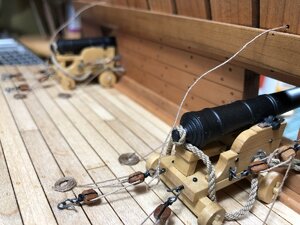
Here I am again with both ropes completed and at the proper length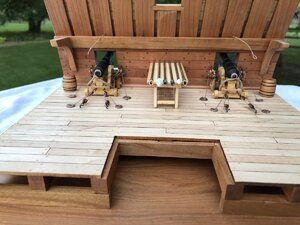
A new table to hold the tools and some barrels added. I'm thinking a bottle of rum may look good there
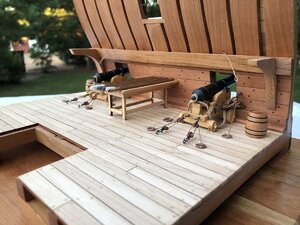
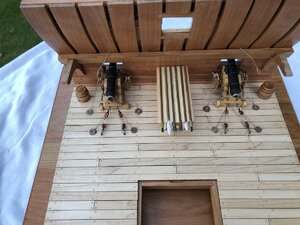
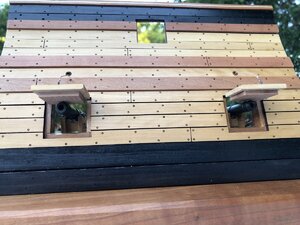
Gun port lids attached. They are fully adjustable and will be raised, also quoins will be added to cannons
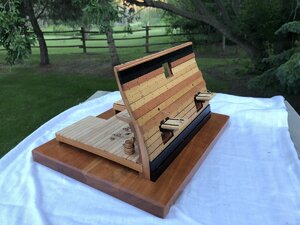
One last picture.
Enjoy yourselves and thanks for stopping in

Here I am seizing a loop onto the rope which will attach to the gunport hatch. You can see I already have a eyebolt attached

Here it is completed. Seizing is a bit sloppy but that's ok because at this point you take scissors and cut the rope off as it is much to short!!

Here I am again with both ropes completed and at the proper length

A new table to hold the tools and some barrels added. I'm thinking a bottle of rum may look good there


Gun port lids attached. They are fully adjustable and will be raised, also quoins will be added to cannons

One last picture.
Enjoy yourselves and thanks for stopping in
Well it is part of the kit. I used pieces of the leftover billets to make it. 
Kurt Konrath
Kurt Konrath
Improvise, Adapt and Overcome!
Table looks great and doors and pull ropes also.
Makes me wish more kits had been made, as I like the small diorama style battle stations.
Table looks great and doors and pull ropes also.
Makes me wish more kits had been made, as I like the small diorama style battle stations.
- Joined
- Apr 20, 2020
- Messages
- 6,239
- Points
- 738

Dear DonHey all another small update:
View attachment 168684
Here I am seizing a loop onto the rope which will attach to the gunport hatch. You can see I already have a eyebolt attached
View attachment 168685
Here it is completed. Seizing is a bit sloppy but that's ok because at this point you take scissors and cut the rope off as it is much to short!!
View attachment 168686
Here I am again with both ropes completed and at the proper lengthView attachment 168687
A new table to hold the tools and some barrels added. I'm thinking a bottle of rum may look good there
View attachment 168688View attachment 168689
View attachment 168690
Gun port lids attached. They are fully adjustable and will be raised, also quoins will be added to cannons
View attachment 168691
One last picture.
Enjoy yourselves and thanks for stopping in
very impressive work process and so the result which came out really beautiful.
It was very interesting to read the blog and the photos you added.
Good day to all!
Another update, the lower deck is now complete and work on the upper deck has begun
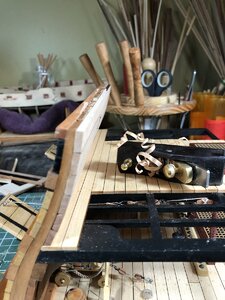
After upper spirkiting was installed the top edge needed to be planed to allow for gun rail to sit properly, the plane is from Lee Valley. Upper deck is now permanently installed. Gun port doors now have rigging added
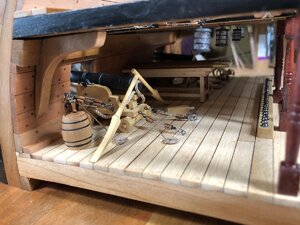
View of completed lower deck
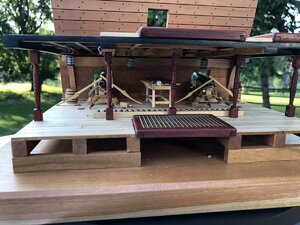
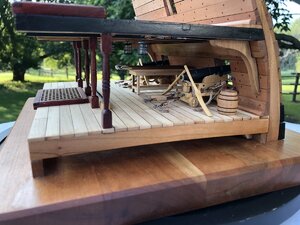
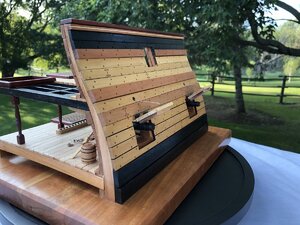
Next is to install upper cannon, stairs and permanently attach hatches.
Thanks for having a look and for all the comments and likes.
Have a Good Sunday
Another update, the lower deck is now complete and work on the upper deck has begun

After upper spirkiting was installed the top edge needed to be planed to allow for gun rail to sit properly, the plane is from Lee Valley. Upper deck is now permanently installed. Gun port doors now have rigging added

View of completed lower deck


Next is to install upper cannon, stairs and permanently attach hatches.
Thanks for having a look and for all the comments and likes.
Have a Good Sunday
Really, really nice, Don. It was worth the wait!
Pardon my ignorance, but what is a quoin?Hello All, I am finally getting around to starting this project and realise I have a long way to go to catch up to Mike and Dave. I thought to be a little different I would start with the carriages and give you a little different look at this model.
View attachment 46960
The billet containing the the parts for the carriages. The billet is a beautiful boxwood picked out by Dave and laser cut by Mike.
View attachment 46961
Here are the pieces separated and mostly cleaned of char. I do not spend too much time on cleaning char as I think a little left does add to the model at times. There two different sizes of quoins as the plans showed two quoins for each of the long guns so we decided to go with one thicker one for those. as you will see later one small quoin will be sufficient for both sizes of cannon.
View attachment 46962
Drilling out the quoin for the handle
View attachment 46963
Drilling the axle
View attachment 46964
Assembly has started
View attachment 46965
Making the handles for the quoins. I made extra ones in order to pick the best of the bunch. These are made by rolling the wire in thick ca then sprinkling them with baking soda to harden them. Then sanded and filed to shape, these are still in need of shaping but I will be able to get three out of these with no problem.
Caution should be taken here not to touch your nose when doing this. If someone was to walk in your shop seeing you enjoying yourself with white powder all over your bench and nose they may be very suspicious of what you are doing!!!
View attachment 46966
Ready for next step
View attachment 46967
Drilling the bed, this hole needs to be drilled completely though the piece and approximately 3 mm from the front
View attachment 46968
Drilling the front support piece, again this needs to be completely drilled through.
View attachment 46969
Both the bed and the front support piece are attached by using two nails, one from either side. The bed is relatively easy to install, however, the front support is a little harder to line up the holes with the nails. A coffee helps calm your nerves while doing this, then a few stiff drinks to celebrate when finished are definitely in order.
View attachment 46970
And here is how they look now. The 3 mm bar used for the trunnions are easily cut with a razor saw then filed smooth. It looks to me there may not be enough elevation to allow for a quoin on the long guns. Dave and Mike you may want to take off a couple of mm on the back support piece (9) to allow for this.
The boxwood looks so nice it hardly needs a finish, but my next step is a coat of wipe on poly.
One last thought and that is to thank Mike and Dave for including me in the wonderful project!!
Thanks for looking in, and I'l' be back with more updates. See You soon
The small triangular part that goes under the base of the cannon. It is used to adjust the cannon elevation by sliding it in and out.what is a quoin?
Love your hatches. How did you do the tree nails?Hello everyone, I hope you are all doing fine during all this Covid fiasco. I have finally returned to the workbench after a long absence and have a little to show. I will not go into depth why I have been missing for so long as most of it is just boring excuses and no need to repeat. My buddy Mike does enough boring reporting so I feel there is no need for me to follow in his footsteps!! LOL
View attachment 167067
Here is the interior, this went relatively well and fit perfectly.
View attachment 167068
A side view showing the floor, originally I was leaving the laser char on the ends but then changed my mind. Would have been much easier sanding before installing. This is one of the moments when the fun started to fade away.
View attachment 167069
Here is where all fun stopped!! While building the upper floor and not paying attention I glued some of the frames in the wrong places and had to disassemble and rebuild. Needless to say there was other damage that was going to show. We were not supposed to use paint on this model, however, I thought it was easier to paint then to ask Dave for some ebony and for Mike to cut it for me. Hahaha.
Although I broke the rules I really don"t mind the look of it.View attachment 167070
Another view, I remade the columns out of Padauk wood to match the hatch combings. I forgot to mention the upper floor is not attached yet it is just sitting there for this awesome photo shoot
I really need to do some dusting soon!
View attachment 167071
Another view, is this getting boring? Blame Mike if it is!!
View attachment 167072
Here we go the hatches. I rebuilt these as I was short two and the one I did have was damaged, no one to blame as I was the one who packed the kits!!
It was not all that bad as I got to use the mill, thickness sander and tablesaw. A few hours work and minimal cussing they came out looking pretty good.
View attachment 167073
And another angle, I'm liable to fall asleep soon if this keeps up. In the top left of the floor you can see a lantern that I made. There are four of them, I will not show a close up as I am not that proud of them and they may end up in the garbage bin.
View attachment 167074
All the blocks rigged and ready for cannons and gun port doors. Blocks were made of left over pieces from various billets, rope is also handmade and the hooks I made from ,5 mm wire. Blocks were finished with boiled linseed oil.
View attachment 167075
A shot of the front with the addition of the gun rail, which I forgot to add in the previous pictures. I remade this from Padauk wood also, the original one made from rosewood was about 2 mm short. When I think back I believe I was the one that cut these pieces to length in Mike's shop. I'm starting to think that I should give up this hobby and take up poking needles in my eyes. LOL
View attachment 167076
Cannons that were once assembled were disassembled as I changed my mind about having brass coloured barrels. Oh yah, a better shot of those infamous lanterns.
Trust me they are good from afar but a far from good.
View attachment 167077
And another view
View attachment 167078
Wow!! Does it ever end? How many pictures of this are needed?
I've got myself so tired and bored I need a sleep!
Take Care and Thanks for dropping in
Thanks, Mike.The small triangular part that goes under the base of the cannon. It is used to adjust the cannon elevation by sliding it in and out.
I was thinking the same thing! LOL!@DocBlake did you get those cannon pike tools with your kit? It seems that Don may have shorted us a few parts.

I like your little lanterns and your bitty plane.Good day to all!
Another update, the lower deck is now complete and work on the upper deck has begun
View attachment 169873
After upper spirkiting was installed the top edge needed to be planed to allow for gun rail to sit properly, the plane is from Lee Valley. Upper deck is now permanently installed. Gun port doors now have rigging added
View attachment 169874
View of completed lower deck
View attachment 169875View attachment 169876View attachment 169877
Next is to install upper cannon, stairs and permanently attach hatches.
Thanks for having a look and for all the comments and likes.
Have a Good Sunday
Those hatches are very famous. We call them Robinson Hatches. All the treenails are laser etched!!Love your hatches. How did you do the tree nails?
They are amazing! (The hatches, that is.)Those hatches are very famous. We call them Robinson Hatches. All the treenails are laser etched!!
The hand pikes were a last minute thing, just trying to use up some of this beautiful wood from the billets. Send me your billets and I will make more!! lololol
"Pardon my ignorance, but what is a quoin? "
@Vfordyce Thanks for all your comments. I think Mike answered all your questions, feel free to ask all the questions you want we don't assume ignorance here
"Pardon my ignorance, but what is a quoin? "
@Vfordyce Thanks for all your comments. I think Mike answered all your questions, feel free to ask all the questions you want we don't assume ignorance here
Don never lets any wood go to waste!!!!!!Send me your billets and I will make more!! lololol


