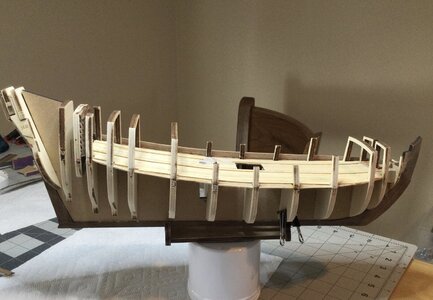
Duyfken 1/50 scale - Kolderstock

Oh well back to the bad words and make a deposit in the “JAR”. Probably should leave the cap off!

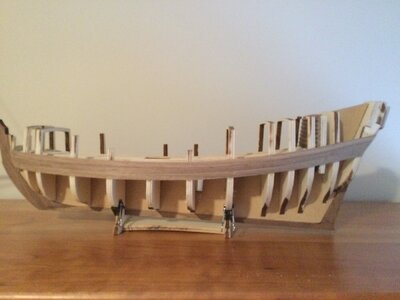
I glued strakes above and below the first. Not happy with the fit.
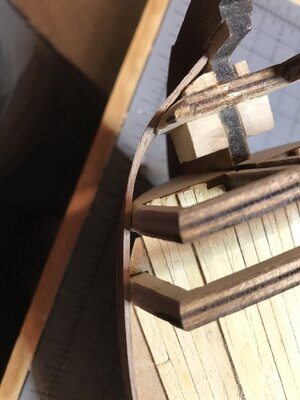
64E3CFC1-2F6B-4CAD-B140-7D5284249448.jpeg
B247CE04-C7B2-44CB-9D0A-F4B3FCE65E1F.jpeg

I think my enthusiasm got the best of me and I over or under did the fairing and also screwed up the bow block. ( The blocks behind bulkhead no. 1 are a repair), I inadvertently broke the bulkhead while pinning the strakes). So to follow in my mentors ( Heinrich) footsteps, everything will be stripped off and redone. :rolleyes::rolleyes:


Jan
 
Oh well back to the bad words and make a deposit in the “JAR”. Probably should leave the cap off!

I glued strakes above and below the first. Not happy with the fit.
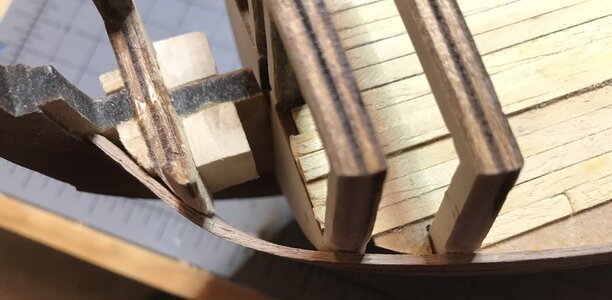
View attachment 279779
View attachment 279780

I think my enthusiasm got the best of me and I over or under did the fairing and also screwed up the bow block. ( The blocks behind bulkhead no. 1 are a repair), I inadvertently broke the bulkhead while pinning the strakes). So to follow in my mentors ( Heinrich) footsteps, everything will be stripped off and redone. :rolleyes::rolleyes:


Jan

C’est la vie Jan. :(
Take a couple laps on the snow machine to clear your head. All can be repaired.

Ron
 
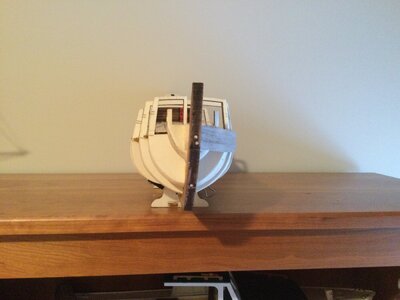
Jan, hold your horses! Before you do anything, can you take a picture directly from the front (standing square and level with the bow and one from the side that is also level at not at an angle?
 
Take a couple laps on the snow machine to clear your head. All can be repaired
I would if could, but alas, warm temperatures, fog and rain have reduced the available snow base. I think I’ll have to wait until the next major snowfall to ride. Fortunately it’s that time of year, so I probably won’t have to wait long.

Jan
 
Thanks Jan. The only "mistake" I can see is in the shape of your filler blocks which are not as "full" as they should have been. However, from what I can see in the picture from the front (difficult because you didn't take a close up pic) is that you have a very nice, flowing line of your planks with no gaps. You are also already at the top of the balsa filler block so it's not going to play any further role from now on.

Therefore I don't know if any stripping is necessary? This is of course is based on what I can see, so if you have any other info that can enlighten us, please share.
 
Ok ... me again ... tell me to bugger off, if I become a pest! ROTF (I hear that regularly, so no problem!)
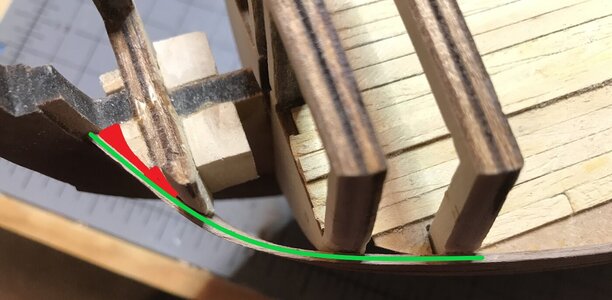
B247CE04-C7B2-44CB-9D0A-F4B3FCE65E1F.jpg
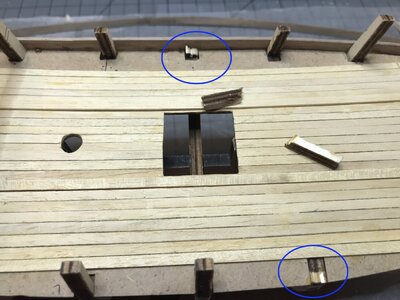
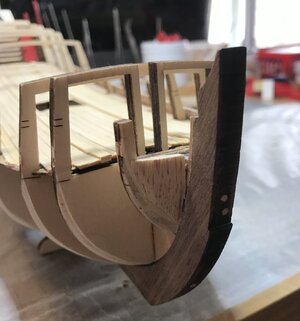
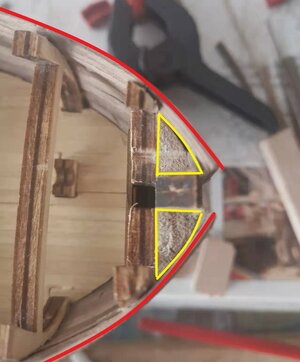
In an ideal world, you should not have had those little open spaces (triangles that I have marked in red) between your strake and the balsa filler block. However, if I look at the line that the actual plank follows, it is firmly embedded in the "rabbet" that the stem creates and follows a beautiful line around the bulkheads. But from this point planking further upwards, the balsa filler block plays no further role.

Have a look at the pic on the WB.

微信图片_20220102132131.jpg
First, the two yellow triangles indicate how the filler blocks should look when viewed from the top. You can still the redress the block on the port side as long as you make sure that it stays symmetrical with the starboard side. But note now: The last three planks are completely unsupported with the filler blocks playing no role whatsoever. Also, you can't raise the height of the filler blocks, because they will then protrude above the deck level.. The three topmost planks are simply glued to bulkhead #1 and then the unsupported part is only edge-glued to the one directly underneath it. That is why I say, the filler blocks now play no further role planking upwards.

So this is a long story to try and tell you that I would not strip those planks. I hope this helps and that it makes sense.
 
just fill it up with scratch pieces of wood. I did that too. It is wood and we are always in a learning curve to do things better next time. Your work on this model is a great thing to see.
 
@Heinrich ,

Not to worry, I don’t mind getting comments, help, hints and criticism. The input from SOS members has helped me with every one of my builds. So keep the comments coming.

@Steef66

Thank you for tuning in. Your method has merit and as you note we learn as we go.

Jan
 
Nice built. I do not see any issue with the plank strip and the space behind it. The Rabbet is keeping the plank tip in place. If you feel uncomfortable seen that space (market in red by Henrich), well, just filled with wood, as been said previously, or, filled it with putty. Putty placed by pressure with your finger will take the internal shape of the hole better.

Personally, if the filler is just not doing anything, and the following planks fit like the one of the picture, the job is done for me. And I will move on. There are no mistakes, and from the pictures, the plank curvature looks fine, as mentioned by Heinrich.

Nice job !!!

Daniel
Ps: Fortunately, probably due to all the atmospheric changes, this year we haven't have yet snow in MA. And, fortunately again, I will me moving to Florida in 2023. My body after shoveling snow and my fractured bone due to ice, will be VERY happy. :-)
 
Ps: Fortunately, probably due to all the atmospheric changes, this year we haven't have yet snow in MA. And, fortunately again, I will me moving to Florida in 2023. My body after shoveling snow and my fractured bone due to ice, will be VERY happy
“Oh no“ on the fractured bones but I wish you the best on your future move. We usually trip down to South Carolina for a couple of weeks in March. We skipped last year and will also skip this year because of Covid.

Thanks for the input on my build. I had convinced myself that a “DO-OVER” was required.

Jan
 
A good day for visiting the shipyard. My other two builds are on temporary hold while waiting for bits and pieces I've ordered. So I dug out the Little Dove and added a bow filler on the Port side to help with the planking on that side.

But as would be the case my "Bumble Fingers" did their thing.

47C6DABD-F18D-4B04-B26B-8880A4FD30A7_1_201_a.jpeg

Not only did I break one, but I broke two :mad::mad:

I did manage to add the bow filler piece.

06EC9FD5-E3B1-4E20-BBD6-F6DB3FA9821B_1_201_a.jpeg

Hopefully I can bend and fix the first plank to the Port side without destroying more of the build.

Jan
 
Oh boy, we are having banner day in the shipyard. The San Bartolome is in the workshop waiting to be faired, the WB is in the shipyard with gunport work in progress. Sitting on the shelf dry dock was this little ship. There are a couple of odd things that need to be fixed (broken bulkhead ends). Planking the hull will resume shortly.
 
Last edited:
The RE-DO:

IMG_2843.jpeg

I had a busy weekend but managed to start a "Re-Do" of this part of the build. When I started this build I was learning a lot of new skills. Fairing the hull was a new skill. I was a little bit timid with my effort at the time. The planking of this hull just was not going according to Hoyle. So with a lot of hot water and perseverance I stripped the planks, sanded the bulkheads, checked the lay of the plank and I'm ready to start the planking process again.
 
Last edited:
Bold move!

I'm no expert but the stern stills looks under-faired based on the char on the wood??? Or maybe the stern doesn't narrow as much as I have in my imagination...
Yes and no, That is a bit of a tricky area and needs a bit more work. My major problem was in the bow. The starter plank was OK but the next set of planks would not fit flush and bow out. Sort of a clinker effect. My other mistake was using a short sanding block (about 4 inches long) to do the fairing. Since then I've acquired three different sanding blocks (1 and 2 inches wide and 8 inches long).

Sanding blocks

I also use Heinrich's approved coarse sandpaper method.
 
Excellent decision Jan to re-do this if you weren't happy with the original effort. I agree with Paul on the stern though. It definitely requires more fairing - you have to have a visual angle which is opposite to that of the angle on the first bulkheads.
 
The RE-DO:

View attachment 357315

I had a busy weekend but managed to start a "Re-Do" of this part of the build. When I started this build I was learning a lot of new skills. Fairing the hull was a new skill. I was a little bit timid with my effort at the time. The planking of this hull just was not going according to Hoyle. So with a lot of hot water and perseverance I stripped the planks, sanded the bulkheads, checked the lay of the plank and I'm ready to start the planking process again.
Good morning Jan. That is a big redo- well done.
 
Back
Top