• SUBSCRIBE TO SHIPS IN SCALE TODAY!

    The beloved Ships in Scale Magazine is back and charting a new course for 2026!
    Discover new skills, new techniques, and new inspirations in every issue.

    NOTE THAT OUR NEXT ISSUE WILL BE July/August 2026
  • Win a Free Custom Engraved Brass Coin!!!
    As a way to introduce our brass coins to the community, we will raffle off a free coin during the month of August. Follow link ABOVE for instructions for entering.

Fair American 1:48 by Model Expo

Namabiiru! Don't tell me you have the ricochet rabbit disease too! I guess there are so many mini kits in the kit one needs to be flexible or it turns into work. ROTF For me, I find myself making to do lists late in the build to make sure that I have done all of the stuff that should be done before the rigging starts.

Blessings.
Chuck
When building plastic models I highlight steps in the instructions I skipped over, then periodically review everything to make sure those steps get completed at the right time. Harder to do with wooden ships, I find because it does seem necessary to jump around a bit. Sometimes, it’s to simplify later steps, sometimes it’s to keep momentum while glue dries, but usually it’s because I’m getting bored/frustrated and need to focus on somethung else for a while.

I know: TMI…
 
I know: TMI…
Never!!! It does help to move around - maintaining momentum and interest. Can't tell you how many times I wanted to throw L'Orenoque in the trash because of the relentless list of things to do. Always one more thing! Ranting. I'll save it for my log :p. I hope, with all of the work you've been doing, you and your Admiral are settling in nicely to your new home.

Blessings. Peace. Gratitude.
Chuck
 
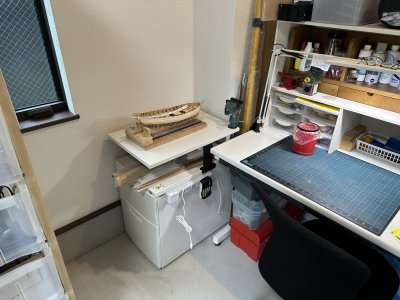
Gentlemen, I am pleased to announce that I’ve got the shipyard sufficiently organized (lots of work yet to be done to procure and install shelves and cabinets!) that I was able to finally take FAIR AMERICAN out of her cardboard berth and start getting parts organized again.
IMG_7238.jpeg
Next weekend will be a three-day backpacking trip in Japan’s Northern Alps, so not likely to make much progress soon, but this was a major milestone achieved.
 
Gentlemen, I am pleased to announce that I’ve got the shipyard sufficiently organized (lots of work yet to be done to procure and install shelves and cabinets!) that I was able to finally take FAIR AMERICAN out of her cardboard berth and start getting parts organized again.
View attachment 615328
Next weekend will be a three-day backpacking trip in Japan’s Northern Alps, so not likely to make much progress soon, but this was a major milestone achieved.
Namabiiru! Congratulations, shipmate!!! Enjoy your adventure time!

Blessings.
Chuck
 
Chuck! I should like to learn more about you technique! I don’t think I could manage @archjofo ‘s perfectly historically accurate blocks at this scale o_O
Namabiiru!

Right as to the perfect block and strop issue! I stopped trying to use metal. Any wire I used destroyed the block when I tried to get it snug. Probably because I don't know my own strength ROTF No doubt some shipmate will see this and supply the answer. But, as luck would have it, I am currently stropping a ton of blocks for L'Orenoques yards, gaffs and boom. I'll take some pictures and post them within the next 6 hours. The thread, at viewing distance, looks just right and I have yet to destroy a block because of my kung fu grip!

Blessings.
Chuck
 
Namabiiru!

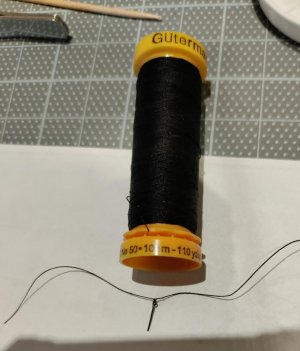
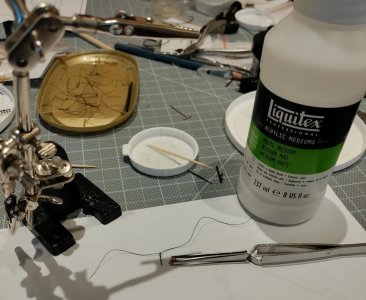
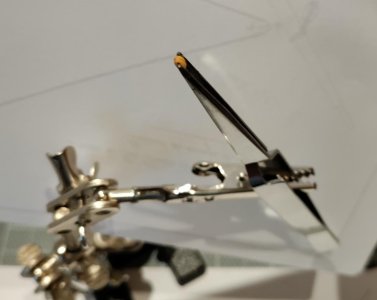
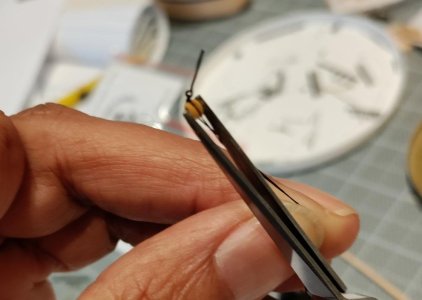
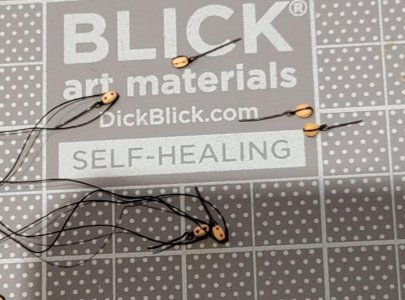
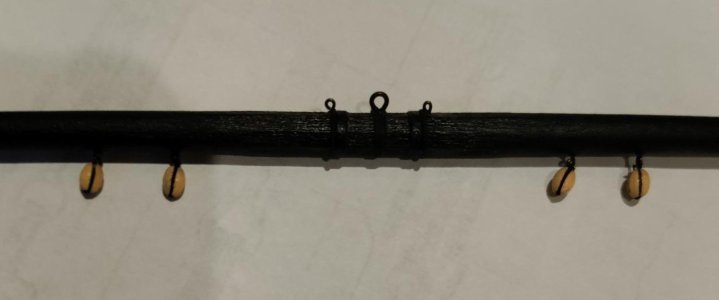
I hope the pictures are self-explanatory. The blocks I am stropping are 3mm. I also did several 2.5mm tonight. For the 3.5mm clew and sheet blocks on the lower yard I went around with the thread twice.

First 2 pics are materials and tools - I use a cheap thin brush to paint the medium onto the block and thread. This thread is 100% cotton. In my Lovely Renee I used CA and then learned that I should not have used CA :eek: ROTF ROTF ROTF ROTF I think I'm right that CA and ploy thread can be used together so you can experiment with that combo.

strop 1.jpgstrop 2.jpg

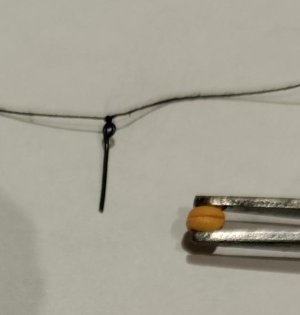
This is 3mm block. The eyebolt is about .8mm outside diameter.strop 3.jpg

strop 4.jpg

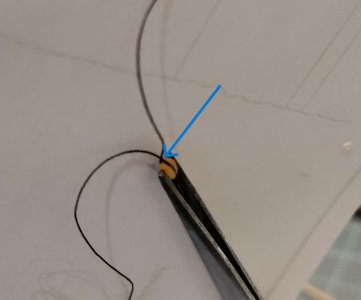
Don't paint the medium on the block until you have the thread in place. I tried it the other way and it didn't work for me. Maybe the missing fingers? I don't know.

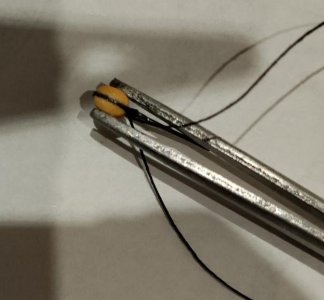
Hard to make my camera focus on small things and hold the small things. One side at a time. Paint the medium on top and blow on it and count ten seconds. Then do next side. Don't rush it - maybe 15 seconds. You can see I have the thread I'm fixing through the tweezer void and I'm holding both threads with tension to hold the eyebolt in position while the medium dries enough for me to tilt the tweezers send the opposing thread through the void paint and pull against both threads wile the medium sets up.

strop 5.jpg

Once your commfortable that the medium is holding, reverse the block bottom side up and paint some medium here and on the threads if you are only going around once. If twice, paint some medium here, blow and count . . . then push the thread ends to their opposite sides underneath the block through the tweezer void and paint both sides and count and pull on the threads to snug them down.strop 6.jpg

strop 7.jpg

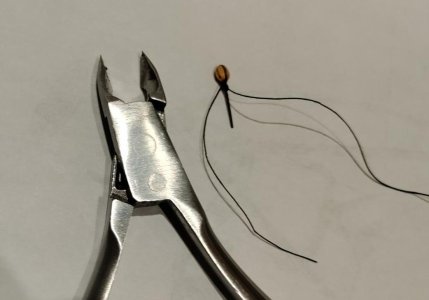
Handy dandy cuticle clippers for clipping the excess thread once the medium is dry.strop 8.jpg
strop 9.jpgstrop 10.jpg

I hope that was helpful.

Blessings.
Chuck
 
Hey Chuck,

Wow, that’s a great technique. I’ll bear that in mind. Really brilliant. Hey Namabiiru, brilliant hobby room, and I’m sure the FA will turn out great. I’ll be keeping an eye on you, my friend …

Best regards,

Günther
 
Namabiiru!

I hope the pictures are self-explanatory. The blocks I am stropping are 3mm. I also did several 2.5mm tonight. For the 3.5mm clew and sheet blocks on the lower yard I went around with the thread twice.

First 2 pics are materials and tools - I use a cheap thin brush to paint the medium onto the block and thread. This thread is 100% cotton. In my Lovely Renee I used CA and then learned that I should not have used CA :eek: ROTF ROTF ROTF ROTF I think I'm right that CA and ploy thread can be used together so you can experiment with that combo.

View attachment 617407View attachment 617408

This is 3mm block. The eyebolt is about .8mm outside diameter.View attachment 617409

View attachment 617410

Don't paint the medium on the block until you have the thread in place. I tried it the other way and it didn't work for me. Maybe the missing fingers? I don't know.

Hard to make my camera focus on small things and hold the small things. One side at a time. Paint the medium on top and blow on it and count ten seconds. Then do next side. Don't rush it - maybe 15 seconds. You can see I have the thread I'm fixing through the tweezer void and I'm holding both threads with tension to hold the eyebolt in position while the medium dries enough for me to tilt the tweezers send the opposing thread through the void paint and pull against both threads wile the medium sets up.

View attachment 617411

Once your commfortable that the medium is holding, reverse the block bottom side up and paint some medium here and on the threads if you are only going around once. If twice, paint some medium here, blow and count . . . then push the thread ends to their opposite sides underneath the block through the tweezer void and paint both sides and count and pull on the threads to snug them down.View attachment 617412

View attachment 617413

Handy dandy cuticle clippers for clipping the excess thread once the medium is dry.View attachment 617414
View attachment 617415View attachment 617416

I hope that was helpful.

Blessings.
Chuck

Thanks for that, Chuck! I think I’ve got the gist of it, but I’m sure there’s plenty of trial and error (more the latter) in my future.
 
Back
Top