• Ships of Scale has incorportated an extra level of security when you log In. Please follow on-screen prompts to acknowledge that you are not a robot via a "Check Box" or a "Pictorial Check Box Puzzle". This is needed due to higher level of AI Activity Security.
  • SUBSCRIBE TO SHIPS IN SCALE TODAY!

    The beloved Ships in Scale Magazine is back and charting a new course for 2026!
    Discover new skills, new techniques, and new inspirations in every issue.

    NOTE THAT OUR NEXT ISSUE WILL BE July/August 2026
  • Win a Free Custom Engraved Brass Coin!!!
    As a way to introduce our brass coins to the community, we will raffle off a free coin during the month of August. Follow link ABOVE for instructions for entering.

Fair American 1:48 by Model Expo

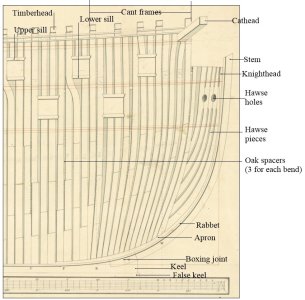
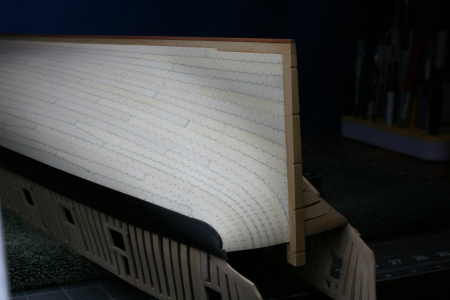
Maybe study some planking expansion drawings to get a feel for the lay of the garboard strake. They all show the shape of the garboard and how it ends at the boxing joint, not up onto the stem like in the photos above.
Allan

Inboard and outboard planking expansion. You can see that the garboard ends at the forward end of the boxing joint
View attachment 642987
First thing I’ll need to do is learn what a boxing joint is ROTF
 
Battens have been removed and the garboards are off. The garboards did not go without a fight (to include jamming an Xacto chisel blade into my finger…). But going through the tutorials again, I’m a bit perplexed by Allan’s comment above about the garboard not extending past the boxing joint. If I lay down a batten along the line of the garboard as described in the one tutorial, the garboard definitely extends past the joint between the stem and the keel, although there is no guarantee that is where the boxing joint would have actually been.

More figuring to do before much else can be done
 
If it runs past the boxing joint the tapering of the hooded ends of the strakes will have to be severe rather than no less than half the full breadth.

1791799826550.jpeg

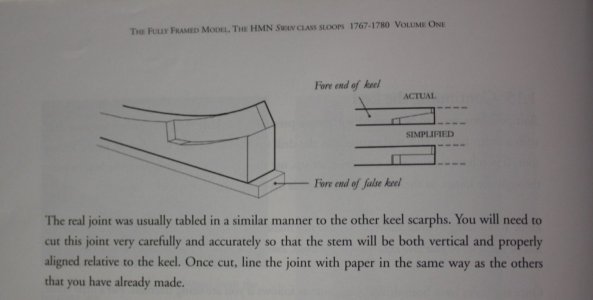
Below is from David Antscherl's The Fully Framed Model, Volume I page 30 He goes into detail on the garboard strake in volume 2 that is helpful as well. The garboard strake is not a straight piece. It widens at the post aft and twists and needs to be shaped at the bow end. The easiest way is to start with the middle plank(s) of the garboard strake then add a short aft piece that widens appropriately and short forward piece that has been shaped. It may sound complicated but it really is not hard to go do.
1791800560381.jpeg
 
I just did some digging in The Construction and Fitting of the English Man of War by Peter Goodwin so it may be close to your build. The width of the garboard strake was 2/3 the moulded (up and down) depth of the keel. Probably not really noticeble and necessary at our scales, but the thickness was more at the lower edge than at the upper edge. The cross section was not rectangular so the lower edge could be shaped to match the groove of the rabbet which was dynamic its entire length. Execution in shaping takes some doing and if the rabbet is not right, it has to be field fit/shaped. Not that difficult, but takes a little time.
Allan
 
Thank you for that input, Allan.

When I experiment with the first batten, it still seems to lead me to a garboard of essentially constant width until I get near the very aft where it flares to a ridiculous width (i.e. ~30-40mm compared to 10mm the rest of it’s length. I know stealers will be needed, which means the garboard doesn’t really need to be that wide, so then why wouldn’t the garboard be a constant 10mm?

I think must be misunderstanding something about how the distances at each station are measured. All the tutorials I have seen make mention of the greatest distance being at the midships station, and Paul even makes mention of this in one of his posts above. But on Fair American, the greatest distance (at least the way I’m measuring it) is one station forward of the farthest one aft. Should I be measuring from the bottom of the wales to the concave curve where the hull meets what I’ll call the fishtail out of ignorance of the proper term, rather than measuring all the way to the keel?

 
I know stealers will be needed, which means the garboard doesn’t really need to be that wide, so then why wouldn’t the garboard be a constant 10mm?
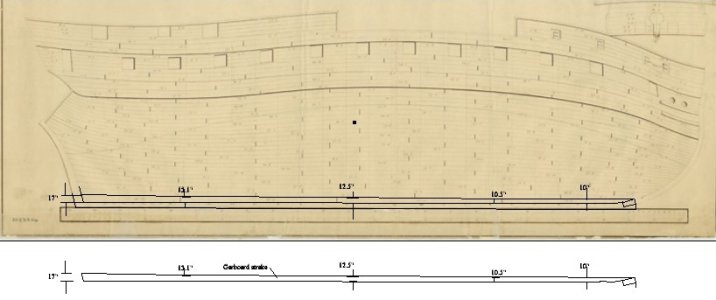
Even without stealers, the planking width aft is not as severe as 4 times wider. Looking at several planking expansion drawings, the breadth at the post is about 1.3 times more than at midships and 1.7 wider than at the boxing joint. Keep in mind the garboard was normally a bit broader than the rest of the bottom planking. I scaled the drawing below to full size then got the dimensions. The drawing is low resolution but the dimensions should be very close. You can see that the aft end is 17" and the forward end before the taper is down to 10" At your scale this would be 8.8mm down to 5.2mm
Allan
1791886096479.jpeg
 
Last edited:
I don’t doubt what you’re saying, but I’m having a tough time convincing the planking battens. By the way, I really appreciate the time and effort you obviously invested in annotating the diagram to highlight and explain the geometry to me.

Worth pointing out that the planking expansion you are using to illustrate your points does not follow the geometry of FA so far as I can tell. In the image shown, the maximum distance from wale to keel is clearly amidships. On FA, it’s all the way aft, and it is significantly longer than the midships measurement.

What I am noticing on the planking elevation is that the distance between the wale and the stern post appears to be treated separately from the distance between the keel and the top of the stern post, but it’s not clear at what point for the purpose of laying out planking belts that those diverge from the single wale to keel measurement. Does what I’m describing in layman’s terms make sense?
 
Does what I’m describing in layman’s terms make sense?
Yes, absolutely. The expansion drawing I gave was just as an illustration. Your ship will be different to some extent. If you mark out the hull as discussed, the breadth of each strake will be there and the way to go. If you do have to use stealers, keep in mind there would not be more than a few IF you widen the planks aft as was usually done. If you are going to use straight pieces for planks like kits provide, that is a whole other problem and you will need a lot of stealers aft.
I truly hope I am on overstepping with this information...... but if I am, let me know to back off. :) :)

Allan
 
All the tutorials I have seen make mention of the greatest distance being at the midships station, and Paul even makes mention of this in one of his posts above. But on Fair American, the greatest distance (at least the way I’m measuring it) is one station forward of the farthest one aft.
What you are finding on your model is normal and correct. But the remedy is to install increasingly wider planks as you approach the stern not to use the stern to determine the number of planks. Of course, wider planks will not be possible if you are using the stripwood provided in a kit (which is why we see stealers on so many models). Here is a picture of what I am talking about:

1791898548999.png

If you use the stern to determine the number of full sized planks then the planking will get impossibly narrow elsewhere.

Anticipating that you will use the kit's stripwood then stealers are your best option.
 
Last edited:
Gentlemen,
The last two posts are money! I think (hope!) I’m getting it now.

Yes, I lack the capability to reliably mill my own stock so I am forced to use what comes with the kit, for the most part. Although with the stock of two kits to work with I think I have some wider planks I can use for the lower part of the hull where to avoid a few stealers.

When all is said and done, the hull is getting painted so I was never shooting for a perfect planking job, but I’d like to do better than my last planking job.
 
Back
Top