
Ok, so opinion time. What is everybody's go-to on a nailer? After installing 12 planks (photos coming soon), the one I ordered is already malfunctioning and seems like something inside is bent. When I ordered it, it was listed as an Artesania Latina, but I don't think that's what I received. I can tell that even if I am able to to finish this build with it, this tool is going to be done for by the end. Going forward, I need something more durable and reliable. I don't have any experience with these tools, so what does everybody think?

-

SUBSCRIBE TO SHIPS IN SCALE TODAY!
The beloved Ships in Scale Magazine is back and charting a new course for 2026!
Discover new skills, new techniques, and new inspirations in every issue.
NOTE THAT OUR NEXT ISSUE WILL BE MARCH/APRIL 2026 -

Win a Free Custom Engraved Brass Coin!!!
As a way to introduce our brass coins to the community, we will raffle off a free coin during the month of August. Follow link ABOVE for instructions for entering.
You are using an out of date browser. It may not display this or other websites correctly.
You should upgrade or use an alternative browser.
You should upgrade or use an alternative browser.
First Build - Polaris by OcCre, 1:50 scale [COMPLETED BUILD]
- Thread starter Xmtrdude
- Start date
- Watchers 20
-
- Tags
- completed build occre polaris

Let's plank the deck!
View attachment 238078
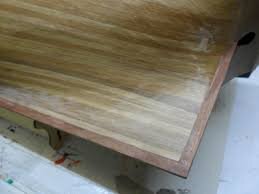
I found the blackening of the edges of the planking material with pencil to be more difficult than I had anticipated. I had some soft lead from drafting pencils (which can be seen in the green box to the left in the below image), and that worked better, by using the side of the stick of graphite. I saw another post where someone on here had used black crayon. I may try that in the future.
View attachment 238084
View attachment 238085
Due to some of the comments I have read in these forums about the problems with using contact cement, which is what the instructions say to use, I opted for white wood glue instead. I have been using Titebond III, and I find the work time/set time ratio to be pretty good. I can still slide things around for a minute or two, but within ~30 minutes it is set enough to support trimming.
View attachment 238086View attachment 238087
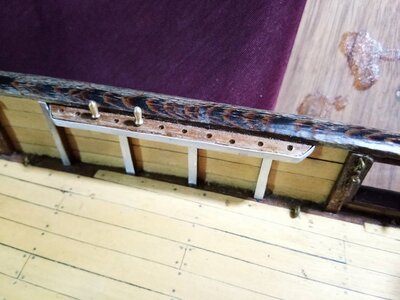
After a light sanding, I started drawing in the ends of the planks and the nails. I initially VERY lightly penciled in the 5-butt shift to see if I liked it before sanding, figuring it would be sanded out if I didn't like it. It ended up that I did like the look, so that's what I went with.
View attachment 238089
View attachment 238090
By this time, it was getting pretty late, so I will have to finish the penciling and varnish the deck next session. So far I'm pretty pleased with how this is going, but as always, comments and advice are welcome!
Surely that's a 3-plank shift. Here's the deck of my Le Superbe partially planked to a French 5-plank shift. Note the Sealey c/Less motor tool with Dremel angle drive, yes - Dremel accessories fit! Using a 1" sanding pad the charge only lasts about 15 mins. but chOk, so opinion time. What is everybody's go-to on a nailer? After installing 12 planks (photos coming soon), the one I ordered is already malfunctioning and seems like something inside is bent. When I ordered it, it was listed as an Artesania Latina, but I don't think that's what I received. I can tell that even if I am able to to finish this build with it, this tool is going to be done for by the end. Going forward, I need something more durable and reliable. I don't have any experience with these tools, so what does everybody think?


 arge up again in 20 mins.
Ok so the image I was working from was this one, which I found when I searched the web for 5-plank shift:Surely that's a 3-plank shift. Here's the deck of my Le Superbe partially planked to a French 5-plank shift.
.jpg.000999dcb51a6b1da2baa3274192b035.jpg")
Going back and looking a bit deeper and altering the search parameters a bit, I found this:

I see the difference now. I still think what I did looks better for a deck the size of the one I'm building though. I think it's too small for the 5-plank.
Note the Sealey c/Less motor tool with Dremel angle drive, yes - Dremel accessories fit!
So are you saying this is what you use for a nailer? The only ones I've looked at are the manual ones. I'm not familiar with a nailer accessory for Dremel.
Sorry for the confusion, no it's a sander. I didn't read the 'nailer' bit . Talking of which I have both a AL & a Draper push pin tools. Some kits have pins with too big a head to fit the AL one, & the small size Draper was a bit too big so I modified it by sleeving the outer tube internally. I try not to use nails if at all possible.
. Talking of which I have both a AL & a Draper push pin tools. Some kits have pins with too big a head to fit the AL one, & the small size Draper was a bit too big so I modified it by sleeving the outer tube internally. I try not to use nails if at all possible.Work continues apace, the above-mentioned tool issues notwithstanding.


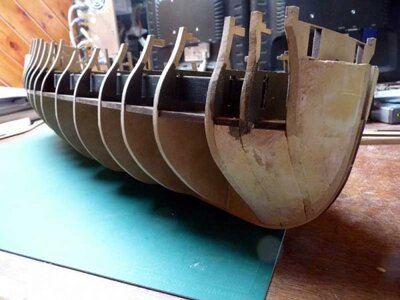
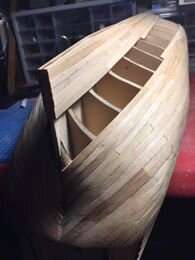
Everything seemed to be going well, when I noticed the bow was not coming together as I would like. I think I may have left the reinforcements a little too thick. I should have sanded it down to a finer point.

I think I'll be able to fix it with filler and proper sanding once the first layer is finished. AND THEN THERE'S THIS THING...

THE TAILPIECE CAME OFF AGAIN!!. That's it, I'm leaving it off until I have planking on the rear, so it has something to sit on. Meanwhile, the error at the bow seems to be multiplying. The planks from the bottom section aren't meeting up like they should. I still think it will be ok, I just won't be able to follow the planking plan in the instructions exactly.


I just hope the foreman doesn't fire me. He's always lurking about.

Everything seemed to be going well, when I noticed the bow was not coming together as I would like. I think I may have left the reinforcements a little too thick. I should have sanded it down to a finer point.
I think I'll be able to fix it with filler and proper sanding once the first layer is finished. AND THEN THERE'S THIS THING...
THE TAILPIECE CAME OFF AGAIN!!. That's it, I'm leaving it off until I have planking on the rear, so it has something to sit on. Meanwhile, the error at the bow seems to be multiplying. The planks from the bottom section aren't meeting up like they should. I still think it will be ok, I just won't be able to follow the planking plan in the instructions exactly.
I just hope the foreman doesn't fire me. He's always lurking about.

Hi over there,A note from Spain and an oldtimer-more than 50. years behind me. s living in pain, I have built quite a few OCCRE KITS over the years.I have most of their Kits downloaded, not your, so I downloaded it yesterday. Wil now goes through it fem A-Z and then compared it. with your buildAlexander is right.
Do not make a minor problem huge. Sit down and think and rethink´-ij must cases the solution is solved
do not use it. it is very difficult to hold the nail inside the pusper. nail and a hammer are much better.Ok so the image I was working from was this one, which I found when I searched the web for 5-plank shift:
View attachment 238717
Going back and looking a bit deeper and altering the search parameters a bit, I found this:
View attachment 238718
I see the difference now. I still think what I did looks better for a deck the size of the one I'm building though. I think it's too small for the 5-plank.
So are you saying this is what you use for a nailer? The only ones I've looked at are the manual ones. I'm not familiar with a nailer accessory for Dremel.
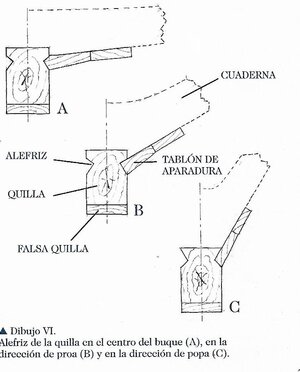
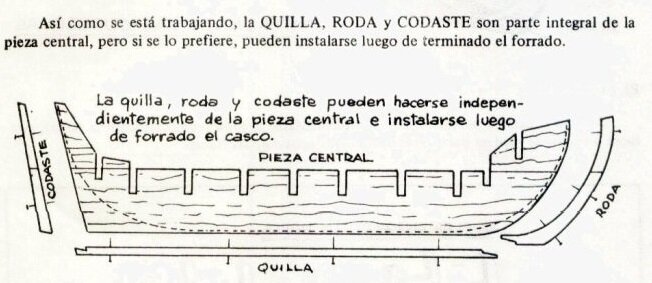
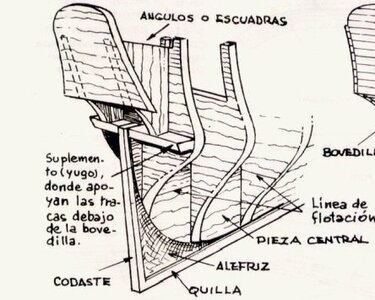
It is clear that you are following the manual. The problem you have is, that you have NOT- not mentioned in the Instruction Book- The Bow Part and the Real Keel. These are the part you should begin with adding to the False Keel. In the instruction Book the Hull is Planked as -SORRY --as yours. not your fault but Occre. These 3 Pick should be the stat of all the build. Later on the Bulkheads. highly recommended to make a real bow filler and sternHi over there,A note from Spain and an oldtimer-more than 50. years behind me. s living in pain, I have built quite a few OCCRE KITS over the years.I have most of their Kits downloaded, not your, so I downloaded it yesterday. Wil now goes through it fem A-Z and then compared it. with your build
please read the attached-NOT ONLY YOU, But many others Click on the name and the PDF will open up.
I have been through the hole Building instruction, and in many point a disaster of building the hull.
The. The deck is well done, but users would have had a better one if you with a sharp razor Blace -starts from to stern all always the same direction. Many do not know, that the Plank-Wood -en general has hundreds if not thousands of time holes .ones done this, gives it one or two layers of a sealing paint, sand it again and then a final tivy layer. with this done you can now make holes etc
Attachments
-
 005-QUILLA-KEEL (5).jpg138.7 KB · Views: 28
 -
 200-QUILLA-KEEL (1).jpg63.7 KB · Views: 24
 -
 008--FALSA KILLA-FALSE KEEL (15).jpg71.5 KB · Views: 20
 -
 351--RELLENO PROA-BOW FILLER (9).jpg154.6 KB · Views: 20
 -
 315- bow reinforment.jpg42.4 KB · Views: 19
 -
 BB-03-STERN 330.jpg65.4 KB · Views: 19
 -
 BB-03STERN 332.jpg30.1 KB · Views: 16
 -
220-plankingprojectbeginners.pdf1.9 MB · Views: 19
-
 128-POPA- STERN (10).jpg5 KB · Views: 17
 -
 418-DECK.jpg74.7 KB · Views: 22
 -
 252--PLANKING.jpg10.5 KB · Views: 29
I am about to begin this boat so your experiences are very instructive. I have done a bit of planking before and this step requires your full attention. I have used medium CA with previous projects for the planking and it bonds very quickly even on wet wood. Plus it eliminates the need for a lot of nails that will have to be laboriously filed down later.
It is clear that you are following the manual. The problem you have is, that you have NOT- not mentioned in the Instruction Book- The Bow Part and the Real Keel. These are the part you should begin with adding to the False Keel. In the instruction Book the Hull is Planked as -SORRY --as yours. not your fault but Occre. These 3 Pick should be the stat of all the build. Later on the Bulkheads.
I see what you are saying, and it makes sense. I will definitely consider this in future builds. As it stands, I did a "test fit" of the bow part, and that allowed me to see what I needed to do to clean up the planking. I feel much better about it now. I will post pics later. I think there is still an issue with how the bow fits in, and I think I will need to make a slight modification to make it seat properly. While the first layer planking is not working out exactly like the instructions, I'm beginning to fill in the gaps, an I feel like once I apply some wood filler and give it all a good sanding, it is going to turn out fine.
I am about to begin this boat so your experiences are very instructive. I have done a bit of planking before and this step requires your full attention. I have used medium CA with previous projects for the planking and it bonds very quickly even on wet wood. Plus it eliminates the need for a lot of nails that will have to be laboriously filed down later.
Happy to serve as your "canary in the coalmine" lol. As far as using CA, the wood glue I'm using has a pretty short set time, and it is working pretty well for me, but I may try the CA on some of the gaps and see how it works for me. I think when it comes to the nails, I have tried pulling a few of them out, and this may actually be quicker and easier than filing them down. They come out pretty easily if you grasp them with a sharp pair of side cutters. Then I can just let the wood filler take care of the holes.
So, as I said, I think doing the test fit of the bow as has made things work out a bit better. I'll still have some clean-up to do to make everything fit together nicely, but at least it doesn't look like it's in desperate need of orthodontics anymore...

I'm moving ahead with the final filling in of the first layer of hull planking, and I'm feeling more confident that even though it doesn't look "exactly like the picture", that the adaptations I'm having to make are going to turn out ok.


I have to keep in mind that this is a learning experience, and I'm not going to get it exactly right the first time. With that in mind, I have to say I'm fairly pleased with the progress so far. Slow and steady wins the race, after all.
I'm moving ahead with the final filling in of the first layer of hull planking, and I'm feeling more confident that even though it doesn't look "exactly like the picture", that the adaptations I'm having to make are going to turn out ok.
I have to keep in mind that this is a learning experience, and I'm not going to get it exactly right the first time. With that in mind, I have to say I'm fairly pleased with the progress so far. Slow and steady wins the race, after all.
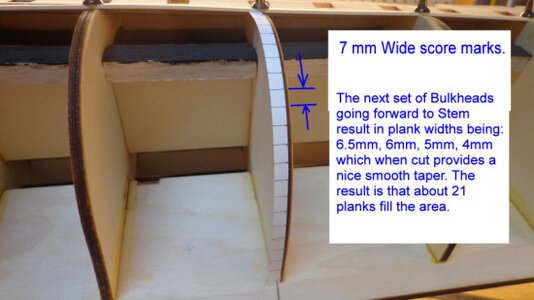
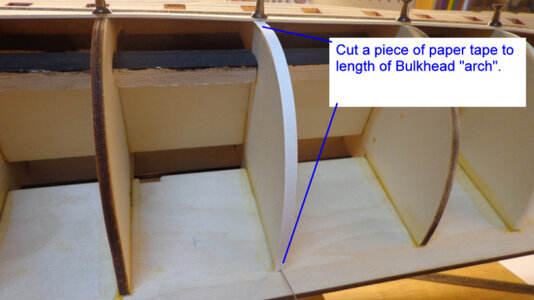
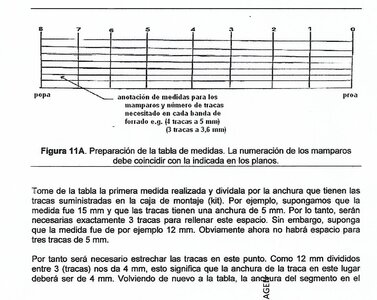
on the picture it can be seen, where the bow part has to insert. this bow part should have added to the false keel as the very beginning as well as the real keel- BIG FAILURE IN THE MANUAL. this is why the planking is going wrong too.. the company is NOT telling you, that each planh for the planking will have to be shaped.. to do it correctly, you will have to measure the main -middle frame from bottom up the result here will now have to be divided with measure od the plank- mainly 40mm. the results here are the number of needed planks here- now you measure every two bulkhead fireward. you will now get another fig -insert into the table. you know that midship you need x amount of planks, but you will need the same amount forward, so these will have to be reduced by a knife and so on, but never Lever less than 0,2 cm. towards the stern some small parts of planks may have to insertSo, as I said, I think doing the test fit of the bow as has made things work out a bit better. I'll still have some clean-up to do to make everything fit together nicely, but at least it doesn't look like it's in desperate need of orthodontics anymore...
View attachment 238988
I'm moving ahead with the final filling in of the first layer of hull planking, and I'm feeling more confident that even though it doesn't look "exactly like the picture", that the adaptations I'm having to make are going to turn out ok.
View attachment 238989View attachment 238990
I have to keep in mind that this is a learning experience, and I'm not going to get it exactly right the first time. With that in mind, I have to say I'm fairly pleased with the progress so far. Slow and steady wins the race, after all.
i know this info is now to late, but I hope some other newcomers see it. in fact I have writing an article about it. happy building. do not fell sorry, as today you kan get all the help yo need. when I started in early 1960 there were no more than the instruction manual and as common from Billing Boats even worse. at least 10 build went direct to the waste bin
Attachments
-
 091-MEDIR CUARDERNAS- MEUSURE THE BULKHEADS FOR PLANKING (2).jpg61.9 KB · Views: 17
 -
 092-MEDIR CUARDERNAS- MEUSURE THE BULKHEADS FOR PLANKING (3).jpg68.2 KB · Views: 17
 -
 223-BULKHEAD MESSUREMENT 2.jpg364.6 KB · Views: 18
 -
 258- HULL.jpg168.6 KB · Views: 19
 -
 056--FALSA QUILA CON CUERDERNAS-FALSE QUIL CON BULKHEADS (24).jpg74.9 KB · Views: 17
 -
 284-MEDIR CUARDERNAS- MEUSURE THE BULKHEADS FOR PLANKING (9).jpg26.8 KB · Views: 16
 -
 286-MEDIR CUARDERNAS- MEUSURE THE BULKHEADS FOR PLANKING (4).jpg145.2 KB · Views: 17

It is a learning curve with the first ship model - everyone from us did this somehow.
Your model is double planked, so what you prepared now has to be the basis for the second and final layer of planks. So most of the information El capi gave in his last post is important for the final layer of planking.
With your model it will be now important to close all the gaps you have and to fill joints, gaps etc. with a filler - and afterwards you have to sand the complete hull in such a way, that you get a smooth surface in the correct shape of the hull. In such a way, that you have a good basis and closed surface for your second (I guess walnut) planking
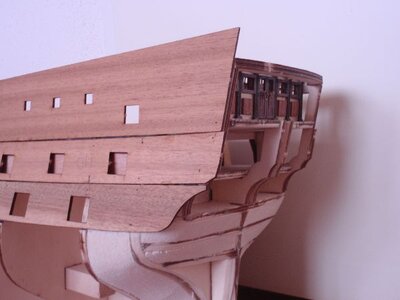
Haven't had a lot of time the last couple of days in the shipyard, but I did manage to finish filling the gaps on the first layer. After everything was set up, I decided to pull the nails out prior to filling and sanding, as they come out pretty easily with some good sidecutters. It only took a few minutes, and seemed easier that the prospect of filing them all down. I think it worked pretty well...


So I have applied a coat of wood filler, and will get it sanded down this weekend...

My plan going forward is after sanding, I will install the bow post and the real keel, in keeping with what @El Capi has suggested. The plans call for it to be installed after the second hull layer, but I don't see how you could keep it neat and tidy doing it that way. It's obviously too late for installing the first layer, but live and learn I suppose. I will not make this mistake on my next build.
So I have applied a coat of wood filler, and will get it sanded down this weekend...
My plan going forward is after sanding, I will install the bow post and the real keel, in keeping with what @El Capi has suggested. The plans call for it to be installed after the second hull layer, but I don't see how you could keep it neat and tidy doing it that way. It's obviously too late for installing the first layer, but live and learn I suppose. I will not make this mistake on my next build.
it looks much better now. Only the Bow could be better -measure and cut the Planks. This will avoid all these Triangles.Haven't had a lot of time the last couple of days in the shipyard, but I did manage to finish filling the gaps on the first layer. After everything was set up, I decided to pull the nails out prior to filling and sanding, as they come out pretty easily with some good sidecutters. It only took a few minutes, and seemed easier that the prospect of filing them all down. I think it worked pretty well...
View attachment 239551
View attachment 239552
So I have applied a coat of wood filler, and will get it sanded down this weekend...
View attachment 239553
My plan going forward is after sanding, I will install the bow post and the real keel, in keeping with what @El Capi has suggested. The plans call for it to be installed after the second hull layer, but I don't see how you could keep it neat and tidy doing it that way. It's obviously too late for installing the first layer, but live and learn I suppose. I will not make this mistake on my next build.
Do not overdo with the Past and take precaution, as adding you will get a cloud of very fine dust- mainly mouth and eyes.
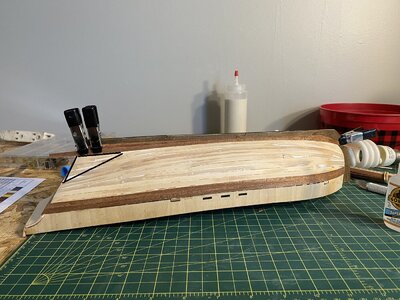
Just a few quick shots of the post-sanding hull. Also, as I said, I have installed the bow post and the real keel. There was a little bit of a height discrepancy with the rear section of the false keel that had to be addressed, but a bit more sanding resolved it.


This is the very reason the sanding was done in the garage with the door open and a fan drawing the dust out. In my former life working on active construction sites, I have had to deal with my share of dust in various forms, I don't relish the headaches and stuffy sinuses you get from overexposure.
I have now commenced with the second layer of planking...

I read through some threads on the various opinions on what adhesive to use. I experimented with some scraps and different materials and methods, and finally decided on the Gorilla CA you can see in the right of the last pic. It sort of walks the line between a gel and a liquid, so it stays in place and doesn't run when you apply it, but also doesn't clump up the way some gels do.
Do not overdo with the Past and take precaution, as adding you will get a cloud of very fine dust- mainly mouth and eyes.
This is the very reason the sanding was done in the garage with the door open and a fan drawing the dust out. In my former life working on active construction sites, I have had to deal with my share of dust in various forms, I don't relish the headaches and stuffy sinuses you get from overexposure.
I have now commenced with the second layer of planking...
I read through some threads on the various opinions on what adhesive to use. I experimented with some scraps and different materials and methods, and finally decided on the Gorilla CA you can see in the right of the last pic. It sort of walks the line between a gel and a liquid, so it stays in place and doesn't run when you apply it, but also doesn't clump up the way some gels do.
Just a few quick shots of the post-sanding hull. Also, as I said, I have installed the bow post and the real keel. There was a little bit of a height discrepancy with the rear section of the false keel that had to be addressed, but a bit more sanding resolved it.
View attachment 240063
View attachment 240064
This is the very reason the sanding was done in the garage with the door open and a fan drawing the dust out. In my former life working on active construction sites, I have had to deal with my share of dust in various forms, I don't relish the headaches and stuffy sinuses you get from overexposure.
I have now commenced with the second layer of planking...
View attachment 240065
I read through some threads on the various opinions on what adhesive to use. I experimented with some scraps and different materials and methods, and finally decided on the Gorilla CA you can see in the right of the last pic. It sort of walks the line between a gel and a liquid, so it stays in place and doesn't run when you apply it, but also doesn't clump up the way some gels do.I I was sure You would have Problens on the Stern part- the famous triangle, which on edge shoud have lovered with 1 mm on each side. see attached-Next time, Stard with addinf the Bow , Stern post plus the Real Keel first. and not forget to meussute the planks. you will save a lot of sanding.. TAKE THIS INTO ACCOUNT; WHEN YOU START THE ": LAYER. the 2Nd pic was my Bible when Building the hull. klick on the black part and it will open up
Attachments
.jpg")
To pull out the nails before the filling and sanding works was a correct decision - sorry I forgot to mention.
Your hull is looking very good after the sanding job so you have a good basis for the second planking
Your hull is looking very good after the sanding job so you have a good basis for the second planking