
Congrats, Mark! It is a great accomplishment and I'm sure an enjoyable moment! Where did she find the rest? Are you planning to make a cover for here?

-

SUBSCRIBE TO SHIPS IN SCALE TODAY!
The beloved Ships in Scale Magazine is back and charting a new course for 2026!
Discover new skills, new techniques, and new inspirations in every issue.
NOTE THAT OUR NEXT ISSUE WILL BE MARCH/APRIL 2026 -

Win a Free Custom Engraved Brass Coin!!!
As a way to introduce our brass coins to the community, we will raffle off a free coin during the month of August. Follow link ABOVE for instructions for entering.
You are using an out of date browser. It may not display this or other websites correctly.
You should upgrade or use an alternative browser.
You should upgrade or use an alternative browser.
First Build - Polaris by OcCre, 1:50 scale [COMPLETED BUILD]
- Thread starter Xmtrdude
- Start date
- Watchers 20
-
- Tags
- completed build occre polaris

Thanks Jim! At this point, I don't have a permanent home for her. Somewhere in my office, once I finish putting it together, which is one of the projects I mentioned.Congrats, Mark! It is a great accomplishment and I'm sure an enjoyable moment! Where did she find the rest? Are you planning to make a cover for here?

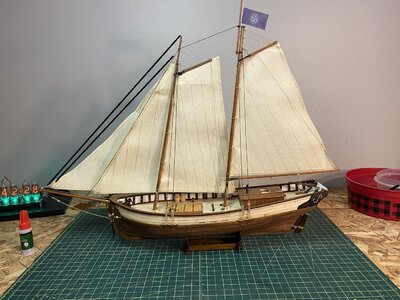
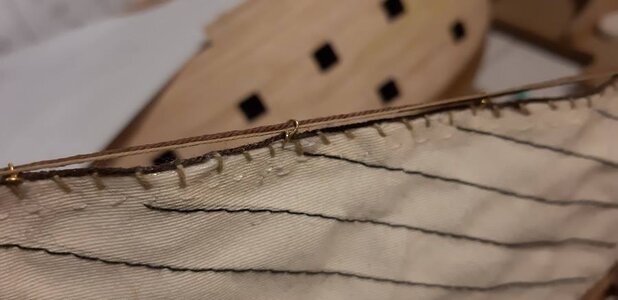
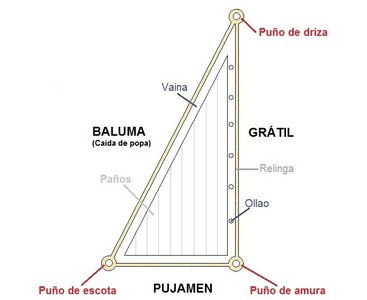
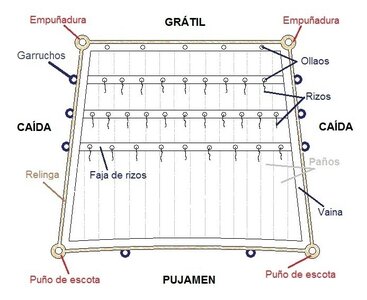
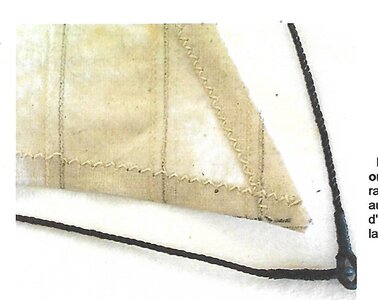
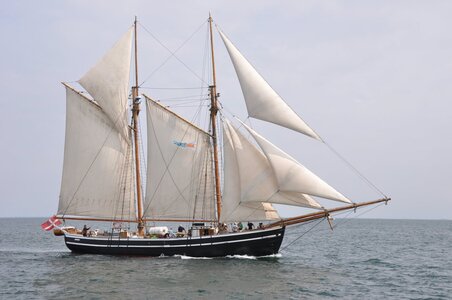
MORNING FROM AN oLD tIMER (50+) I have been through your Pics and have a few Comment-NO CRITIC -for the next one-Your Sails look different-the Sewing- and are Missing the strong riggen threat around the Edge of each sail -In Spanish RELINGE. A T do not have your drawings, to me you are Missing a Forestay-see pic-I was able to finish up last night.
Here she is:
View attachment 246560
View attachment 246561
View attachment 246562
View attachment 246563
View attachment 246564
View attachment 246565
I have to say, I'm pretty pleased with how it turned out overall. Are there some flaws? Yes. Things I would have done differently? Yes. All this information and knowledge will just make my next one that much better. I'm already looking around for the next one, and I've narrowed it down to a couple of options. I do think that I will take a bit of time before I begin the next build, though. I jumped right into this with several projects left undone. Need to play catch-up on those items before moving forward.
A few notes on my impressions of this kit. I chose it in large part based on it being one of the kits @Donnie mentioned in a post about good kits for beginners, and I have to say, I think it was right on the money. It's not an expensive kit, so if it turns out model ship aren't for you, the investment to find that out is modest. I have certainly spent more on other hobbies before figuring out I didn't want to continue. But, for that small investment, I feel like I got a little taste of most of the basics of model ship building. Double planking, mast making, wire shaping, and just enough rigging to challenge an absolute beginner like me. The instructions and plans were pretty easy to understand and follow, and this is one of the models for which OcCre has a complete playlist on YouTube showing each step, so if something isn't clear in the drawings, you can refer to the video, which has been helpful.
There are a couple of issues, as have been documented here. The planking method is not what the experienced builders would recommend, as I learned, and I will make the effort to employ more efficient methods in the future. Also, the metal yokes for the spars are not at all sized properly for the diameter of the masts. I would say if you are planning to build this kit, ditch those right from the start and just make your own from scrap wood.
So, that's my 2 cents. I've really enjoyed this experience, and thanks to all who have given encouragement and advice.
Thanks,
Mark
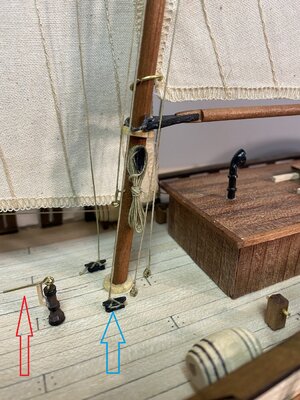
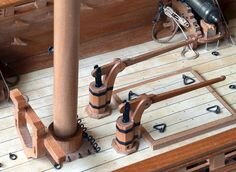
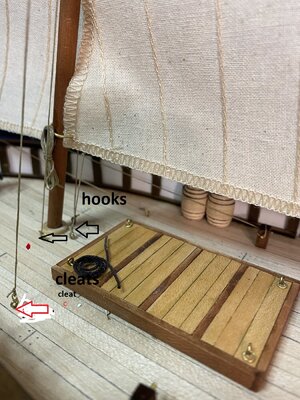
On the Deck use a hook instead of a knot, to fasten the running riggen to the deck. The Waterpump you CAN DO better as well make Wooden Cleats.
The Decking in General wha6t I can see here on your Pic looks perfect- it is Not a Bluenose
These comments are for future Build- DO NOT take it BAD.
You are right, OCCRE has a lot of learning and is fairly cheap-max 75E. I have built some of them myself, and have building instructions downloaded in a PDF format. will come back with more info. material -checkink my extra harddisk
Attachments
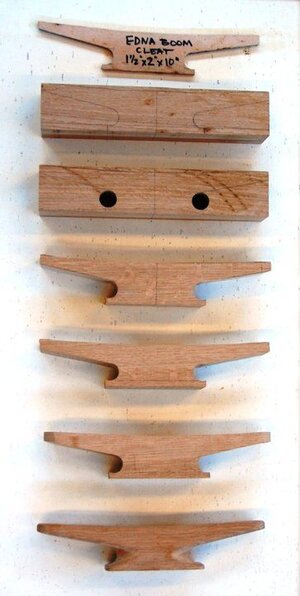
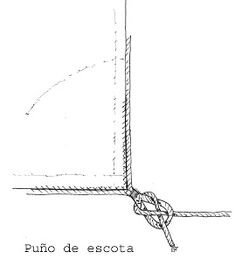
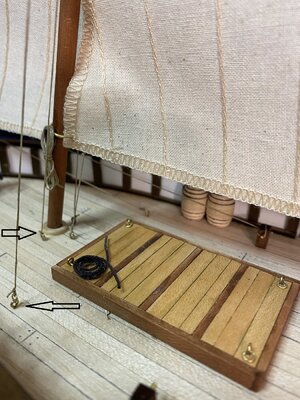
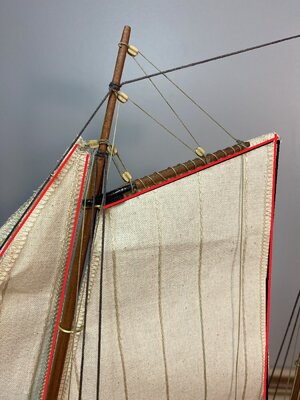
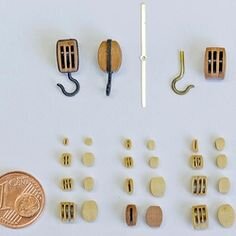
2,round.pic nº 4-Relinge, do nut have the UK name for it -nº 6 Homemade water pumpsMORNING FROM AN oLD tIMER (50+) I have been through your Pics and have a few Comment-NO CRITIC -for the next one-Your Sails look different-the Sewing- and are Missing the strong riggen threat around the Edge of each sail -In Spanish RELINGE. A T do not have your drawings, to me you are Missing a Forestay-see pic-
On the Deck use a hook instead of a knot, to fasten the running riggen to the deck. The Waterpump you CAN DO better as well make Wooden Cleats.
The Decking in General wha6t I can see here on your Pic looks perfect- it is Not a Bluenose
These comments are for future Build- DO NOT take it BAD.
You are right, OCCRE has a lot of learning and is fairly cheap-max 75E. I have built some of them myself, and have building instructions downloaded in a PDF format. will come back with more info. material -checking my extra hard disk
Attachments
-
 53cf675f951fe2428bceb0e3c518be17.jpg21 KB · Views: 16
 -
 2127-RIGNING (27).jpg42.8 KB · Views: 11
 -
 648568ade54a4506497dd755044ecaf5.jpg8.1 KB · Views: 12
 -
 53553146_569461903532150_2682360514058649600_n.jpg35.2 KB · Views: 10
 -
 1359465390.jpg44.1 KB · Views: 6
 -
 1359458667.jpg79.5 KB · Views: 6
 -
 BARQUE 2.jpg188.3 KB · Views: 6
 -
 BARQUE 3.jpg188.1 KB · Views: 10
 -
 constructo-6009-thickbox_default.jpg82.5 KB · Views: 16
 -
 EE-06-WATERPUMP-795.jpg12.1 KB · Views: 18
Dear XMTRUDE: I half will have to apologise for some comments. On the fix Riggen line (with knots) I said Hooks, where I meant CLEATS. I made a comment about a "possible" Forestay- above sails. Have been thru a lot of Pictures )real) and Drawings, and it is still not clear if the forestay is missing or not. I have by the way got a hold of the Instruction Manual- a DISASTER from OCCRE - in a PDF format.2,round.pic nº 4-Relinge, do nut have the UK name for it -nº 6 Homemade water pumps
I CONGRATULATE YOU OF ALL MY HEARTS Your build with very bad instruction- the planking a near nill- the metal cleats- some missing - are absolutely not up to date. In future do them Yourselves
Generally, avoid making Knots in areas of emergency. No time to unlash knots sometimes. the ship as many others are saying out with tourist, groups etc- mainly from Copenhagen
Attachments
Mark--Very nice job on Polaris. I am about to begin this kit and your build log is an inspiration. Plus your helpful hints are a fair warning to me to make the appropriate adjustments along the way. Many kudos!
do not totally believe in the instruction manual, but use your brain and then as here see some hintsMark--Very nice job on Polaris. I am about to begin this kit and your build log is an inspiration. Plus your helpful hints are a fair warning to me to make the appropriate adjustments along the way. Many kudos!
Thank you! I learned a lot from it. I have just ordered a new kit that I will be starting soon. The President MA792 by Mantua/Sergal. I decided to try a kit by another manufacturer just so I could have a basis for comparison. Good luck on the Polaris, I think you’ll enjoy it!Mark--Very nice job on Polaris. I am about to begin this kit and your build log is an inspiration. Plus your helpful hints are a fair warning to me to make the appropriate adjustments along the way. Many kudos!
...and we shall look for your build log, soon?Thank you! I learned a lot from it. I have just ordered a new kit that I will be starting soon. The President MA792 by Mantua/Sergal. I decided to try a kit by another manufacturer just so I could have a basis for comparison. Good luck on the Polaris, I think you’ll enjoy it!
")
Of course!...and we shall look for your build log, soon?

- Joined
- Jul 18, 2021
- Messages
- 37
- Points
- 48

As I'm building my first boat, I am halfway done with the vertical pieces on the bulwarks, I realized that I was supposed to use 2 by 3mm boards. Looks like you did the same thing. I'm not worrying about it. Thanks.Well, it may not look like much, but this is the result of 3 days' work...
View attachment 242678
View attachment 242679
The vertical pieces on the bulwarks were all individually cut and filed to an angle at the top. In order to maintain even spacing, I made a shim from a scrap of planking and inserted it between each strut and the next, then moved it to the next space. It was time consuming, but I felt it was much simpler and more accurate than trying to actually measure and place tick marks. I was not happy with the initial placement of the top rails, so I had to carefully remove and reposition them. I accidentally cracked the starboard side section at the stern, but I think I was able to do a satisfactory repair job.
As for the rudder/tiller assembly, cutting down the nails to make the rivets was at times infuriating. Trying to hold nail just below the head with fine point tweezers and cut it with wire cutters was tough, only to watch the pieces go flying in opposite directions, never to be seen again. When I did manage to hold on to the head, applying CA and getting it positioned in the hole in the rudder before it stuck my tweezers together was the next challenge. Finally got them all in, though.
Next part has me a little worried, cutting the slot in the stern to allow the tiller to pass through to the deck. Again, just gonna take it slow and be as careful as possible.
Hi, Robert. I'm not sure what you mean by I did the same thing. Those are the 2x3 mm boards along the bulwarks. I think you're referring to Section J of the instructions starting at step 16? What did you use instead? Hope you're having as much fun building Polaris as I did. You should start a build log, there's lots of great advice to be had on here as you go along. I just received my next kit yesterday, and will be starting a new log for it soon.As I'm building my first boat, I am halfway done with the vertical pieces on the bulwarks, I realized that I was supposed to use 2 by 3mm boards. Looks like you did the same thing. I'm not worrying about it. Thanks.
Happy Building!
Mark
- Joined
- Jul 18, 2021
- Messages
- 37
- Points
- 48
Hey Mark,Hi, Robert. I'm not sure what you mean by I did the same thing. Those are the 2x3 mm boards along the bulwarks. I think you're referring to Section J of the instructions starting at step 16? What did you use instead? Hope you're having as much fun building Polaris as I did. You should start a build log, there's lots of great advice to be had on here as you go along. I just received my next kit yesterday, and will be starting a new log for it soon.
Happy Building!
Mark
I used 2 by 5 mm planks. I missed that part of the instructions. I keep going back and forth in the pages.
I'm loving the experience though.
Seems as if I'm moving at a snails pace, but enjoying every minute.
I just ordered my next ship. A bit early I know. But I believe it was a great deal. USS Niagara.
I'm looking forward to seeing your next log.
- Joined
- Jul 18, 2021
- Messages
- 37
- Points
- 48
So if there are no stupid questions,Building from Kits does not mean, that each piece fit totally. To lower the manufacturing cost -like metal parts -are being produced to more the one model,Many Kit builders just goes along with instruction manual -GENERALLY WITH MANY MISTAKES - and do not use comment sence
What you have done here are absolutely 1Th Class.
during your build you will find does problems, so as I said Use Common Sence and ask for help in need.
THERE ARE NO STUPID QUESTIONS BUT MAYBE STUPID ANSWER
I'm building the same ship, but I'm leaning towards a natural color for the masts. What's more realistic for ships of that time?
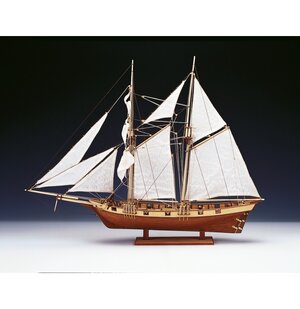
It's worth noting I think that Polaris was not a real ship. It doesn't fall into any particular time period, and from what I can tell ships of this type are still around today. I would guess that if you went with something like what El Capi posted above (JOHANNE_2.JPG), the masts appear to be a brownish-yellow in color. I would think that would be close to at least a real-world version. Probably something akin to the Tinto Pinte or Pine stain that the kit calls for on the hatch cover.So if there are no stupid questions,
I'm building the same ship, but I'm leaning towards a natural color for the masts. What's more realistic for ships of that time?
BROWNISHSo if there are no stupid questions,
I'm building the same ship, but I'm leaning towards a natural color for the masts. What's more realistic for ships of that time?
- Joined
- Jul 18, 2021
- Messages
- 37
- Points
- 48
I do believe you are correct with this model. The Polaris was a real ship. But this model doesn't really come close to looking like the original. It's a wonderful model to learn some of the ropes though.It's worth noting I think that Polaris was not a real ship. It doesn't fall into any particular time period, and from what I can tell ships of this type are still around today. I would guess that if you went with something like what El Capi posted above (JOHANNE_2.JPG), the masts appear to be a brownish-yellow in color. I would think that would be close to at least a real-world version. Probably something akin to the Tinto Pinte or Pine stain that the kit calls for on the hatch cover.
Thanks.
- Joined
- Dec 12, 2020
- Messages
- 151
- Points
- 88

Hello
You have a nice looking boat.
I liked your eagerness to overcome the first difficulties and you managed to bring your ship to port.
Keep it, because it is like a first love.
Let me give you a very intuitive example, which apart from the many existing treatises for lining hulls with strips , is good to reflect on it.
Look at a banana.
You will see that the maximum thickness is about half its length.
In the hull of a ship, the maximum width is given by the MASTER RIB.
Then, the strips of the banana become thinner towards the ends, which are smaller in diameter so that they can all fit.
In a ship the same thing happens, the strips of wood have to be thinned towards the bow (never less than half their width) or else some of them have to be REMOVED, turning two into one.
At the stern, it is usually necessary to introduce additional strips, (TUNA STRIP )as the development is greater than in the MASTER RIB.
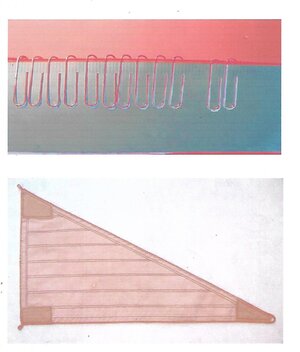
An easy way to calculate this is to put some strips of paper on the edge on one side of the master frame, measure their length and divide by the width of the wooden strips.
This way we will know how many strips of wood fit in the master square.
Do this on all the frames, fore and aft, and you will know if there are LESS or MORE strips than in the master RIB.
The strips should NEVER end in a fine point, always (at least they can be) thinned to half their width.
This is to prevent early rot by the tip
In the false keel, it is necessary to thin it in the bow and stern, in the shape of a wedge, so that adding the thickness of the strips, in total the same thickness of the stem and the rudder
But after these basics, better consult a lining manual.
Health and congratulations
You have a nice looking boat.
I liked your eagerness to overcome the first difficulties and you managed to bring your ship to port.
Keep it, because it is like a first love.
Let me give you a very intuitive example, which apart from the many existing treatises for lining hulls with strips , is good to reflect on it.
Look at a banana.
You will see that the maximum thickness is about half its length.
In the hull of a ship, the maximum width is given by the MASTER RIB.
Then, the strips of the banana become thinner towards the ends, which are smaller in diameter so that they can all fit.
In a ship the same thing happens, the strips of wood have to be thinned towards the bow (never less than half their width) or else some of them have to be REMOVED, turning two into one.
At the stern, it is usually necessary to introduce additional strips, (TUNA STRIP )as the development is greater than in the MASTER RIB.
An easy way to calculate this is to put some strips of paper on the edge on one side of the master frame, measure their length and divide by the width of the wooden strips.
This way we will know how many strips of wood fit in the master square.
Do this on all the frames, fore and aft, and you will know if there are LESS or MORE strips than in the master RIB.
The strips should NEVER end in a fine point, always (at least they can be) thinned to half their width.
This is to prevent early rot by the tip
In the false keel, it is necessary to thin it in the bow and stern, in the shape of a wedge, so that adding the thickness of the strips, in total the same thickness of the stem and the rudder
But after these basics, better consult a lining manual.
Health and congratulations
Absolutely well written- mainly your example. This is what I have tried over Years to tell newcomers, but many won't listenHello
You have a nice looking boat.
I liked your eagerness to overcome the first difficulties and you managed to bring your ship to port.
Keep it, because it is like a first love.
Let me give you a very intuitive example, which apart from the many existing treatises for lining hulls with strips , is good to reflect on it.
Look at a banana.
You will see that the maximum thickness is about half its length.
In the hull of a ship, the maximum width is given by the MASTER RIB.
Then, the strips of the banana become thinner towards the ends, which are smaller in diameter so that they can all fit.
In a ship the same thing happens, the strips of wood have to be thinned towards the bow (never less than half their width) or else some of them have to be REMOVED, turning two into one.
At the stern, it is usually necessary to introduce additional strips, (TUNA STRIP )as the development is greater than in the MASTER RIB.
An easy way to calculate this is to put some strips of paper on the edge on one side of the master frame, measure their length and divide by the width of the wooden strips.
This way we will know how many strips of wood fit in the master square.
Do this on all the frames, fore and aft, and you will know if there are LESS or MORE strips than in the master RIB.
The strips should NEVER end in a fine point, always (at least they can be) thinned to half their width.
This is to prevent early rot by the tip
In the false keel, it is necessary to thin it in the bow and stern, in the shape of a wedge, so that adding the thickness of the strips, in total the same thickness of the stem and the rudder
But after these basics, better consult a lining manual.
Health and congratulations
muy bien escrito campanero. tu ejemplo esta extraordinaire. yo aprendi esto have ya mas de 40 años. principalmente del Libro Planking for beginners.
el buque no esta tan mal. unos de Los muchas Costas alrededor de España. siempre se puede mejorar algun detalle, pero es lo bonito. tengo ya casi 80 años ya, y mas de v50 de hacer Barco's.
you could see many of these types 40- 50 years ago arounf¡d the ports along the Spanish coastI do believe you are correct with this model. The Polaris was a real ship. But this model doesn't really come close to looking like the original. It's a wonderful model to learn some of the ropes though.
Thanks.