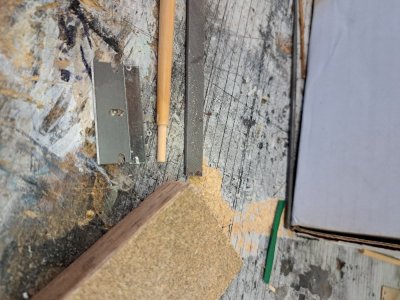
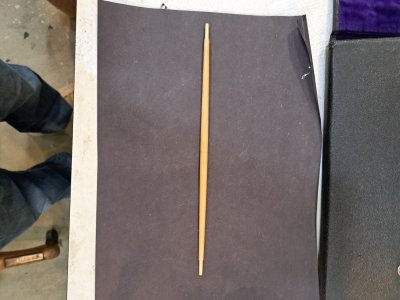
I wish I had known of this build earlier, Pete. I would have definitely looked in. I’ve personally always found rudders to be tricky.On to the rudder. I included earlier pictures of the counter that I made precisely according to the Mamoli instructions, supplied materials and plans. As a result
the counter was at least an eighth of an inch too narrow and tilted at an angle about an eighth of an inch too high at the aft end. (No kidding. I was VERY careful to make and attach it according to the instructions and plan and the laser cut central pattern.) The resulting misalignments required me to carefully cut the counter off the ship, re-shape and veneer it, cut down the upward angle on the frame and reattach it. Now the rudder didn't fit properly, So I reshaped it to do so.
All that said and done I hope the rest is self-explanatory. Note the use of the mini drill press, x-y table and level to mount the pins into the rudder. I used brass tubing for the gudgeon and pintle hinges with View attachment 439652View attachment 439653View attachment 439655View attachment 439656View attachment 439658View attachment 439659View attachment 439660View attachment 439661View attachment 439663View attachment 439665annealed brass strip for the straps.
-

Win a Free Custom Engraved Brass Coin!!!
As a way to introduce our brass coins to the community, we will raffle off a free coin during the month of August. Follow link ABOVE for instructions for entering.
-

PRE-ORDER SHIPS IN SCALE TODAY!
The beloved Ships in Scale Magazine is back and charting a new course for 2026!
Discover new skills, new techniques, and new inspirations in every issue.
NOTE THAT OUR FIRST ISSUE WILL BE JAN/FEB 2026
You are using an out of date browser. It may not display this or other websites correctly.
You should upgrade or use an alternative browser.
You should upgrade or use an alternative browser.
"Flying Cloud " by Mamoli - kit bash
- Thread starter Peter Gutterman
- Start date
- Watchers 33
-
- Tags
- flying cloud mamoli
- Joined
- Jun 17, 2021
- Messages
- 3,202
- Points
- 588

Thanks for checking in Vic. I love your Connie!
Peter, you’re doing an amazing job.
You always did like those old solid hull models, didn’t you?
- Joined
- Jun 17, 2021
- Messages
- 3,202
- Points
- 588

I like the carving and the shaping. With a small enough hull, you can eyeball the fairing. Feels more like sculpting.You always did like those old solid hull models, didn’t you?
- Joined
- Jun 17, 2021
- Messages
- 3,202
- Points
- 588

Glad to see you here as well, Mustafa. As you know, I've been a fan of your scratch Connie build right along. Beautiful work!I didn’t know you had a build log here, Peter. I’m glad I came across it by chance. I’ve started following to watch the rest of the build with interest. Everything has been going great so far.

- Joined
- Jun 17, 2021
- Messages
- 3,202
- Points
- 588

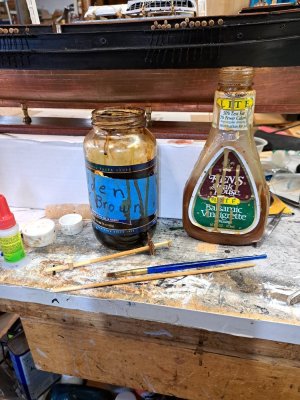
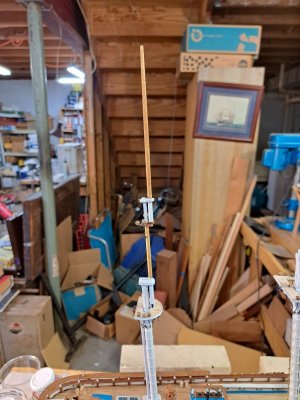
After consulting with "Clipperfan" Rich Jones on mast and spar color schemes, I've proceeded as follows on my masts so far. On the masts I used a "golden brown" alcohol aniline stain sealed with amber shellac. Both very dilute. The couplings and hounds are white (like the lower masts). I left the upper crosstrees in the natural walnut that they were made of by Mamoli. Nice solid hardwood laser cut pieces. Too fussy to paint in place, so I'm taking a little artistic license. The spars (and perhaps the spanker and gaff booms) will be black-ish. Translucent ebony over dark walnut, sealed with amber shellac.
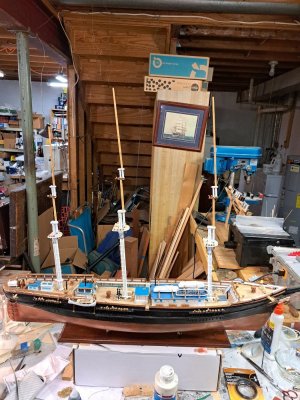


Last edited by a moderator:
- Joined
- Jun 17, 2021
- Messages
- 3,202
- Points
- 588

Ummmm..... The pictures downloaded right side up but posted sideways and now I don't see the "edit attachments" option.
How do I rotate them?
How do I rotate them?
Contact @Donnie He’s been looking at the problem. I’ve run into the same issue.Ummmm..... The pictures downloaded right side up but posted sideways and now I don't see the "edit attachments" option.
How do I rotate them?
I have rorated them...Ummmm..... The pictures downloaded right side up but posted sideways and now I don't see the "edit attachments" option.
How do I rotate them?
- Joined
- Jun 17, 2021
- Messages
- 3,202
- Points
- 588

Thanks, Jim.I have rorated them...
When this happened last week, there was an "edit " choice for attachments next to the standard "edit" option. Now it's not there.
So, there's a gremlin or a ghost in the machine somewhere. Vic said he ran into the same issue and contacted Donnie.
This is all mostly above my pay grade.
Thanks again for jumping in.


We’re not entirely sure what’s causing the issue, Peter. The Edit Attachments function has been temporarily disabled so Donnie can troubleshoot more effectively.
In the meantime, instead of using the Attach button, please try dragging and dropping your images directly into your post. This method seems to preserve the correct orientation, and the forum software handles the rest automatically.
In the meantime, instead of using the Attach button, please try dragging and dropping your images directly into your post. This method seems to preserve the correct orientation, and the forum software handles the rest automatically.
- Joined
- Jun 17, 2021
- Messages
- 3,202
- Points
- 588

I'll try to get someone to show me how. My understanding of how this operates is woefully limited. Whatever word analogous to " illiterate" or "innumerate" concerning IT would apply. 
To drag and drop an image, typically you would click and hold the left mouse button (or tap and hold on a touchscreen) on the image, then move the cursor/finger to the desired location, and then release the button/tap. This will "drop" the image at the new location, effectively moving it.I'll try to get someone to show me how. My understanding of how this operates is woefully limited. Whatever word analogous to " illiterate" or "innumerate" concerning IT would apply.
Unless you’re using your phone, like me. I wonder if copying and pasting from my library would work.To drag and drop an image, typically you would click and hold the left mouse button (or tap and hold on a touchscreen) on the image, then move the cursor/finger to the desired location, and then release the button/tap. This will "drop" the image at the new location, effectively moving it.
- Joined
- Jan 26, 2017
- Messages
- 1,340
- Points
- 493

I've been on summer vacation for a while now. I hope to be back at my shipyard at the end of August.Glad to see you here as well, Mustafa. As you know, I've been a fan of your scratch Connie build right along. Beautiful work!
- Joined
- Jun 17, 2021
- Messages
- 3,202
- Points
- 588

- Joined
- Jun 17, 2021
- Messages
- 3,202
- Points
- 588

I'm still not clear on how to drop the picture into the post. These are sideways too but not so critical here.
Last edited:
- Joined
- Jan 25, 2023
- Messages
- 546
- Points
- 308

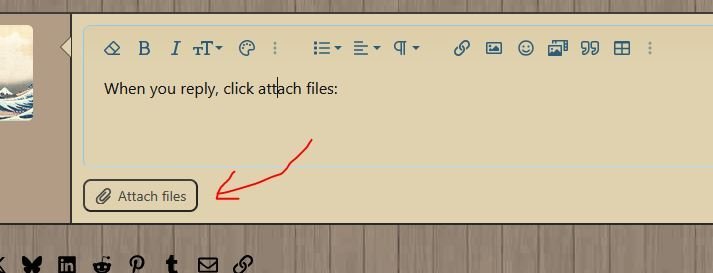
When you reply, click attach files:
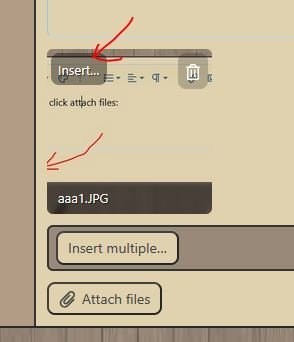
Select the files you want to put in the post. You can select several at once by holding down the CTRL button and selecting each one. Then hit the open button. Then back in your reply find the small version of your image below the text box and click insert:
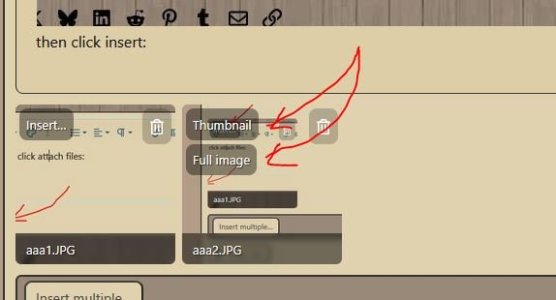
Then click on either thumbnail or full image. Thumbnail puts a small version of the image into your post that people can click on to get the full size version, while full image puts the image in without making it smaller.

Select the files you want to put in the post. You can select several at once by holding down the CTRL button and selecting each one. Then hit the open button. Then back in your reply find the small version of your image below the text box and click insert:

Then click on either thumbnail or full image. Thumbnail puts a small version of the image into your post that people can click on to get the full size version, while full image puts the image in without making it smaller.


