Wow, you’ve made a lot of progress on your little engine. It looks great.
Jan
Jan
 |
As a way to introduce our brass coins to the community, we will raffle off a free coin during the month of August. Follow link ABOVE for instructions for entering. |
 |
 |
The beloved Ships in Scale Magazine is back and charting a new course for 2026! Discover new skills, new techniques, and new inspirations in every issue. NOTE THAT OUR FIRST ISSUE WILL BE JAN/FEB 2026 |
 |
DittoYes sir, you nailed Johan!
Agreed- plenty more detail….Your engine looks way better then the one in the church.
Good morning Johan. Wow - for some reason your thread didn’t come to my reminders and suddenly there are 3 pages of activity. What Daniel said- you nailed it. Way to go. Cheers GrantFinally some progress was made; I was able to test fit the engine. The exhaust stubs were added, as well as the inlet manifold and some cooling tubing. Now I just need to observe this install to see if I am enjoying the result and whether or not to add more details. While adding the inlet- and cooling manifolds, I encountered, again, my limitations in adding more intricate (read smaller and way more difficult to fabricate details).
Seen from the front RH side, with the exhaust stubs in view:
View attachment 449105
Seen from the front LH side, with the inlet- and cooling manifolds in view:
View attachment 449109
For comparison reasons similar pictures, but than from my first attempt of building an engine:
View attachment 449135
View attachment 449136

Wow, you’ve made a lot of progress on your little engine. It looks great.
Jan
That looks outstanding, Johan! I would be super happy with that outcome.
Good morning Johan. Wow - for some reason your thread didn’t come to my reminders and suddenly there are 3 pages of activity. What Daniel said- you nailed it. Way to go. Cheers Grant
True story Johan. Researching certain items and then considering how to scratch make these is sometimes more fun than actually building the part. Cheers Grantfiguring out how-to is very enjoyable


Hey Henk, good to see you once again at SOS!I just saw this build log and the fantastic engine,
This looks excellent, Johan! I
Regards
Henk
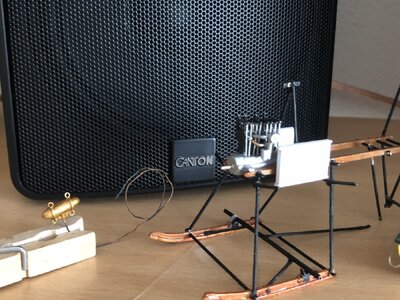

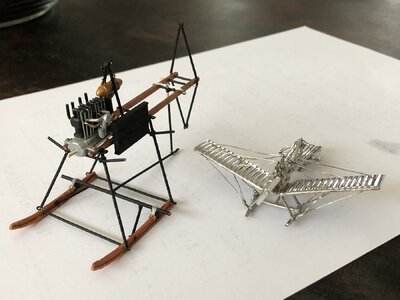
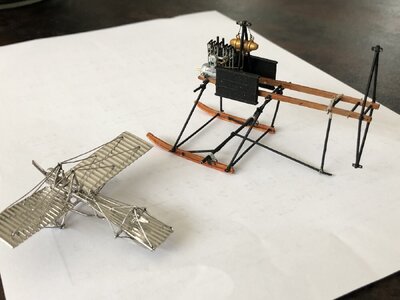
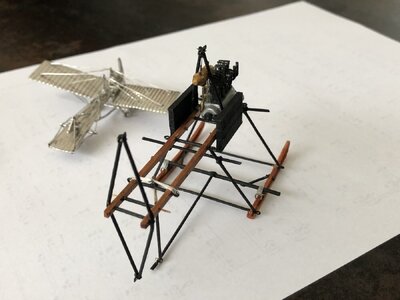
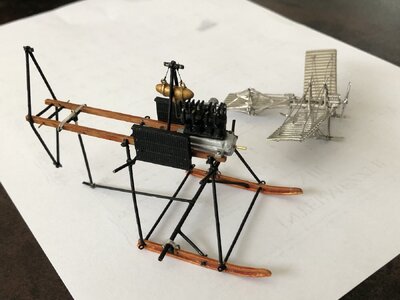
Some very nice looking parts and attachments for the engine, Johan.The last few days I have been working on the fuel tank, the axle suspension, the shock absorber and the radiotors.
The engine is now installed, as is the fuel tank. A fuel line runs from the fuel tank to the carburetor.
The bungee cords have been added to the axle and to the aft shock absorber and all is functional.
The radiators are painted and dry fitted again. Now some coolant lines must find their home.
After that it's seats and control column...
Below a few pictures of the current status. The silver model was gifted some 13 years back to commemorate the historic flight around St Bavo's steeple, then 100 years ago.
View attachment 450013
View attachment 450014
View attachment 450015
View attachment 450016

Just wonderful work Johan!
I love those scratch made radiators.
Thank you gentlemen for your kindness, it's appreciated.Some very nice looking parts and attachments for the engine, Johan.

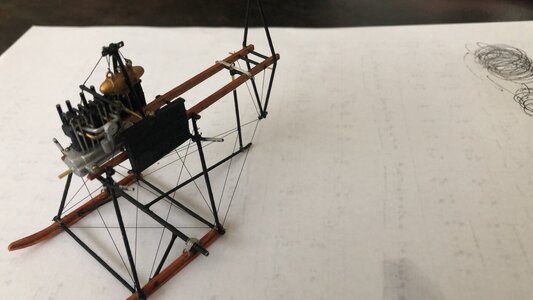
The rigging is looking great, Johan. A true spider is a spider web.Work continues, still, on the fuselage.
I thought a couple of weeks back I could move on to the seats and control column and then quickly continue with the build of the tail. The wing build will be last.
Yet the drive train appears to be a nasty little bugger, the engine was build two and a half times plus the appendages I needed to add were time consuming little monsters.
Since Tuesday I have been working on correcting some errors and I started to add the Spider's web.
For this web I am using the serafil, I was given by @Peter Voogt; it's thin and presents a delicate appearance, which it really is, at least to my eyes. The main drawback being that it's very difficult to work with; I can't feel the thread, when manipulating by hand and, more often than not, tweezers lose their grip.
Still , I managed to complete the main rigging for the fuselage, although details for the til still need to be added.
The reason for starting the rigging so early on, is that I suspect that once tail and wings will be added, accessibility will be hampered considerably.
The drawings I have, though very helpful, I couldn't do without, have their limitations. Being drafted about sixty years ago, or there about, they are not without discrepancies. Some rigging lines appear to be connected to the oddest of parts, for instance, lines are shown to run from the lower part of the (sliding) shock absorber and run to hard points on the fuselage, meaning those lines will become slack if the shock absorber is forced upwards. That can't be correct. And that's just one tiny little nuisance...
Below a picture of the fuselage with the added rigging, or spider's web. I am very pleased with the appearance; the selection of the serafil is paying dividends.
View attachment 450764

Work continues, still, on the fuselage.
I thought a couple of weeks back I could move on to the seats and control column and then quickly continue with the build of the tail. The wing build will be last.
Yet the drive train appears to be a nasty little bugger, the engine was build two and a half times plus the appendages I needed to add were time consuming little monsters.
Since Tuesday I have been working on correcting some errors and I started to add the Spider's web.
For this web I am using the serafil, I was given by @Peter Voogt; it's thin and presents a delicate appearance, which it really is, at least to my eyes. The main drawback being that it's very difficult to work with; I can't feel the thread, when manipulating by hand and, more often than not, tweezers lose their grip.
Still , I managed to complete the main rigging for the fuselage, although details for the til still need to be added.
The reason for starting the rigging so early on, is that I suspect that once tail and wings will be added, accessibility will be hampered considerably.
The drawings I have, though very helpful, I couldn't do without, have their limitations. Being drafted about sixty years ago, or there about, they are not without discrepancies. Some rigging lines appear to be connected to the oddest of parts, for instance, lines are shown to run from the lower part of the (sliding) shock absorber and run to hard points on the fuselage, meaning those lines will become slack if the shock absorber is forced upwards. That can't be correct. And that's just one tiny little nuisance...
Below a picture of the fuselage with the added rigging, or spider's web. I am very pleased with the appearance; the selection of the serafil is paying dividends.
View attachment 450764
Good evening Johan. Plenty Dividends…..looks really good and the thin serafil makes the scale look spot on. Way to go. Cheers GrantWork continues, still, on the fuselage.
I thought a couple of weeks back I could move on to the seats and control column and then quickly continue with the build of the tail. The wing build will be last.
Yet the drive train appears to be a nasty little bugger, the engine was build two and a half times plus the appendages I needed to add were time consuming little monsters.
Since Tuesday I have been working on correcting some errors and I started to add the Spider's web.
For this web I am using the serafil, I was given by @Peter Voogt; it's thin and presents a delicate appearance, which it really is, at least to my eyes. The main drawback being that it's very difficult to work with; I can't feel the thread, when manipulating by hand and, more often than not, tweezers lose their grip.
Still , I managed to complete the main rigging for the fuselage, although details for the til still need to be added.
The reason for starting the rigging so early on, is that I suspect that once tail and wings will be added, accessibility will be hampered considerably.
The drawings I have, though very helpful, I couldn't do without, have their limitations. Being drafted about sixty years ago, or there about, they are not without discrepancies. Some rigging lines appear to be connected to the oddest of parts, for instance, lines are shown to run from the lower part of the (sliding) shock absorber and run to hard points on the fuselage, meaning those lines will become slack if the shock absorber is forced upwards. That can't be correct. And that's just one tiny little nuisance...
Below a picture of the fuselage with the added rigging, or spider's web. I am very pleased with the appearance; the selection of the serafil is paying dividends.
View attachment 450764

The rigging is looking great, Johan. A true spider is a spider web.
Regards, Peter
Good evening Johan. Plenty Dividends…..looks really good and the thin serafil makes the scale look spot on. Way to go. Cheers Grant
Peter, Grant, Dan,Outstanding detail Johan. The serafil rigging adds a rich depth to the bird. This is really turning into a fine model.
Thanks Shota.Dear Johan
I have ve just had a look at your build report and your historical information about Antony Fokker. I am very impressed.
You have chosen a special project for yourself, and is Very impressive
