Forest Gump's Jenny - 1:60 Lindberg Shrimp Boat [COMPLETED BUILD]

Joined
Nov 29, 2016
Messages
376
Points
268

Location
Atlanta, GA
While looking at model kits on Ebay, I came across this kit by Lindberg and Immediately thought of Forest Gump movie. So, $20.00 total, I picked up this kit and have started in. I've downloaded some pictures of of the "Jenny' from movie stills for my reference and the kit comes with some figures, of which I will only use two to create Forest and Capt. Dan. There are not a lot of parts to this kit but what there is looks pretty good.

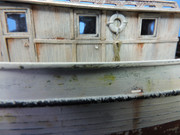
I washed all of the parts and then sprayed everything with a gray primer. After watching a few videos on youtube using hairspray and salt techniques to create weathered paint, I followed the methods shown and it turned out very nice. After the primer, I painted some blotches of yellow, blueish green and brown on hull. Used hairspray and sprayed a thin coat of flat white and then scraped with toothbrush when dried. I then used course salt on wet surface and let dry. I sprayed another thin coat of flat white paint and brushed off remaining salt crystals. There's still a lot to go but it does look like weathered layers of paint!

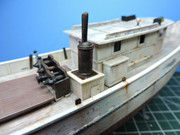
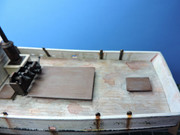
Note: only the hull is glued at this point. Decks and cabin are just for placement.

DSCN6396.JPGDSCN6501 - Copy.JPGDSCN6505 - Copy.JPGDSCN6502 - Copy.JPG
 
Made some progress on Jenny. Taped and painted lower half of hull with red oxide. Also sponged a dark gray along the springer rail. Added more weathering to hull and cabin. Made bulkhead, door, flooring, stove and a bed to the inside of the cabin. I will place a small desk and a wall chart on the opposite bulkhead from stove. I doubt any of this will be able to be seen but, it beats a large gaping hole in the deck!
DSCN6531.JPGDSCN6528.JPGDSCN6530.JPGDSCN6526.JPGDSCN6510.JPG
 
I finally reached an end to my cabin's interior. I borrowed an idea from a very talented modeler, Don Stauffer, where he built a floor and bulkhead for his wheelhouse to hide the open hole inside of the cabin. After two days of adding 'things', I finally said it's time to move on. I was not planning on adding any lighting, but unless I do so, none of this work will ever be seen.
I painted the main hatch with two different shade of brown; then lightly sanded; and brushed on a grayish colored wash. In the movie, Forest can be seen standing at the wheel on a tubular mounting just aft of the main hatch cover. I'm told the Director added this feature for the movie so, in keeping with the theme, I made my frame out of some cut square pieces of Evergreen. I sanded down the sharp edges and painted it flat black. I plan of adding the box and throttles along with some rust effects to it later. I drilled a hole dead center and installed my wheel.
Here are some pictures of my progress along with a picture from the movie:
DSCN6616.JPGDSCN6614.JPGDSCN6612.JPGDSCN6620.JPGDSCN6621.JPGJenny04 copy.jpg
 
I changed out my choice for Forest. Instead of the scene in storm gear, I'm using a figure that looks more like the one pictured above in the movie. I realized I had forgot to make his control box with throttles, so I used some styrene strips and sheet to create the box. I drilled two holes, one in each side, to glue two bent pieces of wire for my throttles.
Once I get the main hatch cover glued down, I will install the center white column under the control box.DSCN6628.JPGDSCN6629.JPG
 
Dear Robert,

we wish you all the Best for your special day

HAPPY BIRTHDAY

Birthday-Cake
 
Sorry for the delay with the 'Jenny', but I seem to have run aground and am workin' up some coin of the realm at the Ren Faire. Hope to be settin' sails by June 2nd to get back to my Jenny. Huzzah!58775375_1290204817806759_7878699050143318016_n.jpg
 
Finally got back to working on my Jenny. Sorry it's been so long but life issues entered into the picture. I installed 1 Pico size warm white light by Evans Designs to the roof on cabin interior. It runs on a 3v coin size battery. Here is a test run that I did at night. Note: cabin roof is not glued in place. Now i can get to work on all of the deck hardware.

85220866_243146420031551_864761355465392128_n.jpg
 
Last edited by a moderator:
Another gray day in Atlanta so I drilled an opening into the top of the engine exhaust and, after painting, glued it to the deck. After gluing and painting the 8 part winch together, it was glued into place. I added the Sampson post to the bow. Glued the gaffing rods to side of cabin. Productive day. I also added a blanket and pillow to interior of cabin before gluing the upper deck to cabin.

87256983_679296222816444_9162457933034815488_n.jpg87244784_620065915500262_158159318816915456_n.jpg84876470_1050421108674009_1939670701900300288_n.jpg87949033_4177869895572020_5995689476662231040_n.jpg87199798_191364342208996_2060222758792462336_n.jpg
 
Got a lot of work in over the weekend on my Jenny shrimp boat. Added the 2nd cabin door (it still needs to have the gaps filled in and painted. I removed the frame from the life preserver and hung it higher up on the cabin along with spare rope (which hides the original hole lower on the cabin for the placement of preserver). In the movie, the Jenny has a circulating air fan in the cabin's roof. I used a 3mm chrome bead attached to a painted toothpick. (My wife's idea and bead!). On the Jenny used in the movie, the engine exhaust vent sits atop a small storage locker with door. I carefully removed my glued stack from the deck. I made my locker from cut styrene sheet and cut the bottom from the exhaust vent. I then glued it to a thinner styrene square and glued that to the top of locker. It now looks accurate to the Jenny from the movie. I also added some sludge and fish blood stains to the rear of the deck. No working boat is accurate without fish blood! She's comin' 'round.


Back
Top