• Ships of Scale has incorportated an extra level of security when you log In. Please follow on-screen prompts to acknowledge that you are not a robot via a "Check Box" or a "Pictorial Check Box Puzzle". This is needed due to higher level of AI Activity Security.
  • SUBSCRIBE TO SHIPS IN SCALE TODAY!

    The beloved Ships in Scale Magazine is back and charting a new course for 2026!
    Discover new skills, new techniques, and new inspirations in every issue.

    NOTE THAT OUR NEXT ISSUE WILL BE July/August 2026
  • Win a Free Custom Engraved Brass Coin!!!
    As a way to introduce our brass coins to the community, we will raffle off a free coin during the month of August. Follow link ABOVE for instructions for entering.

H.M.S. Enterprize 1774 1:48 from Modelship Dockard, by Fangorn (Guy)

I found that actually finer grit sandpaper works well. It takes as long as a rough grit, but doesn't change the shape. And always use it glued to blocks, no loose pieces of paper! I have a ton of small blocks that were easy and quick to make. The frames weren't too bad either. I got a lot of use out of a Dremel in the Dremel router kit as a miniature spindle sander. And again, used relatively fine grit that I found on Amazon in these crazy big and cheap packs of sanding tubes.

I think the finer grit works because the char is actually quite shallow once you scrape away the ashes. Then you don't have to go down too far. If you use heavy grit, you go through the wood faster and you have to keep going until the whole surface is reduced to the thickness of the grit to get the last bits of affected wood.

I had to come up with something because in earlier projects; I was getting too much change in shape.

But finer grit (I get away with 320) and making sure never to use loose paper might help you out.

Also, I know it's tough on the stem. Those pieces are already tough to get right. But wouldn't those joints be felt and tar? (Feel free to correct me as I know people do here). You can always do a light scraping to get that loose stuff off which makes a good glue joint impossible, and then go from there. You'll see the joints. It might be a good way to show the work off too.

So maybe try one piece? Just lightly scrape off the ash with the back of a hobby knife and then try some 320 grit on a block or any shape you have. I used the point end of the hobby knife as a scraper in tough to reach places. I think you might be happy.

And don't despair, it's such a cool kit you started!


Best of luck!
 
Glenn,
Thank you. I have purchased a variety of sandpaper and discs and an assortment of paper to glue to various blocks.
This will take me some time and I will give it a go. I have scrapers and hobby knives work well for this too. I have various flat and shaped high end files as well.. we will see. Thank you for your kindness in writing to me.
Guy
 
Hi Guy,

I'm very sorry that the charleft by laser cutting have had a negative impact on your building experience. Unfortunately, for a kit of this scale, containing dozens of sheets of parts, laser cutting is almost the only practical production method available to us.
I'd be happy to share a few tips from my own building experience, and I hope they may be helpful.
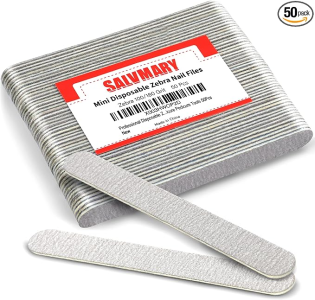
For removing the char from the edges of parts, nail files work very well. They are inexpensive—usually around $5 for a pack of 20 or so—and are commonly available in 100/180 grit or 180/240 grit versions. I personally prefer the 180/240 grit type, as 240 grit is fine enough for finishing, while 180 grit still removes the char quite efficiently. Of course, if you already have a set of good fine files, those will work perfectly well too. I simply find nail files particularly convenient to use.

1791051784906.png
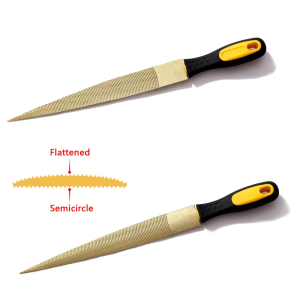
When shaping and fairing the frames, a coarse woodworking rasp with sharp teeth can be extremely helpful. It removes material much more efficiently than a fine file. If you would like to speed up the sanding process even further, you could also consider a small spindle sander. Compact models are usually available for under $100. However, these machines can be somewhat difficult to control when you first start using them, so there is a certain risk of removing too much material or damaging the parts. For most purposes, a woodworking rasp is already sufficient.
1791051898254.png
I hope these suggestions are helpful and can make the building process a little easier.

Vic
 
FWIW; your best friend here is an oscillating spindle sander using 2”-3”or so drum.
It won’t leave uneven surfaces and corners stay sharp, car on frames, beams, about 2-3 minutes per piece
Be advised, if you glue pieces char to char you’re going to have weaker joints.
 
Thanks for the ideas on the sanding. I do have a question on the taper.
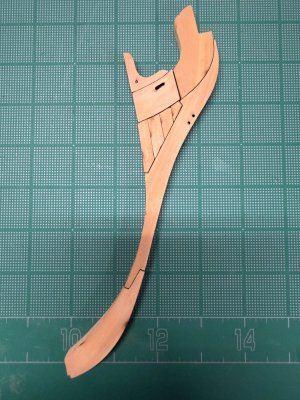
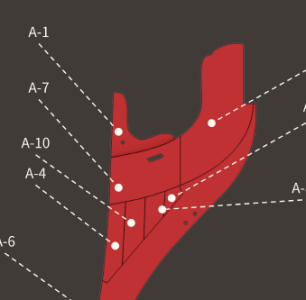
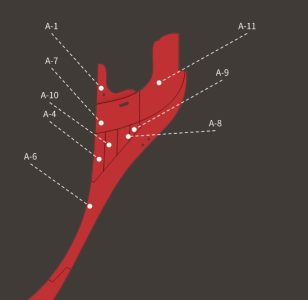
How gradual is the taper (I could not find a tapered picture in the logs.. but I might have missed it.) Is the taper sharply done on A6 and or gradually shaping across the whole face of the bow assembly? Also vertically how far down vertially does the taper go? Pictures would be really handy.
Screenshot 2026-10-03 152203.pngScreenshot 2026-10-03 152243.png
 
Thanks for the ideas on the sanding. I do have a question on the taper.
How gradual is the taper (I could not find a tapered picture in the logs.. but I might have missed it.) Is the taper sharply done on A6 and or gradually shaping across the whole face of the bow assembly? Also vertically how far down vertially does the taper go? Pictures would be really handy.
View attachment 641818View attachment 641819

Best ask @AllanKP69 he know for sure :-)
 
Best ask @AllanKP69 he know for sure :-)
It is all available in various books and sometimes even better contemporary sources such as drawings and contracts found on archival type websites.

In general the taper was about half the breadth where it meets the stem, but specifics for the late 18th century and early 19th century are given on pages 218 and 219 in Scantlings of Royal Navy Ships. According to The Elements and Practice of Naval Architecture, for a 28 gun ship the taper goes down from 11 1/2 inches to 4 inches. There is what may be better information found in an appropriate contract. In the case of Enterprise (28) 1774 the contract for Aurora (28) 1776 could be the most accurate source for any scantlings. The taper is not as severe according to the contract. and it is also about 20 years before Steel's book so hopefully more accurate for the time period. The size of the stem should also be taken into consideration.

From the contract, the stem is shaped as follows:

The Stem not to be more than 2 pieces of good sound Oak, quite free from Defects of any kind, sided at the head (which is to be continued to the Upper Side of the Upper Deck) 16 ins, below the hance 13 ½ ins, & at the Four foot the same as the keel moulded at the head 13 ½ ins & at the forefoot same as the keel, the same; the Scarphs 3 ft 6 ins long, tabled one into the other, laid with white flannel or Kersey, & bolted with 6 bolts of ⅞ ins in diameter, two of the middle to go through the false Stem or Apron, & well clenched thereon. The Lips of the Scarphs not to be more than 3⅞ ins thick.

The head is shaped as follows:

KNEE of the HEAD The knee of the head to extend to the upper side of the upper cheek, to be 11¾ ins thick at the stem and 6 ins at the fore end; the 2 upper bolts to be 1¾ ins dia'r in the knee, & 1⅝ ins in the stem, the third 1½ ins in the knee & 1⅜ ins in the stem, the fourth 1⅜ ins in the knee & 1¼ ins in the stem, the fifth to be 1¼ ins in the knee, & 1¼ ins in the stem; & all the rest to be 1¼ ins dia'r quite thro’. All the holes to be bored thro’ with proper size augers, that is, to receive the bolts in the least drift, that no Reeming may be suffer’d from the stem in, that the holes be bored before the Canvas is put on, & the knee swung off, to observe if the Holes are all good, before any bolts are drove: To have a Throat piece of sufficient depth of elm, tabled & billed, & well secured with bolts drove up with plugs
 
It is all available in various books and sometimes even better contemporary sources such as drawings and contracts found on archival type websites.

In general the taper was about half the breadth where it meets the stem, but specifics for the late 18th century and early 19th century are given on pages 218 and 219 in Scantlings of Royal Navy Ships. According to The Elements and Practice of Naval Architecture, for a 28 gun ship the taper goes down from 11 1/2 inches to 4 inches. There is what may be better information found in an appropriate contract. In the case of Enterprise (28) 1774 the contract for Aurora (28) 1776 could be the most accurate source for any scantlings. The taper is not as severe according to the contract. and it is also about 20 years before Steel's book so hopefully more accurate for the time period. The size of the stem should also be taken into consideration.

From the contract, the stem is shaped as follows:

The Stem not to be more than 2 pieces of good sound Oak, quite free from Defects of any kind, sided at the head (which is to be continued to the Upper Side of the Upper Deck) 16 ins, below the hance 13 ½ ins, & at the Four foot the same as the keel moulded at the head 13 ½ ins & at the forefoot same as the keel, the same; the Scarphs 3 ft 6 ins long, tabled one into the other, laid with white flannel or Kersey, & bolted with 6 bolts of ⅞ ins in diameter, two of the middle to go through the false Stem or Apron, & well clenched thereon. The Lips of the Scarphs not to be more than 3⅞ ins thick.

The head is shaped as follows:

KNEE of the HEAD The knee of the head to extend to the upper side of the upper cheek, to be 11¾ ins thick at the stem and 6 ins at the fore end; the 2 upper bolts to be 1¾ ins dia'r in the knee, & 1⅝ ins in the stem, the third 1½ ins in the knee & 1⅜ ins in the stem, the fourth 1⅜ ins in the knee & 1¼ ins in the stem, the fifth to be 1¼ ins in the knee, & 1¼ ins in the stem; & all the rest to be 1¼ ins dia'r quite thro’. All the holes to be bored thro’ with proper size augers, that is, to receive the bolts in the least drift, that no Reeming may be suffer’d from the stem in, that the holes be bored before the Canvas is put on, & the knee swung off, to observe if the Holes are all good, before any bolts are drove: To have a Throat piece of sufficient depth of elm, tabled & billed, & well secured with bolts drove up with plugs
Allan,
Thank you. You always come thru with very detailed information. I have the "Scantlings of Royal Navy Ships"
as I think you knew from previous conversations. I can read it.. but understanding whats what is a real chore now.


It is very difficult for me to visualize (Constantly foggy brain, hard to find references in it) because of where the strokes (2 of em) happened (right cerebral)(I'm 70+), so I struggle with out having to draw everything out. I am not sure that I will be able to accurately make the taper. Much less the tapers on each of the frames and the rest of the keel including a nice rabbit. One has to make the tapers after the Stem pieces are assembled on a flat surface.
Leave it to me (a past engineer) to pick something that is now hard for me to visualize. Anyway. I am going to think on this and possibly offer up sale of what I have at a much reduced cost to someone who can do a better job of this (and me not ruining the kit (s)). PM me if you have a desire to do this.

Doctor(s) says it is great for me to excercize (or change) my brain with a hobby or 2. Shipbuilding is not going away, just simpler working boats and merchant ships (solid hull I think) with planking. Me concentrating on simpler deck and rigging.
My other hobby is astronomy and that is being simplified as well..

Guy
 
Good day all. I received the model last week. The box got a tad wet in one corner but all is well except for a corner on the box. 19 lb 2.5 oz or 8.7kg.

I know it is quite a large build. I have the 1:96 version as well and it is a much smaller build (.5mm clearances for framing). For me right now bigger is better. I build for my joy and try to do my best. There is a log for the 1:96 too.. but it is on hold.

This will be from start to finish with small comments between, including the building of the Jig.
- I will try to order some prints from RMG https://shipsofscale.com/sosforums/threads/enterprize-1774-1-48-scale-kit-from-md.18451/post-486816 but for the most part I will compare a lot with the AOS book Pandora as this is similar in build.
- Goal to understand the infrastructure
- Goal to fully rig the model (I have heard that MD will be coming out with a rigging upgrade... I HOPE SO)
-Goal concentrate on this model and no others. Although my 70 year old stroke damaged mind would like to.. I have learned not to listen to it. (I have several models I bought and now in my stash that I will never get to.. I listened to my mind. You can only really do ONE thing at a time.)

I will put pictures here for now. https://photos.app.goo.gl/Bbyhdi1D3bQFyQqj7
Please save a seat for me. Don’t know why this only showed up today.
 
Back
Top