Heller Victory 1:100 with resin printed enhancements

i would LOVE LOVE a 1/48 kit of vic connie or any american clipper !! but it wont happen in my lifetime sad to say !!
Randy, unless you're planning on checking out really soon I think you might be surprised. I know there are many other people like me, quietly developing models for 3D printing, and scale is to some extent irrelevant. Once it's all modelled, you just choose whatever scale you want to print it in and there it is. For sure there are issues around detail but these are not especially difficult to address. I won't be at all surprised if you see a Connie within a couple of years, the very popular ships are the most obvious one's to model.

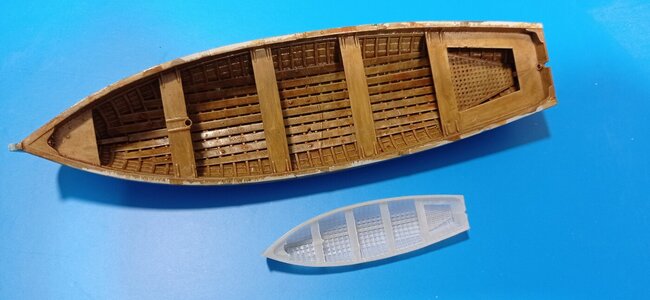
Here's an example of something I'm working on right now (a set of boats for the cutty sark). The top one is printed at around 1/30 - 1/40 ish, the bottom at 1/96, but they are the same model. It literally takes about 10 seconds to adjust the scale.

(For info, the top one is a rough print just so I could see the detail well enough in the flesh to understand what tweaks to make for 1/96, the scale of the ship. The bottom one is a reject; although you can't see it here, certain details need to be either removed or tweaked, and the hull is currently so ridiculously thin that it's virtually transparent. On top of which I broke a bit near the prow while removing the printing supports! I expect that, by the time I've finished, I'll have a little box full of rejects, this is how it is in this shipyard :) ).


boats in progress.jpg
 
Hi Kevin! Those parts are looking great, put me down for a set please. And Welcome to this site! Regards, Pete in RI
Hi Pete, please don't hold your breath! Although the plan was to go straight back to the Victory from the Cutty Sark (which itself has many months of work yet to be done), I bought the 1/96 Kearsage a few months back and I'm itching to play with that as it's such an unusual ship. And I have the 1/96 Connie in the stash...

That said, I'm planning on retirement next year, maybe, recession permitting etc, so things may start happening more quickly!
 
No prob Kev, the model has not been started yet and won't be for a while. Hurry up and retire, it's AWESOME! I am right on the cusp of retiring full time and it's amazing how one's prioroties subtley shift from work to home and family.
 
Hi, I started building this model way, way back, after a break of about 40 years since the typical adolescent modelling experience. I then parked it for quite a few years as there were more important things calling on my time, but picked it up again proper earlier this year. This coincided with getting the first of three 3D printers; the first, a filament printer which was fun to learn on but not that useful for finely detailed work, then a 'baby' resin printer, then it's bigger brother. And yes, I've kept all three - you never know when you might need a spare!

Most of this year has been spent learning how to model in Fusion 360 and, latterly, how to sculpt in Meshmixer, as well as learning the in's and out's of resin printing and a few other essentials for making nice model parts. This has been and will no doubt continue to be a very slow process and I expect it to take me years to reach the rigging stage.

The learning project (for F360 and Meshmixer) has been the stern assembly, which I am remaking in it's entirety. The photos that follow are where I have got to so far. There are still a few details to work on further though I'm taking a little break right now as this was exhausting work! This is a try-out version aimed at seeing what areas were still not quite right so it's far from perfect.

The 'kit', more or less. The small black parts are inserts that fit between the window panels: it's a long and not very interesting story, this way worked. In simple terms, everything yellow is a standalone item that gets glued to a black body. This is because I'm not very good at freehand painting!
View attachment 275565

Quarter galleries. These are (currently) printed separately to the main stern body and glued. The have location lugs to make them line up properly. This design approach is typical across the piece, recesses for the window strips and grooves for the balustrades, as this allows for hidden joints, clean paint lines and, most importantly, a bit of tolerance to ensure they fit! For some reason they look very flat in this photo when in fact they are very curved.

View attachment 275574

The kit assembled. There are a few areas that need a little adjustment.
View attachment 275566

A rather scruffy looking interior. I did mention my lack of painting skills! Good job this is hidden. I built in the benches under the windows, quarter gallery decks and privvies, as these give added strength and help the parts to keep their shape.
View attachment 275573

Nameplate and windows. The lettering sits in letter-shaped grooves. I'll be glazing the windows, probably using printed parts in translucent resin.
View attachment 275567

Figurine and corbel. The figurine is integrated into the middle window, as is the lower scroll. I hadn't yet got to grips with sculpting when I did this and a little job for one evening is to improve on the figurine.
View attachment 275568

Lower decor. The gaps in the corners are not a big deal, just requires me to lengthen the rails by about 0.2mm. I've also decided that I need to reshape the bottom of the lower decor, it's close but not quite right. That wispy bit of decor on the lower counter is seriously thin and needed very careful handling.
View attachment 275569

Corbel. My favourite part, but only because it was so difficult to print that I felt ridiculously pleased when I finally got it right. I broke maybe 10 of them before I got there.
View attachment 275570

Trophy of Arms. I had to exaggerate the detail, especially on the fleur-de-lys, as otherwise it just looked flat. I have actually started painting this but suspect I'm ducking it as I'm dreading doing the flags.
View attachment 275572

great job, I'm building one but I'm missing the decorations, maybe they are for sale or you can share them, thanks
 
I’m just getting back into the victory, have been doing some finishing up work on the Trophy of Arms, lanterns and cannons, and am also beginning work on mapping the entire hull in order to get a nice, close fit for my stern assembly. Who knows, maybe I’ll even print the entire ship, eventually :-).

At some point I’ll make items available for purchase, but don’t hold your breath, I’m a slow worker and seem to have less and less time these days.
 
I am soooo jealous of those that have the computer skills to 3D print. I can handle the mechanical print machine side of things no problem, but 3D design??? Maybe I should get a free/cheap programme just to try it.
 
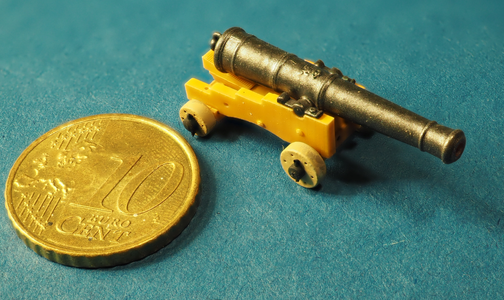
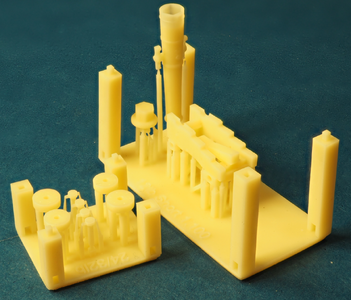
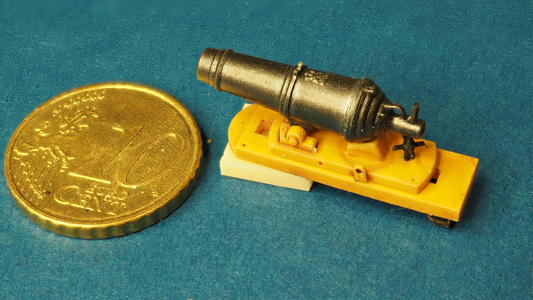
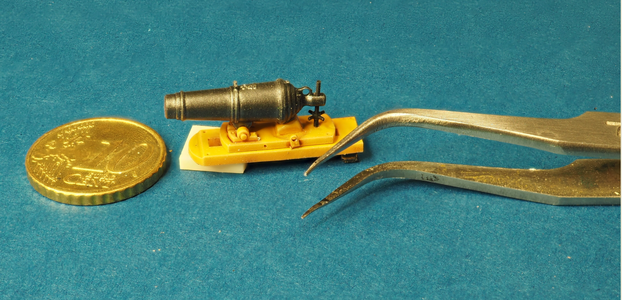
I've now completed a complete set of 1:100 guns, faithful to McKay's 'The 100 Gun-Ship Victory'. I've made four variants (32lb / 24lb; 12lb long; 12lb medium; 12lb short) and these will be on the ubiquitous retail platform shortly. I've made these as micro-kits, basically a 2-part gun and a 9 piece carriage, separating the wheels and axles to get clean paint lines.

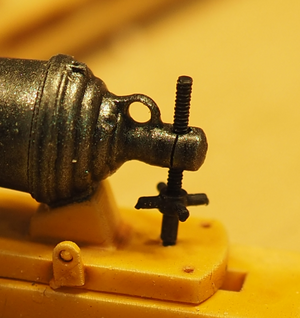
As they are 'on show' I gave particular attention to detailing the carronades - that really is a resin-printed M0.6 threaded adjustment screw .

1715031197204.png

1715031137689.png

1715031336597.png

1715031407727.png

1715031438774.png
 
great details in this small scale - Bravo !
 
Nice!, it will be next year at the earliest before we can take a trip over. D is already to pack now though lol
 
For anyone interested, the guns are now available on ebay, links below. Any queries, please message me rather than posting those in the log itself - thanks!

Heller HMS Victory 1:100 - complete set of 114 guns and carronades
Heller HMS Victory 1:100 - Set of 34 visible guns, carriages and carronades
Heller HMS Victory 1:100 - Set of show guns and carronades including carriages

Weather looks good tomorrow so I think I'll nip down to Portsmouth for another photo session. Last time I went it was so cold I abandoned ship (boom boom) by about 11.30am. I could barely feel my hands even inside the ship. It's become a bit pricey though, £46 for an adult now, but you do get a whole £1 off if you've made it to beyond the age of 65. I'm not quite there yet but close enough to give careful consideration to how I'll use that saving. Maybe it'll stretch to a bread roll to go with the lunchtime soup (to be fair, the food in the cafeteria is seriously good, worth the trip in itself).
 
46 QUID!!!!!!!! Holy Excrement!!!!!! Well, forwarned is forarmed I guess. Thanks for the heads up, will plan for that next year. And, to be fair, restoration and upkeep is seriously expensive.
Thanks for the update on the parts, will send in an order forthwith.
 
Back
Top