HIGH HOPES, WILD MEN AND THE DEVIL’S JAW - Willem Barentsz Kolderstok 1:50

Thanks Hans, very informative. I would imagine the axel would receive the harshest stresses.
Hi Daniel - also bear in mind the era of the ship being a 16th century vessel - materials were kept very basic.
 
Using a brass sheave on a 16th/17th century ship is a bit like "vloeken in de kerk". It was used, but not that much.
The sheaves were mostly made out of pock wood - a very hard fine grained wood, known for its good resistance to wear.

Btw - I was asking my sister in the UK if there is an English phrase for "vloeken in de kerk" - but it seems there is no real English equivalent to this.
It is literally translated as swearing in the church, and it means a bit like "challenging conventional wisdom" or doing/saying something which you know isn't completely the right thing, but anyhow you do it.
As far as I know "swearing in the church" is a well-known saying, Hans.
 

PAALMAST or POLAKKERMAST.


(Afbeelding van een polakker.)

Een paalmast is uit één stuk gemaakt en wordt doorgaans op kleine schepen met langsscheepse, maar ook vierkante zeilen gebruikt. Het kunnen vaste steekmasten zijn die in een mastbank of een mastkoker steken tot in een mastspoor. Paalmasten werden ook op grote schepen gebruikt.
Een ander benaming van de paalmast is polakkermast, zo genoemd omdat deze mast kenmerkend was voor de polakker.
Er waren geen marsen of zalings, zodat de ra's geheel konden worden neergelaten.


(Eenvoudige verbinding van ondermast met steng.)

Een tuigage met polakkermasten is zeer licht, maar heeft het nadeel dat ze niet kan worden ingekort bij zwaar weer en ook de hoogte ervan beperkt is.
men heeft daarom ook wel paalmasten uit twee delen gemaakt door er een verlengstuk of steng op te bevestigen door middel van woelingen of kuipbanden. Tot in de 16e eeuw werden de paalmasten op deze wijze verlengd.
Omstreeks 1570 werd door Wouter Krijnsz uit Enkhuizen de steng schietend gemaakt, waardoor deze naar believen langs de ondermast kon worden gestreken. Dit werd mogelijk door het in gebruik nemen van het 'ezelshoofd'.
Masten werden nu uit meerdere delen gemaakt, waardoor ze bij gebruik beter hersteld konden worden en ook gemakkelijker te behandelen waren.
Bij stormweer konden zij ingekort worden, waardoor de windvang en het zwaartepunt lager kwamen te liggen. De ondermasten zelf, kortweg mast genoemd, werden eerst verlengd met een marssteng, naderhand ook met een bramsteng.

source: http://zienenweten.blogspot.com/2019/01/masten-zeilschepen-deel-1.html

This is what I found about this type of mast, no English name for it.
"genaaide steng" is a name used in Flemish
 
Hello Everyone.

As promised masts - and first up the foremast. The foremast comprises of two dowels which are joined in a particular way. The bigger of the two is a 6mm dowel which is tapered at the top to 4mm, while the smaller one is a 4mm dowel which is tapered to 2mm at the top.

View attachment 312674

Both dowels are cut at an angle over a distance of 30mm, are then glued together and are finally tied with two wooldings which are tied in the following way as per the instruction manual:

View attachment 312675

View attachment 312676

I did not take pictures of this, but here you can see in the instruction manual how the dowels are cut.

View attachment 312677

You obviously have to exercise great care when creating the angled joints to make sure that they are flat and true, but other than that, this part did not present any trouble. The base of the mast still needs to be slightly tapered at an angle as well, but that I will only do before actual installation.

View attachment 312678

Now however, the fun and games start with the shaping of the mast cheeks and then the way that they get attached to the mast. The instruction manual shows a simple groove that is cut into the inside of the mast cheeks for the rope to pass through (Photograph below).

View attachment 312679

But when I enquired about this to make absolutely sure, our dearest @Kolderstok Hans sends me the following drawing to show me how it should actually be done.

View attachment 312680

And then tells me that he is sure I will opt to do it this way (the most difficult way) by fitting actual sheaves to the inside of the mast cheeks. ROTF And to make sure that I know exactly how to do it, he sends me the following literature:

View attachment 312682

View attachment 312681

Much obliged Hans! Thank you very much.

But he also sends me another book - all 600MB of it.

View attachment 312683

Oh boy ...
Hi Heinrich,

Your fore mast looks great.
Modified gun carriage wheels sounds like a good idea.

Cheers,
Stephen.
 
Hi Heinrich,

Your fore mast looks great.
Modified gun carriage wheels sounds like a good idea.

Cheers,
Stephen.
Thank you Stephen. They still need to be tapered, but I will only do that after the glue has had a 24-hour curing time.

微信图片_20220608004029.jpg

The mast cheeks will be tapered accordingly once the glue has properly dried.
 
Hello Mark. It is definitely a scarph joint that is used to join the two parts - no problem there. But in Dutch, or like Stefan said in Flemish is was called a "genaaide steng" - literally meaning a "stitched" or "sewn" mast.
 
Good news. Willem Barentsz #2 has been customs-cleared by Beijing. Now she is on her way to Tianjin.

View attachment 312748
Good Morning Heinrich. What a beautiful photo of your WB- the one from above. I love it. I'm with you re the wooden sheave on your WB both from an accuracy and looks, in my opinion, better on your WB. Great work on making the sheave. (I need to give one a try....does make a noticeable difference). A quick question, although I am sure you researched this inside out already. The scale of the sheave looks a little large in your photo. Perhaps when you tapper it it will come in line? Cheers Grant
 
Good Morning Heinrich. What a beautiful photo of your WB- the one from above. I love it. I'm with you re the wooden sheave on your WB both from an accuracy and looks, in my opinion, better on your WB. Great work on making the sheave. (I need to give one a try....does make a noticeable difference). A quick question, although I am sure you researched this inside out already. The scale of the sheave looks a little large in your photo. Perhaps when you tapper it it will come in line? Cheers Grant
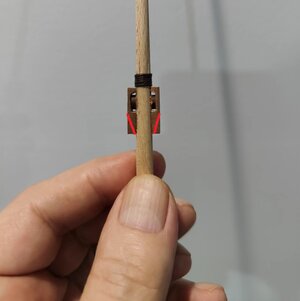
Thank you for the kind words my friend. I think the way that I took the picture by focusing on the sheave per se does appear to make it look larger than what it is. I had two options - the front or rear gun carriage truck wheels. The two small rear wheels look just too small so I chose the larger front ones. By the way, the whole mast cheek assembly fits onto my thumb nail! ROTF
 
Thank you for the kind words my friend. I think the way that I took the picture by focusing on the sheave per se does appear to make it look larger than what it is. I had two options - the front or rear gun carriage truck wheels. The two small rear wheels look just too small so I chose the larger front ones. By the way, the whole mast cheek assembly fits onto my thumb nail! ROTF
Hello Heinrich...that is smallRedface. That has been my delay (probable more likely procrastination) in attempting one- finding a dowel small enough and how to cut it thin enough- like you I am tool deficient. Cheers Grant
 
An excellent peace of work you are showing here Heinrich my friend, and again some beautifull books you received from Admiral Hans
Thank you my dear friend. I am very glad that Hans could show me how it should be done and that I managed to put something together. The books are absolutely great resources and the book on the 7P is something else!
 
Hello Heinrich...that is smallRedface. That has been my delay (probable more likely procrastination) in attempting one- finding a dowel small enough and how to cut it thin enough- like you I am tool deficient. Cheers Grant
Grant that is why I improvised by using the gun carriage wheels. They work great ROTF you don't need to turn them out and they are already nicely finished. I just sanded down their thickness to the level required.
 
Back
Top