-

Win a Free Custom Engraved Brass Coin!!!
As a way to introduce our brass coins to the community, we will raffle off a free coin during the month of August. Follow link ABOVE for instructions for entering.
-

PRE-ORDER SHIPS IN SCALE TODAY!
The beloved Ships in Scale Magazine is back and charting a new course for 2026!
Discover new skills, new techniques, and new inspirations in every issue.
NOTE THAT OUR FIRST ISSUE WILL BE JAN/FEB 2026
You are using an out of date browser. It may not display this or other websites correctly.
You should upgrade or use an alternative browser.
You should upgrade or use an alternative browser.
HM Armed Cutter Alert (1777) - Vanguard Models - 1/64 - Completed Build
- Thread starter Smithy
- Start date
- Watchers 34
-
- Tags
- alert vanguard models
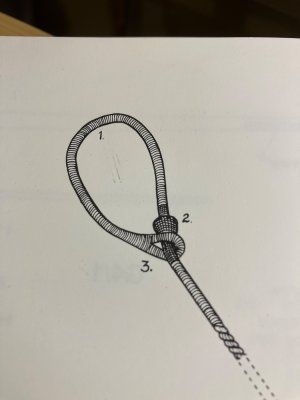
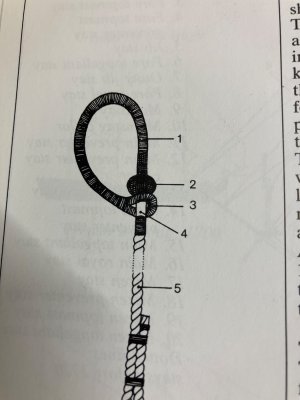
Turns out Mondfeld disagrees with himself:
At the one-minute mark:
Also:
Mainstay mouse.
I would like to know the correct way to install a mouse on a stay. I thought the narrow end went against the loop. I saw a model with the mouse the opposite way around. When I checked against Historic Ship Models it looked like I was wrong. Today I checked some other books and cannot...
shipsofscale.com
At the one-minute mark:
Also:
- Joined
- Dec 3, 2022
- Messages
- 1,547
- Points
- 488

I don’t much care anyway. Though I’m more inclined to follow published authors than other modellers. If a modeller is an authority, then so am I and that gets us nowhere.
(I’ll add Longridge as a further advocate of the thin end first principle. )
(I’ll add Longridge as a further advocate of the thin end first principle. )
Last edited:
I’m not an authority, but since I don’t pay by the letter to contribute! I’ll venture a thought: Initially, I thought it intuitive that the fat end should face the bight, but that caused me to wonder, “why then taper the far end? Why not just keep it simple and symmetrical?”
I figure there’s not enough stretch in that bight for it to slide over the mouse no matter which way the taper faces, so that much is moot. However, with the fat end facing the bight, it puts a tight bend in the end of the stay, which is simply an unnecessary stress point. You can see this in the video above. If you put the tapered end down, facing the bight, it avoids kinking the stay.
So my Christmas present to Smithy is a rationalization of why he and Mondfeldt are correct.
However, with the fat end facing the bight, it puts a tight bend in the end of the stay, which is simply an unnecessary stress point.
For what it is worth, on page 51 of volume IV of The Fully Framed Model, Antscherl is explicit as he comments to make sure that the conical end is directed AWAY from the eye splice. This means the eye slides up to the narrow end of the mouse as you mention. Photos of contemporary models in James Lees' The Masting and Rigging of English Ships of War also show the small end of the cone in the same way as you describe.
Allan
- Joined
- Dec 3, 2022
- Messages
- 1,547
- Points
- 488

Thanks for that reference Allan. You are one of very few modellers whom I think may be cited with confidence, unlike myself (see below).
With so much evidence in the books, old and new, I’m happy to cast my vote in the Lilliputian debating chamber for the party of the Little-Endians.
~~~~~~~~~~
Note that the mouse on my mainstay is shaped like a rugby ball, if it has a coherent shape at all. That isn’t through poor research, but because of incompetent technique - don’t follow my example there!
My apologies for the misdirection.
No apologies necessary, we are all here to contribute and to try to help each other.My apologies for the misdirection.
Allan
- Joined
- Dec 3, 2022
- Messages
- 1,547
- Points
- 488

My apologies for the misdirection.
Not at all, it’s been the most animated day of this entire thread.
- Joined
- Dec 3, 2022
- Messages
- 1,547
- Points
- 488

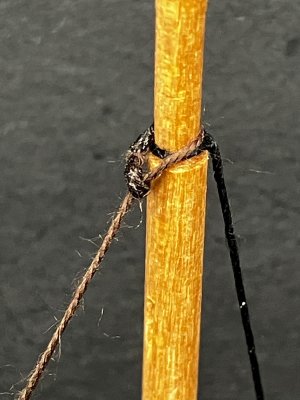
These are the top ends of the topgallant breast backstays in black, which drop down to eyebolts at the aft ends of the channels.
The brown line is the heavier topgallant forestay which leads down to the triple block on the end of the bowsprit. I used a different colour to add interest. I’m not sure if that worked for me.
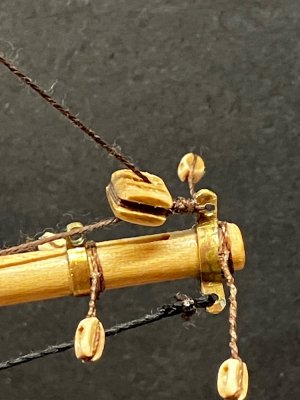
Here is the triple block from where the topgallant fore stay fall heads back to the bow via its tensioning lanyards.
The black lines, there is another one on the other side of the bowsprit, are the bowsprit shrouds.
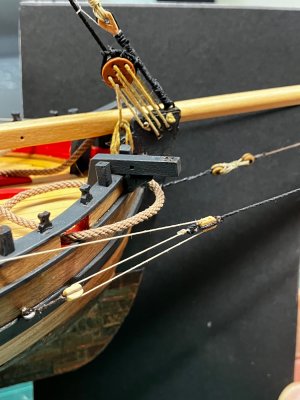
The bowsprit shrouds arrive at their tackles.
The topgallant fore stay fall meets its lanyards and finally ends at an eyebolt in the stem
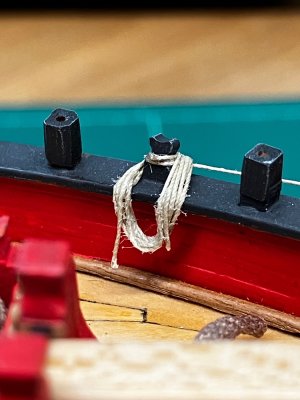
Both of the tackles are finished off with a hank of rope.
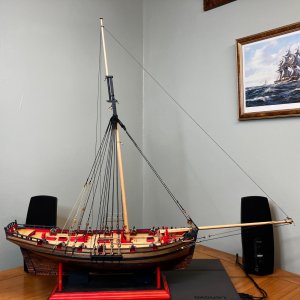
Eleven pieces of string and six pieces of wood later.
Last edited:
- Joined
- Dec 3, 2022
- Messages
- 1,547
- Points
- 488

Looks like you did some rounding of the kit blocks. Assuming that you did the rounding, it is really nice that you took the time to do this. Did you do them by hand or did you make up a little block tumbler?
Allan
I rounded them much earlier in the build when I was still enthusiastic. All done by hand with 600 grit wet and dry paper, then I filed the groove for the strop all the way round and finally cleaned out the rope entry holes and chamfered them in the appropriate direction.
The four small ones on the shrouds beat me today though. I gave up rounding them, and even stropped one of them upside down.

Last edited:
Stuff happens Smithy. You are not the first nor the lastThe four small ones on the shrouds beat me today though. I gave up rounding them, and even stropped one of them upside down.
- Joined
- Dec 3, 2022
- Messages
- 1,547
- Points
- 488

Stuff happens Smithy. You are not the first nor the last
Looking on the bright side, Allan, I stropped three of them the right way round.
Last edited:
Awesome!How do you like these Christmas shrouds and backstays?
Loved the rigging stages 1 - 3 mate, the details are amazing

- Joined
- Dec 3, 2022
- Messages
- 1,547
- Points
- 488

Awesome!
Loved the rigging stages 1 - 3 mate, the details are amazing

Thanks Cat, I’m fairly pleased with progress. I think that’s the last of the standing rigging so the next thing is probably making the boom and gaff for the driver sail (at the back). Kit instructions say to do the yards first but I think they would get in the way of the driver more than the driver would get in the way of the yards?
Maybe I’ll build all the woodwork first and then make it up as I go? Does anyone have advice on this?
~~~~~~~~~~
The close ups show my use of knots instead of proper seizings but in real life (to my eyes anyway) knots are perfectly adequate in 1/64.
At 1/48 or larger, I think it would be necessary to ‘do it properly’ and fortunately it would also be a lot easier.
Happy New Year Smithy,I rounded them much earlier in the build when I was still enthusiastic. All done by hand with 600 grit wet and dry paper,
Next time remember the block tumbler in the Tricks of the Trade forum that you liked. It is easy to make and will last a lifetime.
Allan
- Joined
- Dec 3, 2022
- Messages
- 1,547
- Points
- 488

Two ropes this post, neither of which are mentioned in the kit instructions but both of which have interesting (to me) stories.
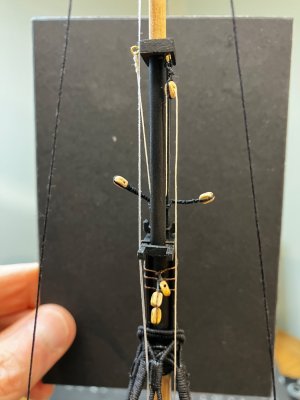
On the right of the photo is the top rope which enables seamen on the deck to lift the topgallant mast out of its socket and lower it to the deck, or to the shrouds where it might be lashed safely out of the way in heavy weather. Obviously it would be guided by sailors aloft.
On the left, the thinner double rope is the pennant halliard.
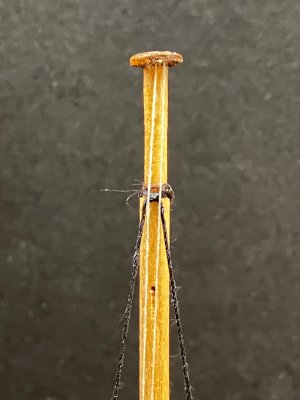
The pennant halliard runs through a sheave in the mast truck and was used by the boat’s signal yeoman for raising and lowering the captains pennant (flag).
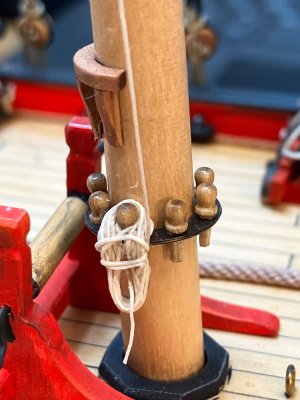
The toprope would need to be three times the height of the lower mast so I made a big bundle of rope at the belay point. It is not scale length though as that would have looked silly.
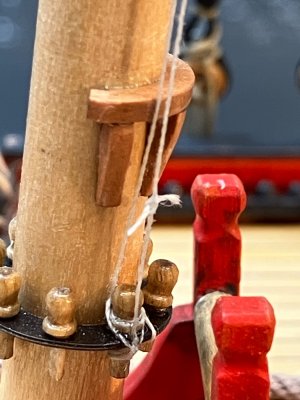
The pennant halliard is a loop with a break in it where the pennant would be tied in. Bunting-tossers weren’t known for their seamanship (and still aren’t ), so I just wound the end casually around a belaying pin, any pin.
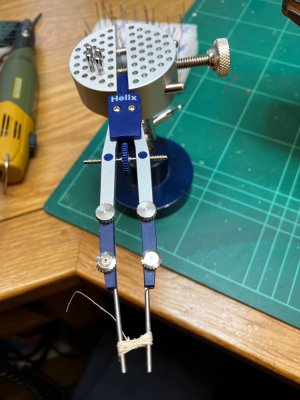
This is how my rope hanks are made to measure. I rub Titebond into the rope and wrap it round the drill bits, releasing the hank when it’s almost set and then moulding it into position on the boat.
There are easier ways for making dozens of hanks that all look the same but that’s not needed on a little boat like this.
It’s also important to me to make the hank from the same rope as the rest of the tackle and as I’m using different colours at random, it’s best for me to make them one at a time.

On the right of the photo is the top rope which enables seamen on the deck to lift the topgallant mast out of its socket and lower it to the deck, or to the shrouds where it might be lashed safely out of the way in heavy weather. Obviously it would be guided by sailors aloft.
On the left, the thinner double rope is the pennant halliard.

The pennant halliard runs through a sheave in the mast truck and was used by the boat’s signal yeoman for raising and lowering the captains pennant (flag).

The toprope would need to be three times the height of the lower mast so I made a big bundle of rope at the belay point. It is not scale length though as that would have looked silly.

The pennant halliard is a loop with a break in it where the pennant would be tied in. Bunting-tossers weren’t known for their seamanship (and still aren’t


This is how my rope hanks are made to measure. I rub Titebond into the rope and wrap it round the drill bits, releasing the hank when it’s almost set and then moulding it into position on the boat.
There are easier ways for making dozens of hanks that all look the same but that’s not needed on a little boat like this.
It’s also important to me to make the hank from the same rope as the rest of the tackle and as I’m using different colours at random, it’s best for me to make them one at a time.
Last edited:
Nice detailing, Smithy. These additions will broaden the story on this small ship.

