HM Armed Cutter Alert (1777) - Vanguard Models - 1/64

Joined
Dec 3, 2022
Messages
801
Points
343

Location
Staffordshire Moorlands, UK
HM Sloop of War Cutter Alert (1777) - Vanguard Models 1/64
Sloop? Where did I get that from? It's a cutter.

Ahoy there, my friends and fellow modellers! Welcome to my build log of Vanguard Models' excellent kit of Alert (1777). I'm sorry that you have already missed approximately half of the build which began in the spring of 2024. In fact, for some weeks I have hesitated to start in the middle like this. However, as I have read some of the excellent and enthralling logs here, I notice that many of them begin long after the laying of the keels, yet are as interesting as those that start with the opening of the box. So here we go.

For a long time after beginning Alert I took no photographs and made no notes but I can remember some of it. The framework of nine bulkheads, a false keel and two decks almost assembled itself; it was really that good. Everything fitted tightly and the design made it all self-aligning. I was very impressed to find I had a recognizable boat shape on my desk so quickly even allowing for the trimming of the keel plate at the bearding line. There was no need to cut a rabbet at the bow because the design includes one cut entirely through. I've never seen this on another model and it proved to be a very useful aid to planking.

First planking went well. The lime (?) stripwood was flexible and bent well. My bending process is to form sideways bends with a clothing iron first and then make face bends with a specialised plank bending tool that looks like a soldering iron with a big round aluminium head. This wasn't my first adventure in planking and the first layer went on easily. I have only completed two wooden models, The Artesia Latina Le Renard and the Amati New Bedford Whaleboat but I have built a few more hulls in projects that sadly were not completed.

I used the kit-supplied pins to hold the planks in place and glued them to the bulkheads with Titebond Original, my glue of choice. (Whenever I refer to 'glue' in this log, that's what I mean. If I'm using something else, I'll make a point of identifying it properly for you.)

At the second planking stage I began to diverge from the instructions. I'd noticed that the kit makes certain compromises, the hull planking is carvel built whereas the original was clinker built; she was copper bottomed; and there's a lot of PE scrollwork and painted decoration which owes a lot to the famous paintings of the model of Alert. I see these as an artist's impression of a modeller's representations of a shipbuilder's future plans rather than an accurate picture of the vessel afloat


Admiralty model in paint aft.jpgAdmiralty model in paint fwd.jpeg

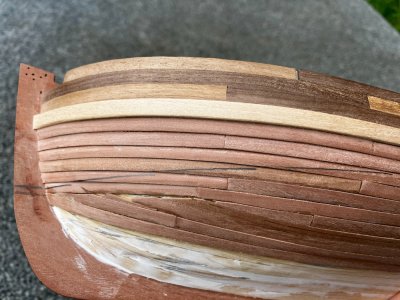
My alternate reference source is Peter Goodwin's Anatomy of the Ship - Alert and in there I discovered that the woodwork wasn't painted but treated with pine rosin, a varnish which would allow me to keep the wood visible. I like wood better than paint and if the wood is going to be visible, I thought, let's find some interesting timbers. I planked the outside of the bulwarks with walnut, deliberately choosing pieces of different colours for maximum effect. I'm not exactly subtle when it comes to aesthetics. :) The kit suggested a double layer of pear planks to simulate the main wale, but I had some thick lime strips and used these instead.

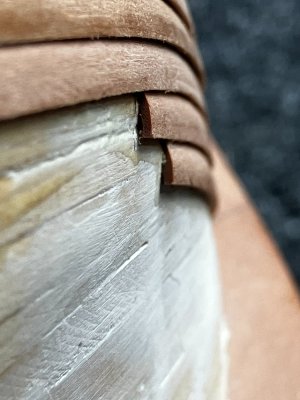
I thought about the clinker-built hull for ages. My Amati whaleboat was clinkered and I found it very challenging to build even with pre-cut plywood planks. I looked for a way to simulate the overlaps and found one that was reasonable easy to do and looked good enough for the narrow band of wood which would be visible above the coppering.

IMG_1233.JPG

This is what it looked like. It's far from perfect but I was pleased enough with it to get my camera out.
IMG_1235.JPG

This is how I did the 'clinkering'. Each plank was sanded or scraped to a knife edge at the top and this was fitted into a small rabbet which I scraped into the underneath of the previously fitted plank. This made things nice and tidy and also helped hold the planks in place while the glue set. I didn't use clamps but simply held each plank in place with fingers for ten minutes while the glue set. I have the impression that Titebond has two resin components, one that sets fast in just a few minutes and then another one that sets hard overnight. Since I didn't want to risk dislodging the previous plank when I scraped out the little rabbets, progress was limited to a strake per day, which I was applying in three scale 20 foot lengths. I find that much easier than doing a whole strake in one piece and I think it looks better and more interesting too.

By the way, I'm using this build as a training exercise. I'm much more interested in building my skills and experience than I am in building a perfect model at this stage in my modelling career. Having fun is even more important to me. :D

I also enjoy telling the story of the build and the conversations that we can all have about it. I'm in my late sixties and really appreciate how marvellous it is to be able to chat with other modellers from all over the world. We have so much in common despite our different countries and cultures and with Google translate even the language barriers are (almost) gone. I want to write this story here on SOS because of this. Collectively we know a lot about our hobby and we can share our technical expertise here AND it's a friendly site with an amazingly positive attitude. Not all sites are like this, of course. I know one where the skill and knowledge is high but the friendliness is lacking, which is a great shame. I know another, which is very friendly and chatty but most of the modelling is plastic aircraft based. SOS seems to be the best of all possible places for me to write my story.

I invite readers to join in with suggestions, support, chatter and criticism. Please don't be shy; tell me when I've done something wrong or badly - I'm a new guy to the hobby and there's much for me to learn. Even tell me when I write too much, because I do ramble on if nobody raps my knuckles from time to time. ROTF I promise I won't be offended by anything you say and I might even follow your suggestions, though I reserve my right to heed the words of the great philosopher Sinatra and do it my way.

I'll continue to bring you up to date with the build in my next few posts. See you very soon.
 
Last edited:
HM Sloop of War Alert (1777) - Vanguard Models 1/64

Ahoy there, my friends and fellow modellers! Welcome to my build log of Vanguard Models' excellent kit of Alert (1777). I'm sorry that you have already missed approximately half of the build which began in the spring of 2024. In fact, for some weeks I have hesitated to start in the middle like this. However, as I have read some of the excellent and enthralling logs here, I notice that many of them begin long after the laying of the keels, yet are as interesting as those that start with the opening of the box. So here we go.

For a long time after beginning Alert I took no photographs and made no notes but I can remember some of it. The framework of nine bulkheads, a false keel and two decks almost assembled itself; it was really that good. Everything fitted tightly and the design made it all self-aligning. I was very impressed to find I had a recognizable boat shape on my desk so quickly even allowing for the trimming of the keel plate at the bearding line. There was no need to cut a rabbet at the bow because the design includes one cut entirely through. I've never seen this on another model and it proved to be a very useful aid to planking.

First planking went well. The lime (?) stripwood was flexible and bent well. My bending process is to form sideways bends with a clothing iron first and then make face bends with a specialised plank bending tool that looks like a soldering iron with a big round aluminium head. This wasn't my first adventure in planking and the first layer went on easily. I have only completed two wooden models, The Artesia Latina Le Renard and the Amati New Bedford Whaleboat but I have built a few more hulls in projects that sadly were not completed.

I used the kit-supplied pins to hold the planks in place and glued them to the bulkheads with Titebond Original, my glue of choice. (Whenever I refer to 'glue' in this log, that's what I mean. If I'm using something else, I'll make a point of identifying it properly for you.)

At the second planking stage I began to diverge from the instructions. I'd noticed that the kit makes certain compromises, the hull planking is carvel built whereas the original was clinker built; she was copper bottomed; and there's a lot of PE scrollwork and painted decoration which owes a lot to the famous paintings of the model of Alert. I see these as an artist's impression of a modeller's representations of a shipbuilder's future plans rather than an accurate picture of the vessel afloat

View attachment 475774View attachment 475775

My alternate reference source is Peter Goodwin's Anatomy of the Ship - Alert and in there I discovered that the woodwork wasn't painted but treated with pine rosin, a varnish which would allow me to keep the wood visible. I like wood better than paint and if the wood is going to be visible, I thought, let's find some interesting timbers. I planked the outside of the bulwarks with walnut, deliberately choosing pieces of different colours for maximum effect. I'm not exactly subtle when it comes to aesthetics. :) The kit suggested a double layer of pear planks to simulate the main wale, but I had some thick lime strips and used these instead.

I thought about the clinker-built hull for ages. My Amati whaleboat was clinkered and I found it very challenging to build even with pre-cut plywood planks. I looked for a way to simulate the overlaps and found one that was reasonable easy to do and looked good enough for the narrow band of wood which would be visible above the coppering.

View attachment 475784

This is what it looked like. It's far from perfect but I was pleased enough with it to get my camera out.

View attachment 475785

This is how I did the 'clinkering'. Each plank was sanded or scraped to a knife edge at the top and this was fitted into a small rabbet which I scraped into the underneath of the previously fitted plank. This made things nice and tidy and also helped hold the planks in place while the glue set. I didn't use clamps but simply held each plank in place with fingers for ten minutes while the glue set. I have the impression that Titebond has two resin components, one that sets fast in just a few minutes and then another one that sets hard overnight. Since I didn't want to risk dislodging the previous plank when I scraped out the little rabbets, progress was limited to a strake per day, which I was applying in three scale 20 foot lengths. I find that much easier than doing a whole strake in one piece and I think it looks better and more interesting too.

By the way, I'm using this build as a training exercise. I'm much more interested in building my skills and experience than I am in building a perfect model at this stage in my modelling career. Having fun is even more important to me. :D

I also enjoy telling the story of the build and the conversations that we can all have about it. I'm in my late sixties and really appreciate how marvellous it is to be able to chat with other modellers from all over the world. We have so much in common despite our different countries and cultures and with Google translate even the language barriers are (almost) gone. I want to write this story here on SOS because of this. Collectively we know a lot about our hobby and we can share our technical expertise here AND it's a friendly site with an amazingly positive attitude. Not all sites are like this, of course. I know one where the skill and knowledge is high but the friendliness is lacking, which is a great shame. I know another, which is very friendly and chatty but most of the modelling is plastic aircraft based. SOS seems to be the best of all possible places for me to write my story.

I invite readers to join in with suggestions, support, chatter and criticism. Please don't be shy; tell me when I've done something wrong or badly - I'm a new guy to the hobby and there's much for me to learn. Even tell me when I write too much, because I do ramble on if nobody raps my knuckles from time to time. ROTF I promise I won't be offended by anything you say and I might even follow your suggestions, though I reserve the right to follow the words of the great philosopher Sinatra and, do it my way.

I'll continue to bring you up to date with the build in my next few posts. See you very soon.
Good morning Smithy. Wow. I agree with you - having fun is everything to me, As for suggestions, chatter and criticism I can only compliment what is beautiful modeling. This POF ,clinker hull is way beyond my skill level. Cheers Grant
 
It’s the POB one Grant. One day I’ll be ready for the plank on frame kit in my wardrobe but for the moment, I close my eyes to it while I dress in the mornings. Big scary boxes!
Ahh , I see. Non the less clinker planking is something I will avoid for a while. I am with you, I have been considering a POF, however I am a tad nervous to push the button and order one...... :D . Cheers Grant
 
I have been considering a POF, however I am a tad nervous to push the button and order one...... :D . Cheers Grant
I had no idea what I was getting myself into! It was an eBay buy from the Heart Charity people. Good price, good cause, looked like an interesting one. So on impulse I bought the ZHL Le Requin! Oh my!
 
Last edited:
A Great Discovery For Me!

IMG_1257.JPG

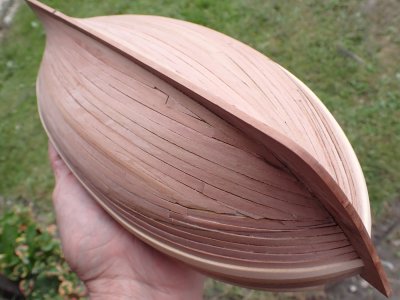
I took a lot of care with those clinkered planks but once I reached the waterline there was need for nothing but speed. All of the jerry built lower planking would be completely hidden behind my copper plating so I bashed on as quickly as possible. Even so, it seemed to be taking ages. Cutting the planks roughly to size was simple. I had no need of edge bending because I could fill the gaps with scraps, as you see. The simple face bending was done in a moment with my hot iron plank bender. So what was the bottleneck in the operation? Glue setting time of course. By now I was confident that a plank held in place only with my fingers would set well enough in five minutes for me to push the next one up against it without dislodging it, but all of those five minute pauses were adding up.

Then I made a lucky mistake. I was a little careless with a longish plank and didn't bend it enough to fit the bow. I was impatient and decided to just hold it a little longer and let the glue do the work for me. Sometimes even Titebond the Great says, "No deal, Buster!" The end of that plank refused to lie down and die. I'd probably applied too much glue and maybe it was over a patch of filler that wasn't absorbing the moisture in the glue as well as the wood did? Anyway, my plank bender was hot and right next to me. I suddenly remembered seeing a YouTube video of someone instantly setting CA with the application of heat. Would it work on Titebond?

I touched the iron to the plank and pressed down for only a couple of seconds. The plank wasn't just sticking, it was stuck. It was as immovable as it would be after an overnight set. I ran the iron down the length of the plank and the whole thing was set rigid. I did a few trials with scrap wood and the heat set joints were stronger than the wood. Ah, but could I depend on them staying solid for years? I asked Google about this and was shown another YouTube video on the official Titebond channel. This demonstrates a way to laminate tables by applying glue to both sides of the join, LETTING IT DRY, and then ironing the veneer onto the table. No clamping and no waiting. It's like a precision setting contact adhesive and better even than that, it's reversible. Heat it up again and the bond releases. Also there’s no unexpected grabbing which is the worst of true contact adhesives (and they stink).

That video is HERE.

Using this method I planked a side and a half of my boat in a day (below the waterline only).

P8050036.JPG

I believe that includes scraping and sanding too. Hitting planks with a cabinet scraper just minutes after sticking them down was a dream come true. This method makes planking ridiculously fast, and since planking operations are usually such a big part of the time required in a build, I think it might halve the overall time needed to build a model like this one with little rigging, and no complicated woodwork on deck.

I posted this breakthrough on another model ship website One person was worried that applying the heat to the second planking might loosen the first, which is a good point. It didn't happen on this build of mine but I guess it's possible if you held the heat in contact for long enough to penetrate both layers of wood, and remember, the under layer is usually thicker. It's not something I am worried about but worth bearing in mind.

I used heat setting on the deck planking too and made quick work of it (you will see the results later) but have yet to try attaching the first planking to the bulkheads with heat and without clamping or waiting. I'm looking forward to doing that on my next build.

Undoubtedly, I'm not the first to think of this but I haven't seen it mentioned anywhere else in the ship modelling world. I think we have missed it for years because we come to the bench thinking '4 inch thick plank' and 'heavy woodworking' when really what we are doing with our thin strips of wood is really more like marquetry, or to be precise, parquetry. I’ll be researching that field for more goodies…

I hope some SOS readers will find this useful. I also hope that I'm not the only one here who didn't already know about it which would be embarrassing ROTF.

If you use it and like it - tell everyone. Spread the glue, sorry, the word. We can build twice as many models this way!
 
Last edited:
HM Sloop of War Alert (1777) - Vanguard Models 1/64

Ahoy there, my friends and fellow modellers! Welcome to my build log of Vanguard Models' excellent kit of Alert (1777). I'm sorry that you have already missed approximately half of the build which began in the spring of 2024. In fact, for some weeks I have hesitated to start in the middle like this. However, as I have read some of the excellent and enthralling logs here, I notice that many of them begin long after the laying of the keels, yet are as interesting as those that start with the opening of the box. So here we go.

For a long time after beginning Alert I took no photographs and made no notes but I can remember some of it. The framework of nine bulkheads, a false keel and two decks almost assembled itself; it was really that good. Everything fitted tightly and the design made it all self-aligning. I was very impressed to find I had a recognizable boat shape on my desk so quickly even allowing for the trimming of the keel plate at the bearding line. There was no need to cut a rabbet at the bow because the design includes one cut entirely through. I've never seen this on another model and it proved to be a very useful aid to planking.

First planking went well. The lime (?) stripwood was flexible and bent well. My bending process is to form sideways bends with a clothing iron first and then make face bends with a specialised plank bending tool that looks like a soldering iron with a big round aluminium head. This wasn't my first adventure in planking and the first layer went on easily. I have only completed two wooden models, The Artesia Latina Le Renard and the Amati New Bedford Whaleboat but I have built a few more hulls in projects that sadly were not completed.

I used the kit-supplied pins to hold the planks in place and glued them to the bulkheads with Titebond Original, my glue of choice. (Whenever I refer to 'glue' in this log, that's what I mean. If I'm using something else, I'll make a point of identifying it properly for you.)

At the second planking stage I began to diverge from the instructions. I'd noticed that the kit makes certain compromises, the hull planking is carvel built whereas the original was clinker built; she was copper bottomed; and there's a lot of PE scrollwork and painted decoration which owes a lot to the famous paintings of the model of Alert. I see these as an artist's impression of a modeller's representations of a shipbuilder's future plans rather than an accurate picture of the vessel afloat

View attachment 475774View attachment 475775

My alternate reference source is Peter Goodwin's Anatomy of the Ship - Alert and in there I discovered that the woodwork wasn't painted but treated with pine rosin, a varnish which would allow me to keep the wood visible. I like wood better than paint and if the wood is going to be visible, I thought, let's find some interesting timbers. I planked the outside of the bulwarks with walnut, deliberately choosing pieces of different colours for maximum effect. I'm not exactly subtle when it comes to aesthetics. :) The kit suggested a double layer of pear planks to simulate the main wale, but I had some thick lime strips and used these instead.

I thought about the clinker-built hull for ages. My Amati whaleboat was clinkered and I found it very challenging to build even with pre-cut plywood planks. I looked for a way to simulate the overlaps and found one that was reasonable easy to do and looked good enough for the narrow band of wood which would be visible above the coppering.

View attachment 475784

This is what it looked like. It's far from perfect but I was pleased enough with it to get my camera out.

View attachment 475785

This is how I did the 'clinkering'. Each plank was sanded or scraped to a knife edge at the top and this was fitted into a small rabbet which I scraped into the underneath of the previously fitted plank. This made things nice and tidy and also helped hold the planks in place while the glue set. I didn't use clamps but simply held each plank in place with fingers for ten minutes while the glue set. I have the impression that Titebond has two resin components, one that sets fast in just a few minutes and then another one that sets hard overnight. Since I didn't want to risk dislodging the previous plank when I scraped out the little rabbets, progress was limited to a strake per day, which I was applying in three scale 20 foot lengths. I find that much easier than doing a whole strake in one piece and I think it looks better and more interesting too.

By the way, I'm using this build as a training exercise. I'm much more interested in building my skills and experience than I am in building a perfect model at this stage in my modelling career. Having fun is even more important to me. :D

I also enjoy telling the story of the build and the conversations that we can all have about it. I'm in my late sixties and really appreciate how marvellous it is to be able to chat with other modellers from all over the world. We have so much in common despite our different countries and cultures and with Google translate even the language barriers are (almost) gone. I want to write this story here on SOS because of this. Collectively we know a lot about our hobby and we can share our technical expertise here AND it's a friendly site with an amazingly positive attitude. Not all sites are like this, of course. I know one where the skill and knowledge is high but the friendliness is lacking, which is a great shame. I know another, which is very friendly and chatty but most of the modelling is plastic aircraft based. SOS seems to be the best of all possible places for me to write my story.

I invite readers to join in with suggestions, support, chatter and criticism. Please don't be shy; tell me when I've done something wrong or badly - I'm a new guy to the hobby and there's much for me to learn. Even tell me when I write too much, because I do ramble on if nobody raps my knuckles from time to time. ROTF I promise I won't be offended by anything you say and I might even follow your suggestions, though I reserve the right to follow the words of the great philosopher Sinatra and do it my way.

I'll continue to bring you up to date with the build in my next few posts. See you very soon.
Very impressive mate, like it Centurion, like it. ;)
And a bonus for me is you say all those fancy-schmancy ship bit terms which I can learn instead of me using "ribs" and "spine" ROTF
Will follow this with a keen interest my friend, great work mate, love it Thumbsup
 
Coppering

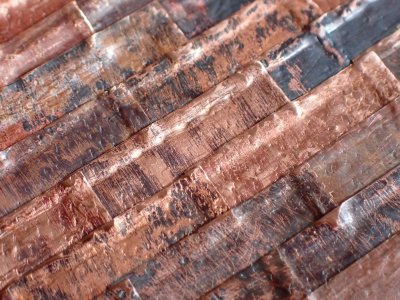
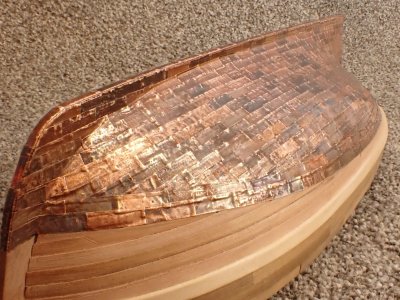
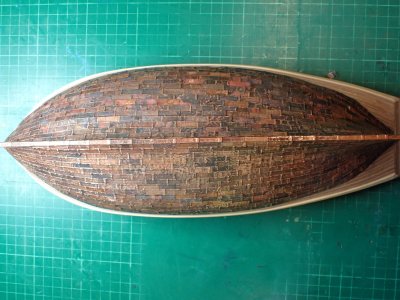
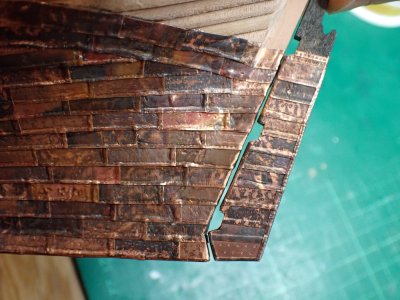
I was happy with the results of my plankings but keen to get the copper in place to hide the worst of it. There's no provision for coppering provided in the Alert kit but it's known that it was done and I wanted to experiment. I'd coppered a model once before, with self-adhesive foil, so I knew the layout, but this time I chose to use some copper sheets made for the purpose by Amati. They were 0.1mm thick and very hard and springy. They were also shiny. Patrick O'Brian, C S Forrester and suchlike authors often mention the beautiful shining streaks of copper showing at the waterline of a ship heeling to the breeze. Clearly they were off school on the day they should have been taught chemistry. Copper in seawater doesn't keep its shine for long, and I suspect that 18th century copper straight from the foundry wasn't particularly lustrous. It was likely to be contaminated with many different compounds which would all react quickly with salty water to produce some marvellous colours - and a lot of brown.

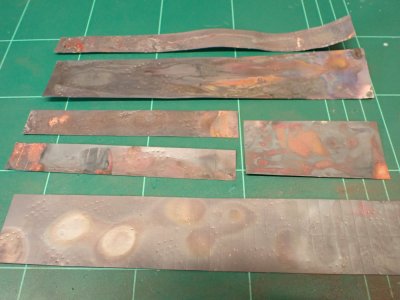
To kill the shine, start the reactions that I wasted to simulate and soften the plates, I annealed the large sheets of copper before breaking them into individual sheets. That's a simple matter pf heating the metal to red hot with a soldering torch and letting it cool slowly.

P8200085.JPG

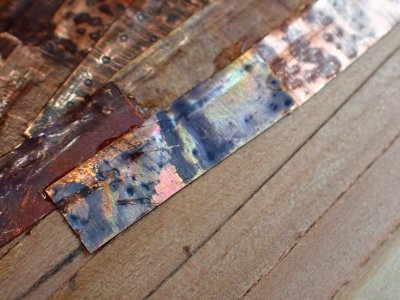
By heating the sheets irregularly, I found that I could vary the colours. Painting on various solutions of household chemicals like bleach, vinegar, saline before the heating was even more spectacular.

P8110055.JPG

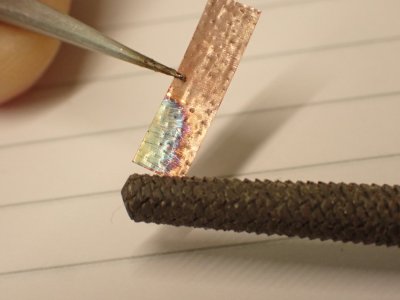
The sheets came with an engraved pattern of circles, meant to represent the nails which held the copper to the hull. I thought the circles were too large, too few and far too regular so I used a variety of sharp tools to impress patterns and random marks into the surface.


A coarse round file was the most useful for general nailmarks. I rolled it over the sheets before separating then into the individual plates, trying to avoid any regularity creeping in. I also coarsely sanded both sides of the sheets for texture and to key the surface for the CA glue.

P8170066.JPG

Each of the 700+ plates were overlapped and worked into place with a ball ended tool. Toolmarks just improved the chaotic, organic appearance of the copper.

P8190080.JPG

Once applied, I gently sanded the high spots. This made the overlapping structure far more apparent and also exposed some fresh copper for the last stage in my chemistry process. I was having such fun - think of a mad scientist, drunk with rum and inspiration. Actually it might have been the CA fumes...

The last stage was to hard boil ten eggs, chop them up and place them in a bowl inside a large plastic storage box with the model. The sulphur compounds that give the eggs their marvellous aroma gave turned some of my copper into copper sulphate and other 'stuff'. (I didn't listen to the chemistry teacher much either.)

P8190073.JPG

This was one of my favourites. There are greens, reds, yellows, black, oranges... Isn't that gorgeous?

P8240090.JPG

After a few weeks the chaos was muted by the general tarnishing of the copper by the ambient atmosphere in a small flat occupied by a single man and his dog. ROTF

This was the best of times and the worst of times. I hugely enjoyed the creative experience of playing with chemicals, fire and sharp things. On the other hand, the exposure to a large amount of CA glue over about three weeks of working was bad news. I was already sensitized to CA so I took precautions.

I had all the windows open, giving a strong cross breeze across the flat. I directed a small fan across my desk with another very big fan blowing the fumes out of the downwind window. I wore nitrile gloves and worked with tweezers. I wore a mask.

I'm glad I was so careful because it must have reduced the damage. However, I still contracted dermatitis with sores on my hands, particularly the right one which was closest to the CA in its little dish (with a cover!) and on my face around my mouth and nose where I'd breathed the fumes in. I looked like a chronic glue-sniffer, which indeed I was, thankfully temporarily. I developed chest pains and a cough too. The sore in my left nostril took a month to heal and bled daily. This is the last time I'll be using CA in any quantity for any reason. It's as nasty as novichok as far as I am concerned.

P8260125.JPG

It was all worth it though. ;)
 
Last edited:
Stand Easy

Once coppered, Alert became a cross between a poodle and a piranha. Stroked bow to stern, it was kind of cuddly but touch it in any other direction and it would bite your fingers. (Come to think of it poodles do that too. :rolleyes: ) I needed a way to handle it that would avoid touching the hull. I also needed to avoid fingerprints, especially bloody ones and to stabilise the model for the deck work which was coming up soon.

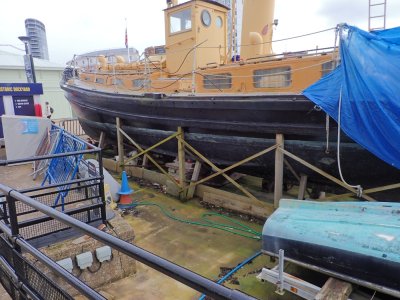
Alert comes with an acrylic cradle stand. It's very nicely fitted to the curve of the hull and reminds me of the kind of thing designed to be unobtrusive, the exhibit stands used in museums. It no longer fit my model because of the coppering, neither did it suit the gnarly aesthetic that I'd drifted into. I pondered for a while and then remembered this photo.

P3100003.JPG

This was taken when I visited Portsmouth Navy Museum (UK) in March this year but we have all seen at some time, somewhere, a boat up on blocks, supported with wooden props. That was my inspiration. I didn't want to build an actual diorama because they are so time consuming. I thought something that suggested this situation would do.

PA080031.JPG

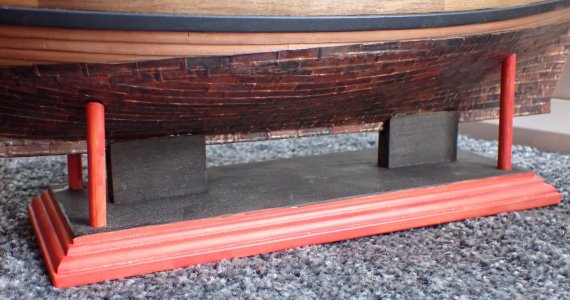
I built this. Originally the props and the edges of the plinth were to be natural wood but later I painted them to match the boat. It's permanently attached with Araldite two-part resin adhesive, the strongest glue I know. That photo was taken today and I'm sure you'll agree it looks pretty dreadful right now. Fear not, fans! It's not finished yet. Once the boat is completed I'll fill the dark spaces with bits and pieces from the spares box. Barrels, blocks, rope, there will have to be an anchor, some timber, some sailcloth... You get the idea. If I get it right, it will look like a stage set for a performance of Billy Budd (the opera).

For now though, it's a heavy and stable workstand and gives me a great handhold, which I needed for the deck planking which is coming up in the next retrospective update.
 
Last edited:
Hit the Deck!

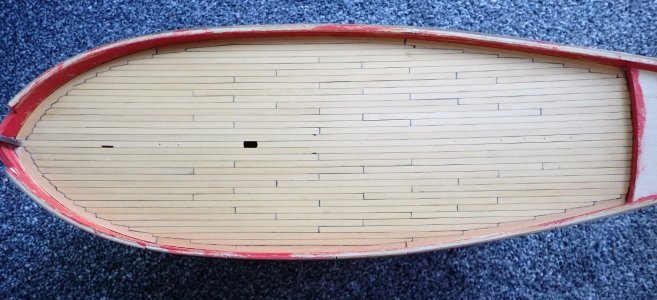
In order to develop as a model shipwright there were some things I wanted to try on this deck. It was big enough to give me some room to practice but not so large that I couldn't chisel it all off and start over if things went awry. The kit contained boxwood planks which I'll hoard for a later model - nice wood! I happened to own a two foot piece of (I think, maple) wood which I'd bought from an exotic wood dealer near here some time ago. I like the colour and it's so tight and straight grained that it can be cut and scraped in any direction. Could I make it into planks?

I own a Proxxon 4 inch table saw, bought in a moment of liquidity a couple of years back and almost never used. To be honest, it scares me. I used to work with a big table saw in the woodwork department of a high school. It had a ten foot table and I think a two foot blade. I never felt in any danger using that beast because the blade was feet away from my tender flesh and the wood was big and heavy and generally stayed where I wanted it to, and it had a guard. The Proxxon is only about 18 inches square, the wood is tiny and floats up on top of the rotating blade if I'm not careful. It might be small but it is powerful and kicks back nastily. The guard is useless for the sizes of wood I'm usually cutting. I know it won't take my arm off but my son shortened some fingers last year with a planer and I came to understand how horrifying it is to see your own bones. I need my fingers for a few more models/years yet.

I was brave. And very, very careful. With a lot of nervous sweat, but no blood or tears, I ripped the stick into planks 3.5mm wide and 2mm thick. In a way they were an improvement on the kit planks because they matched the size of the planking drawn out in the Goodwin book.

P9200171.JPG

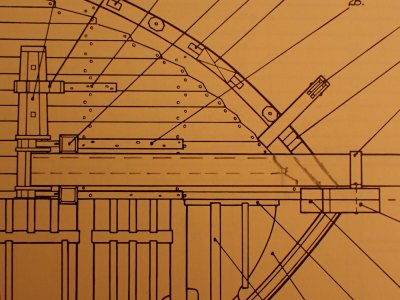
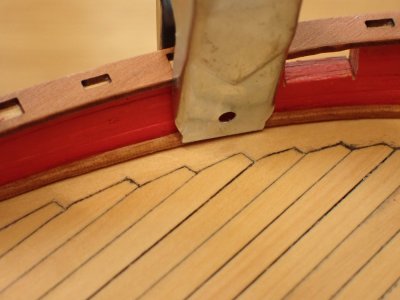
I wanted to fit a margin plank and I wanted to joggle the ends of my planks into it, as shown in the top half of the drawing. I believe its called nibbing in the US? It's a way to avoid feather or shim edges to the planks and in my opinion also to prevent the wedging effect of pointed planks which would move slightly as the boat worked in heavy seas.

P9210185.JPG

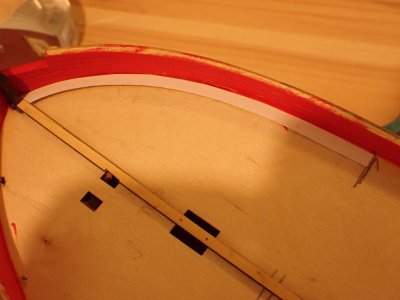
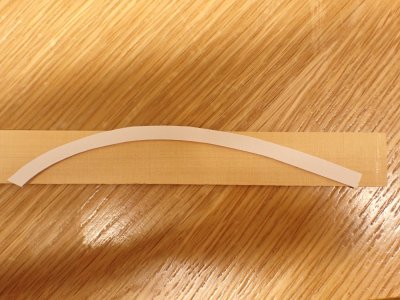
With the centreline plank fitted to the sturdy plywood false deck I made a paper template of the bow section. I'd established that I was unable to side bend a wide maple plank to fit that curve.

P9210186.JPG

I'd kept back some wide timbers from the plank milling. This was one of those rare times when I had planned ahead.

P9210187.JPG

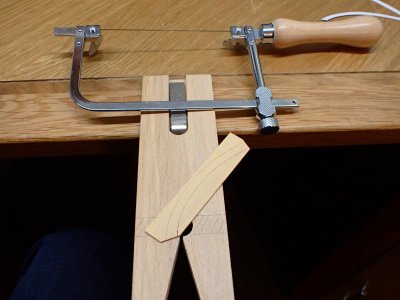
I don't have a scroll saw but a jeweller's piercing saw is a much nicer tool to use, in my experience. That table saw, and my lad's blunt fingers have discouraged me from using power tools except as a last resort. What's the rush?

P9220198.JPG

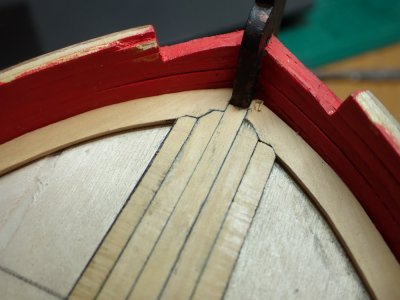
The first few joggles were a little difficult for me to get my head around. Each one has different geometry and I expected to be baffled. However, once I got going I found that it was really simple. The margin planks were stuck down already so the technique went something like this;

P9280220.JPG

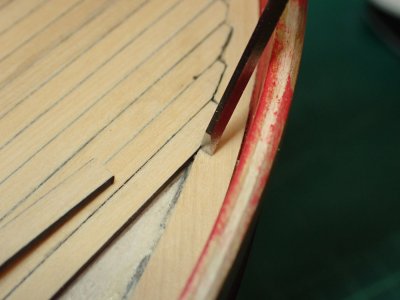
Using a suitable chisel the right angled part of the cut was marked on the nibbing strake.

P9280223.JPG

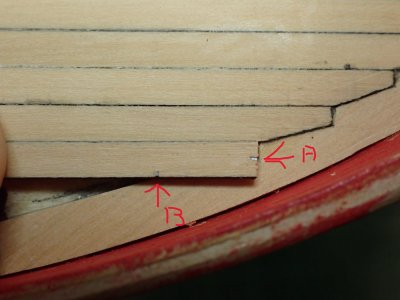
The new plank was marked at A, the end of the chisel cut and B, the point where it crossed the nibbing strake.

P9280224.JPG

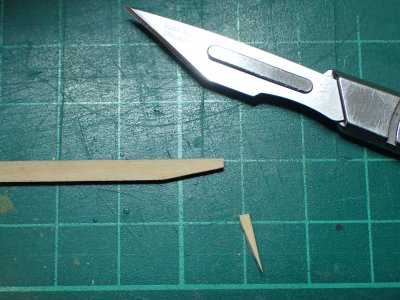
The two marks were cut with a long scalpel. There was no need to draw a line.

In the meantime points A and B were joined on the nibbing strake with a straight-edge and a scalpel/marking knife. The waste was removed from the strake with chisels and scalpels. Then the two parts of the joint were glued together.

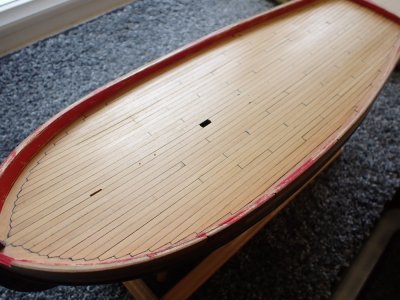
Repeat as necessary until your deck looks like this.

P9290260.JPG

It looks very difficult and impresses everyone but in fact it's an easier way to terminate your deck planks than painstakingly sanding them to a point that matches the sides of the deck. The last few planks are tricky because you have to get both ends spot on but by the time you get to the sides, you are so well practiced that you know what to do. The potential drawback is that if you seriously mess up a joint, you might have to start over, though there are always ways to fudge it. A nibbing strake repaired with a different wood following 'battle damage' would be my way out. :D

P9290259.JPG

That's how it worked out for me prior to final sanding and sealing.. I was particularly pleased that the two sides are so symmetrical, suggesting that I was fairly consistent in the fortnight or so I took to do this. There are mistakes in the butt shift, some of the caulkings are wider than others and some of the joggles are a bit ropey but for a first attempt, I'll accept all that as part of the learning.
 
Rudder Platform Disappointment and the Bulwarks Disaster

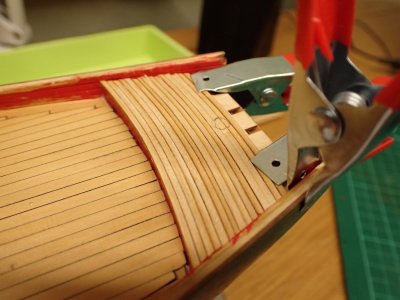
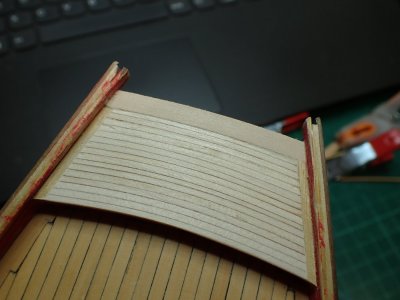
After my delight about the main deck I became careless, sloppy. Instead of cutting my home made planks down to use on the rudder platform, I used some 2mm square section wood left over from goodness knows what.

P9300269.JPG

Hmm. Not so good. The wood bent easily which was why I kept using it but it was splintery in places, probably very old and dry. I had press-on-itis and ignored my misgivings.

P9300270.JPG

I fudged the splintered ends with two pretend margin planks and when the rubbish wood ran out, used a big piece of 'my wood' to ease the transition from the curve at the step up from the main deck to the flat transom. The real Alert had a curved transom but the kit design simplifies this, sensibly in my view. Sealed with sanding sealer, the rubbish wood looks, well, rubbish. "5/10 for that one Smithy, could do better" as my teacher used to say.

Why not do-over? I was sick of the deck planking process and wanted to move on and learn something new. What I learned next was very not good.

PA030001.JPG

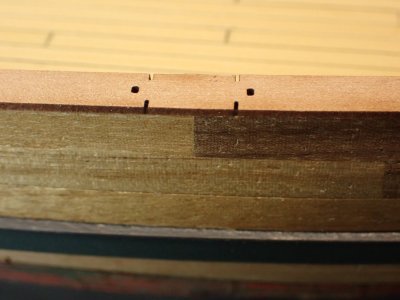
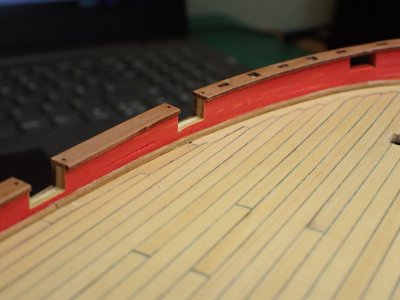
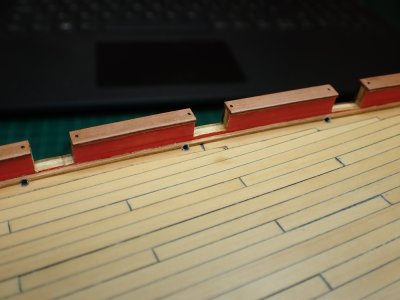
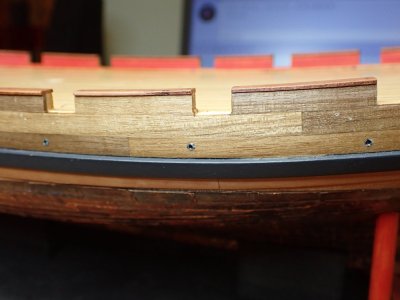
It was time to fit the capping rail and saw out the gun ports. At one stage I had been careful to align the joints in the walnut outer bulwarks with the ports. Unfortunately this foresight had since failed me.

PA030004.JPG

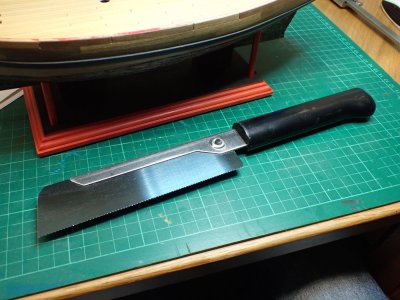
However, on to the cutting of the ports. I used a Tamiya razor saw of great sharpness and minimum kerf. It's designed for plastic but coped well here. It cuts on the pull stroke and caused no splintering.

PA050024.JPG

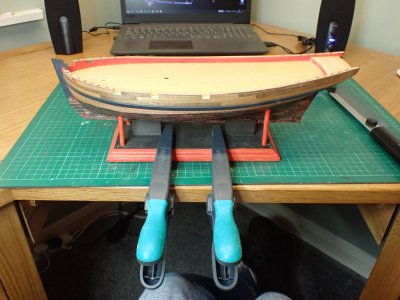
Clamping the model down avoided any lost motion and made my cutting easier and neater.

PA050025.JPG

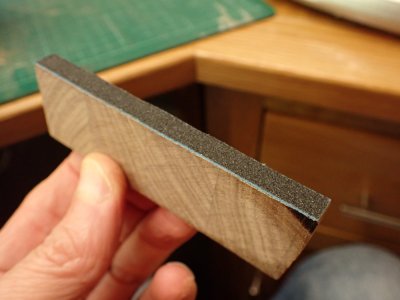
I filed out the remaining waste after making diagonal saw cuts but was at risk of damaging the corners so to protect the sides I built a hand safe edge 'file' that could only abrade downwards, not to the side.

PA030012.JPG

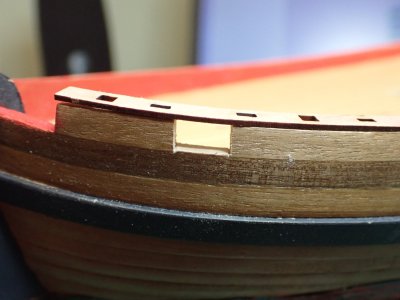
The first port to be cut and filed out was the bow chase port which the rail carries over. I cut the port before putting the rail on, I'm not that daft. Or am I?

PA030016.JPG

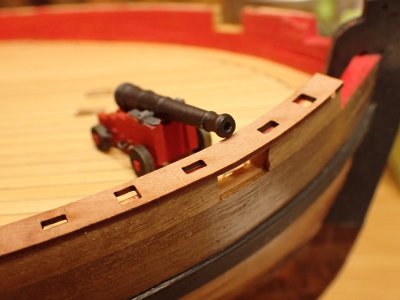
That gun is surely supposed to fit under the rail. :eek:
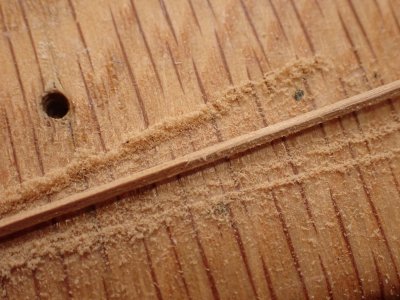
I did some measuring and found that the height of the bulwarks above the deck was 2mm shorter than it ought to be - over five scale inches! Further investigation suggested there were three errors. First, my deck planks were thicker than the kit ones. Not by much, and had that been the only mistake I'd have gotten away with it. The second mistake was the bulwarks themselves, which I had either built too low or more likely sanded too much when I flattened the top to take the rail.

PA040018.JPG

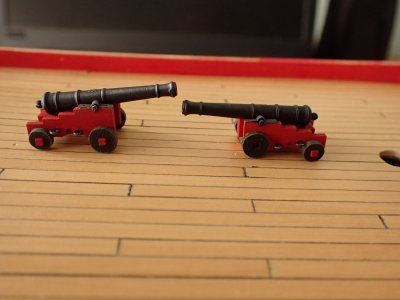
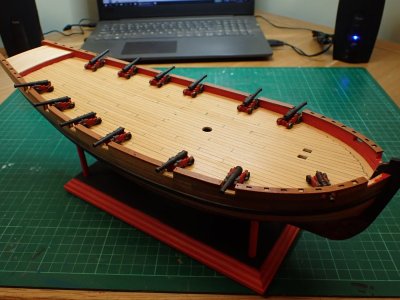
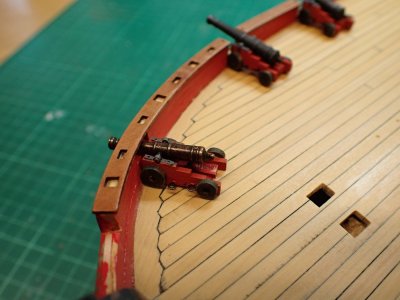
The third error was committed ages ago when I built the gun battery. All of the twelve guns are at maximum elevation. This was why they wouldn't fit the chase port and why they looked silly, towering over the ports which they clearly did not need to be cut down at all.

Building up the bulwarks was impossible without resorting to painting that lovely walnut exterior to hide the mess. Actually I doubted that I had the skill to do it at all. So once again, I took the learning on board, and fudged the issue by lowering the guns. This picture shows the first stage when I cut off the front wheels and reattached them higher up, later I did the same with the back wheels making the armament twelve 6 pounder sawn-offs!

PA050028.JPG

I think I'll get away with it with most people who are likely to see the model. And I've confessed here, so my conscience is clear.

PA050029.JPG

Finally, using the spare carriage provided in the kit and an old metal barrel I made a little bow chase gun that I may or may not fit to the sloop. I'm still thinking about that.

~~~~~~~~~~~~~~~~~~~~~~~~~

And that ladies and gents, brings you right up to date with the build. Since that last picture I've been taking a few days off, to write down all this history, as it happens.

Tomorrow, I'll get back to work and post further updates whenever I have made enough progress to fill one. With luck and a following wind, I aim to post a couple of times a week.

See you soon!
 
Waterways and Scuppers

It was a busy day at Smithy Mansions yesterday but I found time to fit waterways and scuppers to Alert. These are two easy little details to add to the kit specification and I think they are worth the small amount of extra work.

PA090044.JPG

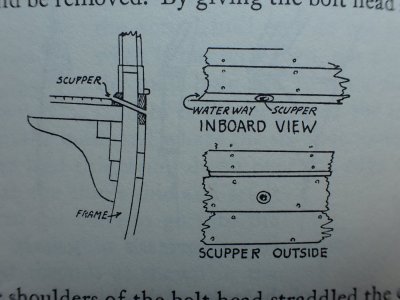
I worked from this diagram and the text in The Built Up Ship Model, Charles Davis 1933. Surprisingly, Anatomy of the Ship Alert made mention of neither feature. I thought that the AotS books were the last word on their subjects but should have realised that they are limited in scope. If they contained all the information available on a vessel, they'd cost a fortune.

Waterways act like 'kerb stones' directing water from the deck to the scuppers which are the drains. They also add some strength and seal the joint between deck and bulwark. In civilian ships they could be a yard wide and six inches high but in warships or gun armed merchantmen they had to be small to leave the deck edge clear for weaponry.

PA090038.JPG

I used square section 1x1mm walnut and rounded off one corner with sandpaper. I found it quite difficult to see what I was doing which was useful, because I had an optician's appointment later in the day and ordered some purpose made modelling specs - powerful reading glasses with a shorter than usual focal length. They were only £15 for frame and prescription lenses. I added £35 for the anti-reflective coating but I still think that price is a bargain. I'll tell you in ten days whether they are useful on the bench.

PA090036.JPG

The thin walnut bent easily on one side of the bow but on the other side it needed help. I wet it, clamped it up and left it for an hour until it took up most of the curve.

PA090037.JPG

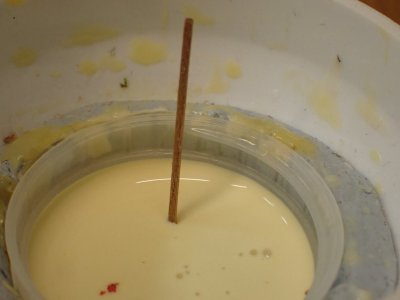
I'm off superglue, as you know, so I used Titebond which had been decanted into this milk bottle top some three days ago. I keep it in a small lidded pot but it had thickened up enough to be really sticky with good 'grab'. It would hold quickly and was unlikely to smear onto my precious deck.

PA090039.JPG

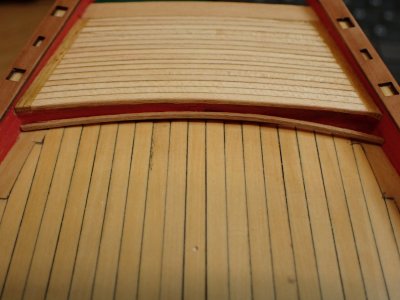
I laid a strip of waterway across the front of the rudder platform. This is incorrect - there's no reason to have one there, so don't copy me. I did this because I wanted to hide the badly finished rear ends of my deck planking.

All of the waterways including this one were fitted into a concavity so they almost clamped themselves if they were cut to exactly the right length. I crept up to that length with one stroke of a sanding stick at a time. Sand - check, sand - check, until finally it was a fraction too short and I had to improvise some clamping. Oh well.

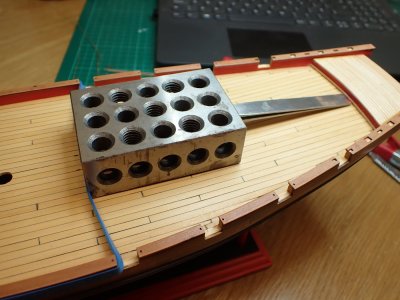
PA090040.JPG

I'm pleased with this 'clamping solution', a composite of gravity and elasticity focussed by the wrong end of a pair of tweezers that have been my constant modelling companions for the last thirty years.

PA090041.JPG

Fitted and varnished. There's a joint on the left which will be underneath a gun and therefore invisible. I could have laid a single piece, bow to stern but it was easier in two halves.

PA090042.JPG

The word scuppers just means holes, sometimes hatches, sometimes port holes, in this case drains. I drilled sets of three. The centre one is abeam the pumps and therefore the low point of the deck, the other two are to deal with trim changes and heeling. I guessed that a three inch drain would be about right and used a scale 1.2m drill bit.

The 'lead flashing' is simply gunmetal grey paint applied inside the holes with a toothpick.

PA090043.JPG

The external holes are also lead lined. They line up perfectly in the middle of that strake which would have needed superhuman control of the angle of my drill at the deck edge - if I had drilled all the way through. Of course, my holes are only a few mm deep and are not connected.

Looking at these photos, large on my laptop, I think the scuppers would have looked better if I had countersunk or at least de-burred the scuppers before painting. (There are also unvarnished patches on the waterways.) At the time I didn't realise this, and that is why I need those new glasses!
 
Hi Smithy
Your woodworking is impeccable with some really fine joinery! I do have a question, hope that is OK. In the photos in post #13, the truck axles appear to be square. This was new for me thus my quandry. I had not seen square caps or anything other than round axle ends in the past. Making them round is really easy though if you have a drill, some scrap brass or aluminum and a hacksaw. I can post photos if you wish and/or you can see them here at SoS https://shipsofscale.com/sosforums/...y-modelship-dockyard.13691/page-5#post-394395 post #91.

Allan
 
Hi Smithy
Your woodworking is impeccable with some really fine joinery!

Thanks Allan.

I do have a question, hope that is OK.

Of course. All questions, comments, criticism, and especially compliments are welcome.

In the photos in post #13, the truck axles appear to be square.

Yes, it's a compromise on the part of the manufacturer. I hated it but to be honest was to lazy to replace them. If I had decided to tackle it I'd have made new wheels with round holes and stuck a piece of dowel in them. At least, that's what I would have done before I saw a genius idea for a simple tool for rounding square stock. It was on SOS somewhere...

This was new for me thus my quandry. I had not seen square caps or anything other than round axle ends in the past. Making them round is really easy though if you have a drill, some scrap brass or aluminum and a hacksaw. I can post photos if you wish and/or you can see them here at SoS https://shipsofscale.com/sosforums/...y-modelship-dockyard.13691/page-5#post-394395 post #91.

Allan

...and there it is! That's a great and simple tool and like the other guy that you showed it to recently, if I'd seen it before the event, I would have used it. Thanks for the excellent suggestion. Is there a tools and tricks section on SOS where you could post it?
 
Back
Top