love your detailed explanations and your modeling skills. 
-

Win a Free Custom Engraved Brass Coin!!!
As a way to introduce our brass coins to the community, we will raffle off a free coin during the month of August. Follow link ABOVE for instructions for entering.
-

PRE-ORDER SHIPS IN SCALE TODAY!
The beloved Ships in Scale Magazine is back and charting a new course for 2026!
Discover new skills, new techniques, and new inspirations in every issue.
NOTE THAT OUR FIRST ISSUE WILL BE JAN/FEB 2026
You are using an out of date browser. It may not display this or other websites correctly.
You should upgrade or use an alternative browser.
You should upgrade or use an alternative browser.
HMS Ajax 38 gun frigate. Euromodel [COMPLETED BUILD]
- Thread starter Ken
- Start date
- Watchers 36
-
- Tags
- ajax completed build euromodel
Hi all
I’d like to put my 2 cents worth in on the discussion on Euromodel.
Over the last 40 years I’ve built the kits from the major companies and have been very satisfied with the results. Years ago I was told at my local hobby shop that Euromodel kits were to difficult to build as they had no instructions so I avoided them. But I wanted more of a challenge so I bought the Friedrich and downloaded piratpetes manual. I soon discovered that I would need a scroll saw, band saw and sander plus wood if I was going to build something more than a Kit ship. I got a box of walnut and oak off cuts from a cabinet shop and to make a long story short made all the wooden parts according to the very detailed plans
Sometimes it took me longer to figure things out than to make the part but I ended up with the most satisfying build I’ve ever done and the most pleasing ship to look at.
My next project when time permits is the Falmouth which I was able to get before they had to temporarily close shop and the Royal William was not available.
If I had built this from the kit supplied wood I would have been somewhat disappointed but thanks to having me take it up a notch it became a real labour of love and learning. The after sales support was excellent and they are my company of choice from here on at my skill level
Bill
- Joined
- Dec 16, 2016
- Messages
- 1,179
- Points
- 493

Hi Bill, Thanks for posting your experience here. I completely agree with you, I’ve found Euromodels to be a bit of an enigma, as a kit they are a bit wanting and sometimes very frustrating. I don’t know why but like yourself I’ve found that so far they have been the most satisfying and enjoyable models that I have built, the Ajax so far is no exception. I only have a small bench sander, saw and a couple of drills as well as a small selection of hand tools yet I was able to build the Royal William, I think to a fairly high standard, it is shown in the finished section. I want to do the Mordaunt next but at the moment for me it’s looking a bit too expensive, and yes I found that their support was excellent.Hi all
I’d like to put my 2 cents worth in on the discussion on Euromodel.
Over the last 40 years I’ve built the kits from the major companies and have been very satisfied with the results. Years ago I was told at my local hobby shop that Euromodel kits were to difficult to build as they had no instructions so I avoided them. But I wanted more of a challenge so I bought the Friedrich and downloaded piratpetes manual. I soon discovered that I would need a scroll saw, band saw and sander plus wood if I was going to build something more than a Kit ship. I got a box of walnut and oak off cuts from a cabinet shop and to make a long story short made all the wooden parts according to the very detailed plans
Sometimes it took me longer to figure things out than to make the part but I ended up with the most satisfying build I’ve ever done and the most pleasing ship to look at.
My next project when time permits is the Falmouth which I was able to get before they had to temporarily close shop and the Royal William was not available.
If I had built this from the kit supplied wood I would have been somewhat disappointed but thanks to having me take it up a notch it became a real labour of love and learning. The after sales support was excellent and they are my company of choice from here on at my skill level
Bill
Ken
Last edited:
- Joined
- Jan 1, 2018
- Messages
- 51
- Points
- 68

Bill and Ken,
You have both discovered that Euromodel builds are demanding in interpretation and yet produce a very high level of satisfaction. To me that is the key in building a 'kit'. Look at Ken who is struggling to update his current build log because he can hardly put his build down to turn to his PC. Testament to the attraction of such a 'kit' . The only 'complaint' I have with Ken's work is that he has stirred up my part-built Ajax sitting forlorn in a dis-used shipyard and it needs re-visiting.
Pete
.
- Joined
- Jan 1, 2018
- Messages
- 51
- Points
- 68

Hi Bill,Hi all
I’d like to put my 2 cents worth in on the discussion on Euromodel.
Over the last 40 years I’ve built the kits from the major companies and have been very satisfied with the results. Years ago I was told at my local hobby shop that Euromodel kits were to difficult to build as they had no instructions so I avoided them. But I wanted more of a challenge so I bought the Friedrich and downloaded piratpetes manual. I soon discovered that I would need a scroll saw, band saw and sander plus wood if I was going to build something more than a Kit ship. I got a box of walnut and oak off cuts from a cabinet shop and to make a long story short made all the wooden parts according to the very detailed plans
Sometimes it took me longer to figure things out than to make the part but I ended up with the most satisfying build I’ve ever done and the most pleasing ship to look at.
My next project when time permits is the Falmouth which I was able to get before they had to temporarily close shop and the Royal William was not available.
If I had built this from the kit supplied wood I would have been somewhat disappointed but thanks to having me take it up a notch it became a real labour of love and learning. The after sales support was excellent and they are my company of choice from here on at my skill level
Bill
Your comments re power tools brought a wry smile to my face. High on the shopping list was a small lathe to shape the various masts, yards, etc. Such a tool is not cheap.
One day, I sat down with a small hand plane that sat in the palm of my hand and with careful strokes, followed by a part rotation of the timber rod, I was amazed how simple it was to achieve a tapered spar.... and of course, much sandpaper.
Still here in the background if you need any advice on Euromodel ships - but with your skills, it doesn't look you need much of that.
- Joined
- Dec 16, 2016
- Messages
- 1,179
- Points
- 493

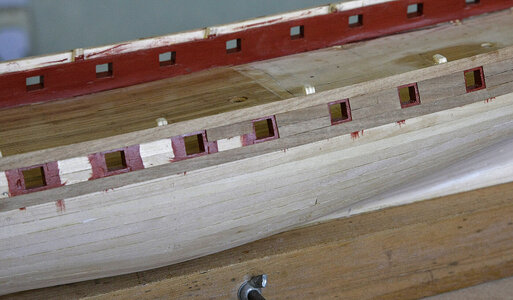
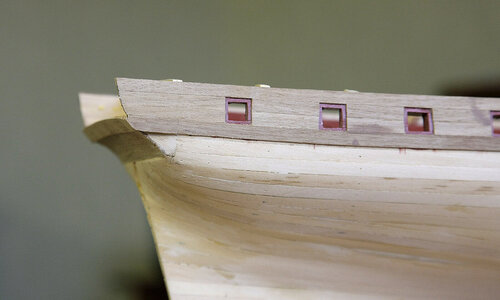
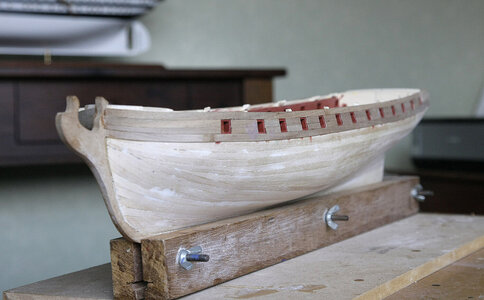
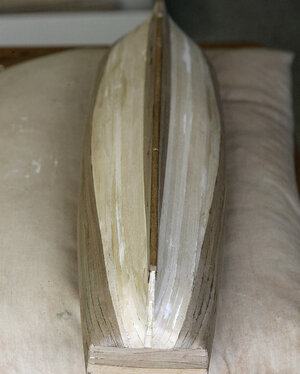
Hello Everyone. Progress continues apace. Today’s post is to tell you about my second planking. I don't intend to do what many do and shape each plank to a set pattern, carefully measured into sections, adding scarfs and stealers so that each plank ends up the same. I tried that once and found that I couldn’t master it and the end result looked poor, a bit of a mess with not perfectly fitting edges. I much prefer the planks to end up smooth, flat and tightly fitted to its adjacent plank with not the slightest gap, they may not be correct to the purists but to my eye it looks better. I know I will end up with the dreaded tapered to a point planks but I will arrange these so that the wale covers the pointy bits and all should look well, to my satisfaction anyway.
The planks are 5mm x 1mm and are nicely machined. Because of the age of the kit I found that although they were still nice and springy the wood was very dry and prone to having small splinters coming away, so I had to be careful with them. I don’t use a holding cradle or hull clamp when planking, I find that these prevent you from getting at the hull from all angles and hampers you. I just put a pillow on my knee and rest the hull on that, you can move it around easily to come at it from any angle just like wresting with a small dog.
I started my planks by running the first just above the gun ports, the width of the recess and the second just below the ports then I planked in between them cutting and sanding them to the exact size so that it leaves the correct gap for the port recess, it may feel like it takes longer but there will be no cutting out for the recess which can often lead to a slightly imperfect edge. With that section done I continued down tapering each plank slightly and fixing until I thought the pointy planks would then run to under the wale then started from the keel upwards. I use cyno on all my second planking only doing small lengths at a time, pressing down into place then when set moving along to another small section. I leave the planks standing upright in a thermos flask of hot water for at least ten minutes before I use them. I only needed to use my nippers for the bow curves but for the stern as the curve was pretty severe I needed to use a soldering iron. A good thing about cyno is it activates with moisture so still works well with damp planks. So far, so good


Last edited:
Looks good Ken, although, not the beautiful mahogany of your last build!  Going to look great!
- Joined
- Dec 16, 2016
- Messages
- 1,179
- Points
- 493

Hi Don. Yes that mahogany was lovely. I do intend to put a light teak wood stain on the hull just to give it a bit more colour, I’ve done this on other models and find that it works wellLooks good Ken, although, not the beautiful mahogany of your last build!Going to look great!
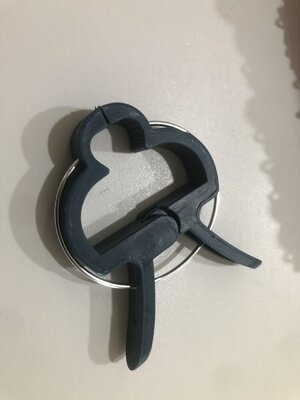
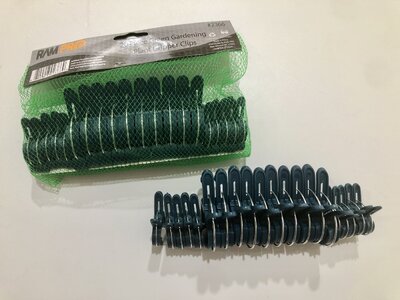
Hello Everyone. Today’s episode is the finishing off the first planking with a good sanding. I hadn’t shown the progress on the first planking as I’m trying to catch up so you only got to see the start and finish, but I’m sure that you’re all familiar with this process and that you have your own techniques. The basic hull ended up pretty good, true with no undulations so a quick sand showed me where to fill and it was only small gaps between some of the planks, These when filled and with a robust sanding saw the hull as perfect as I was ever going to get a first layer. I was only able to do this as the plans supplied for the shaping of the bulkheads must have been perfect, for that I officially forgive Euromodel for the issue with the stern. I started to line the inner wall, none of this will be seen but I needed the depth for the port linings to look right. You’ll see the small clamps that I use, these are the best that I have ever come across, they have a reasonable depth, a very wide throat and a strong spring. I got these from a garden centre, they are for clipping to garden canes, the wide throat is for a flower to pass through. Because it is not for modelling they were very cheap, a large bag full for a couple of pounds. Next post will be the cutting out and lining of the gun ports, see you then
You may notice that the keel and prow are in place, I’d forgotten about doing these at this stage, that’s the problem with doing a post at a later date, the brain doesn’t always follow. I cut a channel for these in the planking to just slot them into, then both nail and glue. I’d checked and shaped the prow early on when I could lay the keel flat so I didn’t expect any problems but with modelling something always comes up and bites your bum. I’d pre drilled the holes for the nails, I glued the parts in then when in place I gave the nails holding the prow one last tap for luck, the prow to my astonishment shattered into about five pieces. Sod’s law, I asked myself why I couldn’t have just left well alone. This was the first time that the age of the kit had had an effect, the wood used for the prow was now dry and brittle, it had broken where the cross grain was at its thinnest, I was able to do a repair without it being noticeable no harm done but I must be more careful. I’ve checked all the other wood and it seems to have been the only piece to have been affected like this.
View attachment 214064
View attachment 214068
View attachment 214069
View attachment 214065
View attachment 214066
View attachment 214067
View attachment 214070
View attachment 214071
Ken:
I love those clamps. I’ll start looking for them on this side if the pond to see if I find them. They are super handy.
On the other hand, your planking looks very clean, something I’ll try to imitate when I get to plank my Cog.
I just found this handy clamps here:
A bargain 40 pieces for $9.00
I already placed my order, you know that we can’t never have enough clamps.
A bargain 40 pieces for $9.00
I already placed my order, you know that we can’t never have enough clamps.
Last edited:
- Joined
- Dec 16, 2016
- Messages
- 1,179
- Points
- 493

Hi Bluebeard.. Yes they look similar, as you said a good price, I bet that if it said, ‘for modelling‘ it would be five times the price, thanks for your likes.I just found this handy clamps here:
A bargain 40 pieces for $9.00
ken
Hi Bluebeard.. Yes they look similar, as you said a good price, I bet that if it said, ‘for modelling‘ it would be five times the price, thanks for your likes.
ken
Let’s keep it a secret until we all buy some.
- Joined
- Jan 1, 2018
- Messages
- 51
- Points
- 68

Ken, a very honest and basic approach to planking that produces a good outcome. Well done. PeteHello Everyone. Progress continues apace. Today’s post is to tell you about my second planking. I don't intend to do what many do and shape each plank to a set pattern, carefully measured into sections, adding scarfs and stealers so that each plank ends up the same. I tried that once and found that I couldn’t master it and the end result looked poor, a bit of a mess with not perfectly fitting edges. I much prefer the planks to end up smooth, flat and tightly fitted to its adjacent plank with not the slightest gap, they may not be correct to the purists but to my eye it looks better. I know I will end up with the dreaded tapered to a point planks but I will arrange these so that the wale covers the pointy bits and all should look well, to my satisfaction anyway.
The planks are 5mm x 1mm and are nicely machined. Because of the age of the kit I found that although they were still nice and springy the wood was very dry and prone to having small splinters coming away, so I had to be careful with them. I don’t use a holding cradle or hull clamp when planking, I find that these prevent you from getting at the hull from all angles and hampers you. I just put a pillow on my knee and rest the hull on that, you can move it around easily to come at it from any angle just like wresting with a small dog.
I started my planks by running the first just above the gun ports, the width of the recess and the second just below the ports then I planked in between them cutting and sanding them to the exact size so that it leaves the correct gap for the port recess, it may feel like it takes longer but there will be no cutting out for the recess which can often lead to a slightly imperfect edge. With that section done I continued down tapering each plank slightly and fixing until I thought the pointy planks would then run to under the wale then started from the keel upwards. I use cyno on all my second planking only doing small lengths at a time, pressing down into place then when set moving along to another small section. I leave the planks standing upright in a thermos flask of hot water for at least ten minutes before I use them. I only needed to use my nippers for the bow curves but for the stern as the curve was pretty severe I needed to use a soldering iron. A good thing about cyno is it activates with moisture so still works well with damp planks. So far, so good
View attachment 215110
View attachment 215111
View attachment 215112
View attachment 215113
View attachment 215114
- Joined
- Dec 16, 2016
- Messages
- 1,179
- Points
- 493

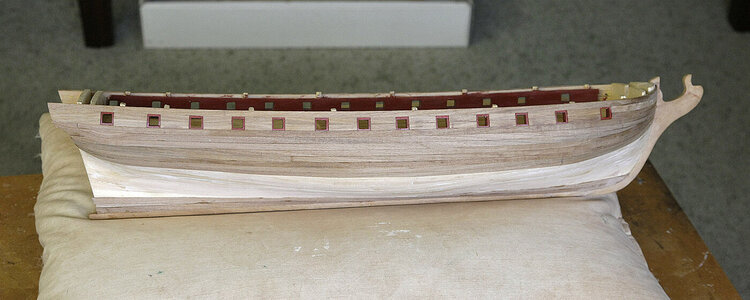
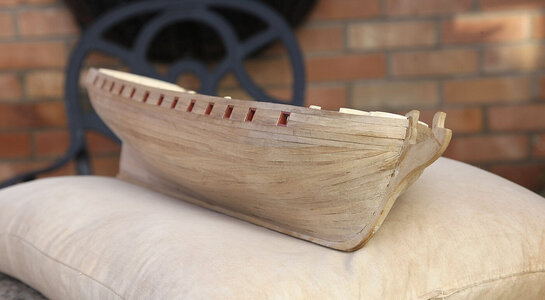
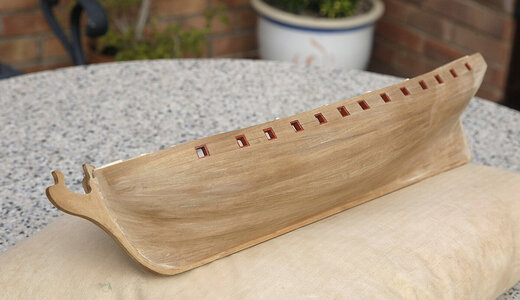
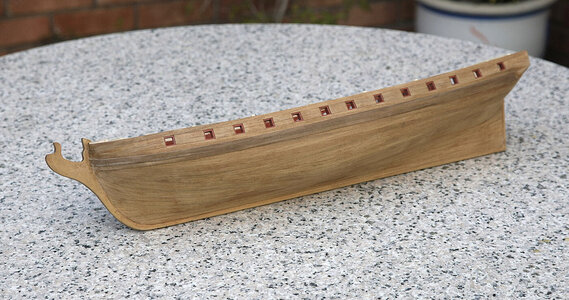
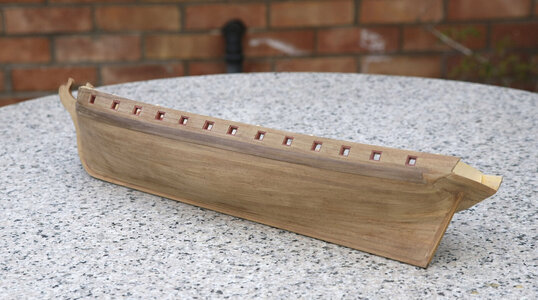
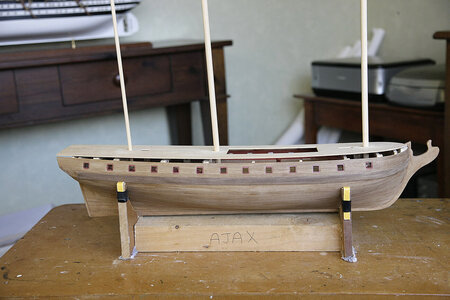
Hello Everyone. Again thanks for your responses to my posts. Today I’m showing you my completed second planking. All went exactly as planed with no issues, the planks being nice and tight against each other and with an acceptable flow to them. There are rather a lot of pictures but they show the sequence of finishing. I could have stretched these out to a few posts but as I’m trying to catch up I’m throwing them all in together. The first couple show after putting the planks on, then after sanding, and finally with the wale attached. I gave it a coat of light teak wood stain, as I mentioned I don’t like the dull greyish colour of walnut and I think that the stain warms it up a bit. I was very pleased that the wale hid the pointy planks as I’d planned and I think that it all came out ok.
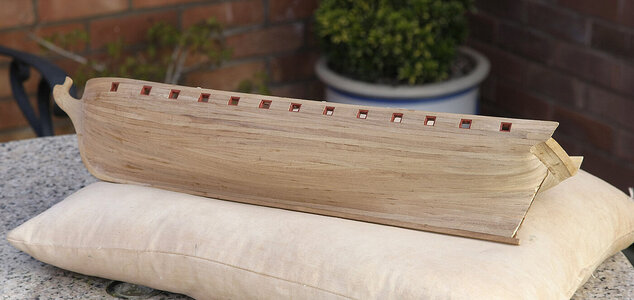
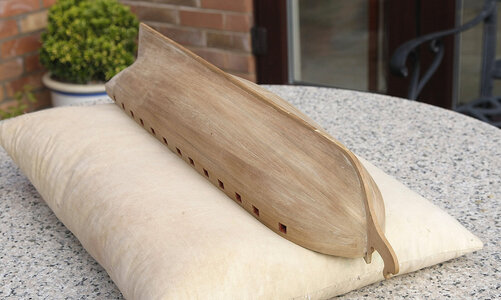
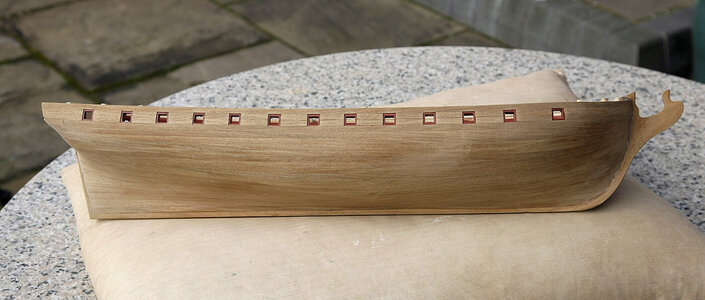
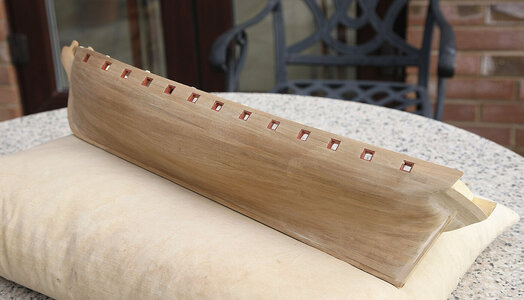


Looks great Ken!Hello Everyone. Again thanks for your responses to my posts. Today I’m showing you my completed second planking. All went exactly as planed with no issues, the planks being nice and tight against each other and with an acceptable flow to them. There are rather a lot of pictures but they show the sequence of finishing. I could have stretched these out to a few posts but as I’m trying to catch up I’m throwing them all in together. The first couple show after putting the planks on, then after sanding, and finally with the wale attached. I gave it a coat of light teak wood stain, as I mentioned I don’t like the dull greyish colour of walnut and I think that the stain warms it up a bit. I was very pleased that the wale hid the pointy planks as I’d planned and I think that it all came out ok.
View attachment 215342
View attachment 215343
View attachment 215344
View attachment 215345
View attachment 215346
View attachment 215347View attachment 215348
View attachment 215349
- Joined
- Dec 16, 2016
- Messages
- 1,179
- Points
- 493

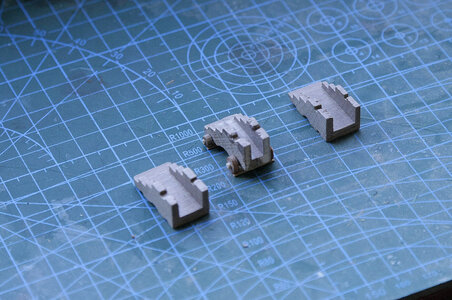
Hello Everyone. Thanks for your interest. I have attended to the placing of the canons, first having made one up. The carriages provided weren’t up to much, as you can see they were straight sided rather than tapered towards the front and they were oversize. To get them more correct I cut them down the middle, chamfered them then glued them back together and sanded the front and rear level. I’m not going to spend time accurately detailing them as only the rear part will be seen. You’ll notice that the one shown in the picture has a strip glued to the wheels, this is to compensate for the height where no deck planks were laid. When the upper deck is in place I won’t have access to most of the canons so for these I’ve made up cradles and will place the barrels on them through the ports.
I made up and fitted one of the capstans and as you can see a set of stairs. I made up from the plan and fitted all the beams which support the upper deck then test fitted the deck and masts, adjusting where needed, I’ll fit these much later after I get some of the detailing done. I have shown a picture from above of the balsa block that I used to shaped up the stern.
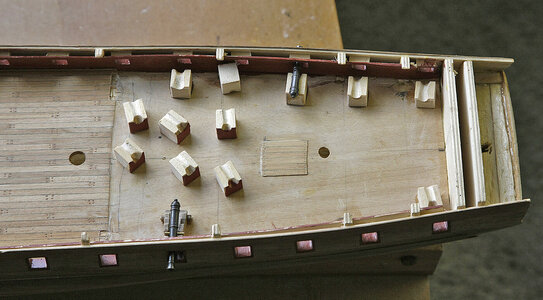
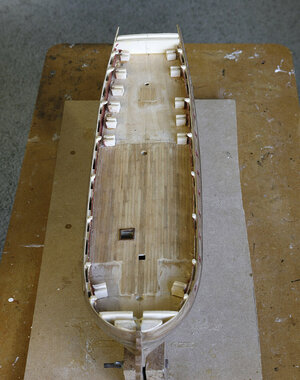
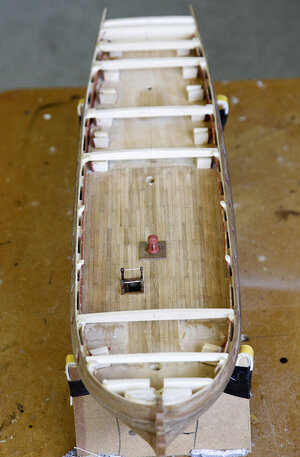
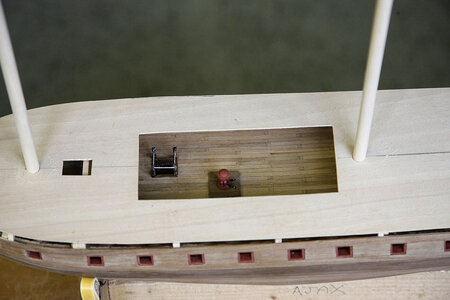
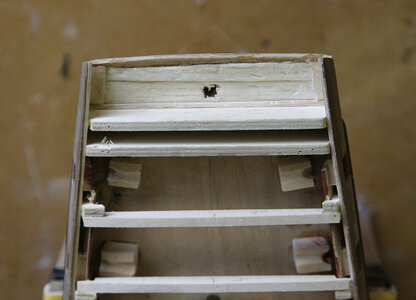
I made up and fitted one of the capstans and as you can see a set of stairs. I made up from the plan and fitted all the beams which support the upper deck then test fitted the deck and masts, adjusting where needed, I’ll fit these much later after I get some of the detailing done. I have shown a picture from above of the balsa block that I used to shaped up the stern.


Hello Everyone. Thanks for your interest. I have attended to the placing of the canons, first having made one up. The carriages provided weren’t up to much, as you can see they were straight sided rather than tapered towards the front and they were oversize. To get them more correct I cut them down the middle, chamfered them then glued them back together and sanded the front and rear level. I’m not going to spend time accurately detailing them as only the rear part will be seen. You’ll notice that the one shown in the picture has a strip glued to the wheels, this is to compensate for the height where no deck planks were laid. When the upper deck is in place I won’t have access to most of the canons so for these I’ve made up cradles and will place the barrels on them through the ports.
I made up and fitted one of the capstans and as you can see a set of stairs. I made up from the plan and fitted all the beams which support the upper deck then test fitted the deck and masts, adjusting where needed, I’ll fit these much later after I get some of the detailing done. I have shown a picture from above of the balsa block that I used to shaped up the stern.
View attachment 215904
View attachment 215905
View attachment 215906
View attachment 215908
View attachment 215909
View attachment 215910
View attachment 215911
Ken:
Great progress. It’s looking fabulous.
About adding a strip to compensate, how about adding bigger wheels. I don’t think it will be noticeable.
But then again, Im just an intermediate, you are the Pro. and knows better.
Good work you are doing.
Very clever idea with the saddle for the cannon...
- Joined
- Dec 16, 2016
- Messages
- 1,179
- Points
- 493

Hi Bluebeard, I can see your point, but I didn’t explain properly, I won’t be adding that strip when they’re fitted, it was just to compensate for the un planked part whilst I was setting up all the canons, when they sit on the planked deck that piece won’t be needed as they will then be the right height. Thanks for your compliment.Ken:
Great progress. It’s looking fabulous.
About adding a strip to compensate, how about adding bigger wheels. I don’t think it will be noticeable.
But then again, Im just an intermediate, you are the Pro. and knows better.
Good work you are doing.
Ken


