• Ships of Scale has incorportated an extra level of security when you log In. Please follow on-screen prompts to acknowledge that you are not a robot via a "Check Box" or a "Pictorial Check Box Puzzle". This is needed due to higher level of AI Activity Security.
  • SUBSCRIBE TO SHIPS IN SCALE TODAY!

    The beloved Ships in Scale Magazine is back and charting a new course for 2026!
    Discover new skills, new techniques, and new inspirations in every issue.

    NOTE THAT OUR NEXT ISSUE WILL BE July/August 2026
  • Win a Free Custom Engraved Brass Coin!!!
    As a way to introduce our brass coins to the community, we will raffle off a free coin during the month of August. Follow link ABOVE for instructions for entering.

HMS Alert [1777] 1:48 POF by serikoff. (Two hulls: skeleton and fully rigged)

Kapitel 27. An Deck (Teil 5)
8/

Bevor ich mit den Arbeiten am Unterdeck des zweiten Rumpfes begann, habe ich alle Komponenten beider Decks – einschließlich der Metallelemente – mit Rustins Tungöl beschichtet.

View attachment 645671

Ursprünglich hatte ich nicht geplant, das Metall einzuölen, aber – wie ich bereits gezeigt habe – kann sich auf galvanisiertem Kupfer, das mit Messingschwarz reagiert hat, mit der Zeit (nach ein paar Monaten) ein neuer Film oder sogar neonfarbene Flecken bilden. Dies betrifft zwar nur etwa 5–10 % der Gesamtfläche, kommt aber vor, und es gibt keine Garantie, dass es sich nicht weiter ausbreitet. Nach Rücksprache mit einem Fachmann erfuhr ich, dass ich den Film mit einem weichen Aufsatz (bei sehr niedriger Drehzahl) entfernen, die Oberfläche mit Alkohol abwischen und anschließend Öl auftragen muss (entweder nur auf das Metall oder auf die gesamte Konstruktion, falls Holz und Metall bereits verbunden sind). Sowohl Tungöl als auch Dänisches Öl sollten funktionieren; beide polymerisieren, verschließen so effektiv den Sauerstoff und stabilisieren – theoretisch – die Oberfläche.

View attachment 645672

Genau das ist bei den Testproben passiert. Ein Monat ist vergangen, und es ist weder ein Film noch eine bläuliche Verfärbung zu erkennen. Ich habe das Öl in einer mäßigen Schicht aufgetragen und es vollständig abgewischt, um sicherzustellen, dass kein Film zurückbleibt. Dies reicht aus, damit das Öl die Mikroporen versiegelt, ohne eine klebrige, glänzende Schicht zu hinterlassen. Ich hoffe, dass dieses Ergebnis dauerhaft stabil bleibt – ich werde dies im Laufe des Winters überprüfen können. In einigen Monaten – voraussichtlich im Frühjahr – plane ich, alle Bauteile mit Bitumen zu beschichten. Dadurch kann ich auch testen, wie sich das Bitumen mit dem Öl verhält. Ich vermute jedoch, dass nach der Polymerisation des Öls alle Oberflächen – sowohl Holz als auch Metall – stabil sein werden.

Um das Unterdeck des ersten Rumpfes fertigzustellen , habe ich außerdem die letzten drei Elemente aufgeklebt.

View attachment 645673

View attachment 645674

View attachment 645675

Das Unterdeck ist nun komplett fertig und bereit für die Überdeckung durch das Oberdeck. Ich bin mir allerdings noch nicht sicher, ob ich den gesamten Innenraum mit Bitumen beschichten soll (nur dünn – nicht zu dick, einfach um ihm einen leicht „gealterten“ Look zu verleihen). Ich tendiere eher zu „ja“ …
Von der genialen Optik einmal abgesehen ist es mehr als nur spannend und interessant, welche Erkenntnisse und Lösungen Du uns hier aufzeigst. Beispielhaft dazu wäre deine Galvanisiertechnik mit „ erkannten Spätfolgen „ und die passenden Lösungen dazu. Einfach Klasse und Wertvoll für jeden Modellbauer hier. Bei deinem Baubericht ist man selbst „mitten drin“. Danke dafür.
 
4.6 Imitation bolts and nails.

We continue to consult the anatomy and do as much as possible as in a book. Bolts fasten different parts of the case and you need to transfer their positions correctly. If you are guided by the image from below, the process is not difficult.

View attachment 523412

First of all, you need to make an imitation of bolts on the keelson and false keel. To do this, I used a slightly larger pen than for boards. Here are both for comparison. And visually it is clear that the cylindrical puncture is of different diameters.

View attachment 523413

Checked what it would look like and...

View attachment 523414

View attachment 523415

... made simulated bolts on the keelon, false keels and on the mast stop.

View attachment 523416

*By the way, the top photo shows the difference between a large and a small cylinder.
It was all done with a pink pen, where the diameter is larger). And now, on all boards you need to make an imitation with a blue handle (where the cylinder diameter is smaller).

View attachment 523417

View attachment 523418

As you were able to notice, the nails beat one nail for each frame in a checkerboard pattern (either higher or lower). I redrawn the image a little from the anatomy and from this I already did all the imitation of nails inside the case.

View attachment 523419

To make it easier to visualize, I marked each board from the set with color in the image in anatomy.

View attachment 564787

And I also visualized the places where the boards are connected. It is clear from the numbers that the 1st board is the bottom and the higher the number, this board is higher.

The 4th board, which holds the upper deck beams, has the simplest locks. Firstly, they were already so in the set (you can't redo it). And secondly, this belt was reinforced from the outside with Main wale (by the way, it is depicted in the diagram above (outside). And plus - this belt was very strongly strengthened by the knees, both horizontal and vertical. Therefore, there was more than enough rigidity here. And most importantly, this belt will be practically invisible due to the knees.

View attachment 523421

View attachment 523422

On the 1st belt, (at the lowest) - there was also not a difficult connection, but longer (this is in anatomy).

View attachment 523423

On the 2nd belt (not visible on anatomy), but logically there should have been a complex lock. Since this and the 3rd belt are very powerful and had to carry a heavy load. For this, complex castles were placed in such places.

View attachment 523424

On the third belt, similarly the same lock, for the same reasons.

View attachment 523425

This is as you understand - an imitation of a connection (lock). It is done simply - the geometry of the lock is drawn, then a groove is pressed through with a straight scalpel. I do not recommend cutting (namely, pushing). Because when cutting - you can accidentally cut further than planned and also crooked.

View attachment 523426

As for the connections, they all need to be placed in different places. This is necessary so that the case is equally strong everywhere and does not break at the joints in one column.

View attachment 523427

So the imitation nails on the inside boards are complete...

View attachment 523428

View attachment 523429

... and it took not so little time and effort (I'm already silent about the time that I could spend on real nagel and bolts...)

And my doubts crept in, but is it necessary to do imitation of bolts on the joints of the frames... according to a modest estimate, there should be more than 3,000 punctures with a pen... I will gather my thoughts and strength and I must decide... otherwise, you won't stop at half the road!

*Now everything is practically invisible, especially from a distance, but... this is before the oil coating. After the oil, everything will be clearly visible and imitation of bolts and nails and locks (already checked on the probes).


Ship-1
Bolt heads look extremely natural but the heads must be darker than surrounding color. Did you try darkening the bolt heads with lead of soft pencil? Sorry if it was already tries or implemented I am only on page 13 of your journey.
 
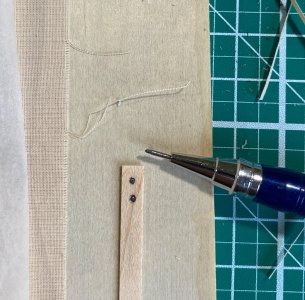
I mean something like this. By the way the impression is done with 0,4 mm led holder pen. No need to modify a ball pen tip. I had done this in heist. May be bolt heads would look better if I was more careful applying the led.
IMG_1758.jpeg
 
Last edited:
Back
Top