Hi Jack. CAF definitely spoils the modeler by giving us predetermined bevel lines. I must say I am enjoying this kit so far. Cheers GrantFor taping the frames, I was going to put a sheet of acrylic over the plans and tape the frames to the acrylic sheet. That way I can keep the plans. I could also use a photocopy...
-

Win a Free Custom Engraved Brass Coin!!!
As a way to introduce our brass coins to the community, we will raffle off a free coin during the month of August. Follow link ABOVE for instructions for entering.
-

PRE-ORDER SHIPS IN SCALE TODAY!
The beloved Ships in Scale Magazine is back and charting a new course for 2026!
Discover new skills, new techniques, and new inspirations in every issue.
NOTE THAT OUR FIRST ISSUE WILL BE JAN/FEB 2026
You are using an out of date browser. It may not display this or other websites correctly.
You should upgrade or use an alternative browser.
You should upgrade or use an alternative browser.
HMS Enterprise 1774 POF 1:48.
- Thread starter GrantTyler
- Start date
- Watchers 85
-
- Tags
- caf model enterprise
Looking very neat and tidy Grant. Great work.
Be sure the copy machine you use gives an accurately dimensioned copy. Many are not set up correctly and could be off enough to cause you problems. Even when I have used an architectural copy service I drew a scale EXACTLY to a given length on the original to be copied. Once the first copy is made, I measure the scale on the copy with calipers. I was amazed how far off the first copy was on several occasions. Luckily the techs made adjustments and got everything perfect after a couple trial runs.I could also use a photocopy...
Allan
Love your progress and your decision making on the pre-sanding. The amount you left on is perfect and the final fairing will work out, once you get everything in place! I'll await all your progress reports!
Good morning Niel. Thank you very much.....I hope it stays that wayLooking very neat and tidy Grant. Great work.
Hello Brad. Doing this for the first time it is a bit of a hit and miss as to how much pre sanding I do, so it is good to get your message. In my mind I am being a little conservative in my approach with my logic being I would rather have to sand more later than taken too much off and have an irreversible mess up. Cheers GrantLove your progress and your decision making on the pre-sanding. The amount you left on is perfect and the final fairing will work out, once you get everything in place! I'll await all your progress reports!
- Joined
- Oct 9, 2020
- Messages
- 2,229
- Points
- 488

really? I didn't know that. Thanks for the heads up.Be sure the copy machine you use gives an accurately dimensioned copy. Many are not set up correctly and could be off enough to cause you problems. Even when I have used an architectural copy service I drew a scale EXACTLY to a given length on the original to be copied. Once the first copy is made, I measure the scale on the copy with calipers. I was amazed how far off the first copy was on several occasions. Luckily the techs made adjustments and got everything perfect after a couple trial runs.
Allan
Happy to help Jack SparrowI didn't know that. Thanks for the heads up.
It is not every machine and the inaccuracy might be slight, but if it is something to consider. Also, I forgot to mention it is good to make the scale that will be checked in both the X and Y dimensions. A 5 or 6 inch is a good example as my calipers go to six inches.
Of course if the plan is one from past centuries there is also the potential that the original drawing has changed dimensions in one or both directions Luckily they usually have a measuring rule of their own at least in the X direction that can be checked first and sometimes adjustments can be made
Allan

- Joined
- Mar 1, 2022
- Messages
- 685
- Points
- 308

AllanKP69 is definitely a bright beacon here on SOS. Isn't he?Happy to help Jack Sparrow
It is not every machine and the inaccuracy might be slight, but if it is something to consider. Also, I forgot to mention it is good to make the scale that will be checked in both the X and Y dimensions. A 5 or 6 inch is a good example as my calipers go to six inches.
Of course if the plan is one from past centuries there is also the potential that the original drawing has changed dimensions in one or both directions Luckily they usually have a measuring rule of their own at least in the X direction that can be checked first and sometimes adjustments can be made
Allan
View attachment 506813
- Joined
- Mar 1, 2022
- Messages
- 685
- Points
- 308

Non dovresti (you don't have to).
True storyAllanKP69 is definitely a bright beacon here on SOS. Isn't he?
AllanKP69 is definitely a bright beacon here on SOS. Isn't he?
Sure is
Oh! Hey Grant, I am so glad you mentioned your Enterprise build on my Le Requin. I would have been distraught had I missed your first POF build. It looks like you have a great start with the keel, like Paul says be as accurate as you can get, these POF's as I found out the hard way tend to be very unforgiving even of little mistakes. Anyway, I'm here for the duration, good luck my friend.
Hi Grant,
I'm a little late to the party, really great start.
I'm a little late to the party, really great start.
Good morning Daniel. I’m super happy to have you on board. We will journey together with our two builds- will be fun. Cheers GrantOh! Hey Grant, I am so glad you mentioned your Enterprise build on my Le Requin. I would have been distraught had I missed your first POF build. It looks like you have a great start with the keel, like Paul says be as accurate as you can get, these POF's as I found out the hard way tend to be very unforgiving even of little mistakes. Anyway, I'm here for the duration, good luck my friend.
Good morning Tobias. Thank you. I always appreciate your involvement in my shipbuilding. Invaluable. Cheers GrantHi Grant,
I'm a little late to the party, really great start.
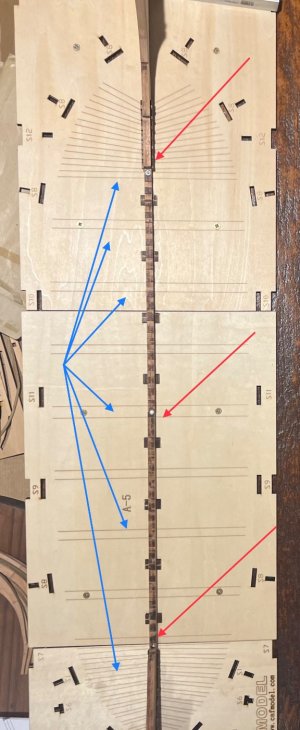
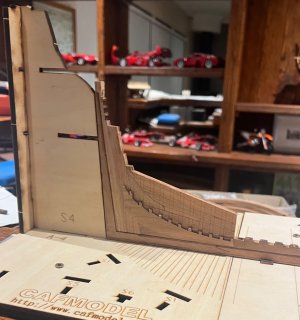
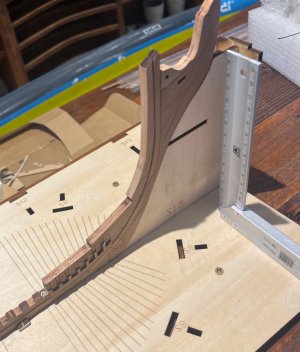
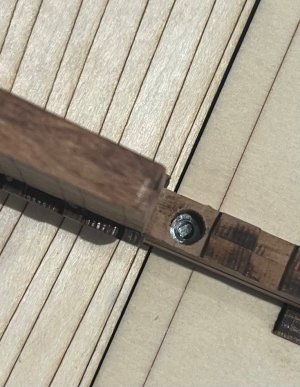
Good morning. I did some preparation work on the keel and centreline timbers. To ensure these lie perfectly in line and there is no movement in the jig I place 3 nuts and bolts into the keel. These go through the jig base so it is all secured nicely.( RED ARROWS) It is also important to place these where you are going to present the model on its stand.
I was extremely happy to see that all my notches lined up perfectly with the markings on the jig (BLUE ARROWS)

The keel will have to come off the jig when my parts arrive from China for me to build the rest of the jig. There is also a whole pile of sanding and cleaning up to do on this out of the jig.


Cheers Grant
I was extremely happy to see that all my notches lined up perfectly with the markings on the jig (BLUE ARROWS)

The keel will have to come off the jig when my parts arrive from China for me to build the rest of the jig. There is also a whole pile of sanding and cleaning up to do on this out of the jig.


Cheers Grant
Well done GrantGood morning. I did some preparation work on the keel and centreline timbers. To ensure these lie perfectly in line and there is no movement in the jig I place 3 nuts and bolts into the keel. These go through the jig base so it is all secured nicely.( RED ARROWS) It is also important to place these where you are going to present the model on its stand.
I was extremely happy to see that all my notches lined up perfectly with the markings on the jig (BLUE ARROWS)
View attachment 507352
The keel will have to come off the jig when my parts arrive from China for me to build the rest of the jig. There is also a whole pile of sanding and cleaning up to do on this out of the jig.
View attachment 507351View attachment 507350View attachment 507349View attachment 507348View attachment 507347
Cheers Grant
Very nice job
A nice and solid base and alignment, Grant. It can't be better to start.Good morning. I did some preparation work on the keel and centreline timbers. To ensure these lie perfectly in line and there is no movement in the jig I place 3 nuts and bolts into the keel. These go through the jig base so it is all secured nicely.( RED ARROWS) It is also important to place these where you are going to present the model on its stand.
I was extremely happy to see that all my notches lined up perfectly with the markings on the jig (BLUE ARROWS)
View attachment 507352
The keel will have to come off the jig when my parts arrive from China for me to build the rest of the jig. There is also a whole pile of sanding and cleaning up to do on this out of the jig.
View attachment 507351View attachment 507350View attachment 507349View attachment 507348View attachment 507347
Cheers Grant
Regards, Peter
Perfect arrangement, Grant. All that's left to do it sand the char off 5000 pieces...you're almost done.


