HMS PANDORA 1:72 - Modelship Dockyard

The same technique with wooden parts will be a really good choice. I avoid working with CA glue as much as possible, so the printed resin parts are nothing for me.

Very good description of your progres, Hermann. It is helpful for everyone who likes to build this kit.
Hi Christian. Absolutely can the same technique be applied to wooden parts as well. As I have said, @Modelship Dockyard will create a kit for you with wooden fittings. I also do not like CA glue, but what the heck ... in for a penny, in for a pound ... ROTF I am glad that you find the log helpful, that is what I try to do. I suppose it's the teacher in me who always wants to tell people what to do! ROTF
 
This is incredible Heinrich; you now have a solid base to work from in the bow and stern which are properly shaped. Just curious weather a light sanding with a very fine grit sandpaper on the resin pieces would produce better adhesion. You have some tight looking bends to contend with and will need all the grip you can get from the CA.
Thank you so much for the kind words, my friend. To me you have said an absolutely crucial thing now - a bow and a stern which are properly shaped! I do not care who the modeler is - to work perfectly symmetrical when it comes to a bow and stern, is highly improbable. With this method, the builder can rest assured that if he can get everything to align, he has a perfectly symmetrical hull. I have made a trial on the bottom of the one of the resin pieces - with 120 grit sandpaper I can definitely create an effect on the resin - so roughing things up will be possible to some extent.
 
Now it’s getting even more interesting as you show the potential issues and then solution to the interface between the resin pieces and the wood.

However, a question: How critical is it ensure that tight fit since it will all be covered with the second planking? I’m thinking of the small gaps not the smooth alignment of the wood and resin pieces.
The issue that I had was all self-inflicted, Roger. With that out CA spill out of the way, the fit was well-nigh perfect. Photographs (especially these macro shots, are terrible things. On the pics the lighting tends to accentuate the gap - in real life it is more of a joint-line than anything else. To put that in perspective, I can barely get the tip of an Xacto knife into the gap before it gets stuck. Even so, I hate gaps - so I am confident that when I am done with the sanding there will be no gap whatsoever.
 
Heinrich, just a little bit of sanding and you wil have a beautiful fit of your resin parts
I agree, Peter! The main thing is just to be patient and to do what needs to be done before I can start the sanding!
 
Dear Friends

I promised you that photographs would follow and here we go.

Closing up the hull on the Port Side went relatively quickly which meant that the first-layer planking was completed. Whilst the temptation to sand the planked portion was great, I resisted as I realized that first adding the resin filler pieces would provide me with a much clearer picture of the run of the hull. I have always said that successful planking depends on how well you can “read” the hull - I am not sure if this makes any sense to anyone else, but to me it is very important.

This also meant that it was now time to install the much spoken about resin filler pieces. I quickly learnt just how accurately this kit is designed when I encountered a challenge fitting the stern piece. Pushed into position (dry-fit, of course) a peculiar situation arose. With the filler piece properly butted up against the wooden planking, the fit was great, BUT I had a gap at the bottom.

View attachment 435076
Note the gap at the bottom between the filler piece and the false deck when the resin filler was pushed against the planked surface.

Conversely, if I pressed it flat against the bottom, there would be a gap between the filler piece and the planking culminating in a very noticeable and large gap at the top.

View attachment 435077
Note the gap between the filler piece and the planked section when the filler piece was pressed flat against the false deck at the bottom.

A quick WeChat message to @wuxiaomeng Wuxi resulted in an instantaneous diagnosis of the problem and two possible solutions. The problem was diagnosed as a CA glue spill which I found hard to imagine could have such a big effect. And yet, when the glue spill was sanded away, the fit was about 90% perfect. Therefore, a note to prospective Pandora builders: Make sure there are no glue spills – no matter how small.

I mentioned that the fit was now about 90% of what I wanted it to be, but not yet at 100%. The second suggestion Wuxi made was to put a very slight bevel at the bottom edge of the filler piece that butts up against the planking. (See illustration below).

View attachment 435078
The red line indicates where I had to put a small bevel on the filler piece. Actually, "bevel" is the wrong word - it was more like than one or two passes with a flat file.

And Voila! With that done, I was very happy with the fit. The bow filler piece slotted into a perfect fit right from the word go with no extra work needed.

View attachment 435079

View attachment 435081

View attachment 435082

Mission accomplished!

View attachment 435083

Please note that I do NOT beautify, photoshop or use filters on any of my pictures.

View attachment 435084

View attachment 435085

View attachment 435086
And this is exactly what I had aimed for - note the planking protruding ever so slightly above the filler piece. Just imagine, sanding from the resin piece at the bow towards the stern, how easy it will be to make the fit between planking and resin piece seamless. Delightful, I tell you! ROTF
After the small adjustments this is a very nice outcome and base for the planking, Heinrich. I think it indeed a good idee to give this layer of planking a light sanding. A very small height difference between 2 planks could affect the 2nd layer. With some shaving light it could make the difference between 'nice and tight' and a 'mmm....'. 1mm thickness is not very much …….
The 2nd layer will of course also receive attention with sanding, but everything that can be avoided is included.
Regards, Peter
Dear Peter. For sure the first layer will get a sanding, but on this ship the final sanding and fairing takes place from the gun ports to the waist and then to the hull. Remember, there are also resin parts that go on top of the false keel and then have to be brought into line with the waist of the ship which forms a crucial part in the whole planking exercise. Therefore, I have to be patient and wait until I'm done with all the above deck parts too. Then and only then must the whole be assembly be sanded down in anticipation of the second / final layer of planking.
 
Dear Friends

Tonight, I am in a zone like in the old WB days.

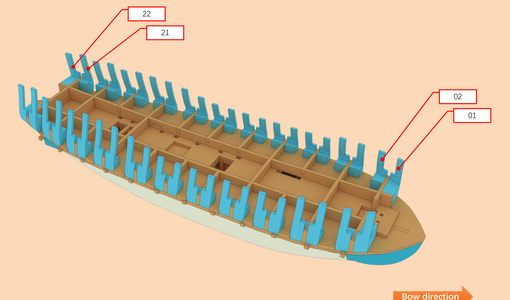
Once more, I resisted the urge to start sanding the hull, for reasons which will best be explained when I actually get to that stage. With the filler pieces installed, I could turn my attention to the construction of the upper gun deck supports.

Manual.png
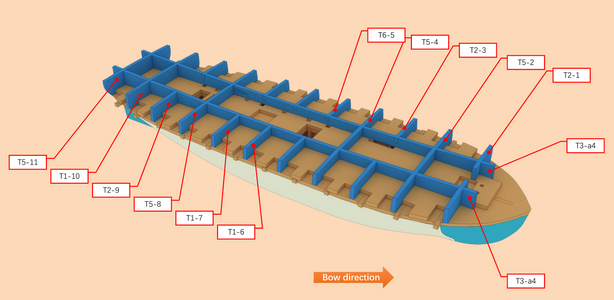
Taken from the instruction manual, the upper gun deck supports are indicated in blue.

微信图片_20240315181536.jpg
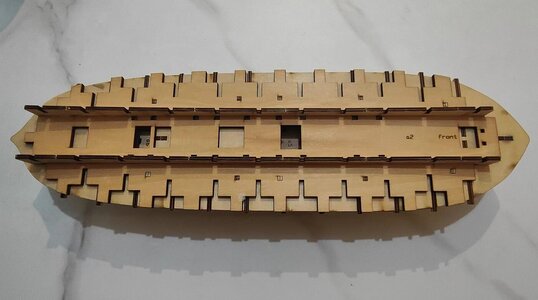
The first step was the installation of the two longitudinal supports which run parallel to each other for basically the whole length of the deck.

微信图片_20240316003921.jpg
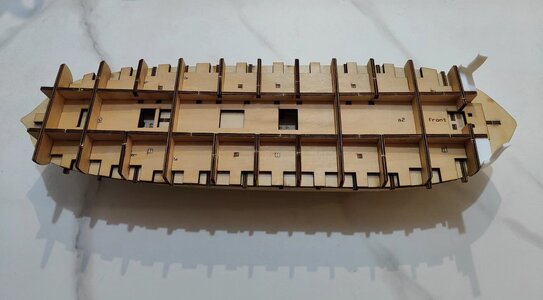
The are intersected by 5 full-width crossbeams and 12 partial width crossbeams (6 on either side). Note that some of these crossbeams have to be beveled to the correct angle as indicated by the inscribed grinding lines on these parts. This step of the build was a walk in the park with all the parts fitting faultlessly with no extra work required.

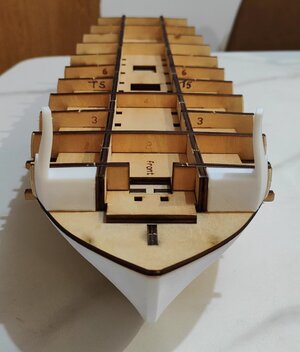
From here onwards, it is all about the resin parts for the time being showcasing (a) what really sets this model apart from anything else and (b) the ingenuity and design employed by @Modelship Dockyard during this process. Therefore, I could not resist in fitting the first two gunport stanchions - it takes two stanchions to make up one gunport but that will become clear tomorrow.

微信图片_20240316003949.jpg
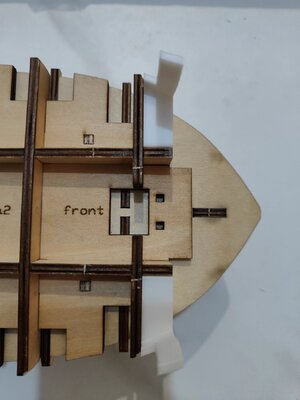
Note the fit of these two stanchions in the space provided for them. It can be that good, but not better.

微信图片_20240316003929.jpg
And with that dear friends, it is now bedtime after a fantastic day in the shipyard!

I will see you all tomorrow with another update - God willing.
 
Dear Friends

Tonight, I am in a zone like in the old WB days.

Once more, I resisted the urge to start sanding the hull, for reasons which will best be explained when I actually get to that stage. With the filler pieces installed, I could turn my attention to the construction of the upper gun deck supports.

View attachment 435121
Taken from the instruction manual, the upper gun deck supports are indicated in blue.

View attachment 435123
The first step was the installation of the two longitudinal supports which run parallel to each other for basically the whole length of the deck.

View attachment 435124
The are intersected by 5 full-width crossbeams and 12 partial width crossbeams (6 on either side). Note that some of these crossbeams have to be beveled to the correct angle as indicated by the inscribed grinding lines on these parts. This step of the build was a walk in the park with all the parts fitting faultlessly with no extra work required.

From here onwards, it is all about the resin parts for the time being showcasing (a) what really sets this model apart from anything else and (b) the ingenuity and design employed by @Modelship Dockyard during this process. Therefore, I could not resist in fitting the first two gunport stanchions - it takes two stanchions to make up one gunport but that will become clear tomorrow.

View attachment 435125
Note the fit of these two stanchions in the space provided for them. It can be that good, but not better.

View attachment 435129
And with that dear friends, it is now bedtime after a fantastic day in the shipyard!

I will see you all tomorrow with another update - God willing.
That’s a nice build-up with nicely fitted parts, Heinrich. I can see that the manufacturer has paid a lot of attention to this design. ThumbsupThumbsup
Regards, Peter
 
Wonderful progress Heinrich! It's nice to see you enjoying this build!
Thank you, Paul! I am enjoying the build as each step of the way so far is something that is new to me. It's like being on a constant road to discovery! ROTF
 
Geez, just catching up, I got a wee bit behind in my follow along. This is a very impressive close tolerance kit.

Jan
ROTF! I do have my moments, Jan - sometimes I just get really focused on something and when the parts then go together as well as they are doing, progress is fast.
 
That’s a nice build-up with nicely fitted parts, Heinrich. I can see that the manufacturer has paid a lot of attention to this design. ThumbsupThumbsup
Regards, Peter
Thank you, Peter! To me the incredibly detailed and intricate work that you are doing on the Balder is not unlike the development or prototype build of a kit manufacturer, so I think you are particularly well-qualified to comment objectively on the design elements of a model. What is fascinating to me are the different routes that kit manufacturers take and the different character inherent in building their models.
 
Dear Friends

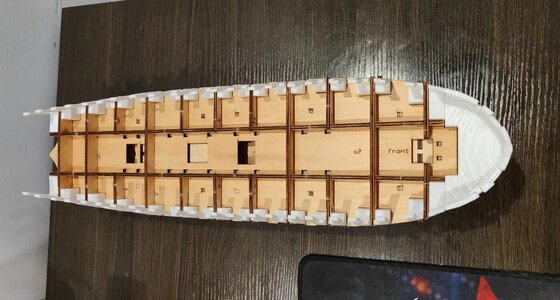
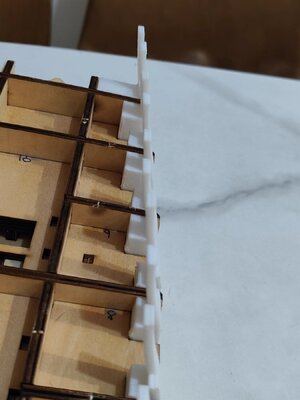
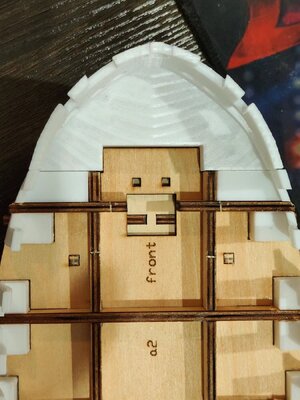
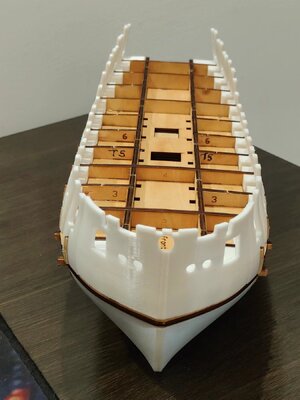
As mentioned to Jan, I had another wonderful day in the Nantong Shipyard. On the agenda for today was installing the half-ribs/gunport stanchions (not sure what to call these) onto the upper gundeck.

Untitled.png

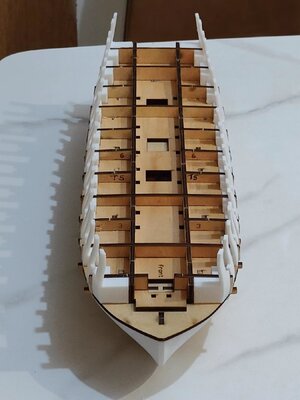
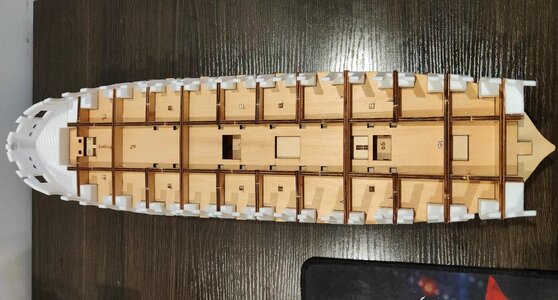
And at the conclusion of the workday, this is what she looks like tonight.

微信图片_20240316190001.jpg
微信图片_20240316183917.jpg
微信图片_20240316183942.jpg
微信图片_20240316183958.jpg
微信图片_20240316183848.jpg
Dry fit of the upper gundeck bow piece. (Just fitted for fun, at this stage.)

微信图片_20240316183856.jpg

Now for those who thought that this was a case of removing the resin pieces from their backing sheets, applying glue, slotting them into position and achieve miraculous and perfect angles - think again! Resin pieces or no resin pieces, when you are trying to align what is essentially frames with only a semi-jig type configuration at the bottom end while the top remains free-floating (without any jig as support), you are going to have loads of fun. And when you are out by maybe two or three degrees, and you have to remove the frame (secured with CA glue) to correct that, you will have even more loads of fun! Had these ribs/frames (call it what you will) been done in wood, it would have been far easier.

In any case, it's done - they are correct, and I will call it a day. Tomorrow, there are a few odds and ends I want to do (maybe even go kayaking) so there is nothing major planned for the shipyard.

Thank you all for following along, supporting, raising reservations, offering advice and just being there. It is great and I appreciate it very much.
 
Back
Top