- Joined
- Dec 25, 2021
- Messages
- 129
- Points
- 213

I have updated the relevant content of the manual, and it will be updated later after Victor translates it
 |
As a way to introduce our brass coins to the community, we will raffle off a free coin during the month of August. Follow link ABOVE for instructions for entering. |
 |
 |
The beloved Ships in Scale Magazine is back and charting a new course for 2026! Discover new skills, new techniques, and new inspirations in every issue. NOTE THAT OUR FIRST ISSUE WILL BE JAN/FEB 2026 |
 |


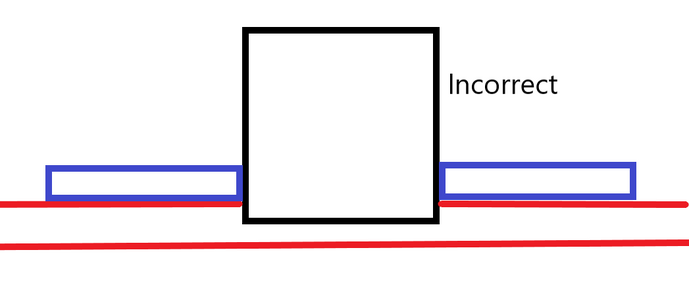
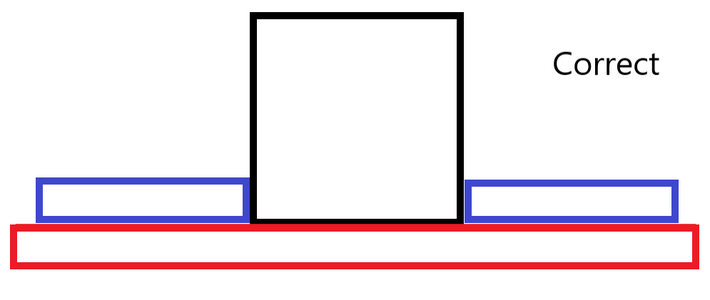
Roger, that is an excellent idea and one that I also considered. However, that would result in a configuration as shown below:Just a suggestion but if you clamp part L2 and L3 in line with the gun ports and sand the panels in between top and bottom i doubt if any one would ever notice and it would come out right for the upper deck work


Very good question, my friend. I have applied some heat and then another problem arose. The resin ribs actually started to deform under the heat. Luckily I could re-heat that part and bend it back into shape and alignment - I just hope that I managed to do that accurately, otherwise I might just have another bugbear that may come back to haunt me.First your question, HMS Agamemnon??
And now how will you be resolving the flaws you mentioned?? Have you tried to apply some heat to your planking??
perhaps you can take it off after some heat is applied, so you can correct , and replace them??
It is a pitty they happened, but everything can be repared after a small screw up

Hi Paul. That is a very, very good "guess" and indeed the Le Fleuron is very much part of @Modelship Dockyard's future plans. This one, however, is not Le Fleuron.Le Fleuron. I've already got this one shortlisted. A Dutch build - then an English build - then a French build...
NO!!! I already cashed my winning ticketHi Paul. That is a very, very good "guess" and indeed the Le Fleuron is very much part of @Modelship Dockyard's future plans. This one, however, is not Le Fleuron.


 !
!
You did sound extremely confident, and I really wanted you to be right, as I would love to build a French ship concurrent with you. We can obviously still be a Les Bleus Team, but, alas ...that doesn't make this ship Le Fleuron!NO!!! I already cashed my winning ticket

!

Two words: Group BuildLes Bleus Team

Excellent idea - I think we should nail that one down very soon! Le Fleuron 1:48 POF. What can be better?Two words: Group Build


No need for apologies my friend. It certainly softened the glue, but unfortunately it also softened the resin parts.I am sorry to hear that my tip about the heat did not work out my friend, i hope that you saved your resin rib, and i wish you a lot of luck, and succes with the acetone

An English ship of the same period. There are much less builds and models to find. For an group build is a smaller project much better to realize.Excellent idea - I think we should nail that one down very soon! Le Fleuron 1:48 POF. What can be better?
This post of yours is valuable on a number of points:Okiedokie friends
I will now try to explain at the hand of the discussions I had with Wuxi, what sins I have committed.
The first problem that Wuxi identified was that I first glued to the waterways to the deck - according to him, I should have installed the two deck halves first and then the waterways. That would have allowed me to custom - sand/shape the outer edge of each of the individual pieces that make up the waterways, separately ensuring the best possible fit. No problem with that, but then I would suggest a change to the instructions which first list the installation of the waterways and then the deck. Look at the numbering of the two pics below which follow each other directly in the instruction manual.
View attachment 438334
View attachment 438335
This is the exact sequence in which the waterways are shown to be done first and then the deck. If it is supposed to be the other way around, these two pages need to be switched.
The second point that Wuxi pointed out is that the inner planking lies at an inward-sloping angle.
View attachment 438336View attachment 438337
You can clearly see the angle at which the inner planking is mounted (especially if you look closely at the base of the inner planking on the right hand-side picture.
View attachment 438338
To ensure that, the appropriate inner planks are all inscribed with a bevel- or sanding line which indicates by how much the planking needs to be beveled.
All good so far, but to my mind I had done exactly that. After all, it makes perfect sense that an unbeveled or insufficiently beveled plank will sit "higher" on the waterways than one which is sloping inwards at an angle. Had I not done this, or had I done it insufficiently, this could have been a big reason for my inner planking coming out too high. But, yikes, I thought I had that down pat.
View attachment 438341
Photographs, however, do not lie and as pointed out by Wuxi (check out the yellow arrow) there is a significant between the inner planking and the deck which tells me I screwed up the beveling. Guilty as charged!
View attachment 438342
And to rub salt in the wounds, the fine red arrow points to where the deck _ and subsequently the waterways as well, are not sitting flat on top of the resin base. Again, guilty as charged.
How it should look if all is done well.
View attachment 438350
As you can see the required level of accuracy is extremely high. If the builder does his part (which clearly, I haven't) the kit will reward you substantially. This is a case where just crossing your "T's" is not enough; you have to a ruler when doing so!
In summary though, the problems I have experienced were all self-inflicted and is a more a case of a culmination of many factors rather than one glaring boo-boo. It is going to require a considerable number of Hail Mary's to correct though!
Many thanks to @wuxiaomeng Wuxi and @Modelship Dockyard Victor for taking the time to explain everything to me and hopefully point me in the right direction.
I hope that Hail Mary will give you at this Easter a lot of inspiration to an acceptable outcome.It is going to require a considerable number of Hail Mary's to correct though!

I agree on all the points you raised, Peter. I am very impressed by the customer service I am receiving.This post of yours is valuable on a number of points:
-the manual that adds a new dimension to a manual thanks to the 3D drawing programs;
-the generous help of Wuxi and Victor looking over your shoulder;
-your self-reflection about what went wrong.
I hope that Hail Mary will give you at this Easter a lot of inspiration to an acceptable outcome.
Regards, Peter

Dear Daniel. Thank you very much for the vote of confidence, my friend. The troubles I have been experiencing are all because I just have not been accurate enough in my execution. This build was all about learning new things and experiencing different techniques, so a few hiccups were to be expected. I will try my best to do full justice to this kit!Dear Heinrich. I was just catching up on your build and am so sorry to read about your troubles with it. Everyone has such good suggestions to help you in this which is a hallmark of this forum. When you finish this build, you will be perhaps one the most experienced modelers of this forum joining wood with resin and there will be many who will look to your build for guidance. I have every confidence you will master the techniques required to have a successful build. It just isn't in your nature to allow any other outcome.
PS: We may need a Le Requin Group??

Thermoplastics and heat, a very bad combination if you want to retain shape. Unfortunately most resin parts in modeling are of the thermoplastic kind.No need for apologies my friend. It certainly softened the glue, but unfortunately it also softened the resin parts.
