
Looking great in 4 eyes!!

-

SUBSCRIBE TO SHIPS IN SCALE TODAY!
The beloved Ships in Scale Magazine is back and charting a new course for 2026!
Discover new skills, new techniques, and new inspirations in every issue.
NOTE THAT OUR NEXT ISSUE WILL BE July/August 2026 -

Win a Free Custom Engraved Brass Coin!!!
As a way to introduce our brass coins to the community, we will raffle off a free coin during the month of August. Follow link ABOVE for instructions for entering.
You are using an out of date browser. It may not display this or other websites correctly.
You should upgrade or use an alternative browser.
You should upgrade or use an alternative browser.
HMS Royal Caroline kit ZHL 1/30
- Thread starter Maarten
- Start date
- Watchers 113
-
- Tags
- royal caroline zhl

Back to the inside, first the planking of the forward bulkhead above the hawse holes.

And as the devil is in the details I decided to also fully treenail the inside bulkwarks also, to start with the forward bulkhead.

Followed by drilling plenty 0.7 mm holes in the inside bullwark to be filled with tooth picks after blackening the holes with a 2B pencil.


You can imagine that our local supermarket does not understand why they are selling this much toothpicks at the moment.
And yes we need more.


Next time cutting off all these and sanding them down. Then I have to consider to varnish it with my transparent red varnish or to just oil the inside bullwarks. Choices choices choices pffffff.
And as the devil is in the details I decided to also fully treenail the inside bulkwarks also, to start with the forward bulkhead.
Followed by drilling plenty 0.7 mm holes in the inside bullwark to be filled with tooth picks after blackening the holes with a 2B pencil.
You can imagine that our local supermarket does not understand why they are selling this much toothpicks at the moment.
And yes we need more.
Next time cutting off all these and sanding them down. Then I have to consider to varnish it with my transparent red varnish or to just oil the inside bullwarks. Choices choices choices pffffff.


Wow, you doing fantastic work, But, there is always a But,
I have only got one Complaint, she is looking better than mine,
best regards John.
I have only got one Complaint, she is looking better than mine,
best regards John.
Hi gents, many thx for your compliments.
My neck is fine, with 46 I am still young") .
.
I am using a proxxon drill for this.
My neck is fine, with 46 I am still young
.I am using a proxxon drill for this.
Just the standard small proxxon drill.

They also have an angled drill which is slightly bigger but perfect for this but I dont have that one ........hmm yet.

They also have an angled drill which is slightly bigger but perfect for this but I dont have that one ........hmm yet.

G'day MaartenThey also have an angled drill which is slightly bigger but perfect for this but I dont have that one ........hmm yet.
There's a saying in Australia 'it is like closing the paddock gate after the horse has boltered'. Another words best to have it before that type of work.
I love your extra eye for details, and as you said 'as the devil is in the details', I agree with you 100%.
The only problem that I can see with your workmanship, my mate, is that you are making the bench mark for us, mere mortals, almost impossible to reach.
I for one will is dreading the thought to 'try' to keep up your exceptional hight standards when I do my Royal Caroline.
Hi Greg,
Thx for the comment and don't worry I am sure your RC will be a masterpiece with all the plans you have. Looking forward to them.
Thx for the comment and don't worry I am sure your RC will be a masterpiece with all the plans you have. Looking forward to them.
Next time cutting off all these and sanding them down. Then I have to consider to varnish it with my transparent red varnish or to just oil the inside bullwarks. Choices choices choices pffffff.
...no matter what decision you make, I am sure she will look great. Although 'red' varnish may darken the wood over time (I've seen this). I am voting for the Oil (Danish or Tung)!
Sorry Jim just to late, see progress after today. Time will tell the effect of it, I mixed it myself it is an acrylic type of paint mixed with a matt acrylic clear coat, when dry I wil finish it with a top layer of beewax.
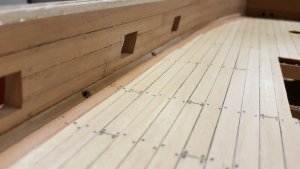
But first I cutted of the wooden dowels this leaves a very nice contrast between the dowels and the surrounding planks.


Allthough the great contrast it is now time to file the dowels down followed by sanding course and fine.


Next step is my mixed red varnish, this is colouring red but will keep the grain and colour differences in the wood visible, as well as the dowels.


Also the gun ports are now red like they should be.


After this is fully dry, I will first polish it with some very fine steel wool and finish it with beewax. After that the deck receives its last coat of oil.
But first I cutted of the wooden dowels this leaves a very nice contrast between the dowels and the surrounding planks.
Allthough the great contrast it is now time to file the dowels down followed by sanding course and fine.
Next step is my mixed red varnish, this is colouring red but will keep the grain and colour differences in the wood visible, as well as the dowels.
Also the gun ports are now red like they should be.
After this is fully dry, I will first polish it with some very fine steel wool and finish it with beewax. After that the deck receives its last coat of oil.
Attachments

...even it was too late, as I predicted, no matter what finish you will decide with - the bulwarks look just great. It is a nice red color.
After the red varnish I sanded the bulwarks with fine steelwool followed by two layers of oil. Surface is now as soft as a baby skin with a nice satin look.

And a detail.

Now time for the deck beams which I cut from 8 mm pear and sanded down to 6,5 mm according to the aots drawings at scale 1:30.


In between the deck beams I added the same layer of planking to lock the beams in place.
This surface will then be covered with veneer.


Next time I will add the beam supports and the knees.
And a detail.
Now time for the deck beams which I cut from 8 mm pear and sanded down to 6,5 mm according to the aots drawings at scale 1:30.
In between the deck beams I added the same layer of planking to lock the beams in place.
This surface will then be covered with veneer.
Next time I will add the beam supports and the knees.
Very good work my friend - this is one of the models, where you can use the Macro-function of the camera without any problem!
Everywhere high accuracy
Everywhere high accuracy
Hi Uwe thx for the compliments.
Sometimes I even zoom in with the camera to see if it is ok. The camera sees more then the bare eye so hope to improve it like that because sometimes you are startled when you check a picture in detail.
Now I am working on the anchor (in Dutch beting) and the chimney.
For the chimney I still need to know if this was an iron pipe or terracotta.


Both work in progress.
Sometimes I even zoom in with the camera to see if it is ok. The camera sees more then the bare eye so hope to improve it like that because sometimes you are startled when you check a picture in detail.
Now I am working on the anchor (in Dutch beting) and the chimney.
For the chimney I still need to know if this was an iron pipe or terracotta.
Both work in progress.
Did you made this form of the chimney, or was it delivered already like this with the kit? - very special form!
Until now I did not hear about terracotta chimneys on ships - I know, that they were often made out of copper, but also earlier out of wood.
Did you check already our mingle-mangle information in the topic
"Stove, galley, oven, firehearth, chimney - tech. details and development over time at different navies" ?
https://shipsofscale.com/sosforums/...velopment-over-time-at-different-navies.2159/
Maybe you find something helping you
Hi Uwe,
Yes this chimney is part of the kit and is according the aots drawings correct.
Seems Greg did already some research and contacted the RMG in Greenwich so thanks to him I have now the info that this chimney was copper plated with a terracotta insulation ring for the main deck passage sealed again with a copper plate.
So I will copper plate my chimney which wil become a nice experiment.
Every time you put a new post in your building log, I learn something new. But no matter what you do, it is clean, accurate and well made! In Russia, we call it (Битенг) bitteng, Perhaps most, if not all nautical names came from Dutch anyway.
That red stain looks great buddy.
amazing work, I love the red stain