
-

SUBSCRIBE TO SHIPS IN SCALE TODAY!
The beloved Ships in Scale Magazine is back and charting a new course for 2026!
Discover new skills, new techniques, and new inspirations in every issue.
NOTE THAT OUR NEXT ISSUE WILL BE MARCH/APRIL 2026 -

Win a Free Custom Engraved Brass Coin!!!
As a way to introduce our brass coins to the community, we will raffle off a free coin during the month of August. Follow link ABOVE for instructions for entering.
You are using an out of date browser. It may not display this or other websites correctly.
You should upgrade or use an alternative browser.
You should upgrade or use an alternative browser.

")
- Joined
- Jun 16, 2023
- Messages
- 6
- Points
- 33

excelente trabajo,impresionante,me gusta mucho la limpieza y fineza de tu barco,enhorabuena

Etching process
I eventually did several attempts to get workable result. I redid the layouts and finally configured parts on 3 sheets of different thickness - 0.5, 0.4 and 0.3 mm. I also made sure to get everywhere more or less same gaps between parts and especially made sure they are no less than a sertain minimum ammount.
The main thing that contributes to a fail is remainder of the photoresist in areas where it was supposed to be removed by development solution. There may be multiple reasons for that - too long exposure or too little exposure, poor template print quality and simple overlook. Even a microscopically thin layer of the photoresist that is very easy to overlook will prevent the etching in that area. And you cannot make the development solution too strong or keep the part in it for too long, otherwise the solution will start removing even that photoresist that was exposed to light.
It is not recommended by people to home-etch the brass thicker than 0.5, and even 0.5 is really a luck to get a good result. The problem is that the etching is never uniform: at some places it goes much faster than at another places. So while you wait for the last areas to be etched through, the solution starts to "eat" the body of the parts at those areas, where the metal is already fully etched throught. Cause... you understand - after the solution removes the metal all through, it starts to remove it broadwise simply going under the photoresist.
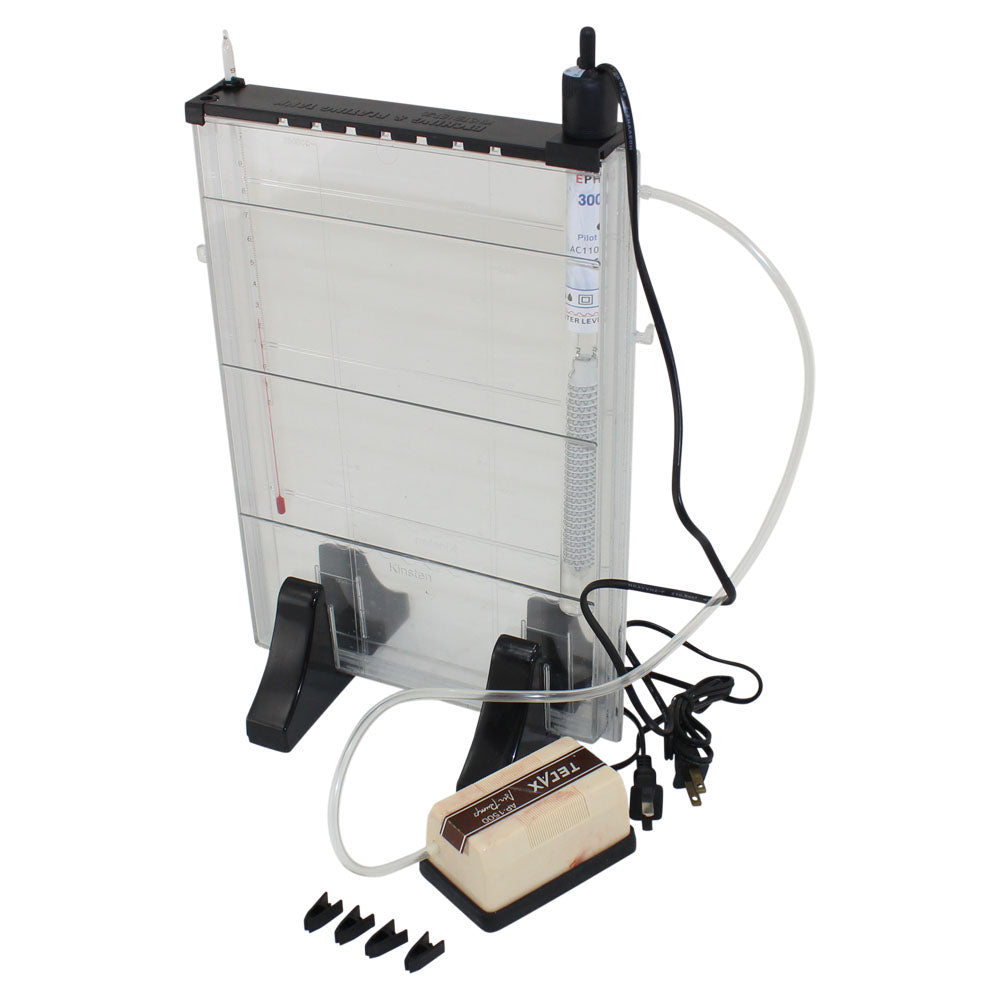
I used ferric chloride for the etching solution and I also bought an etching tank with air pump, heater and thermometer.
 www.circuitspecialists.com


I eventually did several attempts to get workable result. I redid the layouts and finally configured parts on 3 sheets of different thickness - 0.5, 0.4 and 0.3 mm. I also made sure to get everywhere more or less same gaps between parts and especially made sure they are no less than a sertain minimum ammount.
The main thing that contributes to a fail is remainder of the photoresist in areas where it was supposed to be removed by development solution. There may be multiple reasons for that - too long exposure or too little exposure, poor template print quality and simple overlook. Even a microscopically thin layer of the photoresist that is very easy to overlook will prevent the etching in that area. And you cannot make the development solution too strong or keep the part in it for too long, otherwise the solution will start removing even that photoresist that was exposed to light.
It is not recommended by people to home-etch the brass thicker than 0.5, and even 0.5 is really a luck to get a good result. The problem is that the etching is never uniform: at some places it goes much faster than at another places. So while you wait for the last areas to be etched through, the solution starts to "eat" the body of the parts at those areas, where the metal is already fully etched throught. Cause... you understand - after the solution removes the metal all through, it starts to remove it broadwise simply going under the photoresist.
I used ferric chloride for the etching solution and I also bought an etching tank with air pump, heater and thermometer.
Affordable PCB Etching System with Agitator and Heater | Circuit Specialists - Circuit Specialists
Our budget PCB etching kit provides a low cost method to quickly etch printed circuit boards, it includes a heater and a pump as well as a molded plastic chemical tank.
www.circuitspecialists.com


Just one word:
WONDERFUL
WONDERFUL
dittoJust one word:
WONDERFUL
This is brilliant modeling Oleg! Thank you for sharing!

looking forward to finishing...Ready to start...

That’s a museum quality model, well done.


Excellent work Oleg.
DIY etching is one skill I have yet to master
DIY etching is one skill I have yet to master


Brilliant castings, Oleg, and a splendid continuation of the model overall.
Your etchings and castings are all looking great. Brilliant work.
The result of your castings are very good
