HMS Snake

Joined
Feb 27, 2016
Messages
876
Points
343

Hi Donnie/everyone and greetings from the UK. I’ve built models all my life, most lately plastic scale armour (I like Tamiya kits for the accuracy of the mouldings and detail) which I put into diorama scenes.
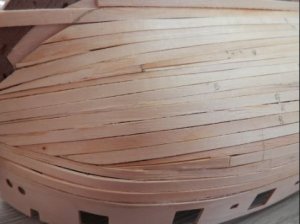
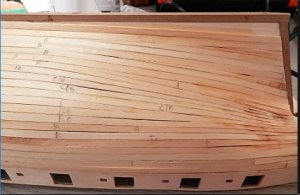
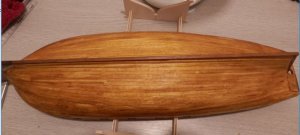
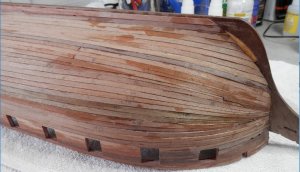
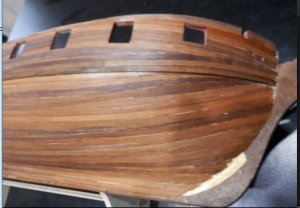
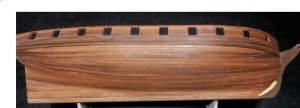
I have only made one wooden ship before. My Dad was a good modeller and I bought him a wooden ship which he made a start on, but when he got Alzheimer’s I think my Mum quietly put it away, he never mentioned it and it slipped my mind. However, when they passed away and we were clearing their house I came across the model and thought it would be a nice memory to finish it. He’d only really got started on the solid hull but after a lot of head scratching I got stuck into it and finished it – see photo.

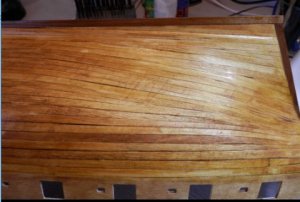
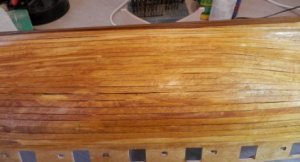
The phrase ‘Boston Fishing Smack’ has stuck in my mind, don’t know why and it is probably not the case; maybe some of you guys know what it actually is. Not only did I enjoy finishing it for Dad, I also enjoyed the woodworking involved, doing the rigging, even sewing the sails!
I always promised myself that when I had the time I would build ‘a big ship’ with no idea at all what that might be. Well, the time has come and I am about to start my first wooden ship model. Prior to this, I have done a lot of reading on various forums and watched quite a bit on Youtube to give me some clue as to how to start out. I have certainly got the most information and ideas from Ships of Scale and so, by way of payback, I thought I would post my build log here and then all you experienced guys can at least get a laugh or two out of the beginner’s mistakes I make – and hopefully offer your experience and advice.
I wanted a kit which would be a plank on frame design and something from the Nelson era which I have been interested in since I made a fascinating visit to HMS Victory. A fantastic day, but lots of head bumping involved (I am 6’1’’ tall) and when I mentioned to one of the guides that people must have been smaller in those days she said that the ship’s carpenter at the time of Trafalgar was 6’4’’ tall! Another great day out was HMS Trincomalee in Hartlepool (they have a website) which is well worth a look.

I have plumped for a Caldercraft kit of HMS Snake which is an 18 gun carronade armed vessel. The description says:-
‘The Snake class were ship-rigged sloops. This class was very business-like with a flush deck and nine cannons or carronades each side, they were very fast and seaworthy. As originally built Snake had a full ordinance of 32 pounder carronades. Carronades replaced the carriage guns because at close quarters the short-range carronades proved devastating to their opponents. Class dimensions were: length 100’; breadth 30’6”; displacement 382 tons with a crew of 121’.

The actual manufacturer is JoTiKa which is also UK based, so I hope the instruction book which comes with the kit is reasonably well written. It is classed as an intermediate kit, so, given that I am an experienced modeler I should be OK. Right? They say pride comes before a fall, but armed with some new knife blades, a bag of small clamps and some super glue here we go.

PS. I have now been building the kit off and on since October but couldn’t find the correct downloading lead for the camera in the mystical Box Of All Wires which we keep under the stairs and we also had the chaos of moving house, so some of these posts may come faster than reality but I will post in the order I went about it.


Regards,
Graham.

P2270380.JPG
 
Hi Graham and welcome, the model you have posted looks like a 'Smack'
the following may be of help. The American built fishing smacks weren't very much different from the English ones, however, judging by the sails on your model I'd say it could be an American version.

A smack was a traditional fishing boat used off the coast of Britain and the Atlantic coast of America for most of the 19th century and, in small numbers, up to the Second World War. Many larger smacks were originally cutter rigged sailing boats until about 1865, when smacks had become so large that cutter main booms were unhandy. The smaller smack retain the gaff cutter rig. The larger smacks were lengthened and re-rigged and new ketch-rigged smacks were built, but boats varied from port to port. Some boats had a topsail on the mizzen mast, while others had a bowsprit carrying a jib.

Large numbers smacks operated in fleets from ports in the UK such as Brixham, Grimsby and Lowestoft as well as at locations along the Thames Estuary. In England the sails were white cotton until a proofing coat was applied, usually after the sail was a few years old. This gave the sails its distinctive red ochre colour, which made them a picturesque sight in large numbers. Smacks were often rebuilt into steam boats in the 1950s.

Military use
Smacks were used in British coastal waters during World War I as Q ships. Actions involving smacks include the Action of 15 August 1917 when the armed smacks Nelson and Ethel & Millie engaged a German U-boat in the North Sea. During this action the Nelson was sunk and its skipper, Thomas Crisp, was posthumously awarded the Victoria Cross. Another Lowestoft smack, HM Armed Smack Inverlyon, commanded by Ernest Jehan, sank the German U-boat UB-4 earlier in the war, the only example of a wooden sailing vessel sinking a modern steel submarine.


Regards
Eric
 
Reference material is very important when building a model, especially when it comes to rigging. On of the best is "Historic Ship Models" by Mondfeld. He covers many aspect of modeling with description and pictures. For some things he covers it is like having an expert sitting next to you showing how it is done.
 
Hi Graham and welcome to the forum.I feel you have made a good choice regarding Snake.I have heard good things about Caldercrafts instructions,never built one of their kits myself.
I wish you all the best with your build and don't be afraid to ask if you are unsure of anything ;-)

Kind Regards

Nigel
 
October. The kit arrived promptly from Caldercraft and I got the suggested paints for the kit as well, which are said to be the actual colors for the period – matt red, black and yellow ochres plus some copper color. All are water-based. The first thing to do is read the book and try to relate that to the plans. The plans for the rigging look mind-boggling, so I’ll just put those to one side and worry about them later. I numbered the parts on the various wooden sheets to the diagrams in the back of the instruction book and the machine cutting looks quite precise on the ply sheets with no break-out of the wood grain.

On to the hull itself. I don’t have a keel clamp (it’s on my Christmas list), so I used a couple of ‘L’ shaped brackets bolted through the keel as shown in the photo – should stand me in good stead until I get to planking when I’ll have to remove it. Pretty straightforward assembly and I took care to get the bulkheads square to the keel but later in the build, I noted that a couple was very slightly out in the vertical axis. Learning point 1 in the next build. As previously noted I like to build dioramas, so I’d like to at least put some figures on the deck. Hence, I cut down on the keel beneath the rear-most hatch (see photo) and put a false deck in so I can do something along the lines of a couple of guys loading some cargo. From what I can see the choice of appropriate figures (1:64 scale) is limited, so I guess that’s my first question – does anyone know a source for figures (crew and officers) in a variety of poses or ones I can modify? If it doesn’t come off I’ll just glue the hatch on and nothing is lost. The bulkhead edges were then shaped to allow for the lay of planks and I later found that some of these needed further fettling when I started planking – but better to take too little off than too much, I reckon.

Keel and Bulkheads.JPGRear Hatch.JPG

 
The instructions say to glue the false deck in place prior to fitting the gun-port bulwarks. I don’t really like this idea because that means planking the deck in situ and I want to do it off the model as it will be a lot less fiddly. After much pondering I put the false deck temporarily in place and used it to align the bottom of the gun-port bulwarks and tack glued where the gun-port bulwarks meet the bulkhead frames at the bottom edge only – the top parts of the bulkheads are later removed at deck level in the build and are only there for profile, so you can’t glue to them. It worked OK, the false deck was then removed and I plan to run the first plank beneath the gunport bulwark and glue the two edges together to provide strength.
I shall plank the deck while I wait for my plank bending tool to arrive. I had put it on my Christmas list but the job is stopped without it. The deck is planked with Tanganiyka strip and my first impression was that this is pretty rough stuff, especially along the edges which I tried lightly sanding but to no avail. I hovered on the edge of buying something better but in the end I decided not to – I got this model to learn the skills, so deal with what you have. I wanted to get a planked effect, so had a look online regarding what the scale length would be. Opinion seems to be divided so I settled on 4’’ based solely on the fact that it looks about right to me – I don’t think this will be the biggest thing to worry about during this build and I can hear the rigging plans laughing at me from the cupboard! I scored each strip at 4’’ with the edge of a file then used a 0.5mm drill in a pin vice to make a small hole either side of the score line – all of these marks should(?) take the stain darker. The fore and aft platforms were treated in the same way and I developed a bad case of Pin Vice Driller’s Thumb.

Deck 1.JPG
 
hi Graham, nice progress so far. On my Endeavour I planked the deck in the two halves so that when they go together you cannot tell that there is a join, Popeye prfers to plank his deks in situ and runs a strip straddling the join. Every modeller has his own "technique" which in turn becomes an idea and a way of doing something.

Regarding scales I have a list of all scales and will post it a little later, some railway scales almost match model scales and they can be used quite comfortably, some may be slightly smaller or bigger BUT when people admire your model they will not be closer than about 12 inches and with a ruler in their hand.

This link is similar to my list, model raiway figures are your best shot and you may have to modify them
https://en.wikipedia.org/wiki/Rail_transport_modelling_scales

Regards
Eric
 
Hi Graham,
Good start on your build and nice to see someone as new to wooden ship building as myself only having 5 ships to my name (first 2 plastic & now on my third wooden one)
As for your question on crew figures have a look at cornwall model boats http://www.cornwallmodelboats.co.uk/acatalog/artesania-crew-figures.html
or alwayshobbies.com http://www.alwayshobbies.com/model-boats/figures/5-metal-sailors-22mm
both have a selection of crew figures 27mm & 22mm respectively.

Brian
 
I don't know if you can get the book "Planking Techniques for Model Ship Builders" by Donald Dressel (ISBN 978-0-8306-2868-1 or ISBN 10-0-8306-2868-1) in the UK. He covers the width sizes of the planks for based on date the ship was build and the country of origin. He also shows you how tree nails are applied base on width of the planks and the proper way to do the 4 staggered state used for deck planking.
Everything in ship modeling has a rule and a reason. As time went by, changes were made based upon new information. Books become invaluable for modeling things correctly because kit manufactures do very little research and invariably have many errors. Some of them are grossly wrong.
 
Thanks for your comments, guys, and the information provided. Thanks for the link to the figures, Brian, and they look to be what I am after. However, they are white metal and after the fun and games I have had with the carronades on my build which are also in white metal (rough does not even begin to describe them) I think I'd like to see them in my hand first! Eric - I will look at railway figures and don't mind doing a bit of fettling on them. Do you know anyone who has done this with a degree of success? I'll do a few posts over the weekend to get you all nearer to where I am at the moment. Have a good weekend.
 
Thanks Gary for the pointer towards 'Planking Techniques for Model Ship Builders, by Donald Dressel. I can get that from Amazon but, unfortunately, it will be of little use to me in my current build and I am way past that point in my build. I am catching up on posting work I have already completed and you will see that I made what are probably some classic mistakes.

However, the kids are always short of ideas for gifts and this is on the list for my birthday. Thanks again.
Graham.
 
To stain the deck I used a medium teak coloured stain I already had in the garage. There were some areas where the CA glue stopped the stain taking, but a light sanding and re-application of stain did the trick. Then a couple of coats of satin lacquer. I think I’ll leave it as a satin finish even though the instructions suggest a matt finish. The photos below show the fore and aft decks not yet stained – sort of a before & after view.

Deck 2.JPGDeck 3.JPGDeck 4.JPG
 
Still working with the deck. The instructions say to snap off the upper protruding parts of the bulkheads with a pair of pliars but having gently tried one it just won’t work – you really would have to apply a lot of heave-ho and risk damaging something. So, I used the circular saw attachment on the Dremel and cut most of the way through and that was better. Now that I have shaped the deck to fit I want to get the inner planking of the gun-port bulwarks fitted to give some rigidity.

I pre-painted the first plank strip and put that in place. I could have then run the planks across the gun ports, but chose to plank individually between because then it is easier to get a knife/file in and I didn’t want to be overly heavy-handed when cleaning the edges up. I guess it takes a bit longer to do the planking, but I’m happy with that method and would do it again. In the rough -


Cleaned up -


Painted -

Gunport Planking 1.JPGGunport Planking 2.JPGGunport Planking 3.JPG
 
End of October and the plank bender has arrived. I chose a heated one in the end. I looked at vids of the plank crimper type in use and they seem to work very well in experienced hands - which mine are not. With the heated one I can bend, unbend, and a template with a couple of curves comes with it which will help me out. I did a few test pieces with it and soon got into the swing. The tool rest provided is only a cheap tin pressing (good enough for the job it has to do), but the weight of the cable drags it around, so I taped it to the worktop. Then after you have bent the wood you put the tool down on the rest, trial fit the plank, put the underside of your arm on the hot plank bender, stamp around, swear profusely and move it further away - learning point 2. First planking tomorrow; how hard can it be?
 
Hmmm. This is harder than I thought; and I thought I’d have it done in a day – it took three. I did not shape the first two planks beneath the gun-port bulwarks because I was keen to get the first one in place to glue the bottom edge of the bulwark along it’s entire length to provide some strength; on the second plank I just got carried away. I should have shaped them because I ended up with a step effect (see photo) and the planks were only glued to the bulkhead at the top edge, not the bottom edge. Learning point 3 – check all planks for shape and make sure the full width of the plank is glued down. I shall play the ‘First Time I’ve Done This’ card here – but you only get one shot and that’s it used up.
To soak the planks I appropriated the tallest vase in the house (don’t tell the wife) and that worked well. Learning point 4 – wet planks cut better because the knife blade does not follow the grain anywhere near as much. The advice to let a full plank run it’s natural course now and again and fit stealers where necessary was good – I didn’t fully understand how that worked until I did it. Also, save the wedge shaped bits you cut off because some of them make great ready-cut stealers. I really enjoyed putting in the stealers, so learning point 5 – I need to get out more.
I also planked the dead area of the keel and stopped just short of the stern post because, when I have sanded this down to almost nothing, the second layer of planking will take the overall thickness at the stern post to that of the rudder. I might be wrong in this, the plan does not show it, the instructions do not mention it, but others seem to do it on hulls of this shape and I think the overall shape and profile is better. Below are a couple of photos of the unsanded hull, warts & all.
 

Attachments

  • First Planking 1.JPG
    First Planking 1.JPG
    30.3 KB · Views: 109
  • First Planking 2.JPG
    First Planking 2.JPG
    36.5 KB · Views: 108
The aforementioned steps in the planking were fixed with a bit of filler. I used a small precision sander to smooth the hull and noticed that some of the planks were springing i.e. the edges not glued together. I could have gone over them with glue but in the end I applied a coat of sealer and this did the trick. I used some Knotting Shellac I had in the garage – this is the stuff you put on knot holes to stop the resin staining the paint overcoat. I used it for no reason other than I had it, but must say that I like the colour finish it gives. The superglue remnants could be sanded out to give a more even colour coverage on a final planking, but I like that sort of patchy look as it looks a bit weathered. Possibly a thought for a future model – but it stayed tacky for a couple of days. I am planked out and will take a break and make some deck fittings.
 

Attachments

  • First Planking 3.JPG
    First Planking 3.JPG
    34.4 KB · Views: 101
  • First Planking 4.JPG
    First Planking 4.JPG
    28.6 KB · Views: 101
  • First Planking 5.JPG
    First Planking 5.JPG
    49.9 KB · Views: 103
Hi Popeye,
Yes there is a second planking. One of my reasons for choosing this kit is that it is double planked and, whilst I wanted the challenge of doing that, the hull is painted and copper plated. So, if I made a fair job of it I can take the experience forward to my next model and if it turned out to be a pig's ear then at least it would be covered by paint and copper.
My posts at the moment are somewhat historic because I started the build in October and so am doing a few rapid posts over this weekend to get us to present time. I watched a few vids on planking and also referred to the kit instructions (not very helpful), so in the end I started at the gunport bulkhead and worked down to the keel. Your explanation is great and I shall apply it to my next build; I sort of did some of what you say and made it up as I went along on the rest! I guess the proof is in the pudding, so here's the bit from my build log which covers it and I look forward to any comments.

Final planking. Taking on board all I think I have learned, I started by planking from the gunport bulkhead bottom edge first. I did this in order to get a true and straight edge to work with. This also finally took me three days but I think the only way is slow and steady. The last two photos are of the hull unsanded, warts & all. Next post will show the sanded hull.
 

Attachments

  • Second Planking 1.JPG
    Second Planking 1.JPG
    34.6 KB · Views: 131
  • Second Planking 2.JPG
    Second Planking 2.JPG
    63.5 KB · Views: 127
  • Second Planking 3.JPG
    Second Planking 3.JPG
    24.5 KB · Views: 129
  • Second Planking 4.JPG
    Second Planking 4.JPG
    53.5 KB · Views: 130
  • Second Planking 5.JPG
    Second Planking 5.JPG
    80.8 KB · Views: 135
  • Second Planking 6.JPG
    Second Planking 6.JPG
    57 KB · Views: 134
Second planking sanded and main wale fitted. I wet the hull with a damp rag to give some clearer definition.
 

Attachments

  • Second Planking 9.JPG
    Second Planking 9.JPG
    32.8 KB · Views: 124
  • Second Planking 10.JPG
    Second Planking 10.JPG
    45.9 KB · Views: 124
  • Second Planking 11.JPG
    Second Planking 11.JPG
    39.1 KB · Views: 123
Back
Top