
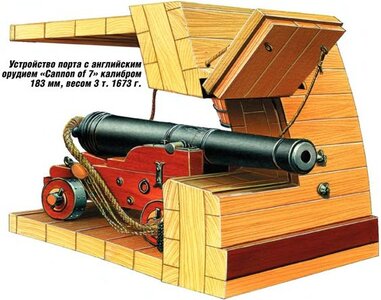
Depending on the Kits, in some I installed the Gunport-all done in 4x4 and carved to follow the curve of Hull -it bulkhead a love. In some other kits, there are some bulkheads on one side or cover totally space where the gunport should be. Here you -as I am doing with an open gunport, have to change part of the bulkhead. if using the dummy guns, then no problems -for example, Montanes from Occre. They have another build Ntra. Sra El Pilar..Here on its 3 decks, one Gunport to starboard, next deck backboard. The last one again to Backboard, so all gunports inserted from the beginning, as I, as usual, DO NOT INSTALL DECKS before planking is over.I placed a piece of wood (I used leftover first planking lime strips) on either side of the square gun ports. I made sure to follow the curve of the hull and the end result was a very nice point on either side of the gun port to glue down the first planking strip. So, first plank from the line flush with the lower edge of the gun ports down to the keel. Then install the gun ports. Then plank up to the wales. Make sense?

-

SUBSCRIBE TO SHIPS IN SCALE TODAY!
The beloved Ships in Scale Magazine is back and charting a new course for 2026!
Discover new skills, new techniques, and new inspirations in every issue.
NOTE THAT OUR NEXT ISSUE WILL BE July/August 2026 -

Win a Free Custom Engraved Brass Coin!!!
As a way to introduce our brass coins to the community, we will raffle off a free coin during the month of August. Follow link ABOVE for instructions for entering.
You are using an out of date browser. It may not display this or other websites correctly.
You should upgrade or use an alternative browser.
You should upgrade or use an alternative browser.

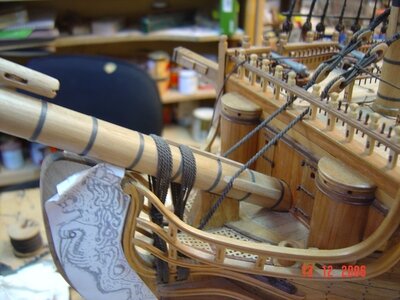
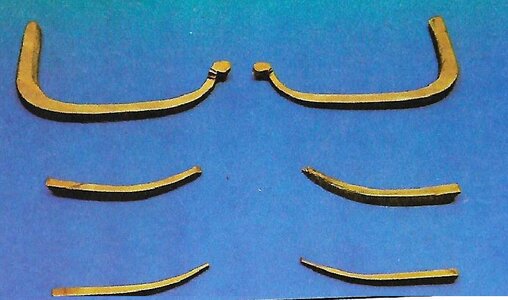
Yes. No doubt that you will run into problems. here on pic 2 ,you can see pars of the head will have to be twisted, bent, apart from the Rggen from the head tothe baupress etc. I did this in parts,Starting to build up the bow. Seems like it's gonna be a time consuming process.
View attachment 218450
Attachments
- Joined
- Mar 27, 2019
- Messages
- 831
- Points
- 403

Yes. No doubt that you will run into problems. here on pic 2 ,you can see pars of the head will have to be twisted, bent, apart from the Rggen from the head tothe baupress etc. I did this in parts,
Did those pieces come for you as laser cut? The head rails I mean. Mamoli Surprise included several lengths of white metal which can be bent and twisted any which away.
No TKAM, You mostly had to cut it yourselves -In Norske Love, it brooks very easily- and I have seen a German LADY taking the ones from Soleigh Royal and mage laser cut in Metal. You are lucky if you have this White Metal pieces -I had one which I used to make curves and could be twisted back late 80 early 80. I got it from a professional Drawing Company, where they used to make curves etc -long before the Computer age, Drawing program.Did those pieces come for you as laser cut? The head rails I mean. Mamoli Surprise included several lengths of white metal which can be bent and twisted any which away.
In my Montañes I did some in 3 pieces.
will send you some more pics today or tomorrov -when I got them scanned,
Finally found the material -having in mind, that the Pics are from 1992-93-with some lack of tools. I got my 1Th Proxcon 1998, so most of it is hard handwork, but you LEARNED the BASIC.- HOPE THAT THIS CAN HELP YOU.No TKAM, You mostly had to cut it yourselves -In Norske Love, it brooks very easily- and I have seen a German LADY taking the ones from Soleigh Royal and mage laser cut in Metal. You are lucky if you have this White Metal pieces -I had one which I used to make curves and could be twisted back late 80 early 80. I got it from a professional Drawing Company, where they used to make curves etc -long before the Computer age, Drawing program.
In my Montañes I did some in 3 pieces.
will send you some more pics today or tomorrov -when I got them scanned,
Attachments
Finally found the material -having in mind, that the Pics are from 1992-93-with some lack of tools. I got my 1Th Proxcon 1998, so most of it is hard handwork, but you LEARNED the BASIC.- HOPE THAT THIS CAN HELP YOU.
Attachments
.jpg")
Scan_0001 - Copy (2).jpg
159.7 KB · Views: 0.jpg")
Scan_0001 - Copy (3).jpg
125.3 KB · Views: 0
Scan_0001.jpg
155.9 KB · Views: 0.jpg")
Scanpeaç - Copy (2).jpg
200.7 KB · Views: 0-
Finally found the material -having in mind, that the Pics are from 1992-93-with some lack of tools. I got my 1Th Proxcon 1998, so most of it is hard handwork, but you LEARNED the BASIC.- HOPE THAT THIS CAN HELP YOU. On Pic 2 it looks like that the curved part to short, but later on the ANKER BOOM comes on top of that.
.jpg")
Scanpeaç - Copy (3).jpg
124.5 KB · Views: 0.jpg")


- Joined
- Mar 27, 2019
- Messages
- 831
- Points
- 403
Got the bow chaser carronades mounted with breech ropes. On the port side (or would that be "larboard" during that era?) I also have the outhaul tackle. I brought back those tiny blocks to do the rigging and completely forgot to bring back the tiny brass hooks I use for gun rigging. I have larger hooks from the same manufacturer for general rigging but they just look way out of place and out of scale on the guns. So I'll get back to the final gun rigging next month when I return again.

- Joined
- Mar 27, 2019
- Messages
- 831
- Points
- 403
Finished building up the bow. Sterns I love working on but bows always give me fits. The headrails in this kit are all cast metal which makes the job much much easier. On Syren they were laser cut basswood which was appropriate as they were stained rather than painted. On Surprise the trim and headrails are all painted so being able to bend the cast parts is nice.
I used two methods for the two sides. The port side was as it's instructed in the plans which was, well, stupid and time consuming. I used my own method for the starboard side and it came out looking identical.
I also started work on the "decking" for the little area under the bowsprit. There are to be two doors added to the vertical bulkhead leading to this area. I'm installing gratings and two "seats of ease" rather than simple decking. Probably some netting as well to keep the sailors doing their #2 business onboard.
- Joined
- Mar 27, 2019
- Messages
- 831
- Points
- 403
Finished with the grating at the bow and installed the two seats of ease. I also installed six eyebolts and black roping as a frame for the netting, but I realized that as low as I set them they'd be not even waist high. Barely useless to keep sailors conducting their business from falling overboard. Gonna have to rip those out and try again.
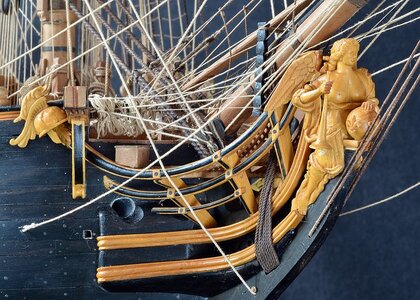
Also installed the first of the trim. These pics show the white metal trim after three coats of yellow ocher (to be accented with blue). You can see how they can be bent to follow exactly the curves needed to lay flush with the built up bow.


Also installed the first of the trim. These pics show the white metal trim after three coats of yellow ocher (to be accented with blue). You can see how they can be bent to follow exactly the curves needed to lay flush with the built up bow.
- Joined
- Mar 27, 2019
- Messages
- 831
- Points
- 403
Finished reinstalling the posts and netting for the area right below the bowsprit. This is more in scale. Before painting the rest of the bow stem black I bent the remaining trim pieces as to allow for just painting before installation. I've found that if I paint first I end up marring the paint so much I have to go back and repaint, sometimes it's difficult if I've already mounted the part in question.


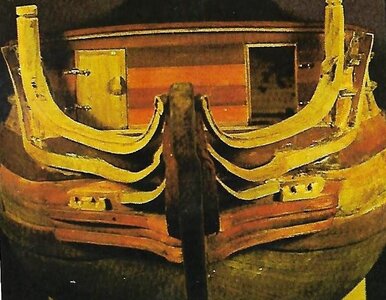
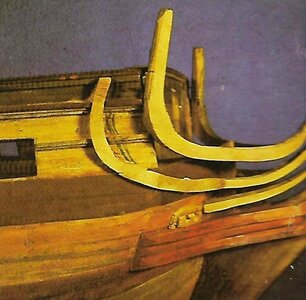
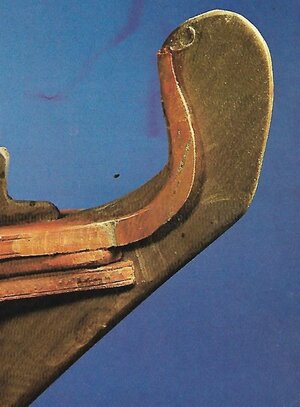
Hi, The ship looks beautiful, but U have a feeling that the two yellow reinforcement on the bow -mainly the upper one - are iuncorted installed (This without having the Drawing) It is one of the most difficult patrs, as it has to be benb, sometimes in 2 direction. I generally divided them into 2 or 3Finished reinstalling the posts and netting for the area right below the bowsprit. This is more in scale. Before painting the rest of the bow stem black I bent the remaining trim pieces as to allow for just painting before installation. I've found that if I paint first I end up marring the paint so much I have to go back and repaint, sometimes it's difficult if I've already mounted the part in question.
View attachment 222879View attachment 222880
- Joined
- Jan 12, 2021
- Messages
- 89
- Points
- 78

Yeah I stumbled on that solution and it works. Especially if the strip will be painted, squirting some CA glue into the splintered area then sanding smooth works fine.
The brass cannon finally arrived from Australia. Clearly, clearly these are far superior to the kit provided white metal canon. These puppies look exactly and I mean exactly like the cannon shipped on the fake Surprise tied up in San Diego. They are also very slightly larger than my upgraded Caldercraft cannon/carriages that I'll fully rig on the weather decks. That's appropriate I think, larger cannon were always lower in the hull with the lighter shot up higher.
View attachment 197644View attachment 197645
Where in Australia did you source the Cannon ?
- Joined
- Jan 12, 2021
- Messages
- 89
- Points
- 78
Proper cannon mounted on all larboard side gun ports. For now I'm not mounting the gun port covers, I've found that they get in the way and I always end up knocking most of them off as I'm working on the rest of the ship. For now I only have the lanyards mounted and at some point I'll mount the already completed gun port covers.
View attachment 198148
I've been admiring that very practical work stand, another "where did you get it" question. I'm in Australia but happy to order necessaries from overseas.
For sure not the metal one. These little mini-kits for the ship's launch I get from Falkonet in Russia and are extremely detailed. The whole launch kit takes 3-4 days but the results are worth it.
Lower rail for the quarterdeck and upper poop. An upper rail will be installed that will go above each of the cutouts for the cannon. Same goes for the forecastle carronade bow chasers.
View attachment 201968
Your decking detail is superb.
I admire your approach to thoughtful detail.
- Joined
- Jan 12, 2021
- Messages
- 89
- Points
- 78
Both port and starboard upper rails finished and outboard pin racks completed. I'm finding I need much more patience when working with these tiny pieces of walnut. They split so easily I've lost count of pieces I've just tossed into the bin. Drilling out holes is the worst, I've slowed my drilling way way down and that's why it took me the better part of today just to finish one side's upper rail plus the pin racks.
I also put together one of the Caldercraft carronade kits I purchased, these will go on the forecastle as bow chasers. The detail is really fantastic. The elevation screw is an actual screw that screws right up into the end of the carronade.
View attachment 202960View attachment 202961View attachment 202962View attachment 202963
Now thats a fantastic and highly detailed kit of the Carronade "smasher" !
I'm noting many of your recommendations and upgrades, saving this thread for a good reference guide to ship building in general.
Thank you sir.
Have a look in the NET of Hoby Guinea- Spain -working together with Amason- this Company have the biggest collection of "Fitting" or asesory that I have found. In fact, I am living in Spain-Another one Model Reyna- Madrid. Those two Companies has a huge amount of Models from different Producer and Model Reyna is doing its own accessory apart from those from each producerI've been admiring that very practical work stand, another "where did you get it" question. I'm in Australia but happy to order necessaries from overseas.
Your decking detail is superb.
- Joined
- Jan 12, 2021
- Messages
- 89
- Points
- 78
My cannon ball order still has not arrived. When it does I'll construct triangle shaped shot racks for each gun, what came with the kit were white metal triangles that look terrible. In the meantime I have these extra cannon balls alongside the gratings. These are for when the sailors are extra pissed off and need to open up an even bigger can of whoop-ass.
I use number 6 Birdshot (as in 12 gauge shotgun cartridges, if you have a friend owning a Shotgun they'll probably give you a cartridge or two) for 1-48 scale Ship guns, calibre differences won't matter really when they're that small.