-

Win a Free Custom Engraved Brass Coin!!!
As a way to introduce our brass coins to the community, we will raffle off a free coin during the month of August. Follow link ABOVE for instructions for entering.
-

PRE-ORDER SHIPS IN SCALE TODAY!
The beloved Ships in Scale Magazine is back and charting a new course for 2026!
Discover new skills, new techniques, and new inspirations in every issue.
NOTE THAT OUR FIRST ISSUE WILL BE JAN/FEB 2026
You are using an out of date browser. It may not display this or other websites correctly.
You should upgrade or use an alternative browser.
You should upgrade or use an alternative browser.
HMS Victory - 1:98 scale. Mantua Model
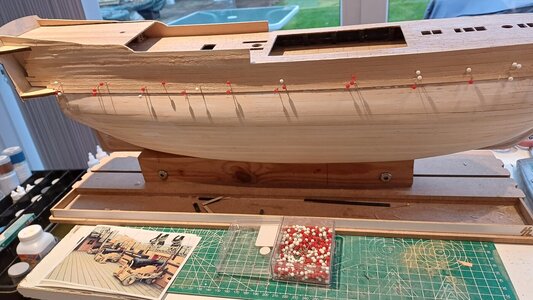
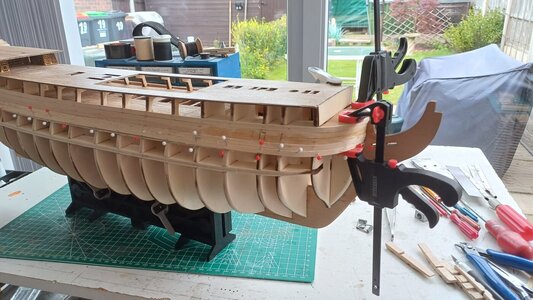
Use balsa filler blocks in the bow where the greatest plank curvature is encountered. Sand them to shape after gluing them into the frames, and make sure they are shaped the same on port and stbd sides. These will give planks a surface to glue them to, and help reduce uneven edges between planks that create steps. Trying to get the sharply curved bow planks to line up edge to edge and produce the proper hull shape, AND make the hull shape symmetrical at the bow is an exercise in frustration, with many splintered and broken planks. Support planking in areas of hull curvature and your life will be easier! Kit instructions are not always the best way to build a model. Experience and good judgement will tell you when to alter a kit’s set of instructions.This is slow going. 5 strips down each side so far. That's about 1/8th of the way. It's looking like several weeks of planking 'fun'. That really is a tight bend at the bow. Soaking the wood stops it splitting, but it is quite 'springy' and a pain to keep down where the front end touches down.
View attachment 391815
In my opinion, a kit that omits filler blocks in the bow and sometimes the stern is a bad kit.
Balsa is cheap. Replacement planks and re-planking efforts are not.Thanks for the heads-up Darivs. The kit has balsa block for the stern. I didn't even think about using it for the front. Another trip to the model shop then.
Even if the plank ends near the stem are not fully shaped to the required curvature, you can hold them to the balsa with pins, and use CA glue for faster construction, but PVA glue will make a more solid construction, and all plank edges will be nearly flush, requiring much less sanding.
Try this method and impress yourself with the results!

Thanks again Darivs. I went to the model shop yesterday and bought some balsa. It's many decades since I last sanded a solid balsa model plane wing. I had forgotten how easy it was to sand. Needless to say blocks in place, sanded to profile and more planks added. So much easier and tidier.
Good evening. Kurt has a good point here. You can get away without filler but you take the risk of the bow on the hull not being correct. The kit is a good outline but as you go you will find many things which will change. Cheers GrantUse balsa filler blocks in the bow where the greatest plank curvature is encountered. Sand them to shape after gluing them into the frames, and make sure they are shaped the same on port and stbd sides. These will give planks a surface to glue them to, and help reduce uneven edges between planks that create steps. Trying to get the sharply curved bow planks to line up edge to edge and produce the proper hull shape, AND make the hull shape symmetrical at the bow is an exercise in frustration, with many splintered and broken planks. Support planking in areas of hull curvature and your life will be easier! Kit instructions are not always the best way to build a model. Experience and good judgement will tell you when to alter a kit’s set of instructions.
In my opinion, a kit that omits filler blocks in the bow and sometimes the stern is a bad kit.
Good evening. The mast rake on the Victory are slightly different per mast. I’m talking from memory and stand to be corrected: the Mizzen has an around 3• aft rake, the main around 2• and foremast is vertical. Somewhere in my log one of the Victory boffins pointed this out to meStep 6 completed with varnishing the middle deck. This is now step 7 and fitting the main deck. I put the masts in just to check alignment all around. Although all 3 are perfectly in line and vertical when viewed from the bow end, side on, the main mast leans slightly to stern, compared to both fore and mizzen which are vertical. Looks like I might have to tweak the holes in lower and middle decks.View attachment 389941
- Joined
- Oct 6, 2019
- Messages
- 3
- Points
- 0
Hello my friends, can I find the mantua victory 776 building instructions and download them to study before ordering the ship? Thank you Konstantinos Skodras
Hello my friends, can I find the mantua victory 776 building instructions and download them to study before ordering the ship? Thank you Konstantinos Skodras

Manual Mantua set 776 Boatkits HMS Victory
Manual for Mantua set 776 Boatkits HMS Victory. View and download the pdf in English. This product currently has 0 frequently asked questions, 1 comment and has 3 votes with an average product rating of 67/100.
- Joined
- Oct 6, 2019
- Messages
- 3
- Points
- 0
thank you for the information Uwek, but these instructions are from 2001 while the photo on the kit does not say the year but only Italy, it's probably a newer version. Konstantinos Skodras
Manual Mantua set 776 Boatkits HMS Victory
Manual for Mantua set 776 Boatkits HMS Victory. View and download the pdf in English. This product currently has 0 frequently asked questions, 1 comment and has 3 votes with an average product rating of 67/100.manuall.co.uk
- Joined
- Oct 6, 2019
- Messages
- 3
- Points
- 0
Thank you very much Ajmitch51, that's exactly what I understood too, and since I'm going to buy from Mantua for the first time and I don't know the instructions he gives, I wanted to see the newest ones, before I make the purchase but I can't find them. Of course I have experience in building model ships, but the instructions make it much easier. Regarding the materials, I have learned that they are of quite high quality. Thank you again for your time!! Konstantinos Skodras
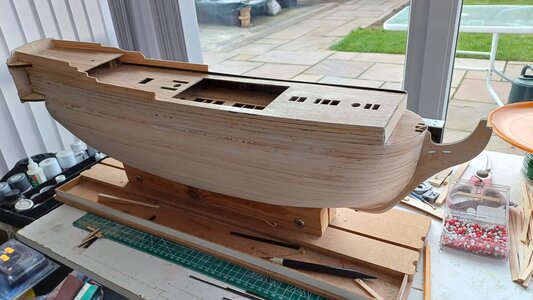
Good evening. All looking swell. Just check Your bulkwarks from the main deck to the poop deck and to the transom they have too many steps in them. I may be jumping the gun and you still have to cut these correctly. Your planking is looking really good- plenty gun ports to cut out1st stage of planking done. A bit of sanding to do next.
Instructions say to paint this first layer with a watered down solution of white wood glue, then sand it once it's dried.
View attachment 398601
Yep you are right. It's waiting for the glue to harden before I cut it back. If you zoom in on the inside of the bulwark on the port side of poop deck, you can see the line that I've drawn to cut down to. That is based on photos taken on the real thing.
Thinking of the colour scheme, I'm torn between what she has been like for the last hundred or so years and the return to what is claimed to be the original colours.
If I go with the way she looks now, the.i have some delicate re-painting of these laser cut parts.
Also is the issue of the 1720's copper clad hull and the more recent dark grey paint job.
What do other members think?
If I go with the way she looks now, the.i have some delicate re-painting of these laser cut parts.
Also is the issue of the 1720's copper clad hull and the more recent dark grey paint job.
What do other members think?

I would always go with the original colors from Trafalgar, since they are known from paint samples take from the timbers themselves. Ships go through a lot of paint schemes and rebuilds over their life span, if it is long. When modelling, it is a challenge to research all the details of the appearance of a vessel at a particular time in history. This is especially difficult since, in most cases, there is no surviving evidence to work from and you usually have to go with guess work.
Second stage planking in progress now. The bulwarks are cut to shape now that the second layer is on. I've been experimenting with the paint based on photos that I have of the new (original) colour scheme and have painted the insides of the bulwarks as they are on the real thing.View attachment 401402

Last edited:
Disaster struck yesterday after originally posting that last pic. I was working with the ship on my knees, had a sneezing fit and it dropped onto the tiled floor. It landed on the top edge of the transom, splitting the transom horizontally and smashing the bulwarks on the poop deck. 
Repairs now in progress.
Repairs now in progress.


