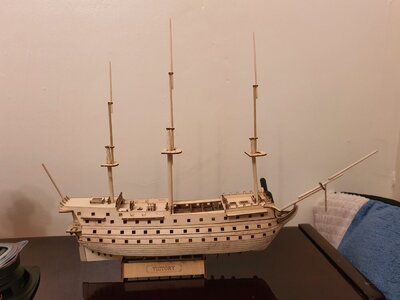
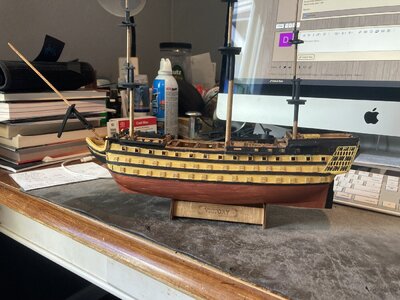
HMS Victory 1765 kit 1:200

My friends, sadly I've been very busy with work, dealing with these crazy times and the Admiral wanted the kitchen table back!

I'll be back to work soon on this project, I need to wrap it up and get to work on my next project.

More to come soon

Brian
 
Hello all, it's time to begin my first build log, of HMS Victory in 1:200 scale. This will be the 3rd sailing vessel I have built, though my previous 2 were Revel Plastic kits of the Cutty Sark and the CSS Alabama, and both were several decades ago while I was in high school.

I've been lurking here in SOS for a couple months now once I decided I wanted to pick up the hobby again and wanted to build in wood this time, and have been dropping hints to the Admiral that all along. So last week for Christmas she presented me with this kit, proud as can be. I just wish she had taken a closer look to my wish list on Amazon instead! But as a fist time kit to learn new skills and techniques on, I can't complain.

To start off, I am not sure who makes this kit, it came from Amazon from a seller called TWOBOYS and as far as I can tell the manufacturer is Western Wooden Sailboat. The parts sheets are die cut, I think, as I don't see any char on the cut edges, but as you can see in some of the pics below, of the stern windows and deck grates, the detail is pretty good at this scale
.View attachment 125873View attachment 125874View attachment 125875View attachment 125876

Sadly, the plans and instructions are seriously lacking. I have basically 4 8.5x11 pages of very basic plans and directions to work from. I have tried searching online for the MFG, but have had no luck locating anything with greater detail. Luckily I have YOU here at SOS to lend a hand and a few tips and tricks when I run into a road block, and a number of Victory build logs that I can review also. What I do not have at all is a rigging and sail plan, but I think I can work this out, at least well enough for this first attempt.
View attachment 125880View attachment 125881View attachment 125882View attachment 125884

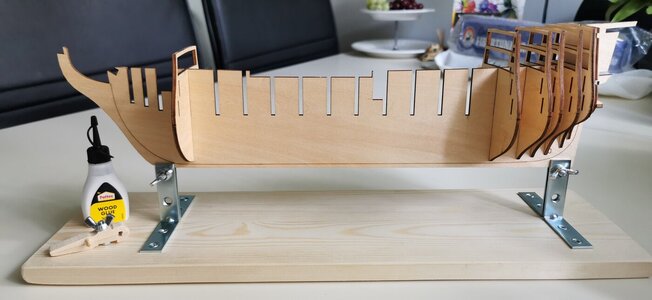
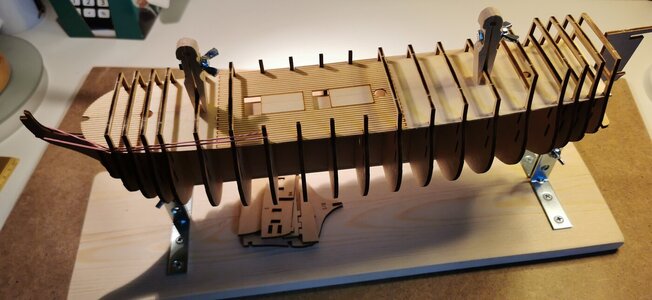
So, after checking each parts sheet for missing parts or damage, I popped the false keel out, and starting to dry fit the bulkheads. The fit and finish it pretty good with most of the bulkheads fitting snugly, but not to tight that I have to sand anything to make it fit. I want to head off to the hardware store tomorrow and get a few things to build a jig to hold the keel straight while I fit the bulkheads and gun port backing/supports, along with some filler blocks between bulkheads to stiffen the whole structure.
View attachment 125886View attachment 125887

Thank you, and wish me luck as I dive into this kit and see what I can make of it.

Thanks

Brian
Hallo Brian alias @Sgt_Hoser
we wish you all the BEST and a HAPPY BIRTHDAY
Birthday-Cake
 
Thanks Uwe, it's been quite the year. I promise this build has not ended, just been suspended due to 2020. We'll be moving to a new place in a few months and once we get settled, I plan to come back and finish the Victory and start on my next build. Just need to get past the next few months.

I've been wondering, at what point can we start using 2020 as swear word, like "that's a load of 2020" or "What the 2020?" or "Abso-2020-lutely!!"
 
Hi Sgt_Hoser. I was overjoyed when I found your project. There is so much to learn from. I'm waiting for my "KIT" from China. The only difference is that the scale is 1: 150. I have promised my wife not to start construction until the autumn. I have so far built Halcon and Harvey so Vihctory will be my third project. I will enjoy your experience a lot. I hope you have a good summer 2021.
 
Thanks Uwe, it's been quite the year. I promise this build has not ended, just been suspended due to 2020. We'll be moving to a new place in a few months and once we get settled, I plan to come back and finish the Victory and start on my next build. Just need to get past the next few months.

I've been wondering, at what point can we start using 2020 as swear word, like "that's a load of 2020" or "What the 2020?" or "Abso-2020-lutely!!"
Hi Brian hope you're good and your ship project is still on track. As it happens I am also building the exact same ship and have just got to the point of realising the lack of dead eyes and other rigging equipment. I was wondering if you could give me some info with regard to what you bought from scale expo to facilitate the proper build.


Cheers in advance

Paul
Sure Paul, for the dead eyes, I bought the smallest they had,the 2mm and 2.5mm, using the 2.5mm for the main stays, and the 2mm for the tops.

Same thing for the blocks, and buy mote then you think you'll need.

I would love to see a build log of yours, and compare how we both handled the issues and deficiencies of this kit. It's been a fun challenge and I think I am just about settled from our cross country move and ready to get back to work.

Thanks for the interest and comments

Brian
 
Last edited:
Sure Paul, for the deadliest, I bought the smallest they had,the 2mm and 2.5mm, using the 2.5mm for the main stays, and the 2mm for the tops.

Same thing for the blocks, and buy mote then you think you'll need.

I would love to see a build log of yours, and compare how we both handled the issues and deficiencies of this kit. It's been a fun challenge and I think I am just about settled from our cross country move and ready to get back to work.

Thanks for the interest and comments

Brian
Brilliant thanks! Yes I'm no way near as far on as you. I'm thinking of doing some 3D printed parts, on mine, replacing the cannons etc

Cheers

Paul
 

Attachments

  • 20210705_235355.jpg
    20210705_235355.jpg
    140.5 KB · Views: 66
Oh how I wish I had a 3D printer! I searched for good scale cannons for this kit, and didn't find any that I thought was cost effective. But 3D printing them would be great! Good luck, and keep working on it, its a strange kit, so much thought and detail at times and then nothing....

Good Luck, and set up a build log, I would love to follow your progress too.

Brian
 
Hi Sgt_Hoser.
I have to check with you. Is it necessary to divide the 3rd deck into two parts? I was convinced that it was possible to insert the 3rd deck if you did not glue "the framestructure" as described in Mantua's manual. I have exactly the same description as you have but with other dimensions (has a scale of 1: 150) and then you can see in step 4 that the 3rd deck has a marking in the middle. I do not see that it is possible to assemble without sharing. Grateful for answers.
Sincerely
Goran
 
Hello Goran, I think Paul and I are working on a model from a cheap Chinese import, not the Mantua kit, but in my case I did have to split the main gun deck lengthwise to one side of the deck hatches to be able to get the deck to slide in and fit around the frame ribs. With a very careful cut with a new sharp blade I was able to split the deck, and once glued back in it's hard to see.

Have you started a build log of your own we can look at pics on?
 
Hi Sgt Hoser
Thanks for your reply, I understand I will have to split the 3rd deck into two parts. I have started my building log: HMS Victory Scale 1:150 (another construction project) Previous Building log is: Boston Schooner Harvey 1847 1:96 I think you have misunderstood my message. I also build a cheap Chinese kit with exactly the same description as you have. The only difference is that I have a scale of 1: 150. Since there is so much information and instructions missing (Details, rig and sails) I have found online complete drawings and construction descriptions for HMS Victrory to be able to build on with rig, details and sails etc. Mantua scale 1:78, Artesania scale 1:84, Hs scale 1: 100, Mamoli scale 1:90, Heller 1: 100, Shipyardtable.by.ru

Victory_Pic_1.jpg
 
Hello Goran, I think Paul and I are working on a model from a cheap Chinese import, not the Mantua kit, but in my case I did have to split the main gun deck lengthwise to one side of the deck hatches to be able to get the deck to slide in and fit around the frame ribs. With a very careful cut with a new sharp blade I was able to split the deck, and once glued back in it's hard to see.

Have you started a build log of your own we can look at pics on?
Ah, I almost forgot about that conundrum, my method was to cut the edges of the vertical ribs just under where they connect to the supportive horizontal beam,
then slide the deck in very carefully and glue the cut i had made once the deck was in... I also used an incredibly sharp scalpel.

Cheers

Paul
 
Hi Sgt_Hoser.
I have to check with you. Is it necessary to divide the 3rd deck into two parts? I was convinced that it was possible to insert the 3rd deck if you did not glue "the framestructure" as described in Mantua's manual. I have exactly the same description as you have but with other dimensions (has a scale of 1: 150) and then you can see in step 4 that the 3rd deck has a marking in the middle. I do not see that it is possible to assemble without sharing. Grateful for answers.
Sincerely
Goran

Ah, I almost forgot about that conundrum, my method was to cut the edges of the vertical ribs just under where they connect to the supportive horizontal beam,
then slide the deck in very carefully and glue the cut i had made once the deck was in... I also used an incredibly sharp scalpel.

Cheers

Paul
Hi Paul and thanks for your tips.
 
Hello Sgt_Hoser
Thank you for the moral support. I divided the deck into 2 parts and it turned out very well, the cut is almost invisible even though I have not yet glued any part. I have only tested the fit of the parts and sanded a bit here and there. Paul's tip was not applicable as the frame is about 3 mm thick (in inches ??) It was not possible to cut with my scalpel. I get in touch when it's time for new advice.
Bye for now.

Victory_Pic_2.jpg
 
Brian, just wanted to say thank you for the build log and pictures. I have the same kit and the instructions are basically worthless. Best wishes, the model looks great.
 
Hi Brian (Sgt). I just went there your log now - your Victory is looking good- I have no idea how you guys do such small scale. Well done. Have you made any progress since your last post?
 
Been making progress. Have to clean up the lines on my paint job. My hands are not as steady as when I was younger. Your build log has been very helpful with this kit Brian. Not sure if I want to just find a copper antique paint to do the hull or attempt the copper strips. I used them on a smaller build and they were very difficult to work with. Best wishes!
 

Attachments

  • IMG_0079.jpg
    IMG_0079.jpg
    244.8 KB · Views: 27
It's looking good so far. I opted to just sand and stain the lower hullinstead of trying to find the super small copper plates. I wanted to show off the work done to plant the hull.

But I did give it some serious thought, and was looking on Amazon for some small gauge/width copper strip on a roll. I thought to lay this down a something slightly soft,like my cutting mat, and using a clean but not sharp edge to imprint/score a line to simulate the plates and then lay this strip on the hull.

Thoughts?

Good luck on your build, you are giving me the itch to finish the set up of my.new work space and get to work finishing the rigging on my model.

Thanks
 
Very happy with the way the copper hull came out. Now to try and start the rigging. I have never done this before and have no idea what I need to order as the kit only came with a spool of very thin black thread. I ordered a book on rigging and masting of this period and am waiting on that. Any info or advice on what you needed to order from model expo or other help would be greatly appreciated. Thanks and best wishes.
 

Attachments

  • IMG_0086.jpg
    IMG_0086.jpg
    286.4 KB · Views: 41
Hello all, it's time to begin my first build log, of HMS Victory in 1:200 scale. This will be the 3rd sailing vessel I have built, though my previous 2 were Revel Plastic kits of the Cutty Sark and the CSS Alabama, and both were several decades ago while I was in high school.

I've been lurking here in SOS for a couple months now once I decided I wanted to pick up the hobby again and wanted to build in wood this time, and have been dropping hints to the Admiral that all along. So last week for Christmas she presented me with this kit, proud as can be. I just wish she had taken a closer look to my wish list on Amazon instead! But as a fist time kit to learn new skills and techniques on, I can't complain.

To start off, I am not sure who makes this kit, it came from Amazon from a seller called TWOBOYS and as far as I can tell the manufacturer is Western Wooden Sailboat. The parts sheets are die cut, I think, as I don't see any char on the cut edges, but as you can see in some of the pics below, of the stern windows and deck grates, the detail is pretty good at this scale

Sadly, the plans and instructions are seriously lacking. I have basically 4 8.5x11 pages of very basic plans and directions to work from. I have tried searching online for the MFG, but have had no luck locating anything with greater detail. Luckily I have YOU here at SOS to lend a hand and a few tips and tricks when I run into a road block, and a number of Victory build logs that I can review also. What I do not have at all is a rigging and sail plan, but I think I can work this out, at least well enough for this first attempt.
So, after checking each parts sheet for missing parts or damage, I popped the false keel out, and starting to dry fit the bulkheads. The fit and finish it pretty good with most of the bulkheads fitting snugly, but not to tight that I have to sand anything to make it fit. I want to head off to the hardware store tomorrow and get a few things to build a jig to hold the keel straight while I fit the bulkheads and gun port backing/supports, along with some filler blocks between bulkheads to stiffen the whole structure.

Thank you, and wish me luck as I dive into this kit and see what I can make of it.

Thanks

Brian
Hallo Brian alias @Sgt_Hoser
we wish you all the BEST ans a HAPPY BIRTHDAY
Birthday-Cake
 
Back
Top