HMS Victory 1765 kit 1:200

Thanks Bill, I appreciate the comments.

My wife found this kit on Amazon, for $50 I think. I would not recommend it, as it has almost nothing for instructions, and is missing rigging supplies like blocks, deadeyes and eye bolts.

I've been able to find rigging plans and lots of info online as this is the Victory, and I'm happy with how this has turned out so far. My order from Model Expo should be arriving Tuesday with the paint and rigging goods so I can move forward with this build.

Here's a link to the Amazon page for this kit:

 
Brian,

I am working on an HMS Victory of similar but larger scale, 1/180. The kit is by Aeropiccola, is very simplistic, but the finished product can look the part with extensive modifications. For example, the directions call for simply drawing the gun ports onto the painted hull. I have carved them out and have framed them. The kit planks are grossly out of scale, so I planked my outer hull using very thin and narrow "model lumbar" strips for model railroading. I am using them to plank the decks as well.
Is your the Mantua 1/200 kit?

Bill
 
Sadly no Bill, it is not the Mantua 1:200 kit, i would have loved that one. It is a 'cost effective' Chinese import from Amazon, and even Amazon is listing it as a 3D puzzle now.

I agree that while the kit is pretty basic, it does have some charm, and with some attention to detail and additional product, I hope to make a fair model out of it. As my first build in wood, I am very pleased with it, mostly because any mistakes or errors were made on such an inexpensive kit instead of one costing several hundred dollars or more. Not to say i won't be making mistakes down the road on more expensive kits, but i have learned a lot from this build, well worth the time and effort.

Brian
 
Small update, not a lot of work in the shipyard this week, got the 3rd row of Wales and gun port covers done, ( mostly) as well as the quarter deck cannons. The gun tubes for these are laser cut wood and not the best quality,. It for this build I didn't want to spend what was needed to get better guns at this time.

IMG_20200201_203109.jpgIMG_20200201_205715.jpgIMG_20200201_205729.jpg

On a brighter note, my long awaited shipment from Model Expo arrived today, and my Syren is here! As well as the rope, blocks, deadeyes, and paint I need to finish this project.

I did crack open my Syren kit, just to oggle it. Had to be careful not to drool on it.;) I did a cursory check of the parts list and checked the false keel and bulkheads. These look straight and true, and cut from the "good wood". I'll do a much more detailed parts list accounting this weekend before putting it away so I can finish the Victory.

All in all, not a bad day

Thanks
 
Ok, I have some touch up to do in a few places, and I need to decide how to deal with the deck furniture, whether to paint it or not and what color, but here is the exterior of the hull from the main Wales up.
IMG_20200215_153216.jpgIMG_20200215_153222.jpgIMG_20200215_153240.jpgIMG_20200215_153228.jpg

Pretty happy with it so far. Still need to decide how to deal with the stern galleries also, but the hull is nearing the point where I'll start attaching rigging points like eye bolts and dead eyes on the chain rails.

For the lower hull I have decided instead of trying to find and source the 4mm x 7mm copper plates, I will be staining the hull in Golden Oak as well as the decks.
 
New update, touched up the paint working the hull, painted what I'm going to for the deck and blacked the mast tops and bow sprit.
IMG_20200217_205030.jpgIMG_20200217_205041.jpg


I got in the 3.5 and 2.5 mm deadeyes last week along with the rigging blocks. I started working on the main deadeyes on the fore master chain rails, bending some black wire and drilling into the hull just above the top most wale to achor them.

I've decided that at this scale I'm not going to try and duplicate chains and chain plates, as the entire assembly wouldn't be more that 7-8 mm long.
IMG_20200217_203944.jpgIMG_20200217_204055.jpgIMG_20200217_204743.jpg

Work in the yard progresses, trying to wrap up the last details before I start rigging.

Brian
 
Ok, more work done in the shipyard. The yard apes got the deadeyes mounted on all three port chain rails, as well as a large number of eye bolts for anchor points on the deck and bow.

We also got the desks and lower hull stained golden Oak, and I am very happy with how it turned out. Surprised at how well it looks, considering how much wood filler and glue we used in the planking.
IMG_20200222_165257.jpgIMG_20200222_165235.jpgIMG_20200222_125812.jpg

Now onto some rigging. I need to do some preliminary rigging, blocks and deadeyes on the bow sprit and masts. I'm having to give this some serious thought. I have a full set of rigging plans I found online, and I need to decide how much detail I want to model here. I'm struggling with how much detail I would love to include vs how much realistically I can include.

I've already had to make some compromises with the number of deadeyes for the back stays and standing rigging, reducing the number on each chain rails to what I could fit. These are the smallest deadeyes I could find, the 3.5 and 2.5 mm from Model Expo, which are too large for this scale, but the smallest I could find.

Below is another example. I have mounted 5 deadeyes for the sprit stays, and there should be at least 2 more, but I don't want to clutter up the space any more than I have already. And with no instructions from the MFG on what they planned for this scale, I'm totally winging it for almost all this build so far.
IMG_20200222_170540.jpg

Here the bow sprit is glued in, gammoned and the first sprit stay is rigged
IMG_20200222_190415.jpg

Thoughts and ideas?

Thanks guys for taking a look and sharing.

Brian
 
Last edited:
I must be a slave driver, the yard apes have gotten more work done!

I have the sprit stays rigged, decided to keep it limited to the 5 deadeyes I had started with.IMG_20200223_192429.jpgIMG_20200223_200725.jpg

Next I added and rigged the boomkins, and mounted the sprit yard and started working on the rigging for this.
IMG_20200224_202555_197.jpg

Rigging the guys that pass through the eye bolts in the yard, and anchor to the bow bulkhead, man this is eye watering detail work. Damn those 2mm single blocks are SMALL. Sure am glad I paid attention to the docs tying my stitches as a kid, it's been 30 years since my last rigging build, but it's coming back to me now, tying tiny knots with tweezers.
IMG_20200225_173916.jpgIMG_20200225_180811.jpgIMG_20200225_182337.jpg
IMG_20200225_201233.jpgIMG_20200225_205103.jpg

I next need to rig the open hearts for the foremast and main mast stay and preventers the wrap around the bow sprit, and rig the martingale stays and I think I will have the standing rigging for the bow sprit done and can move onto the foremast.

Moving right along

Brian
 
Last edited:
Cracked the whip again today, and for the martingale stays rigged as well as the 4 open hearts for the fore and main mast stays.

Pro tip, rig these BEFORE you start rigging anything else on the bow sprit, otherwise you have to cross your eye, stick you tongue out and hold your pinkies just right to thread the ropes through everything else to get these rigged;)
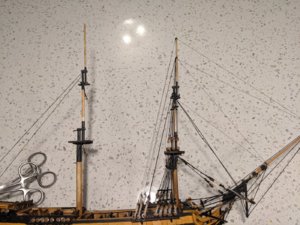
, especially the main mast stay open hearts, as these are mounted at the base of the bow sprit and have to pass through the grating that covers the base of the sprit....

I then stepped the foremast and started rigging the fore stay and preventer.
IMG_20200226_203856.jpg

I used a bent wire clip as a length jig while I anchored the stay to the fore top.

IMG_20200226_203904.jpgIMG_20200226_210751.jpgIMG_20200226_210817.jpg
I ordered the open and closed heart kits from Chuck P at Syren and love them!

Next I'll use the same type of wire clip to set the spacing on the deadeyes and I'll start to rig the lower back stays.

Thanks
Brian
 
Last edited:
I've been whipping the yard apes to work, I'm a slave driver! One of these days the apes will rebel and I'll be in trouble

I re-did the rigging for one of the for stays, I didn't like how it looked. I then rigged the rest of the fore stays, but I need to get a better back drop to contrast with the rigging so the pics come out. I'll post more pics when I do

Next I started work on the lower back stays for the fore mast. I took the line and doubled it over, passing through the gap between the fore mast and the fore top, passing in back through itselfs.
IMG_20200227_190149.jpg
Once I pulled these tight and snugged them down to the cross trees and passed the ends down through the top, the stay rigging in the top looks like it should.
IMG_20200227_190241.jpgIMG_20200227_190358.jpg

So far tonight I have the first two deadeyes on the starboard side rigged, paying close attention to the length and spacing to keep them even.
IMG_20200227_193242.jpgIMG_20200227_194836.jpg

Pretty happy with how it's looking, but I'm done for the night. More to come

Brian
 
Progress,. I finished all 5 lower back stays on the foremast, tied in the futtock staves and rigged the deadeyes for the fore top back stays.

IMG_20200301_144357.jpgIMG_20200301_164954.jpgIMG_20200301_165012.jpg

Next on the list is the fore top stays and continue on up to the top gallant and the rat lines before I step the main mast and start this all over again.

I also learned a fun little trick. On my lines that I have waxed and then worked with, the wax has started to lift in a few places. Well some simple TLC with the admirals hair dryer set to low melts that wax right back into the lines, pretty as can be and is MUCH safer than trying the same thing with a micro torch or other source of flame.

Thanks

Brian
 
Finished the fore top mast back stays. I am not very happy with how the lower back stays turned out in terms of how even they are, so I decided to try a different tack.

I still looped rope through the fore top to get even drops to the deadeyes, but this time once I stretched and looped around another deadeye, I locked them in my smallest hemostat the made sure the length was right. I then put a dab of glue on the bottom of the loop and left them to hand and dry.IMG_20200303_171001.jpg
IMG_20200303_171522.jpgIMG_20200303_172600.jpg

Once they dried I then tied the rope for the deadeye rigging around the top of the loop to close it and added another dab of glue.

Once this dried I then rigged and tightened the dedeyes, and used the hemostats again to grab the threads on the back side of the deadeye to hold them all in place as I lashes and tied off the rope to finish the deadeye and anther dab of glue.

These turned out much better then the lower set, it think. I also rigged the back stay from the fore top to the chain rail.
IMG_20200303_185746.jpgIMG_20200303_185802.jpg
Once these are dry, I'll rig the final top gallant back stays and proceed onto the main mast


Thanks
 
Tonight I rigging in the futtock staves for the topmast shrouds and rigged the top gallant shrouds.IMG_20200305_200933.jpg
Now the three levels of shrouds for the foremast are rigged
IMG_20200305_201020.jpg
I also glued 4 double blocks to the under side of the fore top for the bow sprit yard sheets, and rigged a double block over the fore top saddle to sling the fore mast yard later.
IMG_20200305_200954.jpg
I glued these in instead of rigged them through the top, because at this scale and with all that is going on in that area, unless you're looking with a magnifying glass, you'll not see them.

I then rigged the lifts and sheets for the sprit yard.
IMG_20200305_200834.jpg
I'm going to hold off on the boom yard until I start on all the yards, once the masts are all rigged with the standing rigging.

Thanks
Brian
 
Wow - Looking very good - especially having in mind, that it is only scale 1:200 :cool:
 
Thanks Uwe, much appreciated. I've been staring at the rigging plans I found online, which are drawn for a 1:72 scale model of the Victory,and trying to decide how much of the detail I can incorporate at 1:200. I think I have come to a happy medium, at least for me. My plan going forward once I start on the yards and running rigging is to only model the yard control rigging, the lifts, halyards and braces while leaving most if not all the sail control lines like clue, leach, bunt and sheets out. There's just no room for them all at this scale and with the limits of what materials are available.

Thanks again for the kind words and support, very much appreciated

Brian
 
I finished the last top Gallant back stays for the foremast,
IMG_20200309_191132.jpgIMG_20200309_191152.jpg
IMG_20200309_191446.jpg

I then stepped the main mast, using some temp line and the hemostats to hold the mast back in the hole and in the correct position.IMG_20200309_191343.jpg

Once the glue dried I removed the clamps and temp line

I decided to try a different idea to keep the deadeyes even, and inserted 2 Staples into a deadeye and bent the leg over to secure it in the deadeye.
IMG_20200309_192707.jpgIMG_20200309_192827.jpg

I then rigged the shroud lines through the main top same as the fore, and was able to carefully loop the line around the deadeye, tie a simple knot and secure with a drop of glue.


I then carefully clipped the Staples to remove them and rigged the deadeyes on both sides as normal.
IMG_20200309_193430.jpgIMG_20200309_201440.jpg
Both deadeyes came out very even in length, and look good.

Next I used the last length of heavy line I bought so far to rig the main fore stay, locking the main mast in position. I need to place another order for more line in all sizes. I went through the 10 ft spool I got from Model Expo much faster than I expected .
IMG_20200309_203259.jpgIMG_20200309_203306.jpg

Time I think to start shaping the yards while I order more line.

Thanks
Brian
 

Attachments

  • IMG_20200309_191152.jpg
    IMG_20200309_191152.jpg
    322.7 KB · Views: 50
  • IMG_20200309_191446.jpg
    IMG_20200309_191446.jpg
    232.7 KB · Views: 53
  • IMG_20200309_191132.jpg
    IMG_20200309_191132.jpg
    281.6 KB · Views: 50
Last edited:
Back
Top