I continued with the deck and gratings and amunition racks. I am not going to glue any of this into place at the minute just see how it looks.
The companion way stairs are not correct they should face opposite directions. Not enough treads seems to make them look narrower than they should.
The canon balls are from a shot gun cartridge,View attachment 222982View attachment 222983 probably scale wise too large but looks ok.
-

Win a Free Custom Engraved Brass Coin!!!
As a way to introduce our brass coins to the community, we will raffle off a free coin during the month of August. Follow link ABOVE for instructions for entering.
-

PRE-ORDER SHIPS IN SCALE TODAY!
The beloved Ships in Scale Magazine is back and charting a new course for 2026!
Discover new skills, new techniques, and new inspirations in every issue.
NOTE THAT OUR FIRST ISSUE WILL BE JAN/FEB 2026
You are using an out of date browser. It may not display this or other websites correctly.
You should upgrade or use an alternative browser.
You should upgrade or use an alternative browser.
Hms Victory - Constructo by Pale rider
- Thread starter Pale rider
- Start date
- Watchers 9
-
- Tags
- constructo victory
You say in your opening comments you have never built a model ship before. It is obvious buy the high quality you show in your posts that you have had a fair amount of experience working with wood and have the necessary equipment to do it well. As someone who has built furniture in the past as a past time I appreciate your level of expertise. Nice work. And yes, most boat kits I have worked on are lacking good instructions and are often incomplete so you have to "wing it" sometimes. I am working on an HMS Bounty by Amati and it is driving me insane. The original instruction sheets/diagrams are in Italian and incomplete. There is an english translation booklet but jumping back and forth is a pain and it just translates the complete Italian version. Two questions for you - First, your cannon ball holders are neatly done, how did you make them so well spaced? And secondly you glue joints are very neat. No sign of excessive glue around the edges of your work. What glues are you using? I have been using both CA and carpenters glue but find some always seems to show after it sets. I have tried to gently use a damp cloth/sponge tip to remove excess carpenters glue but the CA is a little more difficult as if you are holding a piece in place it is often difficult to clean the excess away (I need a third hand!). Maybe just less CA! Again, thanks for a great post. Bill
- Joined
- Mar 16, 2021
- Messages
- 25
- Points
- 48

Hi Bill, How you doing. Thank you for your kind comments I will try to answer you questions. I have had many occupations in the past, from working on aircraft, metal work, building work, I made a 70ft narrow boat from scratch in steel, which I lived on for 10 years. As I said this is my first model and getting used to the small size of everything is a skill I am working on. I have a wood turning lathe on which I enjoy making bowls. I have a metal work lathe and a milling machine, planer for wood. All are too big for models. I have a dremel drill and stand which I used for the amunition racks. I set up a stop clamped to the base of the dremel stand to ensure that the cutter would always be in the centre line of the wood used for the rack and made a mark on the stop/guide at 3mm from the cutter which is the distance from centre to centre of the holes. I used a ball burr that came with the dremel for the holes. I used a much longer piece of wood than was require. I made the first cut, with the depth stop set, and the wood up against the guide then moved this hole the the 3mm mark and made another cut. I continued this for about 40 holes then cut the wood to the size I required. Then rounded the ends. As for the glue, my experiance with CA and wood is that CA soaks into the wood and sort of stains it and is very difficut to sand out. I have only used carpenters pva glue by Ceys on the model. It is fast drying, only 5 minutes. It squeezes out everywhere, but after about 10 minutes it is still soft but not sticky. I then cut/scrape it off with a craft knife. I don't sponge it because that seems to thin the glue down and push it into the grain. This is obviously not a problem if you are painting your model, as I am, but an issue if you are varnishing.
Thanks for your response. Even though I have a drill press to use I made my cannon ball holders by marking out the distancing in pencil dots the used by small bit hand drill set to drill holes (rather than depressions). When the cannon balls were glued in place they look OK except in using the hand drill and bits I could not get the holes exactly distanced apart. They are "close enough" but I was annoyed they were not exact. However, as with many build shortfalls only I will be aware of them!Hi Bill, How you doing. Thank you for your kind comments I will try to answer you questions. I have had many occupations in the past, from working on aircraft, metal work, building work, I made a 70ft narrow boat from scratch in steel, which I lived on for 10 years. As I said this is my first model and getting used to the small size of everything is a skill I am working on. I have a wood turning lathe on which I enjoy making bowls. I have a metal work lathe and a milling machine, planer for wood. All are too big for models. I have a dremel drill and stand which I used for the amunition racks. I set up a stop clamped to the base of the dremel stand to ensure that the cutter would always be in the centre line of the wood used for the rack and made a mark on the stop/guide at 3mm from the cutter which is the distance from centre to centre of the holes. I used a ball burr that came with the dremel for the holes. I used a much longer piece of wood than was require. I made the first cut, with the depth stop set, and the wood up against the guide then moved this hole the the 3mm mark and made another cut. I continued this for about 40 holes then cut the wood to the size I required. Then rounded the ends. As for the glue, my experiance with CA and wood is that CA soaks into the wood and sort of stains it and is very difficut to sand out. I have only used carpenters pva glue by Ceys on the model. It is fast drying, only 5 minutes. It squeezes out everywhere, but after about 10 minutes it is still soft but not sticky. I then cut/scrape it off with a craft knife. I don't sponge it because that seems to thin the glue down and push it into the grain. This is obviously not a problem if you are painting your model, as I am, but an issue if you are varnishing.
- Joined
- Mar 6, 2021
- Messages
- 3
- Points
- 11
Bonjour , je trouve que pour une première maquette c'est un très bon début ,bravo, continuais comme ça et va être une très belle maquette , bon courage et bonne continuation .
- Joined
- Mar 16, 2021
- Messages
- 25
- Points
- 48

Bonjour Thomas, Merci pour vos gentils commentaires
- Joined
- Mar 16, 2021
- Messages
- 25
- Points
- 48

I alos tried this method but found the the chisel point on the drill bit cause it to wander off position, also possible made worse by the grain of the wood.Thanks for your response. Even though I have a drill press to use I made my cannon ball holders by marking out the distancing in pencil dots the used by small bit hand drill set to drill holes (rather than depressions). When the cannon balls were glued in place they look OK except in using the hand drill and bits I could not get the holes exactly distanced apart. They are "close enough" but I was annoyed they were not exact. However, as with many build shortfalls only I will be aware of them!
- Joined
- Mar 16, 2021
- Messages
- 25
- Points
- 48

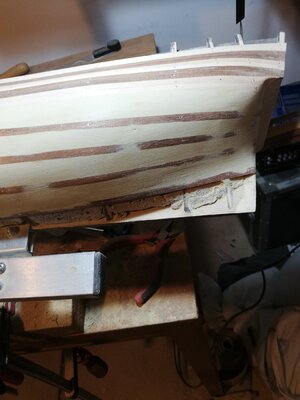
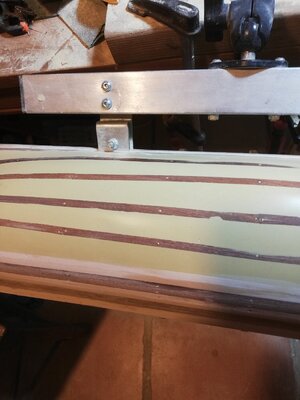
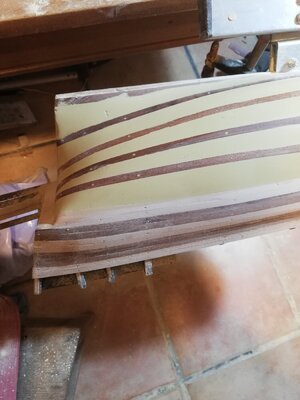
I have completed the planking of the hull to below the gun rails on one side and counting up the amount of planks needed for the rest of both side and all the other areas that are going to need this planking I think I will be short by at least 15 planks. Dilemma, buy more planking or get around it in some way. I have decided to fill in between the frames with expanding foam, put a few planks on top of this at intervals to use as guides then fill in between these planks with some sort of fillng medium, possible car body filler. I intend to paint and copper tile the hull so I don't see the need follow the drawings as planned and I can save the wooden planks for somewhere else. This is probable heresy to the wooden ship building community and I risk being kicked off the forum and it could go horribly wrong, here we go.
Last edited:
- Joined
- Mar 16, 2021
- Messages
- 102
- Points
- 78

Hola, lleva un avance muy bueno te recomiendo que las tracas del forro las adelgaces hacia la proa para que no se deformen, saludos.
- Joined
- Mar 16, 2021
- Messages
- 25
- Points
- 48

Hola gracias por el consejo, haré lo que sea necesarioHola, lleva un avance muy bueno te recomiendo que las tracas del forro las adelgaces hacia la proa para que no se deformen, saludos.
- Joined
- Mar 16, 2021
- Messages
- 25
- Points
- 48

HI everyone, I filled between the frames with spray foam that is used for holding roof tiles in place, without the roof tiles! I then fitted 5 planks on each side then filled between these with semi flexable car body filler, then spent quite some hours sanding, then filling then sanding, then....... ad boredom.

Bit at a time it started to look like the hull of a ship, not finished yet but getting there. I think this just might work.


Bit at a time it started to look like the hull of a ship, not finished yet but getting there. I think this just might work.


Thats a fine technique for getting the hull into the right shape. Its the second planking that matters. 
- Joined
- Mar 16, 2021
- Messages
- 25
- Points
- 48

Hi Brian, thanks for your comment. I don't have the planks for a second layer. The kit only supplies one layer. I am going to copper tile below the water line and paint above the water line.


