HMS Victory, Inside out

Ja, jij ook zo te zien. Word drukker hier. :)

Yes, I can see U2. Still more join here. :)
 
Update 9
The next deck to build is the middle gundeck. (Picture from McGowan)

09-1-McGowan.jpg
This is what it looks like.
From right to left:
. Bowsprit and foremast
. Brodie stove
. Pantry
. Staircase up and down
. Top of fore capstan
. Staircase up and down
. Mainmast
. Staircase
. Top of main capstan
. Staircase
. Mizzenmast
. Wardroom
. Head of rudder
On this deck I want to show the daily life on board. On one side “dinertime” and on the other side “nighttime”

09-2-Middledek.jpg

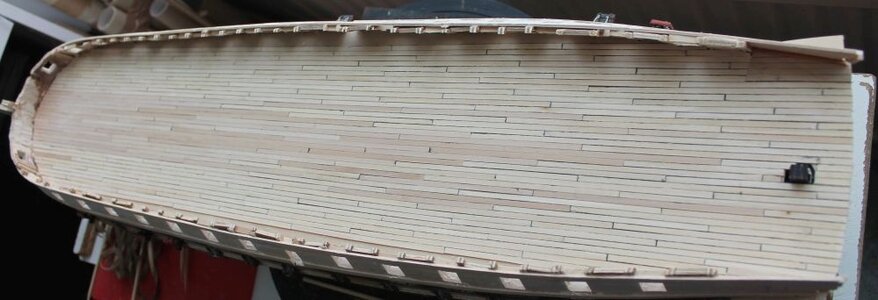
This is my starting point : the empty deck with on the right the top of te rudder.

09-3-Boegspriet.jpg
First I made the construction in the bow with the bowsprit. Later I put some details on the shelves. And the case for som chickens on the left.

09-4-Kippenhok.jpg
Left: The chickens on the victory, right on the model.

Then one of the details should be a model of the Brodie-stove.

09-5-Vic-Brodie.jpg

It should look like the one on the Victory itself. The dimensions of the stove on the model are about 30x30 mm and 25 mm high.
I made it from 1mm plywood.
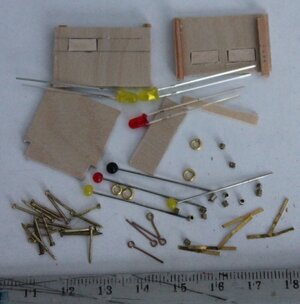
09-6-BrodieOnderdelen.jpg

Here you see most of the parts i used.

09-7-BrodiePanelen.jpg
Some stages of the build

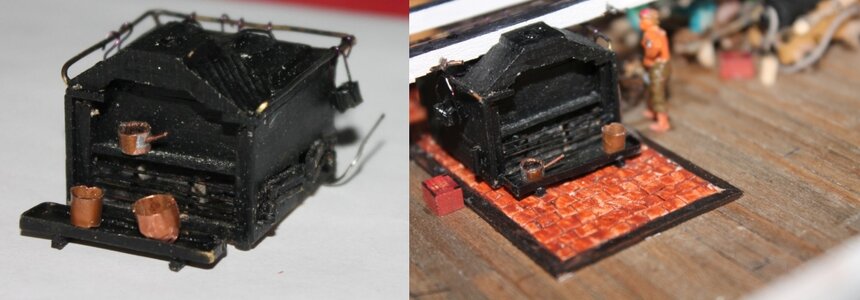
09-8-BrodieKlaar.jpg

and the finished stove. Right on a stone floor on the model.
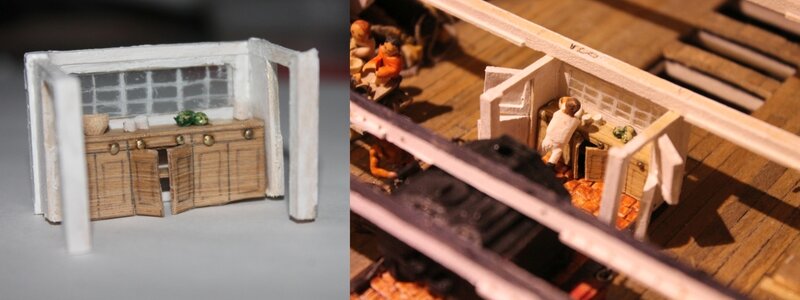
Behind the stove is a small pantry.

09-9-VicPantry.jpg
Above seen from behind and below seen inside. The stove is on the rightsside,
09-10-ModelPantry.jpg

And this is the pantry on the model.

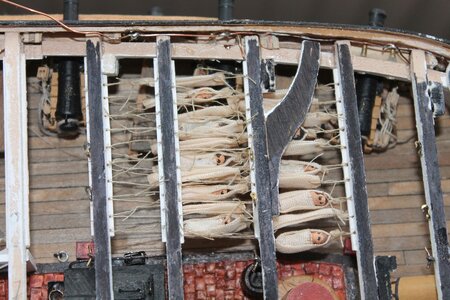
For nighttime I have to make a 100 hammocks.
09-11-Hangmat.jpg

On the Victory there are two divisions of the seamen in larboard and starboard. When larboard is on duty the starboardmen are free to sleep. And otherwise. The Watches are 4 hours long. You can sleep from 20:00 until 24:00 and from 04:00 until 08:00. The next day you only can sleep from 24:00 until 04:00.
You can hang your hammock on the deckbeams. There is room for a hammock on every 45cm. But hammocks are hung alternatively for a larboardman and a starboardman. This means that between two men in a hammock there is always an empty hammock, giving some more space.


09-12-20Hangmatten.jpg

The first two rows of hammocks are hanging above the cannons. Clearly visible is the empty hammock between two men.
Below also the stone floor and the Brodiestove are visible.
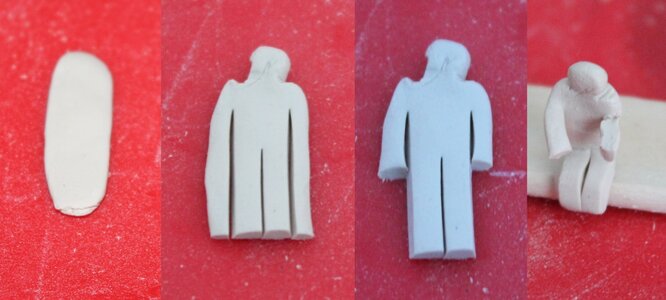
For lunchtime I need a 100 men sitting on the tables.
I made them from FIMO-clay.
09-13-EtersProductie.jpg
4 stages in producing sitting men.


09-14-Mess.jpg
After producing a lot of them and painting, you see here a mess of 8 men sitting on a table. Between the cannons.


09-15-5Messes.jpg
On lunchtime there are a lot of them eating.

09-16-TafelsENHangmatten.jpg

Here are some used details. Hammocks, tables with square wooden dinerplates and some bowls.

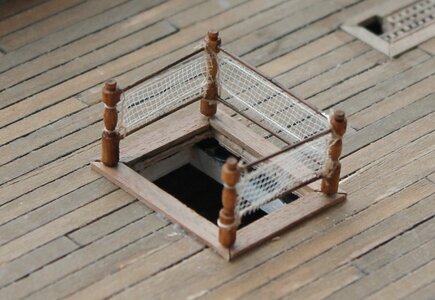
The next detail is a staircase.

09-17-Trapnet.jpg
First I made the netting around the stair.

09-18-LangsTrapgat.jpg

Here you see the stairs with the main capstanhead.

To be contined.
 
Last edited:
Update 10
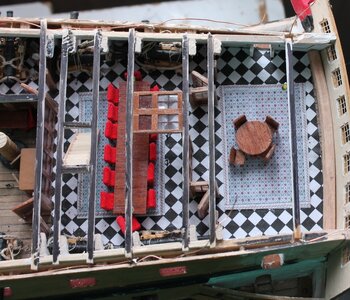
On the final part of the middledeck the wardroom is situated.
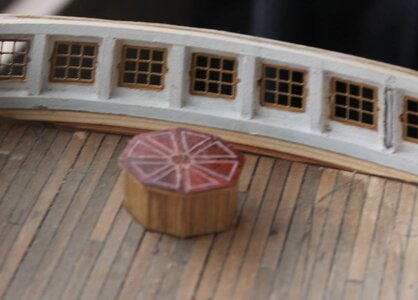
There is a cover over the rudderhead in the form of a table.
10-1-Wardroom.jpg


The floor is covered with black and white squares, diagonal laid. I printed that pattern on a printer, but diagonal straight lines are difficult to print for a printer. So I printed them with vertical and horizontal lines

10-2-TegelsWardroom.jpg

The upper part is diagonal printed the lower part horizontal.

Then I glued that on the deck with some battens to indicate the different rooms.

10-3-VloerWardroom.jpg

For the wardroom I made a table and som chairs.

10-4-MetMeubilair.jpg

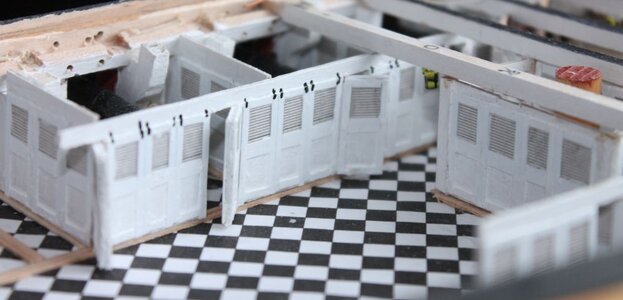
The dividers of the rooms I made from plywood and Stripstyrene

10-5-WardroomWanden.jpg

And placed in the room.

10-6-Wardroom.jpg

The entrance to the wardroom is with some round double doors. Here seen on the victory.

10-7-VicWardroomentry.jpg

And on my model. The space around the mizzenmast is a little pantry for the officers.

10-8-Modelwardroomentry.jpg

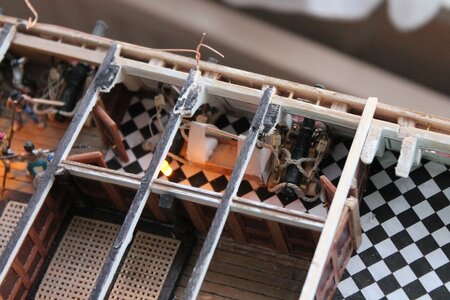
Another view on the panels separating the cabins. In battle stituation the panels can be lifted to the ceiling by hinges on top of them.

10-9-Wardroomschotten.jpg

And this is the final situation.

10-10-WardrooomBoven.jpg

There are seven cabins for one or two officers. The first lieutenant has the room top right, with an entrance to the starboard side gallery for his own. The larboard side gallery is for the other 10 officers of lower rank and can be reached from the wardroom by a small corridor.
10-11-GallerijVanBinnen.jpg


To be contined.
 
Last edited:
Update 11
On the final part of the middledeck the wardroom is situated.
There is a cover over the rudderhead in the form of a table. Visitors of the Victory are not allowed to enter this room, because it is still used by the Commander of the Marine base of Porthmouth.

20210510113305-d3f185f0.jpg


The floor is covered with black and white squares, diagonal laid. I printed that pattern on a printer, but diagonal straight lines are difficult to print for a printer. So I printed them with vertical and horizontal lines

20210510114411-c1ead134.jpg


The upper part is diagonal printed the lower part horizontal.

Then I glued thad on the deck with some battens to indicate the different rooms.

20210510115059-770440c0.jpg


For the wardroom I made a table and som chairs.

20210510115421-40e2bc0a.jpg


The dividers of the rooms I made from plywood and Stripstyrene

20210510115905-c5689ab9.jpg


And placed in the room.

20210510120327-aacc2720.jpg


The entrance to the wardroom is with some round double doors. Here seen on the victory.

20210510115902-83b8ece8.jpg


And on my model. The space around the mizzenmast is a little pantry for the officers.

20210510120644-7621140e.jpg


Another view on the panels separating the cabins. In battle stituation the panels can be lifted to the ceiling by hinges on top of them.

20210510130647-bbd61735.jpg


And this is the final situation.

20210510132656-4fa8381c.jpg


There are seven cabins for one or two officers. The first lieutenant has the room top right, with an entrance to the starboard side gallery for his own. The larboard side gallery is for the other 10 officers of lower rank and can be reached from the wardroom by a small corridor.

i.php


To be contined.
Nice detailing and log entries with your photos along the way. Rich
 
Update 11
It is rather some time ago since my last post.
I have to move my pictures from my Flickr account to my personal server. I don’t want to use my Flickr anymore and the pictures of this update were still there. So I have to move them first before writing this update, and therefore also update my buildlog on the Dutch forum with the new location. That takes some time.
But now I can continue to show you the build of the upper gundeck.
On this deck I want to show you a fighting situation. More or less. in peace time, on this deck is also the sick-bay. In fighting time it is moved to lower decks, but I leaved it on this deck.
Also the admiral rooms are still here and are not cleared for the cannons.


11-1-Bouwplan.jpgThe structures on the deck are as shown in this picture. (McGowan)
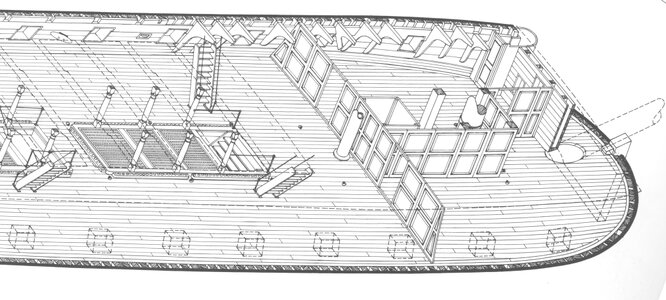
11-2-McGowanVoordek.jpg

Another picture shows a separate part for the sick-bay. I create the last one.

11-3-Luizenplecht.jpg

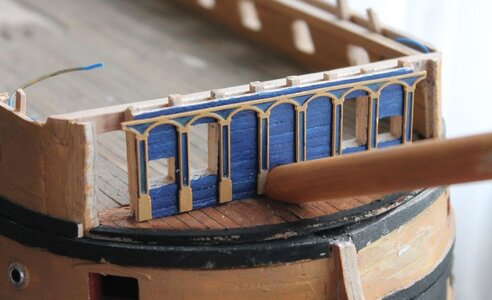
First I built the bulkhead at the front. The position of the bowsprit is the actual situation on the Victory.

11-4-Upperfront.jpg

On the inside you see at far right the electricity connection. Then the entry-door to the roundhouse. This one is specifically for the sick-bow.

11-5-Roundhouse.jpg
The roundhouse entry and seen from above.

11-6-Ziekenboeg.jpg
The final situation.

The five beds are hung over the cannon. The whole sick-bay is separated from the rest of the deck by some canvas. The left roundhouse is accessable for other officers. In the middle before the fore-mast there is a corner for the “doctor”.

11-7-Vic-Ziekenboeg.jpg
The real corner on the Victory. The staircase, left, is placed for the tourists and not original.

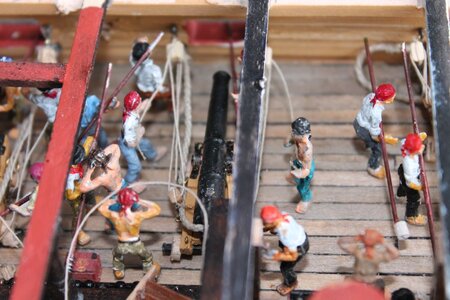
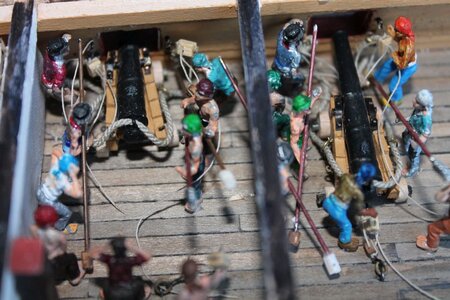
Then I started with the fighting situation. I had a lot of figurines ordered during the build of the DeAgostini Victory, to use them here. In a real situation the cannons are never fired all at once, and on the model they are pictured in 10 situations in order of the procedure of firing a cannon.

11-8-Situatie-1.jpg

The first cannon, on top, is just fired and the second is rolled back. And so on. Clearing, loading, rolling back, etc.

It is difficult to clean the cannon after a shot with the long rods with a spunge with water and a scraper. There is not enough room to put the rod into the cannon. You have to put the end of the rod out of the gunport before you can insert it into the cannon. When the ship is entered, the gunport is blocked by the other ship and you cannot put your rod far enough out. Then also you cannot fire anymore.

11-9a-Lichtkoepels.jpg

Just after the fore mast there is on the moment a lightbox on the deck to give light in the pantry below. This is not shown on the deckplan of McGowan. I made one and placed it here.


11-10-Situatie-3.jpg

A few cannons more are installed.

11-11-Situatie-4.jpg

And one more.

11-12-Officieren.jpg

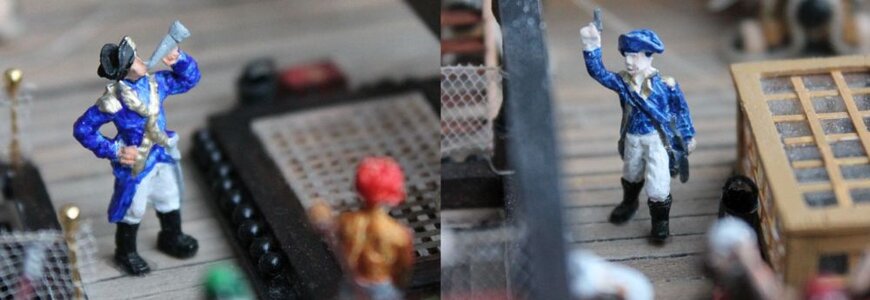
Also some officers, giving signals, are present.

13-Situatie-5.jpg
11-13-Situatie-5.jpg

Here they are reaching the admirals rooms, where fighting stops.

11-14-Slaapkamer.jpg
The first room after the fighting is the admirals sleeping room. There are two cannons installed and his bed is hung over them.


11-15-Eetkamer.jpg
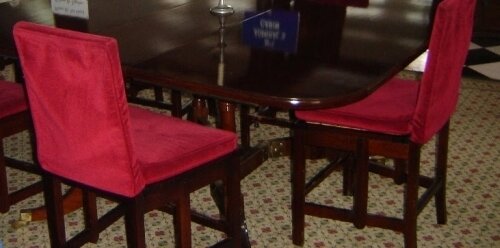
The next room is the diningroom. Here two cannons are stored aside. The carpet is printed on paper from a picture I made of the carpet in the diningroom of the Victory. With paint I reproduced the print.

Then I have to make a number of chairs for the diningroom.

11-16-Stoeleproductie.jpg

This picture shows how I made them, resulting in...

11-17-StoelenENTafel.jpg

And do they, and the carpet, look correct?

11-18-VicStoelen.jpg

After placing them it looks like …..

11-19-DiningEnDayroom.jpg

The admiral rooms.

Finally the total deck looks like:

11-20-UpperFinal.jpg


To be continued.

11-9-Situatie-2.jpg
 
Last edited:
It is rather some time ago since my last post.
I have to move my pictures from my Flickr account to my personal server. I don’t want to use my Flickr anymore and the pictures of this update were still there. So I have to move them first before writing this update, and therefore also update my buildlog on the Dutch forum with the new location. That takes some time.
But now I can continue to show you the build of the upper gundeck.
On this deck I want to show you a fighting situation. More or less. in peace time, on this deck is also the sick-bay. In fighting time it is moved to lower decks, but I leaved it on this deck.
Also the admiral rooms are still here and are not cleared for the cannons.

i.php


The structures on the deck are as shown in this picture. (McGowan)

20210604133747-16d2cf4f.jpg


Another picture shows a separate part for the sick-bay. I create the last one.

20210529144833-ccdb04e2.jpg


First I built the bulkhead at the front. The position of the bowsprit is the actual situation on the Victory.

20210529145512-eb756e48.jpg


On the inside you see at far right the electricity connection. Then the entry-door to the roundhouse. This one is specifically for the sick-bow.

20210604133811-db77bfb9-la.jpg


The roundhouse entry and seen from above.

20210529161019-4e5b7c05.jpg


The final situation.
The five beds are hung over the cannon. The whole sick-bay is separated from the rest of the deck by some canvas. The left roundhouse is accessable for other officers. In the middle before the fore-mast there is a corner for the “doctor”.

20210604133816-37439ebd.jpg


The real corner on the Victory. The staircase, left, is placed for the tourists and not original.
Then I started with the fighting situation. I had a lot of figurines ordered during the build of the DeAgostini Victory, to use them here. In a real situation the cannons are never fired all at once, and on the model they are pictured in 10 situations in order of the procedure of firing a connon.

20210529161658-dcff48eb.jpg


The first cannon, on top, is just fired and the second is rolled back. And so on. Clearing, loading, rolling back, etc.
It is difficult to clean the cannon after a shot with the long rods with a spunge with water and a scraper. There is not enough room to put the rod into the cannon. You have to put the end of the rod out of the gunport before you can insert it into the cannon. When the ship is entered, the gunport is blocked by the other ship and you cannot put your rod far enough out. Then also you cannot fire anymore.

20210529161655-4ffa80b7.jpg


i.php


Just after the fore mast there is on the moment a lightbox on the deck to give light in the pantry below. This is not shown on the deckplan of McGowan. I made one and placed it here.

20210529162649-1864b516.jpg


A few cannons more are installed.

20210529162906-0103cb91.jpg


And one more.

20210529163528-4cfd9691.jpg


Also some officers, giving signals, are present.

20210529163518-86ffde02.jpg


Here they are reaching the admirals rooms, where fighting stops.

20210529163620-eb260db4.jpg


The first room after the fighting is the admirals sleeping room. There are two cannons installed and his bed is hung over them.

20210529163732-bd77fb9d.jpg


The next room is the diningroom. Here two cannons are stored aside. The carpet is printed on paper from a picture I made of the carpet in the diningroom of the Victory. With paint I reproduced the print.

Then I have to make a number of chairs for the diningroom.

20210604133840-042d53bb.jpg


This picture shows how I made them, resulting in...

20210529163941-f2ef97d6-la.jpg


And do they, and the carpet, look correct?

20210604133834-fde877bd.jpg


After placing them it looks like …..

20210529163817-cbfa05c4-la.jpg


The admiral rooms.

Finally the total deck looks like:

20210604141436-ec6060ca.jpg


To be continued.
Outstanding detailing on your part everywhere that I look. Rich (PT-2)
 
Update 12
The next deck to show you is the half deck. Here a picture from McGowan, how it should look like.
12-12-01-193-5-HalfdekMcGowan.jpg

It is what you also see when building from a kit.

The difference now is that it is only this deck with nothing below it.
I started again with a plain deck with a great hole in it. That makes it very weak. Therefore I made it stronger by gluing two metal strips below the deck.
12-12-02-193-4-Vanonder.jpg
Here seen from below.


12-12-03-195-2-Kuilbalken.jpg

Here the deck is planked already, and you see the deckbeams over the open space above the uppergundeck.

I have split these deckbeams in two. The lower parts form the deckbeams of the uppergundeck and the upper parts form the deckbeams on this deck. That is because I need them on both decks.

On the foredeck there is the belfree. Left as on the Victory en on the right how I made it for my model.

12-12-04-196-3-Bel.jpg

Further there are some gratings.

12-12-05-197-1-RoostersForedeck.jpg

And on the front the railing.
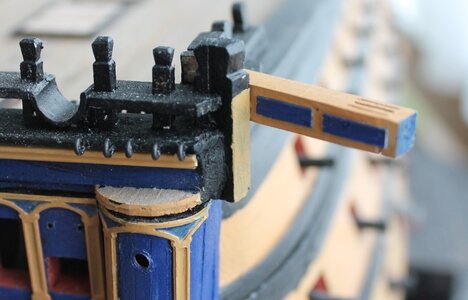
12-12-06-200-1-Front.jpg


And the catbeams to hoist the anchors
12-12-07-201-1-KraanbalkenInAanbouw.jpg


And finished…..
12-12-08-201-2-Kraanbalk.jpg


The division between this deck and the lowergundeck is under the roof of the roundhouse. So the inner of the roundhouse is visible when the deck is removed.

Now it looks like as follows:
12-12-09-202-Overzicht.jpg


On the other side of the open space before the mainmast is also a railing with hammock racks.
12-12-10-204-1-HangmattenrekOpReling.jpg


Further on the quarterdeck I made details on the sideboards.
12-12-11-204-3-RelingMeubilair.jpg


And the netting around the main staires.
12-12-12-205-3-OpDek.jpg


To be continued.
 
Last edited:
Update 12
The next deck to show you is the half deck. Here a picture from McGowan, how it should look like.

12-01-193-5-HalfdekMcGowan.jpg


It is what you also see when building from a kit.

The difference now is that it is only this deck with nothing below it.
I started again with a plain deck with a great hole in it. That makes it very weak. Therefore I made it stronger by gluing two metal strips below the deck.

12-02-193-4-Vanonder.jpg

Here seen from below.

12-03-195-2-Kuilbalken.jpg

Here the deck is planked already, and you see the deckbeams over the open space above the uppergundeck.

I have split these deckbeams in two. The lower parts form the deckbeams of the uppergundeck and the upper parts form the deckbeams on this deck. That is because I need them on both decks.

On the foredeck there is the belfree. Left as on the Victory en on the right how I made it for my model.
12-04-196-3-Bel.jpg


Further there are some gratings.
12-05-197-1-RoostersForedeck.jpg


And on the front the railing.
12-06-200-1-Front.jpg


And the catbeams to hoist the anchors
12-07-201-1-KraanbalkenInAanbouw.jpg


And finished…..
12-08-201-2-Kraanbalk.jpg


The division between this deck and the lowergundeck is under the roof of the roundhouse. So the inner of the roundhouse is visible when the deck is removed.

Now it looks like as follows:
12-09-202-Overzicht.jpg


On the other side of the open space before the mainmast is also a railing with hammock racks.
12-10-204-1-HangmattenrekOpReling.jpg


Further on the quarterdeck I made details on the sideboards.
12-11-204-3-RelingMeubilair.jpg


And the netting around the main staires.
12-12-205-3-OpDek.jpg


To be continued.
Your patient working and skills in execution are remarkable. It is eye candy to watch your progress. Rich (PT-2)
 
Goede morgen Jan,
Stumbled upon your log quite by accident, but boy, I am really impressed by your build; the quality, the detail and the undoubtedly extensive research which went into it, in the preparation of your build. OkayThumbs-Up
Kind regards, Johan (Swart)
 
Goede morgen Jan,
Stumbled upon your log quite by accident, but boy, I am really impressed by your build; the quality, the detail and the undoubtedly extensive research which went into it, in the preparation of your build. OkayThumbs-Up
Kind regards, Johan (Swart)

Hi Johan. Now you know that all these split hulls that we suddenly see, is actually nothing new. BUT ... whereas most kits and build split into two, this build takes it to another dimension. You should have been in Hillegom today to meet Jan Zwart who is organizing the get together there of all Dutch model builders.
 
Hi Johan. Now you know that all these split hulls that we suddenly see, is actually nothing new. BUT ... whereas most kits and build split into two, this build takes it to another dimension. You should have been in Hillegom today to meet Jan Zwart who is organizing the get together there of all Dutch model builders.
Hello Heinrich,

Honestly, those guys, using their saws indiscriminately, scare the living daylight out of me, but the results are stunning!

Yeah, I saw your post on Hillegom today. Unfortunately, the Admiral and I have some other obligations for the day, so I'm not able to go there... Sick
 
Update 11
It is rather some time ago since my last post.
I have to move my pictures from my Flickr account to my personal server. I don’t want to use my Flickr anymore and the pictures of this update were still there. So I have to move them first before writing this update, and therefore also update my buildlog on the Dutch forum with the new location. That takes some time.
But now I can continue to show you the build of the upper gundeck.
On this deck I want to show you a fighting situation. More or less. in peace time, on this deck is also the sick-bay. In fighting time it is moved to lower decks, but I leaved it on this deck.
Also the admiral rooms are still here and are not cleared for the cannons.

1-Bouwplan.jpg


The structures on the deck are as shown in this picture. (McGowan)

2-McGowanVoordek.jpg


Another picture shows a separate part for the sick-bay. I create the last one.

3-Luizenplecht.jpg


First I built the bulkhead at the front. The position of the bowsprit is the actual situation on the Victory.

4-Upperfront.jpg


On the inside you see at far right the electricity connection. Then the entry-door to the roundhouse. This one is specifically for the sick-bow.

5-Roundhouse.jpg


The roundhouse entry and seen from above.

6-Ziekenboeg.jpg

The final situation.

The five beds are hung over the cannon. The whole sick-bay is separated from the rest of the deck by some canvas. The left roundhouse is accessable for other officers. In the middle before the fore-mast there is a corner for the “doctor”.

7-Vic-Ziekenboeg.jpg

The real corner on the Victory. The staircase, left, is placed for the tourists and not original.

Then I started with the fighting situation. I had a lot of figurines ordered during the build of the DeAgostini Victory, to use them here. In a real situation the cannons are never fired all at once, and on the model they are pictured in 10 situations in order of the procedure of firing a cannon.

8-Situatie-1.jpg


The first cannon, on top, is just fired and the second is rolled back. And so on. Clearing, loading, rolling back, etc.

It is difficult to clean the cannon after a shot with the long rods with a spunge with water and a scraper. There is not enough room to put the rod into the cannon. You have to put the end of the rod out of the gunport before you can insert it into the cannon. When the ship is entered, the gunport is blocked by the other ship and you cannot put your rod far enough out. Then also you cannot fire anymore.

9-Situatie-2.jpg


9aLichtkoepels.jpg


9a-Lichtkoepels.jpg


Just after the fore mast there is on the moment a lightbox on the deck to give light in the pantry below. This is not shown on the deckplan of McGowan. I made one and placed it here.


10-Situatie-3.jpg


A few cannons more are installed.

11-Situatie-4.jpg


And one more.

12-Officieren.jpg


Also some officers, giving signals, are present.

13-Situatie-5.jpg


Here they are reaching the admirals rooms, where fighting stops.

14-Slaapkamer.jpg


The first room after the fighting is the admirals sleeping room. There are two cannons installed and his bed is hung over them.

15-Eetkamer.jpg


The next room is the diningroom. Here two cannons are stored aside. The carpet is printed on paper from a picture I made of the carpet in the diningroom of the Victory. With paint I reproduced the print.

Then I have to make a number of chairs for the diningroom.

16-Stoeleproductie.jpg


This picture shows how I made them, resulting in...

17-StoelenENTafel.jpg


And do they, and the carpet, look correct?

18-VicStoelen.jpg


After placing them it looks like …..

19-DiningEnDayroom.jpg


The admiral rooms.

Finally the total deck looks like:

20-UpperFinal.jpg


To be continued. . . . sounds like a story but with all of the small details something is likely to come to attention from somewhere. Sadly, all models have their completion, at least in the hands of the builder while the mind continues the voyage. Rich (PT-2)
 
I don't visit this forum very often. Now I see the comments and likes. Thank you all for them.
 
Back
Top