Follow along with the video below to see how to install our site as a web app on your home screen.
Note: This feature may not be available in some browsers.
Win a Free Custom Engraved Brass Coin!!!
As a way to introduce our brass coins to the community, we will raffle off a free coin during the month
of August. Follow link ABOVE for instructions for entering.
Beautiful treenails. The subtlety of your work is beautiful, while the trennels remain perfectly visible at the same time. They add a nice finishing touch to the chocks and bodes well for the future hull trennels. At 1:48 it is without doubt the way to go.
With the completion of the fairing, I turned my attention to the addition of trenails at the locations of the frame chocks. For anyone interested there is a nice discussion about trenails (treenails, trunnels) on Dean's build log. That conversation runs for several pages:
Nice save..Over here there's a saying about breasts and model trains; meant for kids but grown-up men are playing with them. Now this extends to Lego as well. I told my wife yesterday… the difference between a child building a model and a grown man building one, is the level of expertise! ROTF
shipsofscale.com
Issues raised include wood species, material options for the trenails, what is visible at a normal viewing distance (especially inside of a case), time commitment vs ROI, even the simple fact that once one begins there is really no turning back, etc. But at the crosshairs of that discussion was the issue of scale...
Well, for this Kingfisher build, the decision to add trenails was made long ago. Factors: 1. this is a POF build, and I really wanted to showcase the construction of the ship to the extent possible, 2. at 1:48 I believe trenails would be visible when examined at close range, 3. my earlier experiments with making trenails got me down to 0.56-0.58 mm (scaled to about 1.15 inches or 30 mm) which meant I could make 'true-to-size' trenails, 4. and finally, I like the look!
First job was to drill some holes. This was easier said than done as there is very little space inside the hull (that's where I began just in case this all went tragically wrong). I first tried to use a pin-vise type manual drill but that didn't work for me: the holes were too irregular - and I kept breaking the hardened metal drill bits. I ended up using a small, powered drill and never broke another drill bit:
I learned that I needed to insert the trenails using my fingers and not a tool. The use of tweezers (or orthodontic pliers) tended to 'dent' the trenail and caused it to snap (yes, I broke lots of trenail strips using my fingers as well). Given the difficulty of creating trenails this small you can be confident that I used up every broken scrap I could .
Here is the thickness of my trenail stock compared to a garden variety toothpick:
I am very happy with the size, shape, and uniformity of these trenails. I believe careful drilling, use of a draw plate to create trenail stock, and adequate sanding all contributed to the final appearance.
Next, I'll add the chock trenails to the outside of the hull - but first a short break. My bride and I are headed to Yellowstone / Glacier National Parks for some sightseeing and hiking. See you in a few weeks!
You made the only right decision: treenailing the frames, Paul. And fore the discussion: treenailing can be done at every scale!
It’s all about the size. And also here: Excess will damage.
About the visibility, the start is with the visualization of them in your head.
Whether other members of the SoS can see them also depends on:
-your camera chip and resolution,
-the size of picture compressing the file,
-reducing the size of the file when posting on the site,
-the settings and resolution of the display of the one who is looking at your treenails.
So there is a good chance that you will see them yourself and the other will say ‘to much work for what hardly can bee seen’.
That is too short sighted. It depends on many more factors.
Regard, Peter
With the completion of the fairing, I turned my attention to the addition of trenails at the locations of the frame chocks. For anyone interested there is a nice discussion about trenails (treenails, trunnels) on Dean's build log. That conversation runs for several pages:
Nice save..Over here there's a saying about breasts and model trains; meant for kids but grown-up men are playing with them. Now this extends to Lego as well. I told my wife yesterday… the difference between a child building a model and a grown man building one, is the level of expertise! ROTF
I decision is made - treenailing or bolting the frame elements - once started there is no way back
and at the end it will be some thousand of nails
and when you read my post, it will be maybe double you have in moment in mind
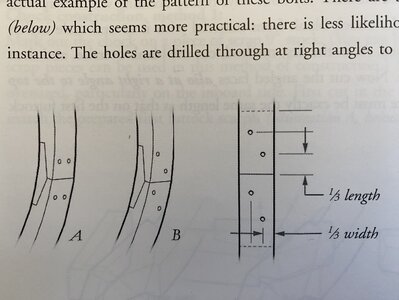
I do not know if the diagonal pattern of two times two nails per chock is enough - I thought, that there has to be two times four nails per chock. But this is maybe not the general rule, but was shown by Goodwin in some of his sketches of the Granado (1742)
Maybe you take a look at my log of the Granado section with excerpts of the Goodwin book
Hello, Mon Amie. It does look not as much complicated as challenging projects assembling frames. You have to 100% understand what goes to where. So, in recap...let see if I get it. A single paper template provides a layout for both components of the given frame 'A' and 'B', correct? Where you...
shipsofscale.com
BTW: very good execution of the nails - very good work
Beautiful treenails. The subtlety of your work is beautiful, while the trennels remain perfectly visible at the same time. They add a nice finishing touch to the chocks and bodes well for the future hull trennels. At 1:48 it is without doubt the way to go.
Thank you very much, Heinrich. Yes, the plan is to add trenails to the hull planking - but I'll do some tests first just to make sure this is a good decision. On the Vasa I was making a real mess of the hull until I figured out what I was doing...
You made the only right decision: treenailing the frames, Paul. And fore the discussion: treenailing can be done at every scale!
It’s all about the size. And also here: Excess will damage.
About the visibility, the start is with the visualization of them in your head.
Whether other members of the SoS can see them also depends on:
-your camera chip and resolution,
-the size of picture compressing the file,
-reducing the size of the file when posting on the site,
-the settings and resolution of the display of the one who is looking at your treenails.
So there is a good chance that you will see them yourself and the other will say ‘to much work for what hardly can bee seen’.
That is too short sighted. It depends on many more factors.
Regard, Peter
A very well thought out synopsis reflective of your deep experience in model building. I'm pleased with my results so far - though I have had to lean heavily on those who have gone before me.
I decision is made - treenailing or bolting the frame elements - once started there is no way back
and at the end it will be some thousand of nails
and when you read my post, it will be maybe double you have in moment in mind
I do not know if the diagonal pattern of two times two nails per chock is enough - I thought, that there has to be two times four nails per chock. But this is maybe not the general rule, but was shown by Goodwin in some of his sketches of the Granado (1742)
Maybe you take a look at my log of the Granado section with excerpts of the Goodwin book
Hello, Mon Amie. It does look not as much complicated as challenging projects assembling frames. You have to 100% understand what goes to where. So, in recap...let see if I get it. A single paper template provides a layout for both components of the given frame 'A' and 'B', correct? Where you...
shipsofscale.com
BTW: very good execution of the nails - very good work
Thank you so much for raising this question, @Uwek! I have to confess that I gave this very little thought and even less research time. Thank you, also, for the timeliness of your posting as there is still time to make the correction to 8 trenails per chock if necessary.
Thus far I have been relying on David Antscherl to guide this build. Here is an image from page 88 of Volume 1 (Fully Framed Model):
By way of support David mentions that Steele (Elements and Practice) calls for two 7/8" square metal bolts per scarph (thus a total of 4 on the chock). Greg Herbert (the builder of the models David uses in his series) follows that pattern - and since most everyone else building swan class ships follows after Greg, they also show 4 trenails per chock.
The interesting bit here is that Steel calls for square metal bolts (to be individually set on the diagonal) but I have yet to see that in use on a swan class model. Most everyone uses round wooden pegs (4x) (including Greg Herbert) with the exception of Signor Giampy who has used 6 round metal bolts.
Anyway, I am out of my depth in this discussion and am eager to make corrections as needed.
With the completion of the fairing, I turned my attention to the addition of trenails at the locations of the frame chocks. For anyone interested there is a nice discussion about trenails (treenails, trunnels) on Dean's build log. That conversation runs for several pages:
Nice save..Over here there's a saying about breasts and model trains; meant for kids but grown-up men are playing with them. Now this extends to Lego as well. I told my wife yesterday… the difference between a child building a model and a grown man building one, is the level of expertise! ROTF
shipsofscale.com
Issues raised include wood species, material options for the trenails, what is visible at a normal viewing distance (especially inside of a case), time commitment vs ROI, even the simple fact that once one begins there is really no turning back, etc. But at the crosshairs of that discussion was the issue of scale...
Well, for this Kingfisher build, the decision to add trenails was made long ago. Factors: 1. this is a POF build, and I really wanted to showcase the construction of the ship to the extent possible, 2. at 1:48 I believe trenails would be visible when examined at close range, 3. my earlier experiments with making trenails got me down to 0.56-0.58 mm (scaled to about 1.15 inches or 30 mm) which meant I could make 'true-to-size' trenails, 4. and finally, I like the look!
First job was to drill some holes. This was easier said than done as there is very little space inside the hull (that's where I began just in case this all went tragically wrong). I first tried to use a pin-vise type manual drill but that didn't work for me: the holes were too irregular - and I kept breaking the hardened metal drill bits. I ended up using a small, powered drill and never broke another drill bit:
I learned that I needed to insert the trenails using my fingers and not a tool. The use of tweezers (or orthodontic pliers) tended to 'dent' the trenail and caused it to snap (yes, I broke lots of trenail strips using my fingers as well). Given the difficulty of creating trenails this small you can be confident that I used up every broken scrap I could .
Here is the thickness of my trenail stock compared to a garden variety toothpick:
I am very happy with the size, shape, and uniformity of these trenails. I believe careful drilling, use of a draw plate to create trenail stock, and adequate sanding all contributed to the final appearance.
Next, I'll add the chock trenails to the outside of the hull - but first a short break. My bride and I are headed to Yellowstone / Glacier National Parks for some sightseeing and hiking. See you in a few weeks!
Yes, the drawplate from Model Machines (Jim Byrnes). I started with 1x1 mm boxwood. I also drew down black hornbeam but it's sort of waxy/sticky so I stopped at 0.69-0.70 mm. This will be for the black wales.
Thx.
I forgot to order it when ordering my thickness sander, now I have an Alibaba drawplate which doesn t work with wood. I tested the cutting plate methode which seems fine but as I will treenail my complete build maybe still have to order the Byrness one.
Thx.
I forgot to order it when ordering my thickness sander, now I have an Alibaba drawplate which doesn t work with wood. I tested the cutting plate methode which seems fine but as I will treenail my complete build maybe still have to order the Byrness one.
Thank you so much for raising this question, @Uwek! I have to confess that I gave this very little thought and even less research time. Thank you, also, for the timeliness of your posting as there is still time to make the correction to 8 trenails per chock if necessary.
Thus far I have been relying on David Antscherl to guide this build. Here is an image from page 88 of Volume 1 (Fully Framed Model):
By way of support David mentions that Steele (Elements and Practice) calls for two 7/8" square metal bolts per scarph (thus a total of 4 on the chock). Greg Herbert (the builder of the models David uses in his series) follows that pattern - and since most everyone else building swan class ships follows after Greg, they also show 4 trenails per chock.
The interesting bit here is that Steel calls for square metal bolts (to be individually set on the diagonal) but I have yet to see that in use on a swan class model. Most everyone uses round wooden pegs (4x) (including Greg Herbert) with the exception of Signor Giampy who has used 6 round metal bolts.
Anyway, I am out of my depth in this discussion and am eager to make corrections as needed.
As for the correctness of what David and Greg do, you are with excellent company, there. Those two will never steer you wrong, and if need be - they would always cop to an educated guess.
With the completion of the fairing, I turned my attention to the addition of trenails at the locations of the frame chocks. For anyone interested there is a nice discussion about trenails (treenails, trunnels) on Dean's build log. That conversation runs for several pages:
Nice save..Over here there's a saying about breasts and model trains; meant for kids but grown-up men are playing with them. Now this extends to Lego as well. I told my wife yesterday… the difference between a child building a model and a grown man building one, is the level of expertise! ROTF
shipsofscale.com
Issues raised include wood species, material options for the trenails, what is visible at a normal viewing distance (especially inside of a case), time commitment vs ROI, even the simple fact that once one begins there is really no turning back, etc. But at the crosshairs of that discussion was the issue of scale...
Well, for this Kingfisher build, the decision to add trenails was made long ago. Factors: 1. this is a POF build, and I really wanted to showcase the construction of the ship to the extent possible, 2. at 1:48 I believe trenails would be visible when examined at close range, 3. my earlier experiments with making trenails got me down to 0.56-0.58 mm (scaled to about 1.15 inches or 30 mm) which meant I could make 'true-to-size' trenails, 4. and finally, I like the look!
First job was to drill some holes. This was easier said than done as there is very little space inside the hull (that's where I began just in case this all went tragically wrong). I first tried to use a pin-vise type manual drill but that didn't work for me: the holes were too irregular - and I kept breaking the hardened metal drill bits. I ended up using a small, powered drill and never broke another drill bit:
I learned that I needed to insert the trenails using my fingers and not a tool. The use of tweezers (or orthodontic pliers) tended to 'dent' the trenail and caused it to snap (yes, I broke lots of trenail strips using my fingers as well). Given the difficulty of creating trenails this small you can be confident that I used up every broken scrap I could .
Here is the thickness of my trenail stock compared to a garden variety toothpick:
I am very happy with the size, shape, and uniformity of these trenails. I believe careful drilling, use of a draw plate to create trenail stock, and adequate sanding all contributed to the final appearance.
Next, I'll add the chock trenails to the outside of the hull - but first a short break. My bride and I are headed to Yellowstone / Glacier National Parks for some sightseeing and hiking. See you in a few weeks!
Good morning Paul. Subtle tree nailing. Boy you like to make work for yourself….making a 1000+ boxwood nails with a draw plate. Going to be fun . After the poly coat they do show up well and your efforts one day, far far away, will be amazing. Enjoy your holiday in the Yellowstone with Lynn. Cheers Grant
Thank you so much for raising this question, @Uwek! I have to confess that I gave this very little thought and even less research time. Thank you, also, for the timeliness of your posting as there is still time to make the correction to 8 trenails per chock if necessary.
Thus far I have been relying on David Antscherl to guide this build. Here is an image from page 88 of Volume 1 (Fully Framed Model):
By way of support David mentions that Steele (Elements and Practice) calls for two 7/8" square metal bolts per scarph (thus a total of 4 on the chock). Greg Herbert (the builder of the models David uses in his series) follows that pattern - and since most everyone else building swan class ships follows after Greg, they also show 4 trenails per chock.
The interesting bit here is that Steel calls for square metal bolts (to be individually set on the diagonal) but I have yet to see that in use on a swan class model. Most everyone uses round wooden pegs (4x) (including Greg Herbert) with the exception of Signor Giampy who has used 6 round metal bolts.
Anyway, I am out of my depth in this discussion and am eager to make corrections as needed.
Many Thanks for the understanable explanations - good to know, that also the specialists have different solutions
seems there was no real fixed regulations for such a connection - maybe decision by the shipwright in the shipyard .....
Many Thanks
Good morning Paul. Subtle tree nailing. Boy you like to make work for yourself….making a 1000+ boxwood nails with a draw plate. Going to be fun . After the poly coat they do show up well and your efforts one day, far far away, will be amazing. Enjoy your holiday in the Yellowstone with Lynn. Cheers Grant
At the end, although 90% of these nails and bolts are not visible, but the 10% which are visible, are worth the complete work.
These are the small details which are making the difference ........
Maybe on some areas, which definitly be hidden later on by some interioer etc. you can reduce the total number of them
… and the ornery patient still waiting nearby says, “are you going to fix my teeth or what? I’ve been here four hours and you just endlessly sand pieces of wood and make wooden nail things” .
(Joking aside: Beautiful work as always Paul, have a great vacation).
Since I completed planking, I've been wondering about treenails in the unpainted side of my BN. You, my dear friend, opened up that particular can of worms again.
The reason I then opted against adding the treenails were some examples of how I did not want my model to look like. In that respect I don't trust my capabilities; (hand)drilling holes of 0,3mm (22mm real life), when I struggle with 0,5mm...