La Salamandre 1/96 by Miniature Arts [COMPLETED BUILD]

Joined
Feb 3, 2021
Messages
75
Points
143

Hello all
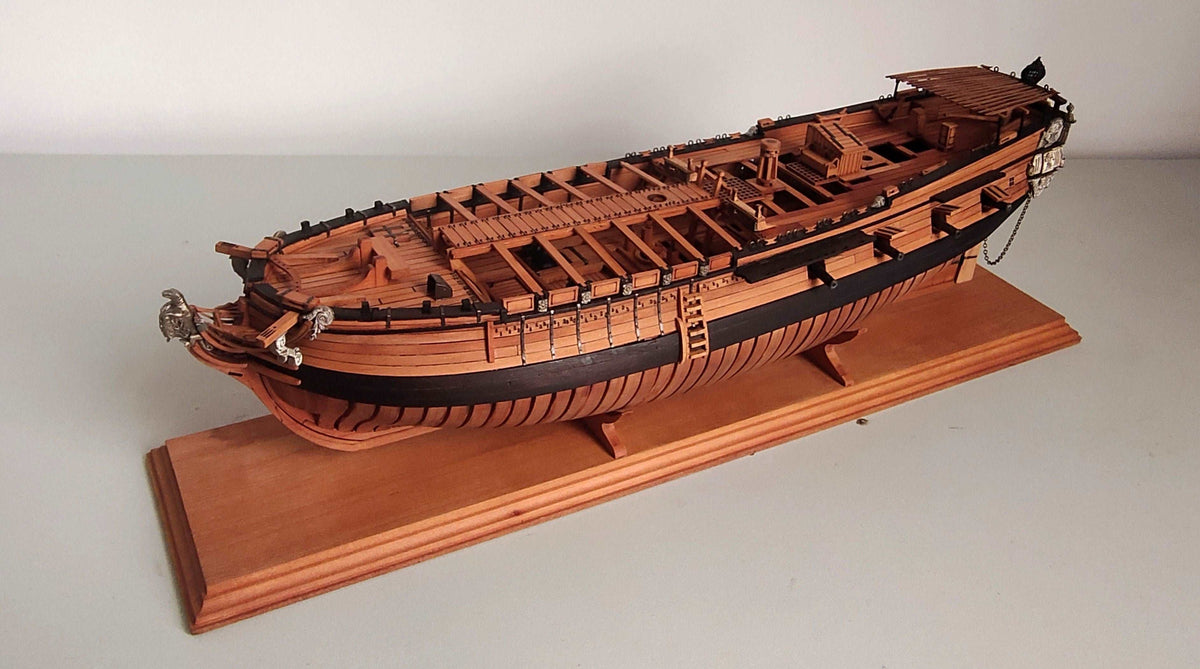
A very attractive model, but a rather difficult kit.

DSC03202.JPG

First of all, I assembled the jig, but the board was bent.

DSC03203.JPG

I was able to fix it without any problems by pasting it on a 1cm thick plate.
DSC03216.JPG

The frame is as easy as sticking two pieces together.
DSC03204.JPG

There are a few parts that are not laser cut perfectly.
It is necessary to cut so that the frame is thin and does not break.
DSC03282.JPG

Frames 1-22 are No 1 in the front and No 2 in the back due to the bevel cut. Frames 23-44 are number 2 in the front and number 1 in the rear.
DSC03207.JPG

I use this router all the time to remove laser cut soot and bevels.
DSC02986.JPG

The frame does not fit in the jig and keel, and it is difficult to adjust the meshing with a file.
DSC03219.JPG
 
Last edited:
I will watch your build as you advance to various stages.

If anyone is interested, a while back I made a review of this kit

 
Hi. Where is this kit sold?
right here, Yuri

 
Thank you. Jimsky
I also saw Jim's review and bought it at that store.
It looks like I'm going to take a vacation this month for a family service trip.

I broke one bone, but the soot removal and beveling of the frame were completed.DSC03213.JPG

It went smoothly except that the thickness of the frame did not match the jig and keel and had to be cut.
DSC03223a.jpg

I glued the frame to the keel while pulling it from side to side with a rubber band.
I glued it to the keel while checking each piece to see if the keelson to be attached on top would fit.DSC03225.JPG
 
Thank you Uwe.
I will refer to everyone's past logs.

I glued from the shiphead to the keel up to the 41nd frame.
DSC03230.JPG

I attached the Transom beam to the keel.
The beam in the middle seems to be the wrong bevel.
DSC03233.JPGView attachment 370043

I glued the rest of the frames from the stern from the 45th frame to the 42nd frame.
DSC03235.JPG

Glue the keelson.
Keelson will never fit unless you dry fit each time you glue one frame.
DSC03236.JPG
 
Last edited:
Thank you Uwe.
I will refer to everyone's past logs.

I glued from the shiphead to the keel up to the 41nd frame.
View attachment 370041

I attached the Transom beam to the keel.
The beam in the middle seems to be the wrong bevel.
View attachment 370042View attachment 370043

I glued the rest of the frames from the stern from the 45th frame to the 42nd frame.
View attachment 370044

Glue the keelson.
Keelson will never fit unless you dry fit each time you glue one frame.
View attachment 370045
Muchi, very good work, congratulations !
 
Hello
Thanks all.
I have an exhibition in July, so I'm making it in a hurry.

As for the assembly of the stem, cut the part through which the rudder passes.
DSC03275a.jpg

The jig for the stern part was difficult for me to use, so I glued it according to the drawing.
DSC03277.JPG


The keel and the frame are only glued at one point, and the hull is not strong enough, so I cut the outer plate and glued it between the frames.

DSC03279.JPG

The optimum thickness between frames is 0.7 to 0.75 mm.
The thickness of the outer panel is 0.85mm, which is a little too thick, so I attached it to the base with double-sided tape and shaved it to 0.7-0.75mm to make it fit.
DSC03274.JPG
 
Hello.
Thanks all.

This French ship doesn't seem to have any obvious deck clamps, but I'm going to stick the hull plates as inner hull plates so that the beams can be easily fixed.
DSC03243a.jpg

I added 2.5x0.8 pear wood deck clamps from the stern to frame 9.
This kit has the beam position marked on the frame. Moreover, it was accurate and I pasted the clamp so that the beam would rest on the mark.
This kit, which is marked on the frame, is less error-prone than a jig-based alignment system.
DSC03280.JPG

The yellow arrow marks the alignment.
While fitting, the floor rider is also glued.

I applied low temperature wax paraffin and melted it with a hair dryer to coat it.
Dust doesn't easily stick to structural models, so it seems to be recommended over linseed oil, but it takes a little more time.
DSC03281a.jpg

When I sanded the inside of the hull, the hull was a little weak in the lateral direction, so I glued a plate to the top of the hull with Araldite.
Araldite does not soak into the board, so it is ideal for temporary fixation.
However, if you apply it all over the board, it may become impossible to remove it, so I painted it on the top surface of the board.
DSC03285a.jpg
 
The hawse pieces in this kit are difficult and come with 5 sets in anticipation of failure.
I managed to fit it in the cradle before I used it up.
DSC03287.JPG

There are 6 hawse pieces from 1 to 6, and if there is a gap, I will use the 7th piece, but I was able to go with 6 pieces.
DSC03288.JPG

I took it out of the cradle.
DSC03295.JPG

The kit comes with seals for bevel positioning of the hawse pieces.
600_3757 (1).jpg
It may not be helpful, but it is how I made hawse pieces.
First, I marked the bevel on the side without the bevel mark with a seal, and then sanded the bevel on both sides. (Scrape the surface with soot)
DSC03369.JPG

After sharpening the chamfer, further sharpen the front diagonally.
As shown in the image, I attached it to the jig attached to the kit with double-sided tape and sanded it.
DSC03363.JPG

I glued hose pieces 4 to 6.
Hose piece 1 was double-sided taped to the keel of the Cradle hull, and hose pieces 4-6 were double-sided taped to rib #1.
I made hawse pieces 2 and 3 a little wider and cut them to fit bit by bit.
DSC03365.JPG

DSC03303.JPG

DSC03304.JPG
 
Last edited:
HI MUCHI GREAT JOB OF THIS MODEL VERY GOOD CRAFTMANSHIP QUESTION THE MACHINE THAT YOU SHOW IN THE TOP PICTURES I AM TRYING TO FIND THIS ON AMAZON CAN NOT FIND IT WHERE DID YOU GET IT AND WHAT IS IT CALLED. THANK YOU. GOD BLESS YOU AND YOURS STAY SAFE DON
 
Hello
I bought from Dry-Dock Models that Jimsky mentioned in this la salamandre kit review.
It seems that you can also buy it at ZHL and ZJ CN Model co., LTD.
I'm not used to putting links or quoting sentences, so I can't introduce well.
 
Back
Top