-

Win a Free Custom Engraved Brass Coin!!!
As a way to introduce our brass coins to the community, we will raffle off a free coin during the month of August. Follow link ABOVE for instructions for entering.
You are using an out of date browser. It may not display this or other websites correctly.
You should upgrade or use an alternative browser.
You should upgrade or use an alternative browser.
Layout for copper plates
- Thread starter Ted Robinson
- Start date
- Watchers 16
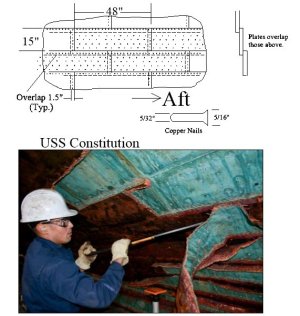
From what Goodwin shows, they were installed from the water line down with a 1.5" overlap. (I realize most plates for models are too thick to consider overlapping) But, I cannot figure out how to make a layout so they are parallel to the waterline AND the keel as you point out without a lot of playing around in between. With two exceptions in nearly 50 years, this is one reason I stay with models launched before 1782 if they are armed British navy vessels. Question: what other nations coppered the bottoms and when did the practice begin in those nations?All the models I've seen show the copper plates parallel to the keel and waterlines
Allan
- Joined
- Oct 1, 2023
- Messages
- 1,961
- Points
- 488

Don't have a clue unless US.From what Goodwin shows, they were installed from the water line down with a 1.5" overlap. (I realize most plates for models are too thick to consider overlapping) But, I cannot figure out how to make a layout so they are parallel to the waterline AND the keel as you point out without a lot of playing around in between. With two exceptions in nearly 50 years, this is one reason I stay with models launched before 1782 if they are armed British navy vessels. Question: what other nations coppered the bottoms and when did the practice begin in those nations?
Allan
- Joined
- Oct 1, 2023
- Messages
- 1,961
- Points
- 488

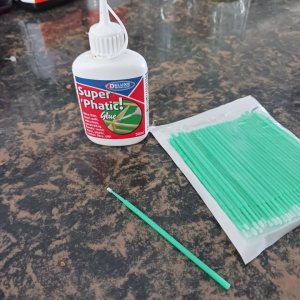
Where did you purchase the glue and could you give some details on the applicators shownView attachment 525307I used this Super Phatic glue for My Pegasus copper. It is eazy to use cleans up with water and no fumes. They stick well, mined was done 2 years ago and the are all still on. Just a suggestion!!
Bobby K .
- Joined
- Feb 8, 2025
- Messages
- 262
- Points
- 138

Hi Ted, I bought this glue at Eleminator Hobbies in Wiinnipeg Canada . I just asked a moderator to delete this post I thought you were looking for a good glue but your looking how to install them.Where did you purchase the glue and could you give some details on the applicators shown
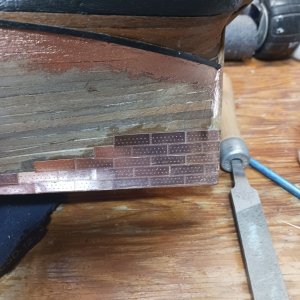
The Pegasus , by Amati, was my first attempt at coppering, I followed the instructions, they said start at the stern, so I separated all the tiles in two tile pieces. I applied a coat of glue to the back of the tiles, you will notice that it separating a bit but don't worry. Apply a coat to the area of the hull you are going to stick it to, then apply another coat to the tile it doesn't separate this time.
Like I said I started ay the sten worked my way up row by row, I butted the piece together and overlap them just a bit vertically. The only cutting was to start or finish a row till I got to the waterline then trimed them to follow the water line.
Not sure if I did it right but there done and I am happy about my frist copper job.
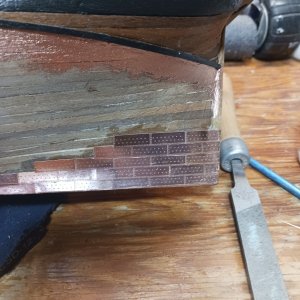
I started here and put them on two by two.
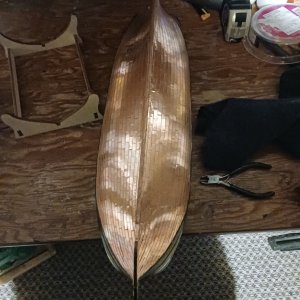 when it was finished I spayed two coats of clear coat on it to keep it shinny, I don't like green copper
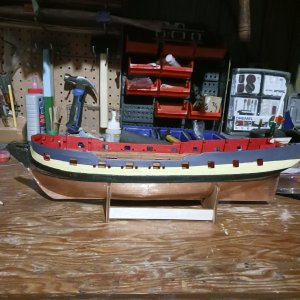
This is my Pegasus that I have to get back to some day, I am still learning how to rig ships, sorry for filling up your post with my pictures but a picture is better if you can't spell all that well. @zoly99sask , don't delete this unless Ted wants it deleted lol.
Hope this helps,fellow shipmate
Bobby K
Last edited:
- Joined
- Oct 1, 2023
- Messages
- 1,961
- Points
- 488

I had questions on the glue too so your post is timely. The photo with the file also gives a hint to trimming. I had just been using scissors.Hi Ted, I bought this glue at Eleminator Hobbies in Wiinnipeg Canada . I just asked a moderator to delete this post I thought you were looking for a good glue but your looking how to install them.
The Pegasus , by Amati, was my first attempt at coppering, I followed the instructions, they said start at the stern, so I separated all the tiles in two tile pieces. I applied a coat of glue to the back of the tiles, you will notice that it separating a bit but don't worry. Apply a coat to the area of the hull you are going to stick it to, then apply another coat to the tile it doesn't separate this time.
Like I said I started ay the sten worked my way up row by row, I butted the piece together and overlap them just a bit vertically. The only cutting was to start or finish a row till I got to the waterline then trimed them to follow the water line.
Not sure if I did it right but there done and I am happy about my frist copper job.View attachment 525372
I started here and put them on two by two.View attachment 525370when it was finished I spayed two coats of clear coat on it to keep it shinny, I don't like green copper
View attachment 525369
This is my Pegasus that I have to get back to some day, I am still learning how to rig ships, sorry for filling up your post with my pictures but a picture is better if you can't spell all that well. @zoly99sask , don't delete this unless Ted wants it deleted lol.
Hope this helps,fellow shipmate
Bobby K
View attachment 525371
So thank you very kindly.
- Joined
- Feb 8, 2025
- Messages
- 262
- Points
- 138

I found that scissors bent the copper plates so I used a steel ruler and an Olfa knive to cut t.he copper, the file was used to deburr the edges, yes there was blood lol.I had questions on the glue too so your post is timely. The photo with the file also gives a hint to trimming. I had just been using scissors.
So thank you very kindly.
Bobby K
- Joined
- Oct 1, 2023
- Messages
- 1,961
- Points
- 488

I'll try cutting them with a knife.I found that scissors bent the copper plates so I used a steel ruler and an Olfa knive to cut t.he copper, the file was used to deburr the edges, yes there was blood lol.
Bobby K
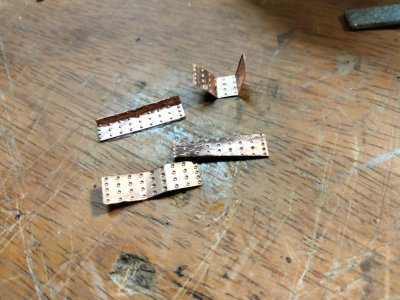
Some are pretty rough. They were just floating free in the container when I first opened it. Maybe from the first or second owner surveying the contents. Probably from the factory. It still astounds me that a major premier manufacturer doesn't answer emails. While researching online this seems to have been a problem for years.
- Joined
- Oct 1, 2023
- Messages
- 1,961
- Points
- 488

That seems to be the needed solution.Late to the dance as usual. Ted, with the ship's hull curves, it is not possible to maintain the plates parallel to the keel and waterline. You need to establish one or more gore lines as I did on my Harriet Lane.
View attachment 525545View attachment 525546View attachment 525547View attachment 525548
I'll explore how to do this on YouTube.
Thank you
- Joined
- Oct 1, 2023
- Messages
- 1,961
- Points
- 488

It looks like it's deno time again. The CA glue isn't cutting it. Plates are getting knocked off when I brush against them.
Ordered some of the Super Phatic glue but at over$20 for 50 ml I need a better solution.
Ordered some of the Super Phatic glue but at over$20 for 50 ml I need a better solution.
Your plates with a single row along the long edge make the overlaps look excellent. Can't tell from the photo but are they overlapped on the short edge as well?Not sure if I did it right but there done and I am happy about my frist copper job.
Posted the below before, but FWIW, Goodwin shows the following on how the plates were laid from the waterline down and worked down as well as aft to forward. Other than Constitution does anyone have additional photos of copper bottoms or information/drawings from contemporary sources?
Allan
- Joined
- Feb 8, 2025
- Messages
- 262
- Points
- 138

Ted you can find it on Amazon for about 8.95. Cutting the tiles with a knive takes several passes, hold the straight edge tight and do not let go till your done the Cutting lol that's how I did mine.
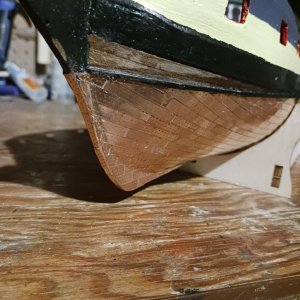
Allan as far as the plates went, I butted the small edge and over laped the long edge using the first rivet mark as a guide to keep them straight. No gore lines just started at the keel at the stren , so it was probably beginer luck that my tiles look not bad.to me.
Bobby K
Allan as far as the plates went, I butted the small edge and over laped the long edge using the first rivet mark as a guide to keep them straight. No gore lines just started at the keel at the stren , so it was probably beginer luck that my tiles look not bad.to me.

Bobby K
- Joined
- May 25, 2020
- Messages
- 1,098
- Points
- 443

That seems to be the needed solution.
I'll explore how to do this on YouTube.
Thank you
It looks like it's deno time again. The CA glue isn't cutting it. Plates are getting knocked off when I brush against them.
Ordered some of the Super Phatic glue but at over$20 for 50 ml I need a better solution.
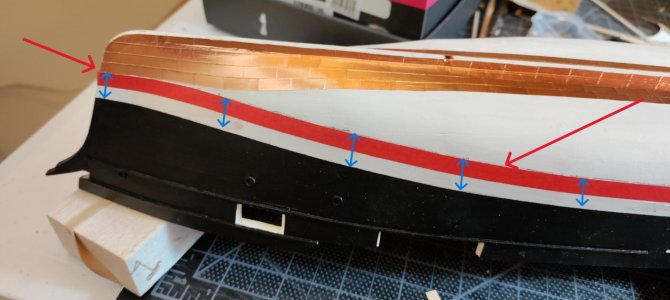
Ted! The method is as follows:
1. Decide the number of rows of plates you want to be parallel to the waterline. So if you decide 3 rows that distance is 3 times the width of your plates MINUS a faction for overlap. (Others have mentioned that the plates overlapped on these ships - If there was no overlap the sheathing really couldn't do the job it was meant to do.)
2. Mark that distance below your existing waterline. Effectively, you've drawn a second waterline. This is the gore line.
3. Mask at the new waterline - the tape you use should be fairly wide so you can plate over it
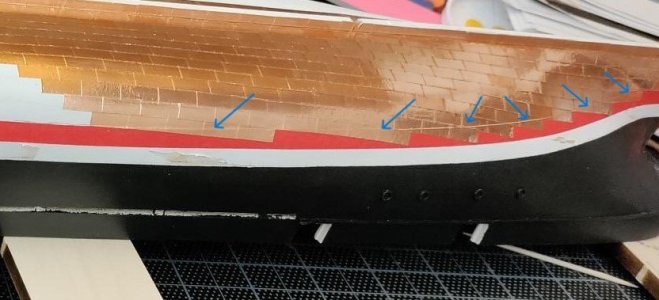
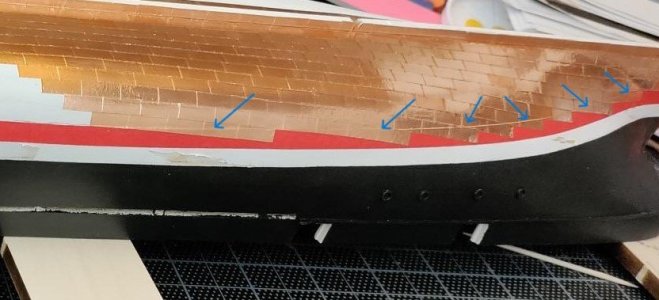
4. Once you have plated up to the gore line you can burnish the plates where the meet and overlap with the masking tape. I just used my thumbnail. Then a sharp #11 blade is run along the gore line to cut the plates so you can take the tape off without pulling off or damaging the plates.
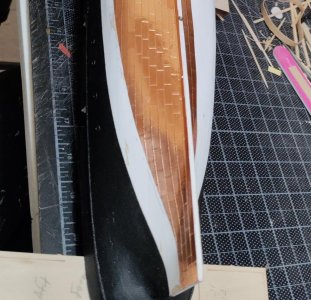
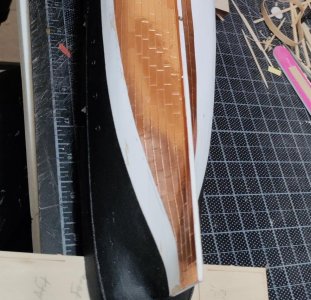
5. Now you're ready to lay your parallel rows of plates.
NOTE! This method works with copper tape which is very thin and very adhesive. Your plates look very thick. So rather than applying the plates over the gore line, you can use the line to mark your plates so they match the curves of the gore line.
If I was you, I'd get a roll of copper tape - Blue Jacket Ship Crafters sells is in a variety of widths. It sticks great! No need for more glue. And it's really eaty to cut with the old #11 blade. You can cut individual plates of the correct scale length, what I did, or you can apply the tape and burnish the individual plates into it. One of our shipmates Pete @Peter Gutterman used that method on his Flying Cloud and it came out great!
Blessings. Peace. Gratitude.
Chuck
The copper plates you are using are really very good compared to the ones we used to see with rivet like protrusions instead of nail dents. Beginners luck or not, this is no easy task for anyone, yours is nicely done.so it was probably beginer luck that my tiles look not bad.to me.
Allan
- Joined
- Oct 1, 2023
- Messages
- 1,961
- Points
- 488

Thank youThe copper plates you are using are really very good compared to the ones we used to see with rivet like protrusions instead of nail dents. Beginners luck or not, this is no easy task for anyone, yours is nicely done.
Allan
Can you explain what a gore line is? I cannot find this term except a gore area being an empty area between where two roads merge. I can see how lines of plating could have the same situation, but looking at the plating on the hull of Constitution there does not appear to be any area like that.blade is run along the gore line
Thanks The Gavel, any help on this would be appreciated.
Allan
- Joined
- Oct 1, 2023
- Messages
- 1,961
- Points
- 488

I think I understand this. Tried to find an instructional video on YouTube but no joy.Ted! The method is as follows:
1. Decide the number of rows of plates you want to be parallel to the waterline. So if you decide 3 rows that distance is 3 times the width of your plates MINUS a faction for overlap. (Others have mentioned that the plates overlapped on these ships - If there was no overlap the sheathing really couldn't do the job it was meant to do.)
2. Mark that distance below your existing waterline. Effectively, you've drawn a second waterline. This is the gore line.
3. Mask at the new waterline - the tape you use should be fairly wide so you can plate over it
View attachment 525560
4. Once you have plated up to the gore line you can burnish the plates where the meet and overlap with the masking tape. I just used my thumbnail. Then a sharp #11 blade is run along the gore line to cut the plates so you can take the tape off without pulling off or damaging the plates.
View attachment 525563
5. Now you're ready to lay your parallel rows of plates.
NOTE! This method works with copper tape which is very thin and very adhesive. Your plates look very thick. So rather than applying the plates over the gore line, you can use the line to mark your plates so they match the curves of the gore line.
If I was you, I'd get a roll of copper tape - Blue Jacket Ship Crafters sells is in a variety of widths. It sticks great! No need for more glue. And it's really eaty to cut with the old #11 blade. You can cut individual plates of the correct scale length, what I did, or you can apply the tape and burnish the individual plates into it. One of our shipmates Pete @Peter Gutterman used that method on his Flying Cloud and it came out great!
Blessings. Peace. Gratitude.
Chuck
Ted you can find it on Amazon for about 8.95. Cutting the tiles with a knive takes several passes, hold the straight edge tight and do not let go till your done the Cutting lol that's how I did mine.
Allan as far as the plates went, I butted the small edge and over laped the long edge using the first rivet mark as a guide to keep them straight. No gore lines just started at the keel at the stren , so it was probably beginer luck that my tiles look not bad.to me.
View attachment 525554
Bobby K
Thank you @Bobby K. Unfortunately, it is now $22 in Amazon.
I found it for about half that on eBay with shipping. I ordered one from Amazon to get started with. How many bottles of the glue did you need for your . model
- Joined
- May 25, 2020
- Messages
- 1,098
- Points
- 443

What ho, shipmates!
First: My thoughts on the layout of the copper plates was only meant to contribute to the discussion of Ted's question about layout. I apologize for giving any impression that "I know the right and only correct way." If you've looked at my logs you know that I struggle with the challenges of historical accuracy and what pleases my artistic eye. In short, I know only what I know and darn little of that.
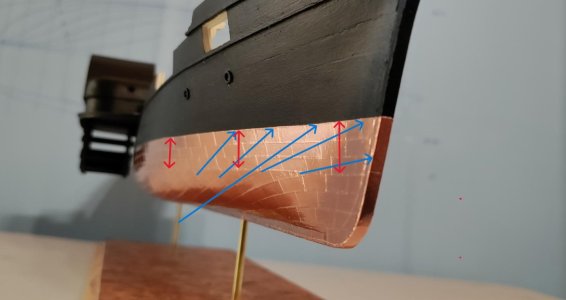
Second: Gore lines: I was fortunate to have a modern rendering of the Harriet lane showing what the artist imagined to be the lay out of her copper. When I did my work I worked from memory and got it wrong even though the reference book was within arms reach.
The blue arrows show that the row adjacent to the water line is parallel to the waterline. I believe this is called the finishing belt. The yellow arrows point to the gore lines. The red arrows indicate that the plates after the turn of the bilge were largely parallel to the waterline. I don't know the definitive definition of gore line on ships. Gore line, to me, indicates a line where plates that were curving too much stopped and a new line parallel to the waterline was established.

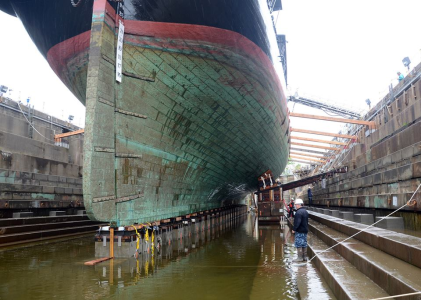
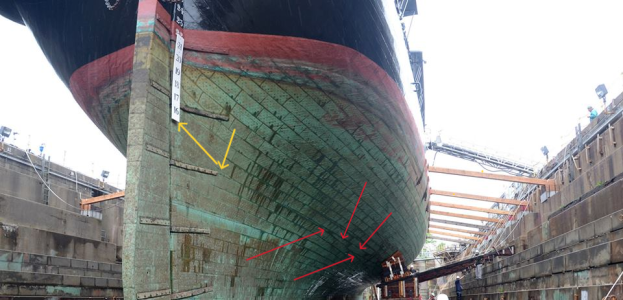
There are gore lines on the Constitution. See red arrows. Part of the issue seeing them is the angle of the picture and the vanishing point. Here's what I see: looking aft forward, the plates follow the level of the waterline. Also, the shape of the hull may not have required several gore lines. We would need to see her from the side to tell how many gore lines she had.
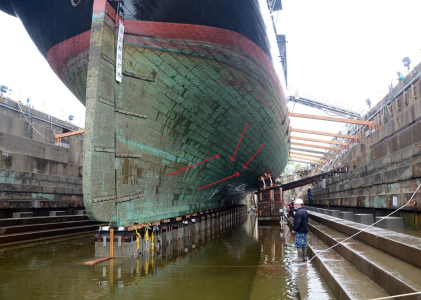
I hope this is helpful!
Blessings. Peace. Gratitude.
Chuck
First: My thoughts on the layout of the copper plates was only meant to contribute to the discussion of Ted's question about layout. I apologize for giving any impression that "I know the right and only correct way." If you've looked at my logs you know that I struggle with the challenges of historical accuracy and what pleases my artistic eye. In short, I know only what I know and darn little of that.
Second: Gore lines: I was fortunate to have a modern rendering of the Harriet lane showing what the artist imagined to be the lay out of her copper. When I did my work I worked from memory and got it wrong even though the reference book was within arms reach.
The blue arrows show that the row adjacent to the water line is parallel to the waterline. I believe this is called the finishing belt. The yellow arrows point to the gore lines. The red arrows indicate that the plates after the turn of the bilge were largely parallel to the waterline. I don't know the definitive definition of gore line on ships. Gore line, to me, indicates a line where plates that were curving too much stopped and a new line parallel to the waterline was established.

There are gore lines on the Constitution. See red arrows. Part of the issue seeing them is the angle of the picture and the vanishing point. Here's what I see: looking aft forward, the plates follow the level of the waterline. Also, the shape of the hull may not have required several gore lines. We would need to see her from the side to tell how many gore lines she had.


I hope this is helpful!
Blessings. Peace. Gratitude.
Chuck

